Changing the DNS server on a router#
In this guide, you will change DNS on your router. This is needed when the DNS from your provider blocks access to Afina servers. The guide uses Google DNS 8.8.8.8 and 8.8.4.4 as an example, but you can also use Cloudflare DNS 1.1.1.1 and 1.0.0.1 if needed.
This guide covers popular mass-market router brands that are commonly sold and used at home.
Before you start#
- Connect to the exact router where you want to change DNS.
- Prepare the router administrator password.
- If possible, configure the settings from a computer or laptop.
Section names can differ across router models, but the setup logic is the same: first change DNS in the internet connection section, then in the local network section if it has separate DNS fields.
Instead of Google DNS 8.8.8.8 and 8.8.4.4, you can use Cloudflare DNS 1.1.1.1 and 1.0.0.1. In that case, enter the selected pair of addresses in all DNS fields.
TP-Link#
Official source: TP-Link guide.
- Open
http://tplinkwifi.netorhttp://192.168.0.1in your browser. - Log in to the router control panel.
- Go to Advanced > Network > Internet.
- The screenshot below shows the "Advanced > Network > Internet" section, where you can enable manual DNS setup and enter server addresses.
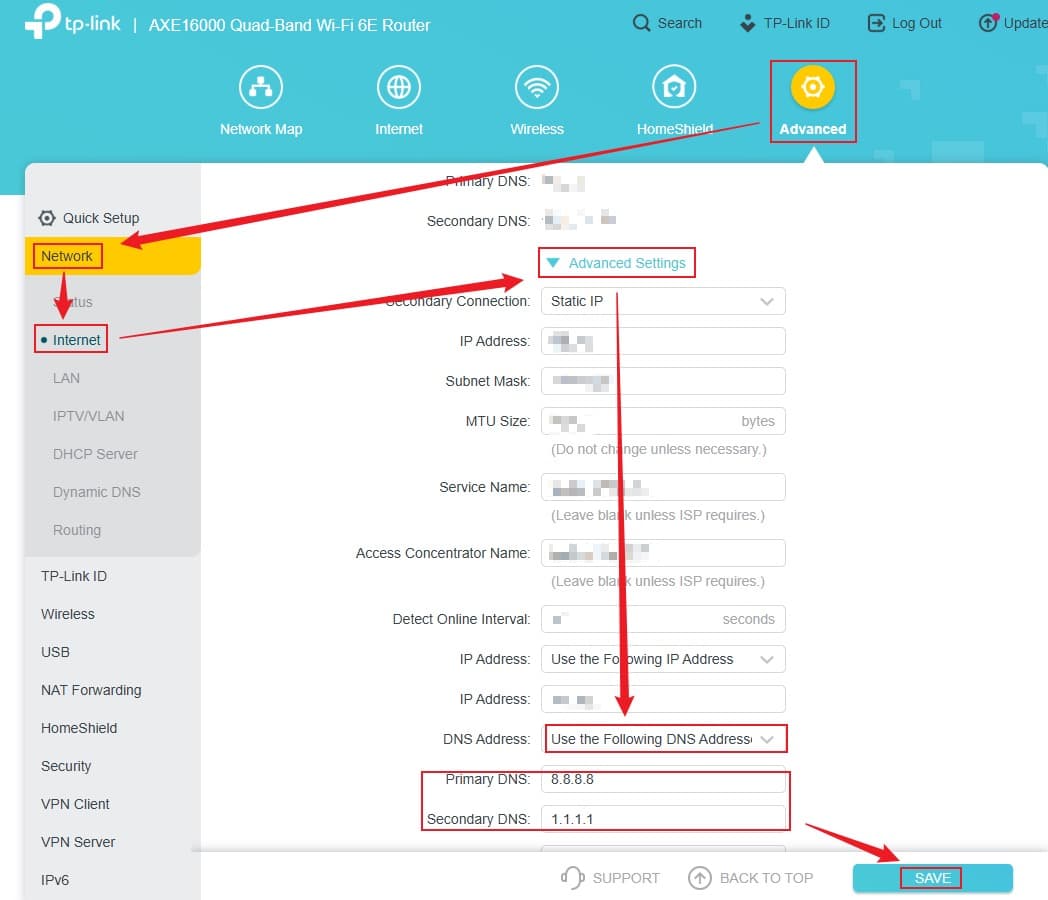
- Enable manual DNS setup.
- In the "Primary DNS" field, enter
8.8.8.8or1.1.1.1. - In the "Secondary DNS" field, enter
8.8.4.4or1.0.0.1. - The next TP-Link example shows the "Primary DNS" and "Secondary DNS" fields after manual address entry is enabled.
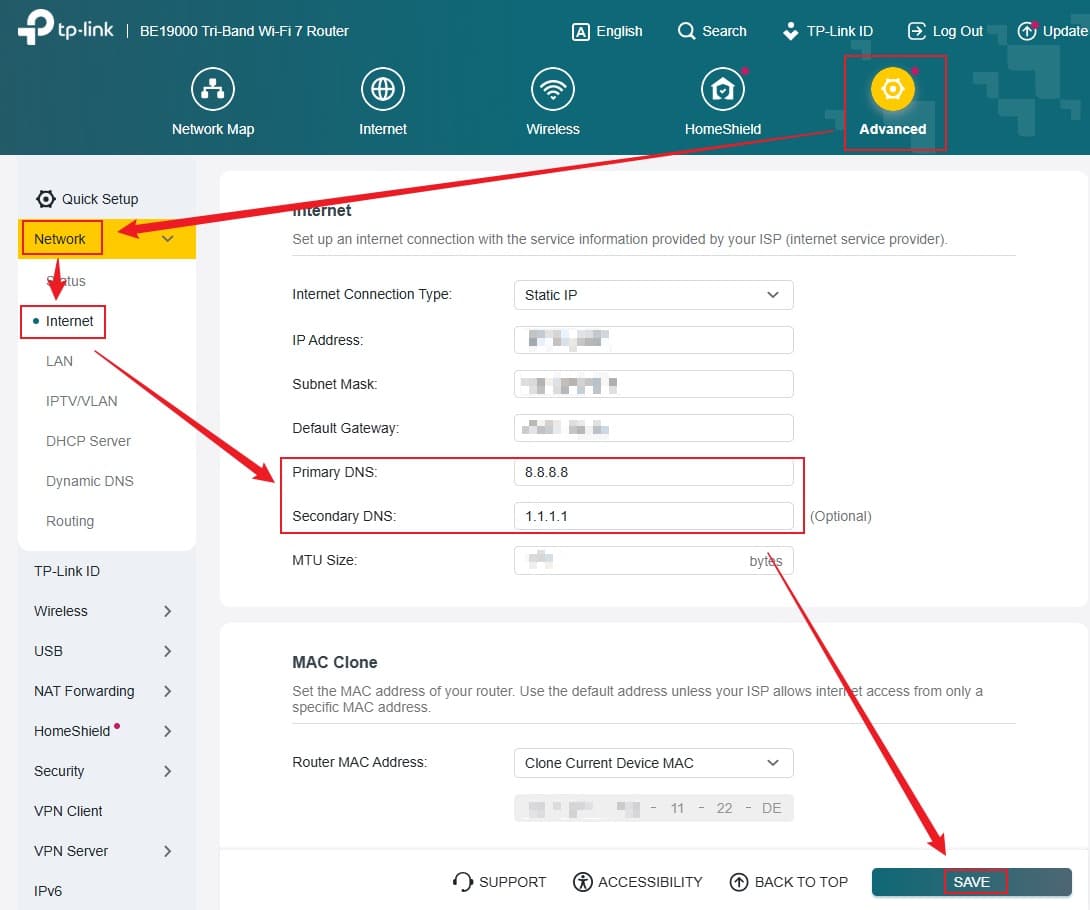
- Click Save or OK.
- If needed, go to Advanced > Network > LAN Settings or Advanced > Network > DHCP Server.
- If this section has "Primary DNS" and "Secondary DNS" fields, enter the same values there.
- Another TP-Link example shows saving the settings with the OK button.
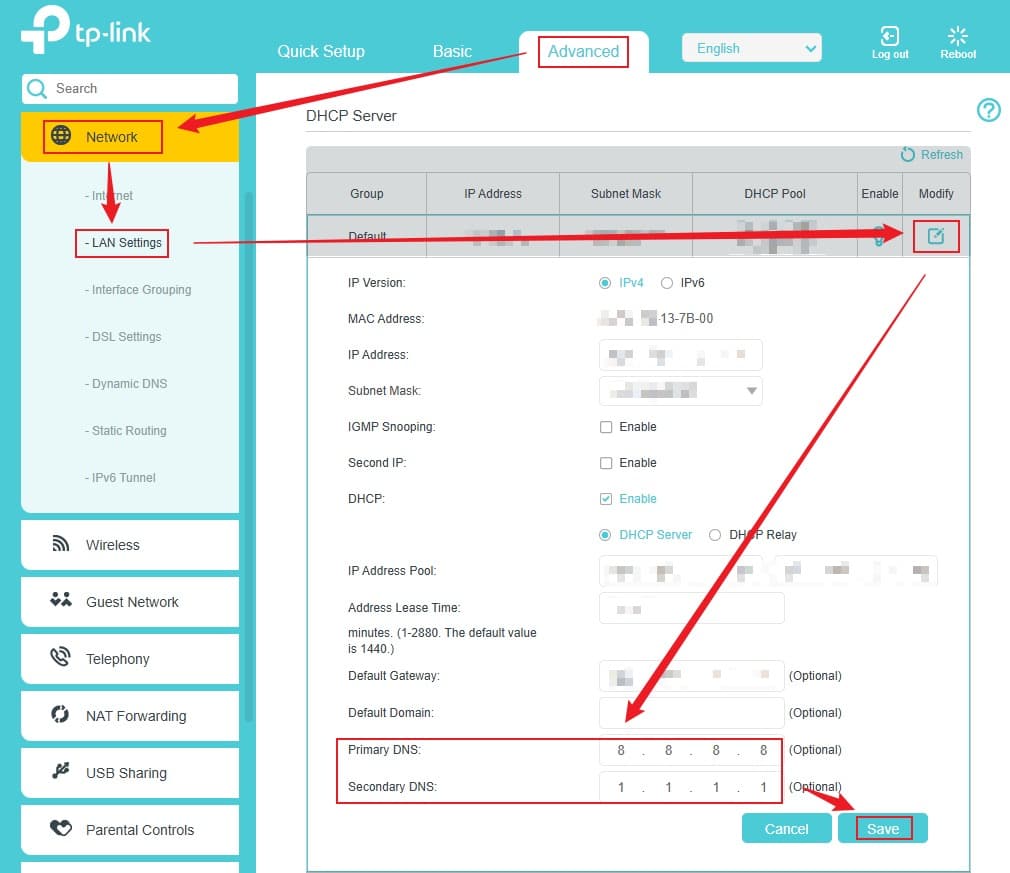
- Go to Advanced > System > Reboot.
- Click Reboot.
ASUS#
Official source: ASUS guide.
- Open
http://www.asusrouter.comorhttp://192.168.1.1in your browser. - Log in to the router control panel.
- Go to WAN.
- Open the "Internet Connection" page.
- Find the "WAN DNS Setting" block.
- In "Connect to DNS Server automatically", select No if this option is available.
- In the "DNS Server1" field, enter
8.8.8.8or1.1.1.1. - In the "DNS Server2" field, enter
8.8.4.4or1.0.0.1. - The screenshot below shows the WAN DNS Setting block, where automatic DNS retrieval is disabled and the DNS Server1 and DNS Server2 fields are filled in manually.
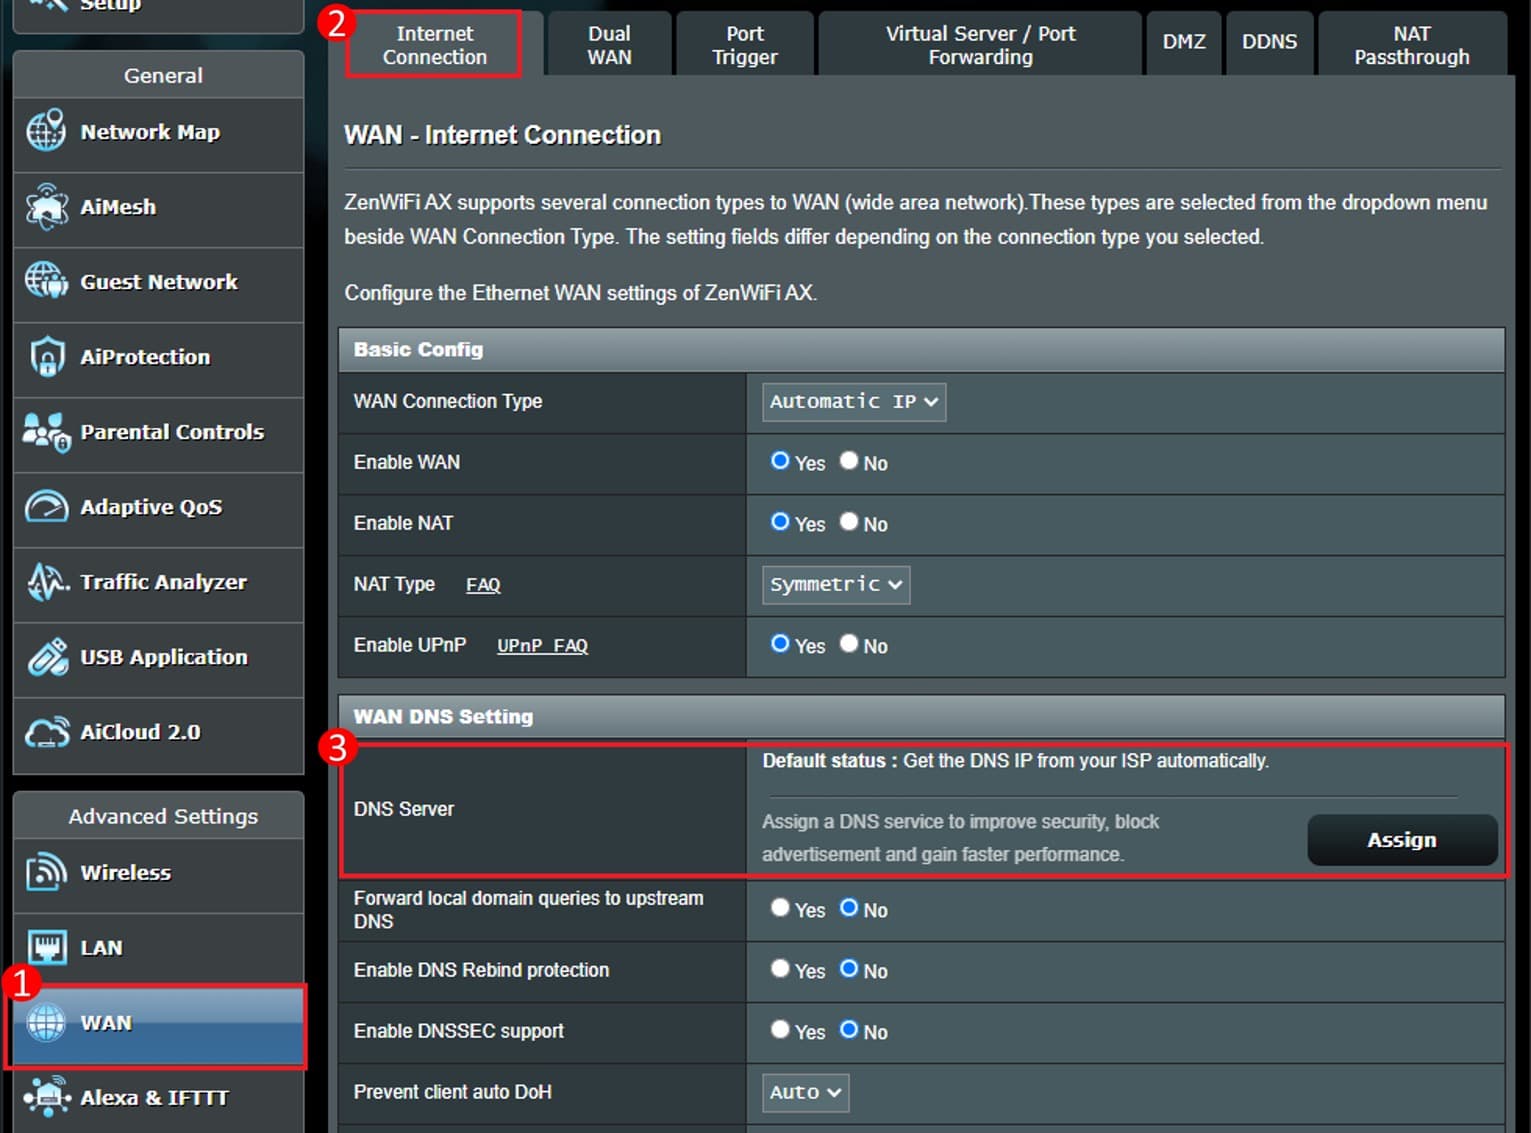
- Click Apply.
- Reboot the router with the Reboot button if the changes were not applied automatically.
Keenetic#
Official source: Keenetic guide.
- Open
http://192.168.1.1in your browser. - Log in to the router web interface.
- Go to "My Networks and Wi-Fi".
- Open the "Home segment" page.
- Find the DHCP settings.
- In the "DNS server 1" field, enter
8.8.8.8or1.1.1.1. - In the "DNS server 2" field, enter
8.8.4.4or1.0.0.1. - The screenshot below shows the "Home segment" page with DHCP settings, where you can enter DNS server 1 and DNS server 2 for the home network.
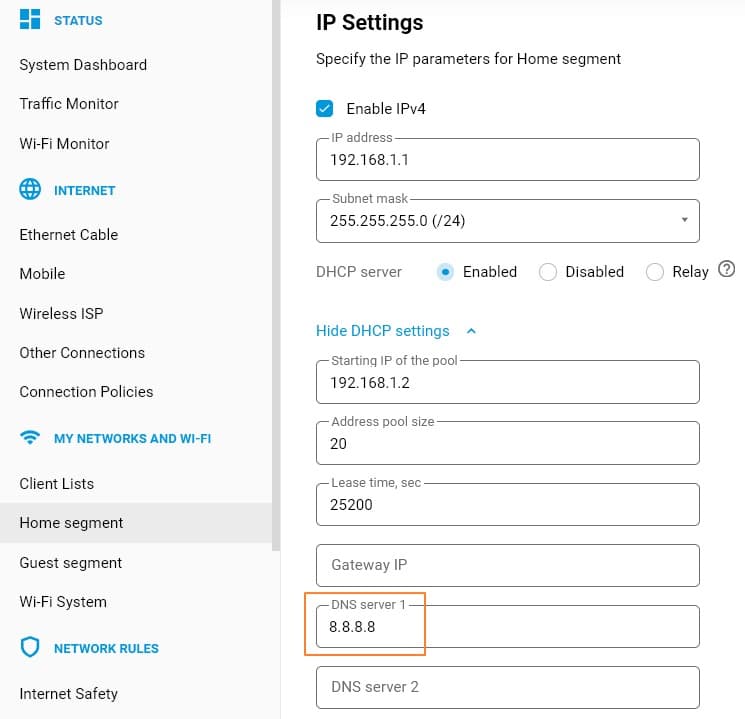
- Go to "Internet".
- Open the "Ethernet Cable" page.
- In the "IPv4 Settings" block, enter the address in the "IPv4 DNS 1" field.
- The next Keenetic example shows the "Ethernet Cable" page with the IPv4 Settings block, where you can specify IPv4 DNS 1 for the internet connection.
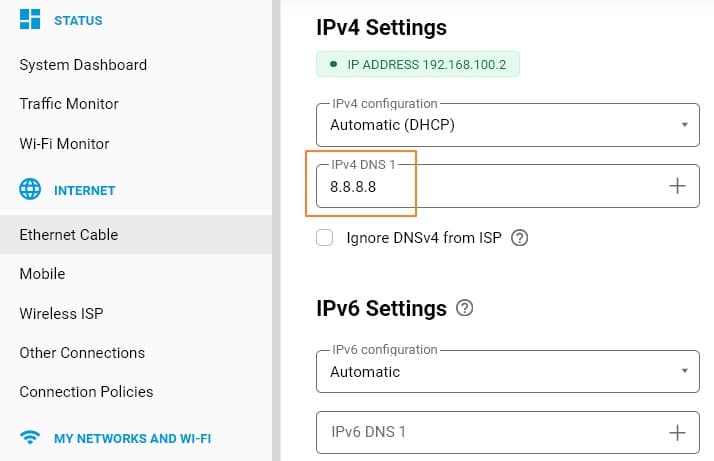
- Enable "Ignore DNSv4 from ISP" if you want to fully ignore DNS from the provider.
- Another Keenetic example shows the Ignore DNSv4 from ISP option, which allows you not to use DNS from the provider.
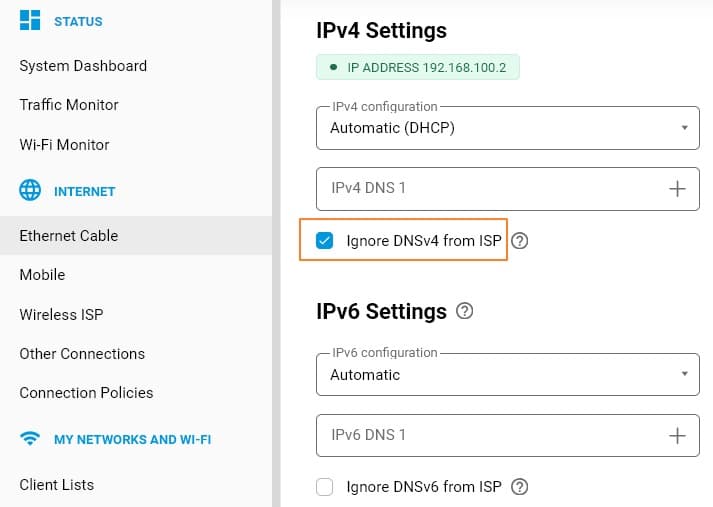
- Save the changes.
NETGEAR#
Official source: NETGEAR guide.
- Open
http://www.routerlogin.netorhttp://192.168.1.1in your browser. - Log in to the router control panel.
- Open Basic.
- Go to the "Internet" or "Basic Settings" page.
- Find the "Domain Name Server (DNS) Address" block.
- Select "Use These DNS Servers".
- In the "Primary DNS" field, enter
8.8.8.8or1.1.1.1. - In the "Secondary DNS" field, enter
8.8.4.4or1.0.0.1. - Click Apply.
- Reconnect your devices to Wi-Fi after applying the settings.
Linksys#
Official source: Linksys guide.
- Open the Linksys app.
- Log in to your account.
- Tap the menu in the upper-left corner.
- Go to Advanced Settings.
- The screenshot below shows the transition to Advanced Settings, from which the local network section opens in the Linksys app.
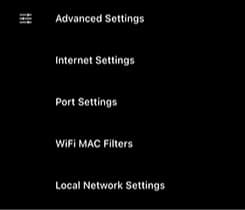
- Open Local Network Settings.
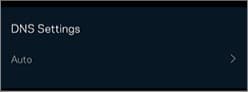
- Tap DNS Settings.
- The next Linksys screenshot shows DNS Settings, where manual address configuration opens.
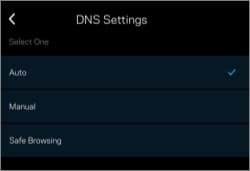
- Select Manual mode.
- Enter the DNS addresses manually.
- Another Linksys example shows Manual mode, where DNS values are entered manually.
- Click Save.
Google Nest Wifi / Google Wifi#
Official source: Google Home guide.
- Open the Google Home app on your phone.
- Go to Wi-Fi.
- Open Network settings.
- Open Advanced networking.
- Open DNS.
- Select Custom mode.
- In the "Primary server" field, enter
8.8.8.8or1.1.1.1. - In the "Secondary server" field, enter
8.8.4.4or1.0.0.1. - Save the settings.
MikroTik#
Official sources: DNS - RouterOS - MikroTik Documentation, DHCP - RouterOS - MikroTik Documentation.
- Open WinBox, WebFig, or Terminal.
- If you use WinBox or WebFig, go to IP > DNS.
- In the "Servers" field, enter
8.8.8.8,8.8.4.4or1.1.1.1,1.0.0.1. - If the router needs to distribute DNS to clients itself, enable Allow Remote Requests.
- Click Apply, then OK.
- Go to IP > DHCP Server > Networks.
- Select your local network.
- In the "DNS Servers" field, enter
8.8.8.8,8.8.4.4or1.1.1.1,1.0.0.1. - If you use Terminal, run
/ip dns set servers=8.8.8.8,8.8.4.4 allow-remote-requests=yesor specify the Cloudflare DNS pair. - For DHCP in Terminal, run
/ip dhcp-server network set [find] dns-server=8.8.8.8,8.8.4.4or specify the Cloudflare DNS pair.
D-Link, Tenda, Xiaomi / Mi Router#
Source: source material for this guide.
D-Link
- Open
http://dlinkrouter.localorhttp://192.168.0.1in your browser. - Log in to the router control panel.
- Open one of these sections: Settings > Internet, Settings > Network, Advanced > WAN, or Network > WAN.
- In the "Primary DNS Server" or "DNS 1" field, enter
8.8.8.8or1.1.1.1. - In the "Secondary DNS Server" or "DNS 2" field, enter
8.8.4.4or1.0.0.1. - Click Save or Apply.
- If the router has a LAN > DHCP Server or Network > DHCP section, open it.
- If this section has DNS fields, enter the same values there.
Tenda Official source: Tenda guide.
- Open
http://192.168.0.1orhttp://192.168.1.1in your browser. - Log in to the router control panel.
- Open one of these sections: Internet Settings, WAN Settings, Advanced Settings, or DNS Settings.
- Enable manual DNS setup if this option is available.
- In the "Primary DNS" field, enter
8.8.8.8or1.1.1.1. - In the "Secondary DNS" field, enter
8.8.4.4or1.0.0.1. - Click Save or OK.
Xiaomi / Mi Router
- Open
http://miwifi.comorhttp://192.168.31.1in your browser. - Log in to the router control panel.
- Go to Settings > Network Settings.
- Find the DNS fields.
- In the "Primary DNS" field, enter
8.8.8.8or1.1.1.1. - In the "Secondary DNS" field, enter
8.8.4.4or1.0.0.1. - Save the settings and reboot the router.
Ubiquiti / UniFi#
Official source:
- Log in to UniFi Network Controller.
- Go to Settings.
- Open Networks.
- Select the required network.
- Find the "DNS Server" field.
- Disable automatic mode if it is enabled.
- Enter
8.8.8.8and8.8.4.4or1.1.1.1and1.0.0.1. - Click Apply Changes.
Checking DNS#
- On Windows, open Command Prompt.
- Enter the command
ipconfig /all. - Find the DNS Servers line.
- Make sure the DNS Servers line shows the new DNS addresses.
- If Windows shows the old values, enter the command
ipconfig /flushdns. - On macOS, open Terminal.
- Enter the command
networksetup -getdnsservers Wi-Fi. - Make sure the output shows the new DNS addresses.
- On your phone, turn off Wi-Fi.
- Turn on Wi-Fi.
- Connect to the network again.
If DNS did not change#
- Reconnect Wi-Fi on the device.
- Restart your phone or computer.
- If your router has a separate "LAN", "DHCP Server", or "Home segment" section, check whether the same DNS addresses are saved there.
- Turn off VPN during the check.
- Turn off Secure DNS or DNS over HTTPS in the browser during the check.
After saving the new DNS, the internet connection may temporarily disappear for a few seconds. This is normal while network settings are being applied.
On Huawei and ZTE routers, DNS fields may be hidden or blocked by the provider. If you cannot change DNS in the interface, contact the provider, ask them to switch the device to bridge mode, or use your own router after the provider's device.
Result#
After these steps, the router will use the selected DNS for the internet connection and, if separate DHCP settings are available, will pass these values to connected devices. If the check on the device shows the new DNS addresses, the settings have been applied correctly.