Databases in Afina#
In this guide, you will learn how to work with databases in Afina: how to create or connect a database, how to manage tables and records, how to import and export data, and how to use a database in script logic. This is useful for storing structured data conveniently and for automating scenarios where a script needs to read, update, or check records.
Before You Start#
A database, or DB, is a structured storage system for information.
Data in it is not stored chaotically, but in a clear structure so that it is easy to:
- find;
- add;
- update;
- delete;
- use in automation.
In the context of Afina, a database most often stores:
- wallet addresses;
- balances;
- lists of accounts or addresses;
- processing statuses;
- a log or action history;
- technical data that a script needs to read or update.
In Afina, a database is used as a local .db file.
This is convenient because:
- no separate server connection is required;
- work is local and fast;
- a database is better suited for bulk reading and writing;
- it is easy to move, copy, and use in different scripts.
The basic and main format in this scenario is SQLite.
SQLite is a database where everything is stored in a single file. Example names:
database.db;wallet.db;accounts.db.
The main advantage of SQLite is that it does not require a separate server. That is why it works well for local work in Afina.
The "Databases" section in Afina is used for complete basic work with DBs. Here you can:
- create a new connection to a database;
- connect an existing
.dbfile; - view the list of databases;
- group databases by folders;
- open a database to work with tables;
- create tables;
- add and edit records;
- run SQL queries;
- import and export a database;
- work with tables inside a database.
Creating and Connecting a Database#
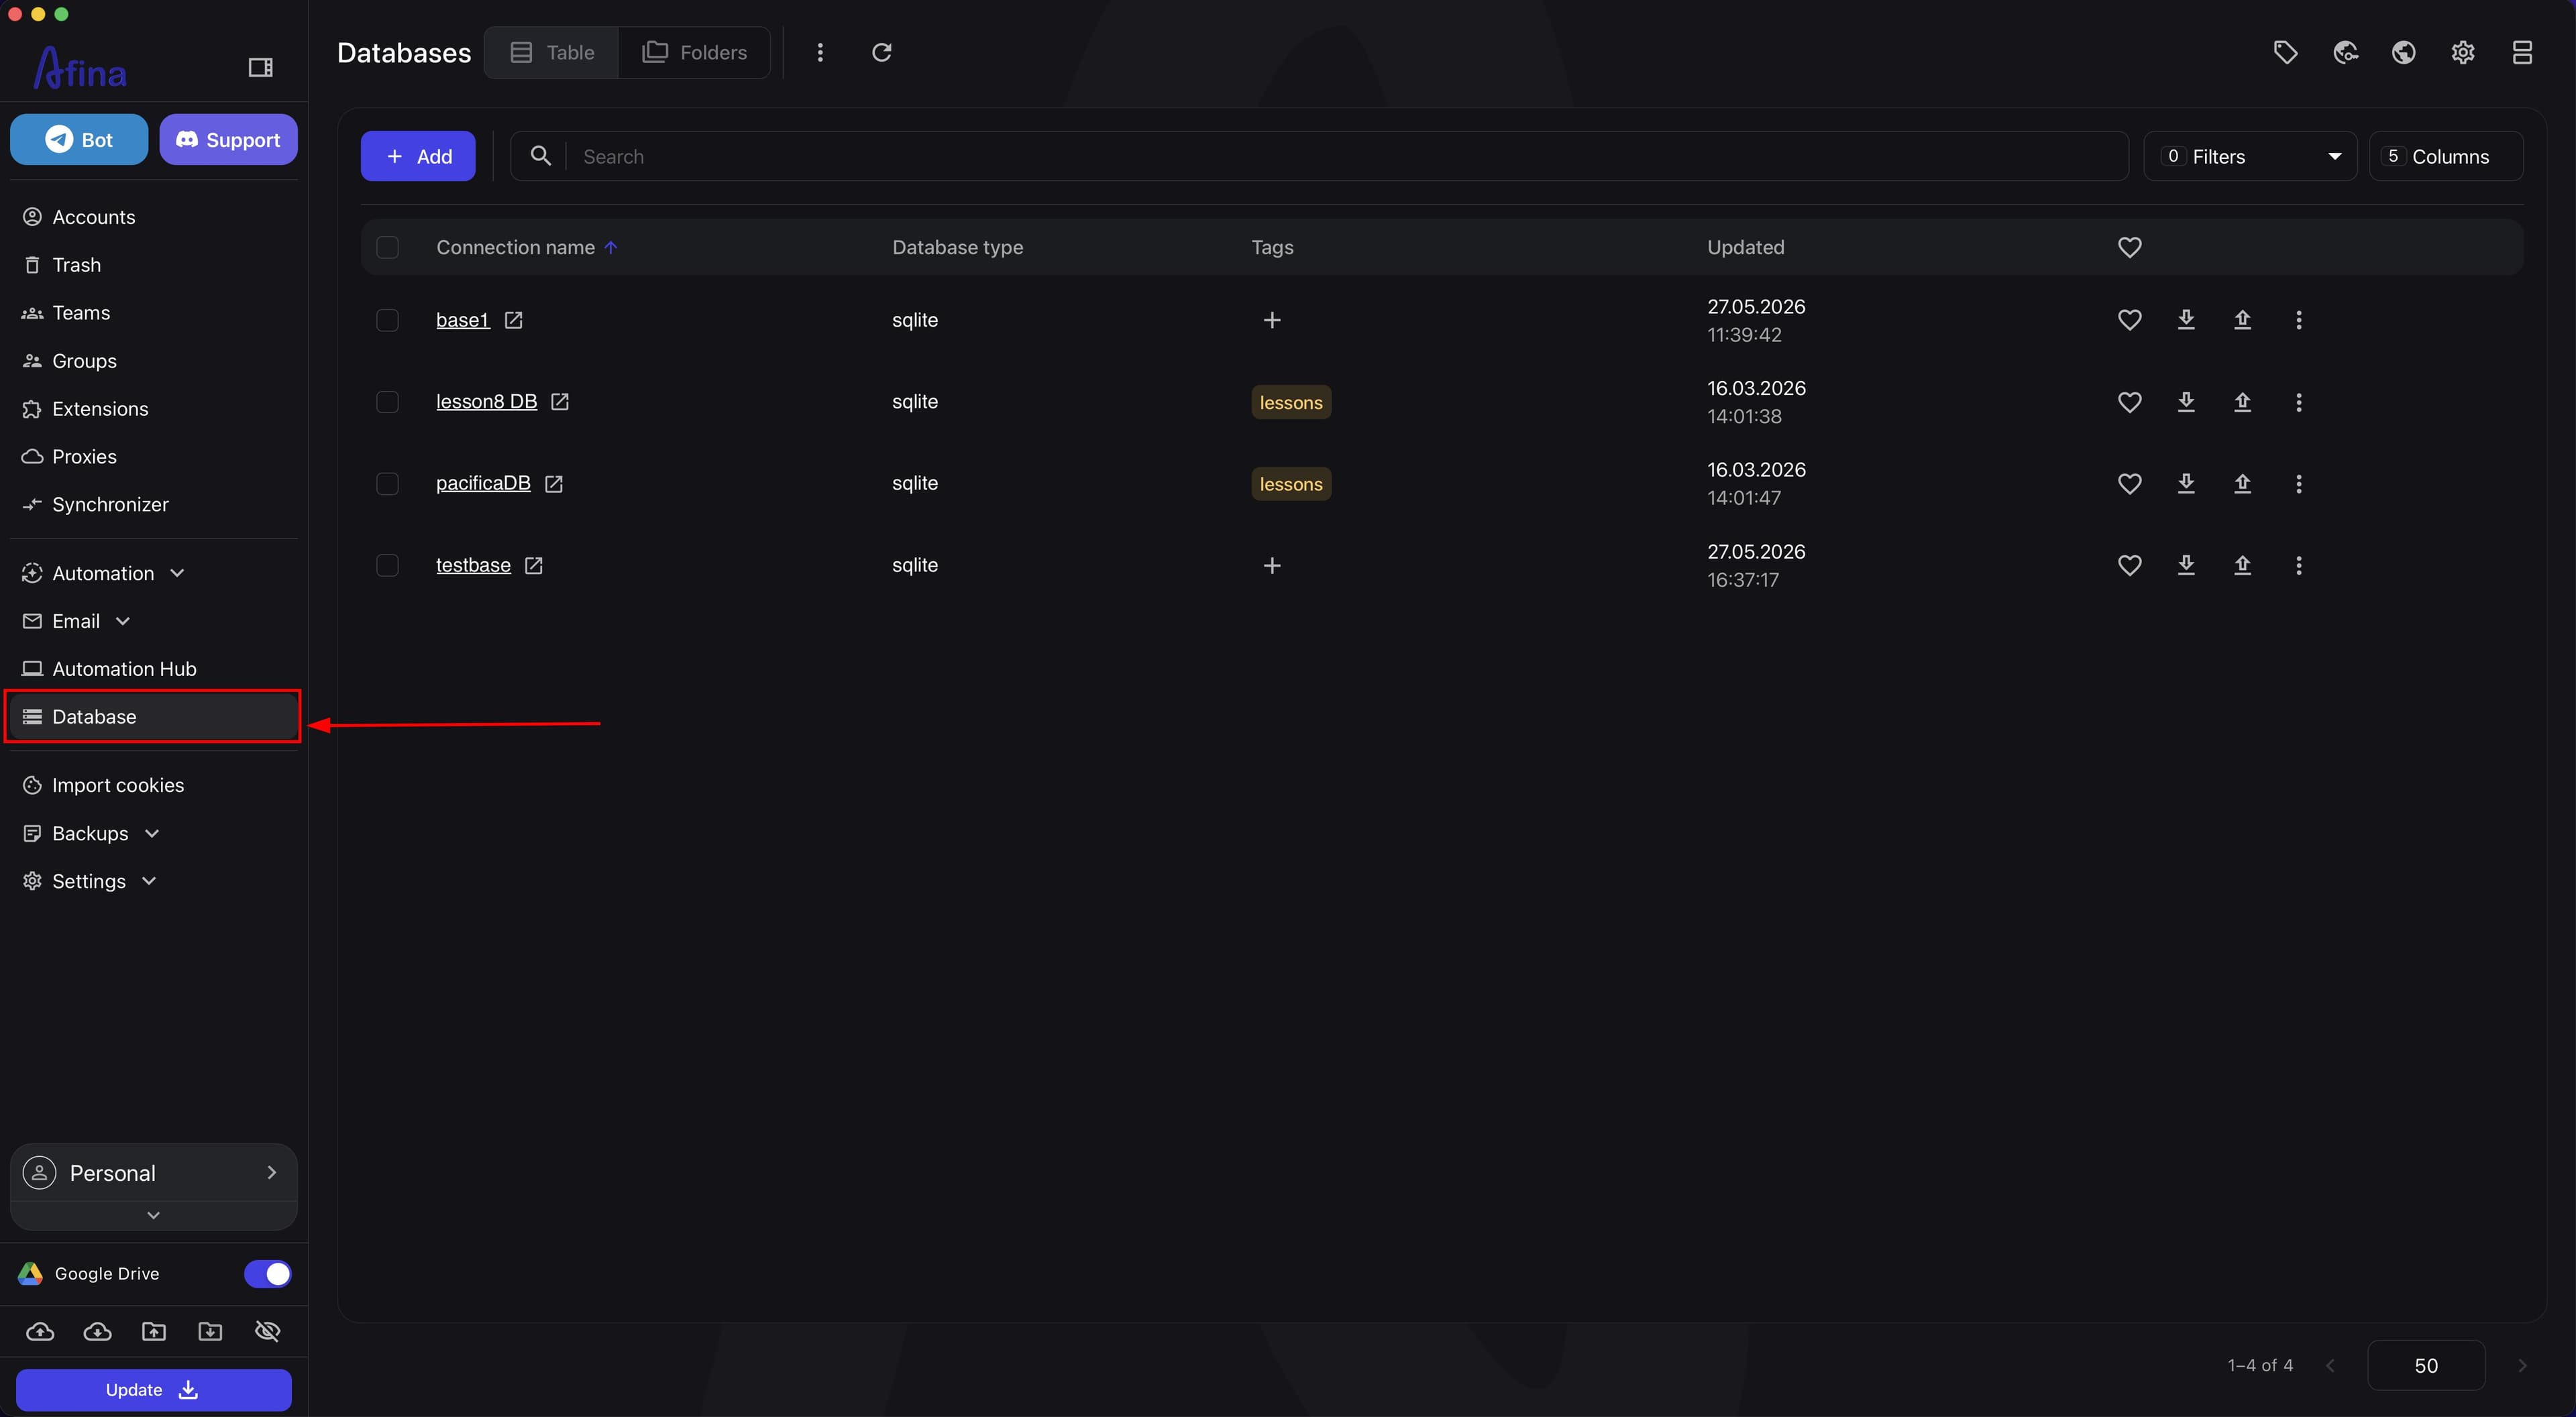
- Go to Databases.
The screenshot below shows the "Databases" section in table mode with a list of connections.
- Click Add if you want to create a new database or connect an existing one.
The next screenshot shows the "Add" button in the "Databases" section.
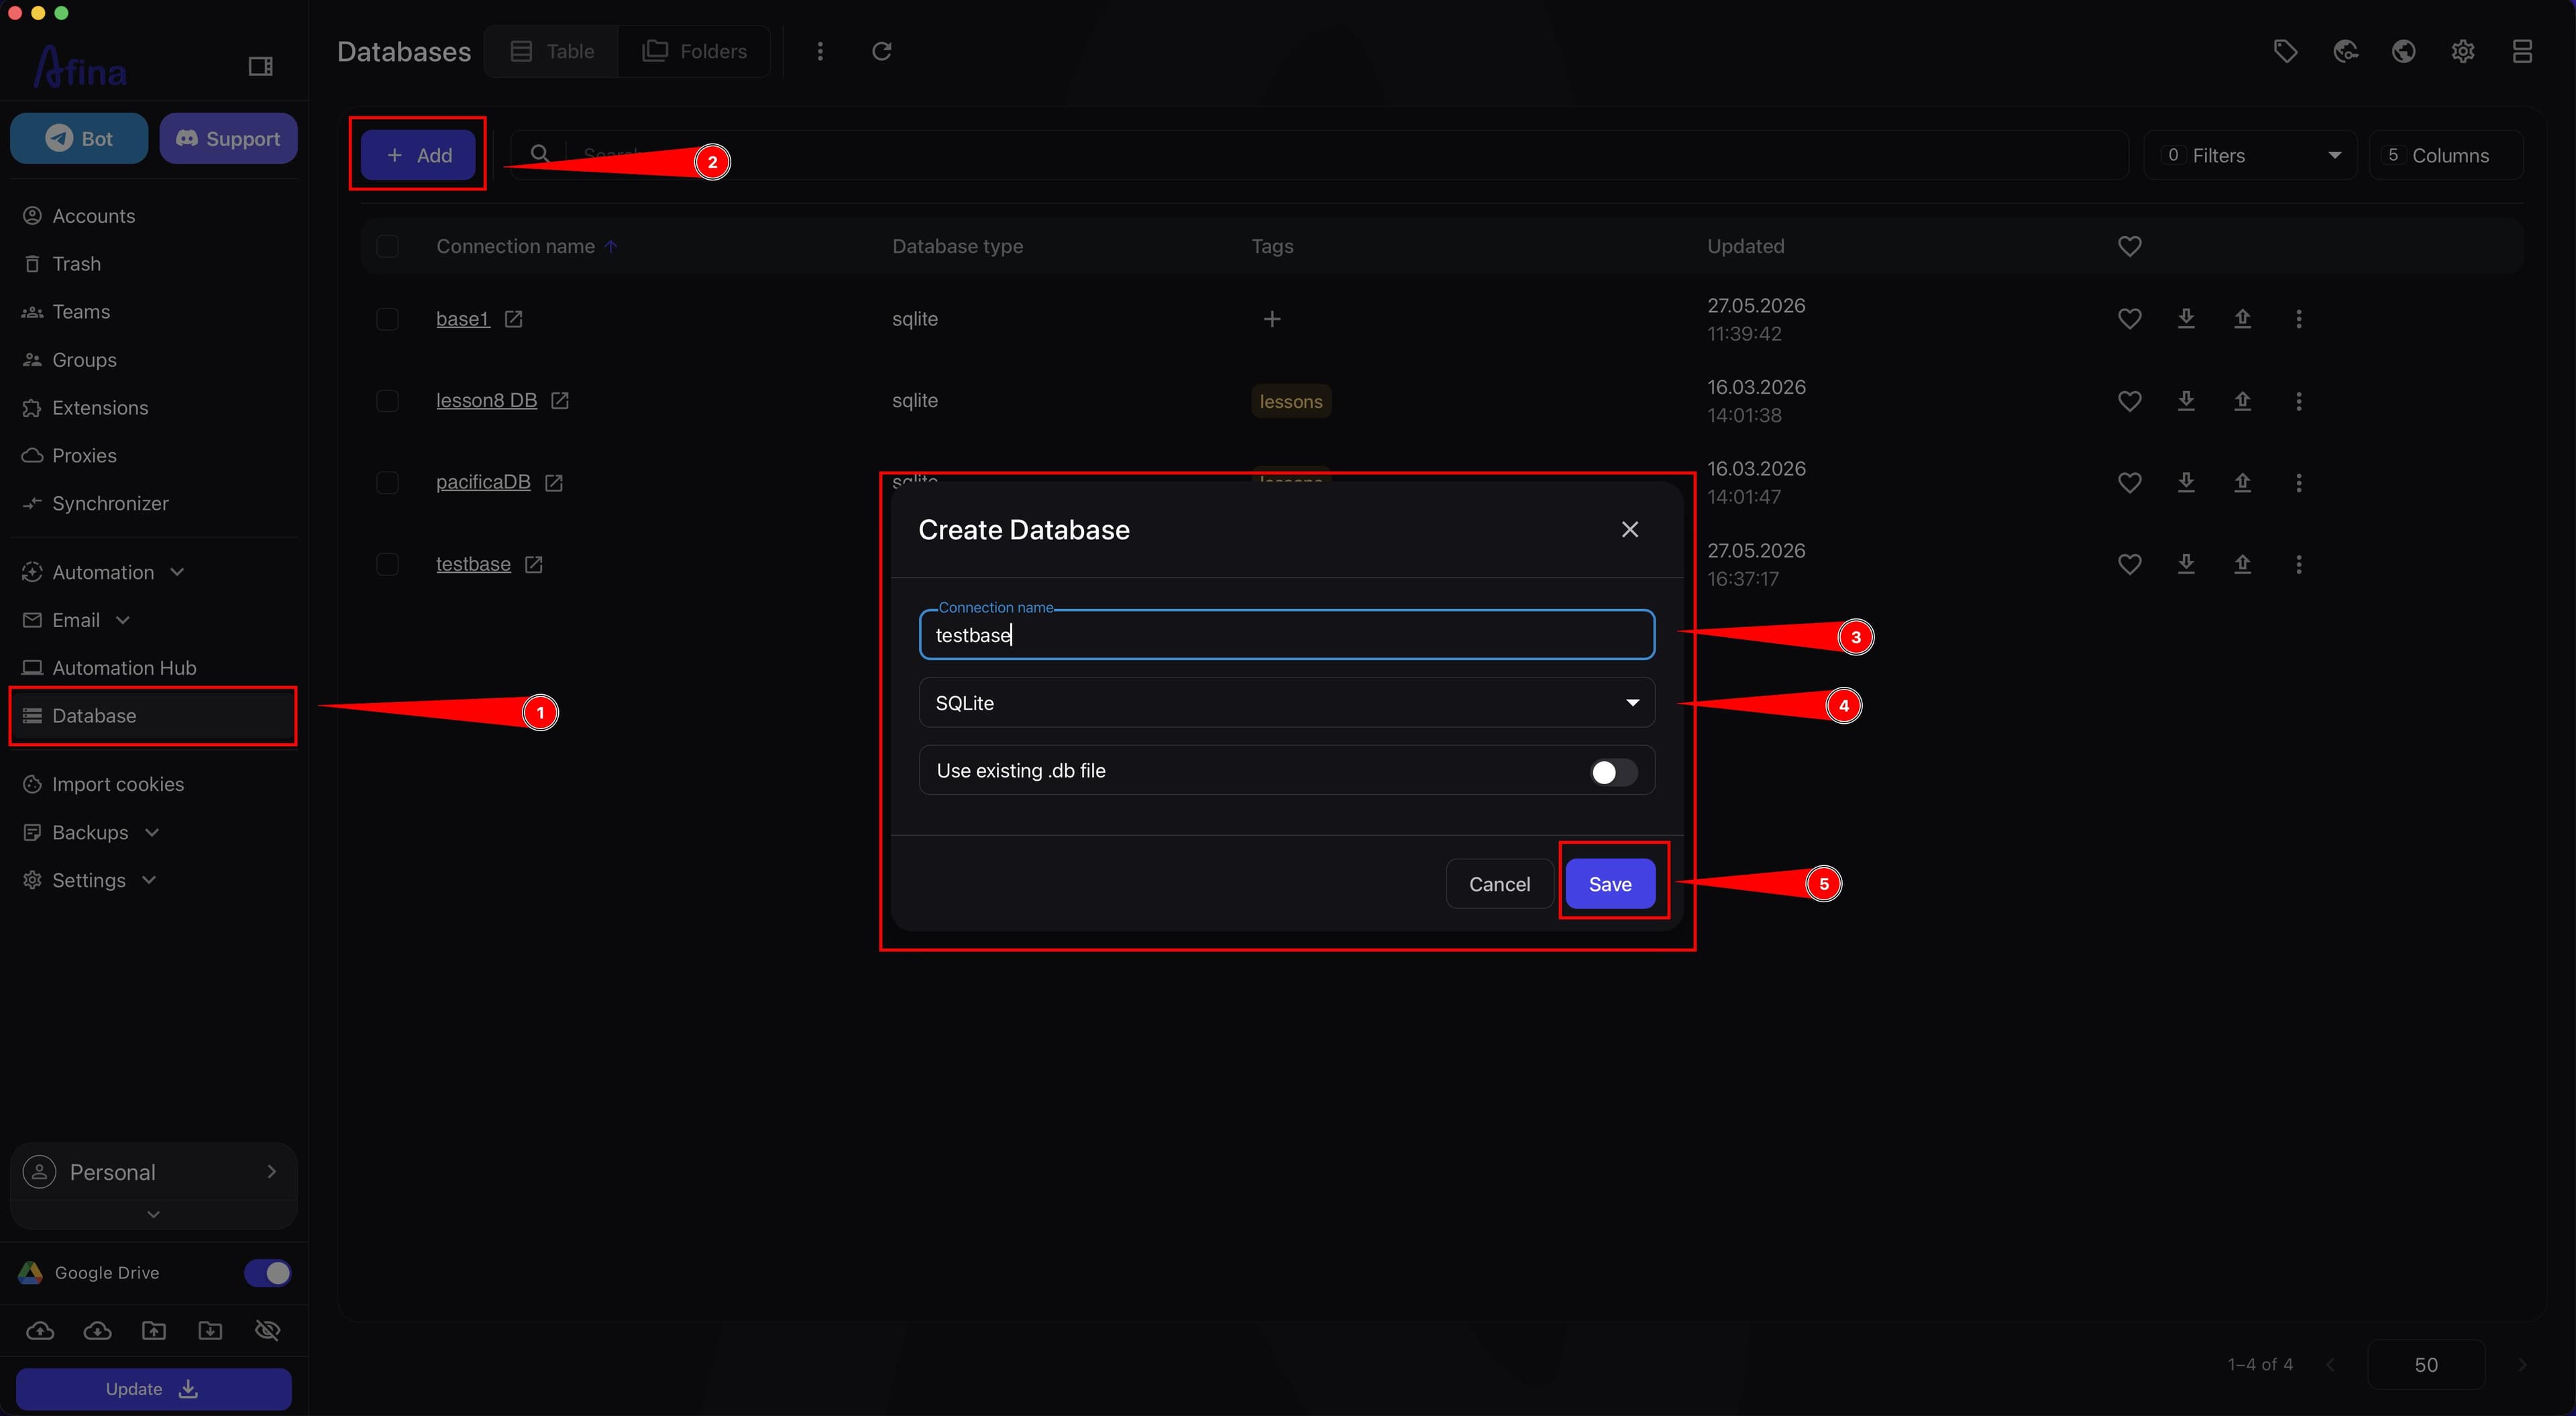
- In the "Connection name" field, enter the connection name.
The "Connection name" field is required. If it is empty, the "Save" button will be inactive.
-
Make sure
SQLiteis selected in the "Database type" field. -
Click Save if you want to create a new connection to a local database.
After that, Afina will create a new connection to the local database.
-
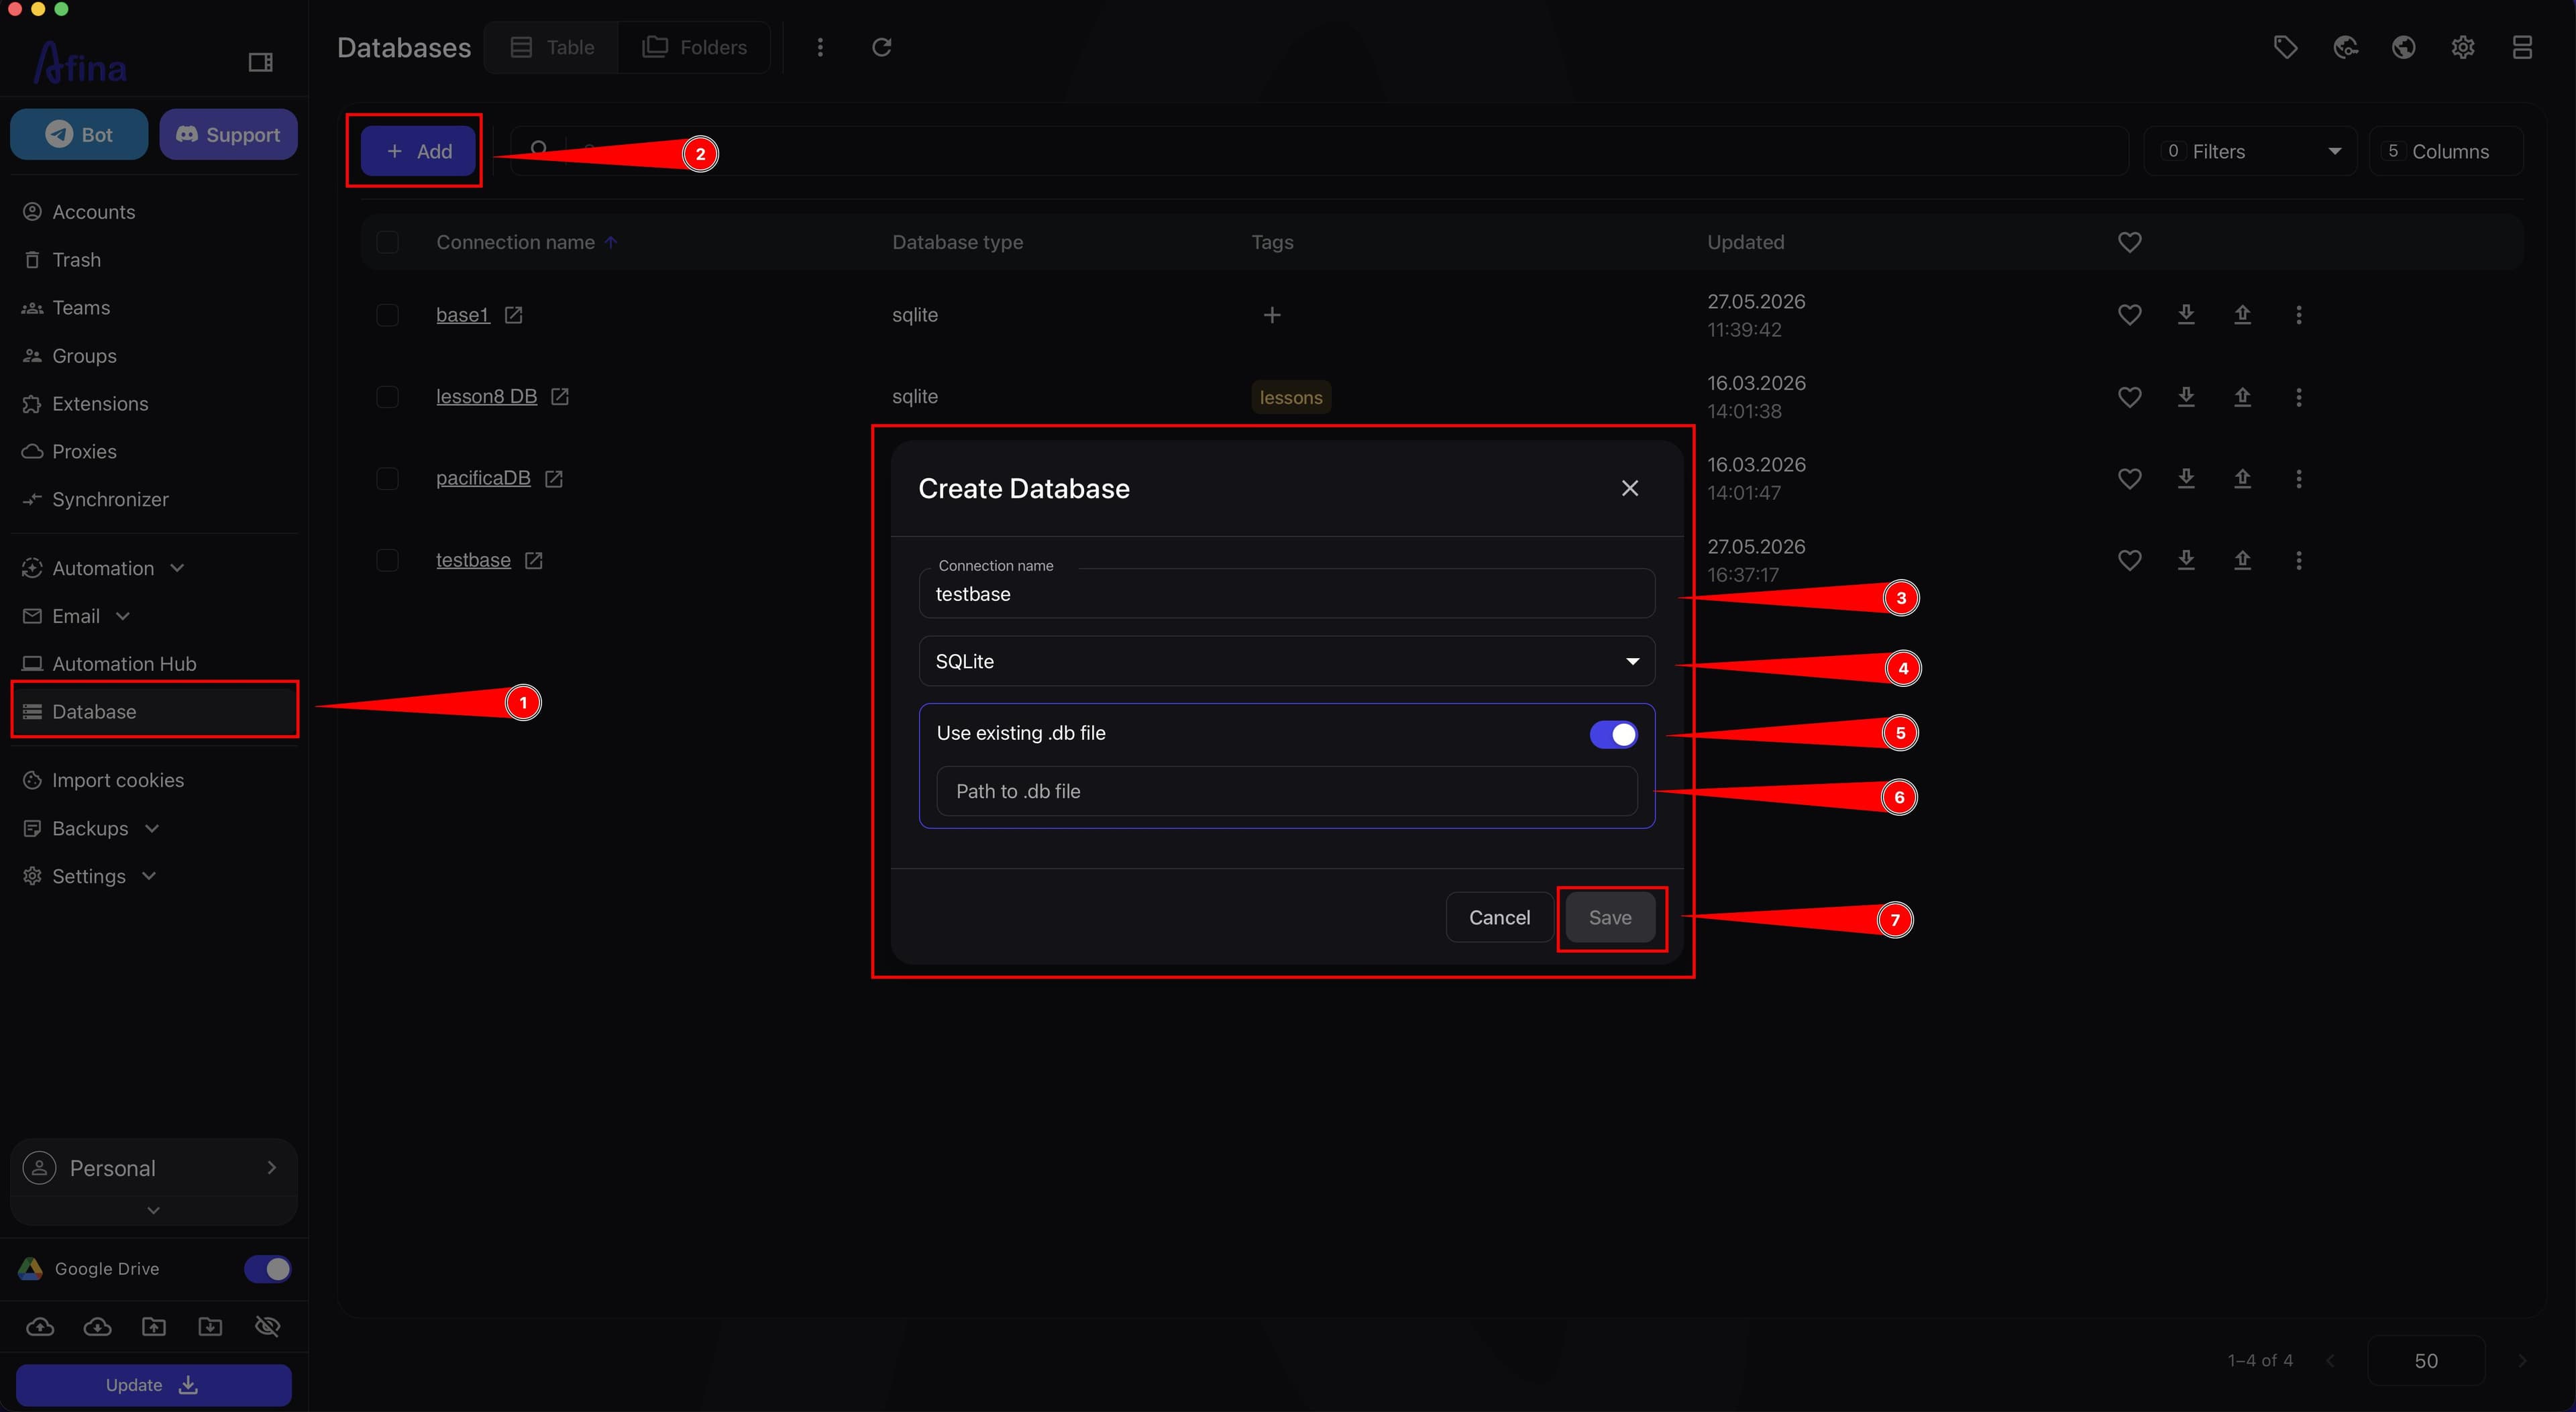
Turn on the "Use existing .db file" switch if you need to connect an already prepared
.dbfile. -
Specify the path to the required
.dbfile. -
Click Save to connect the existing database.
After that, Afina will start working with the prepared database.
This screenshot shows the "Create Database" window with the connection name, SQLite type, and mode for connecting an existing .db file.
Importing and Exporting a Database#
SQL dump is a backup copy of a database in SQL format.
Such a file stores:
- the table structure;
- SQL commands for creating the database;
- records that exist in the tables.
SQL dump is needed to:
- restore the database;
- pass it to another person;
- move it to another PC;
- save a full backup before making changes.
-
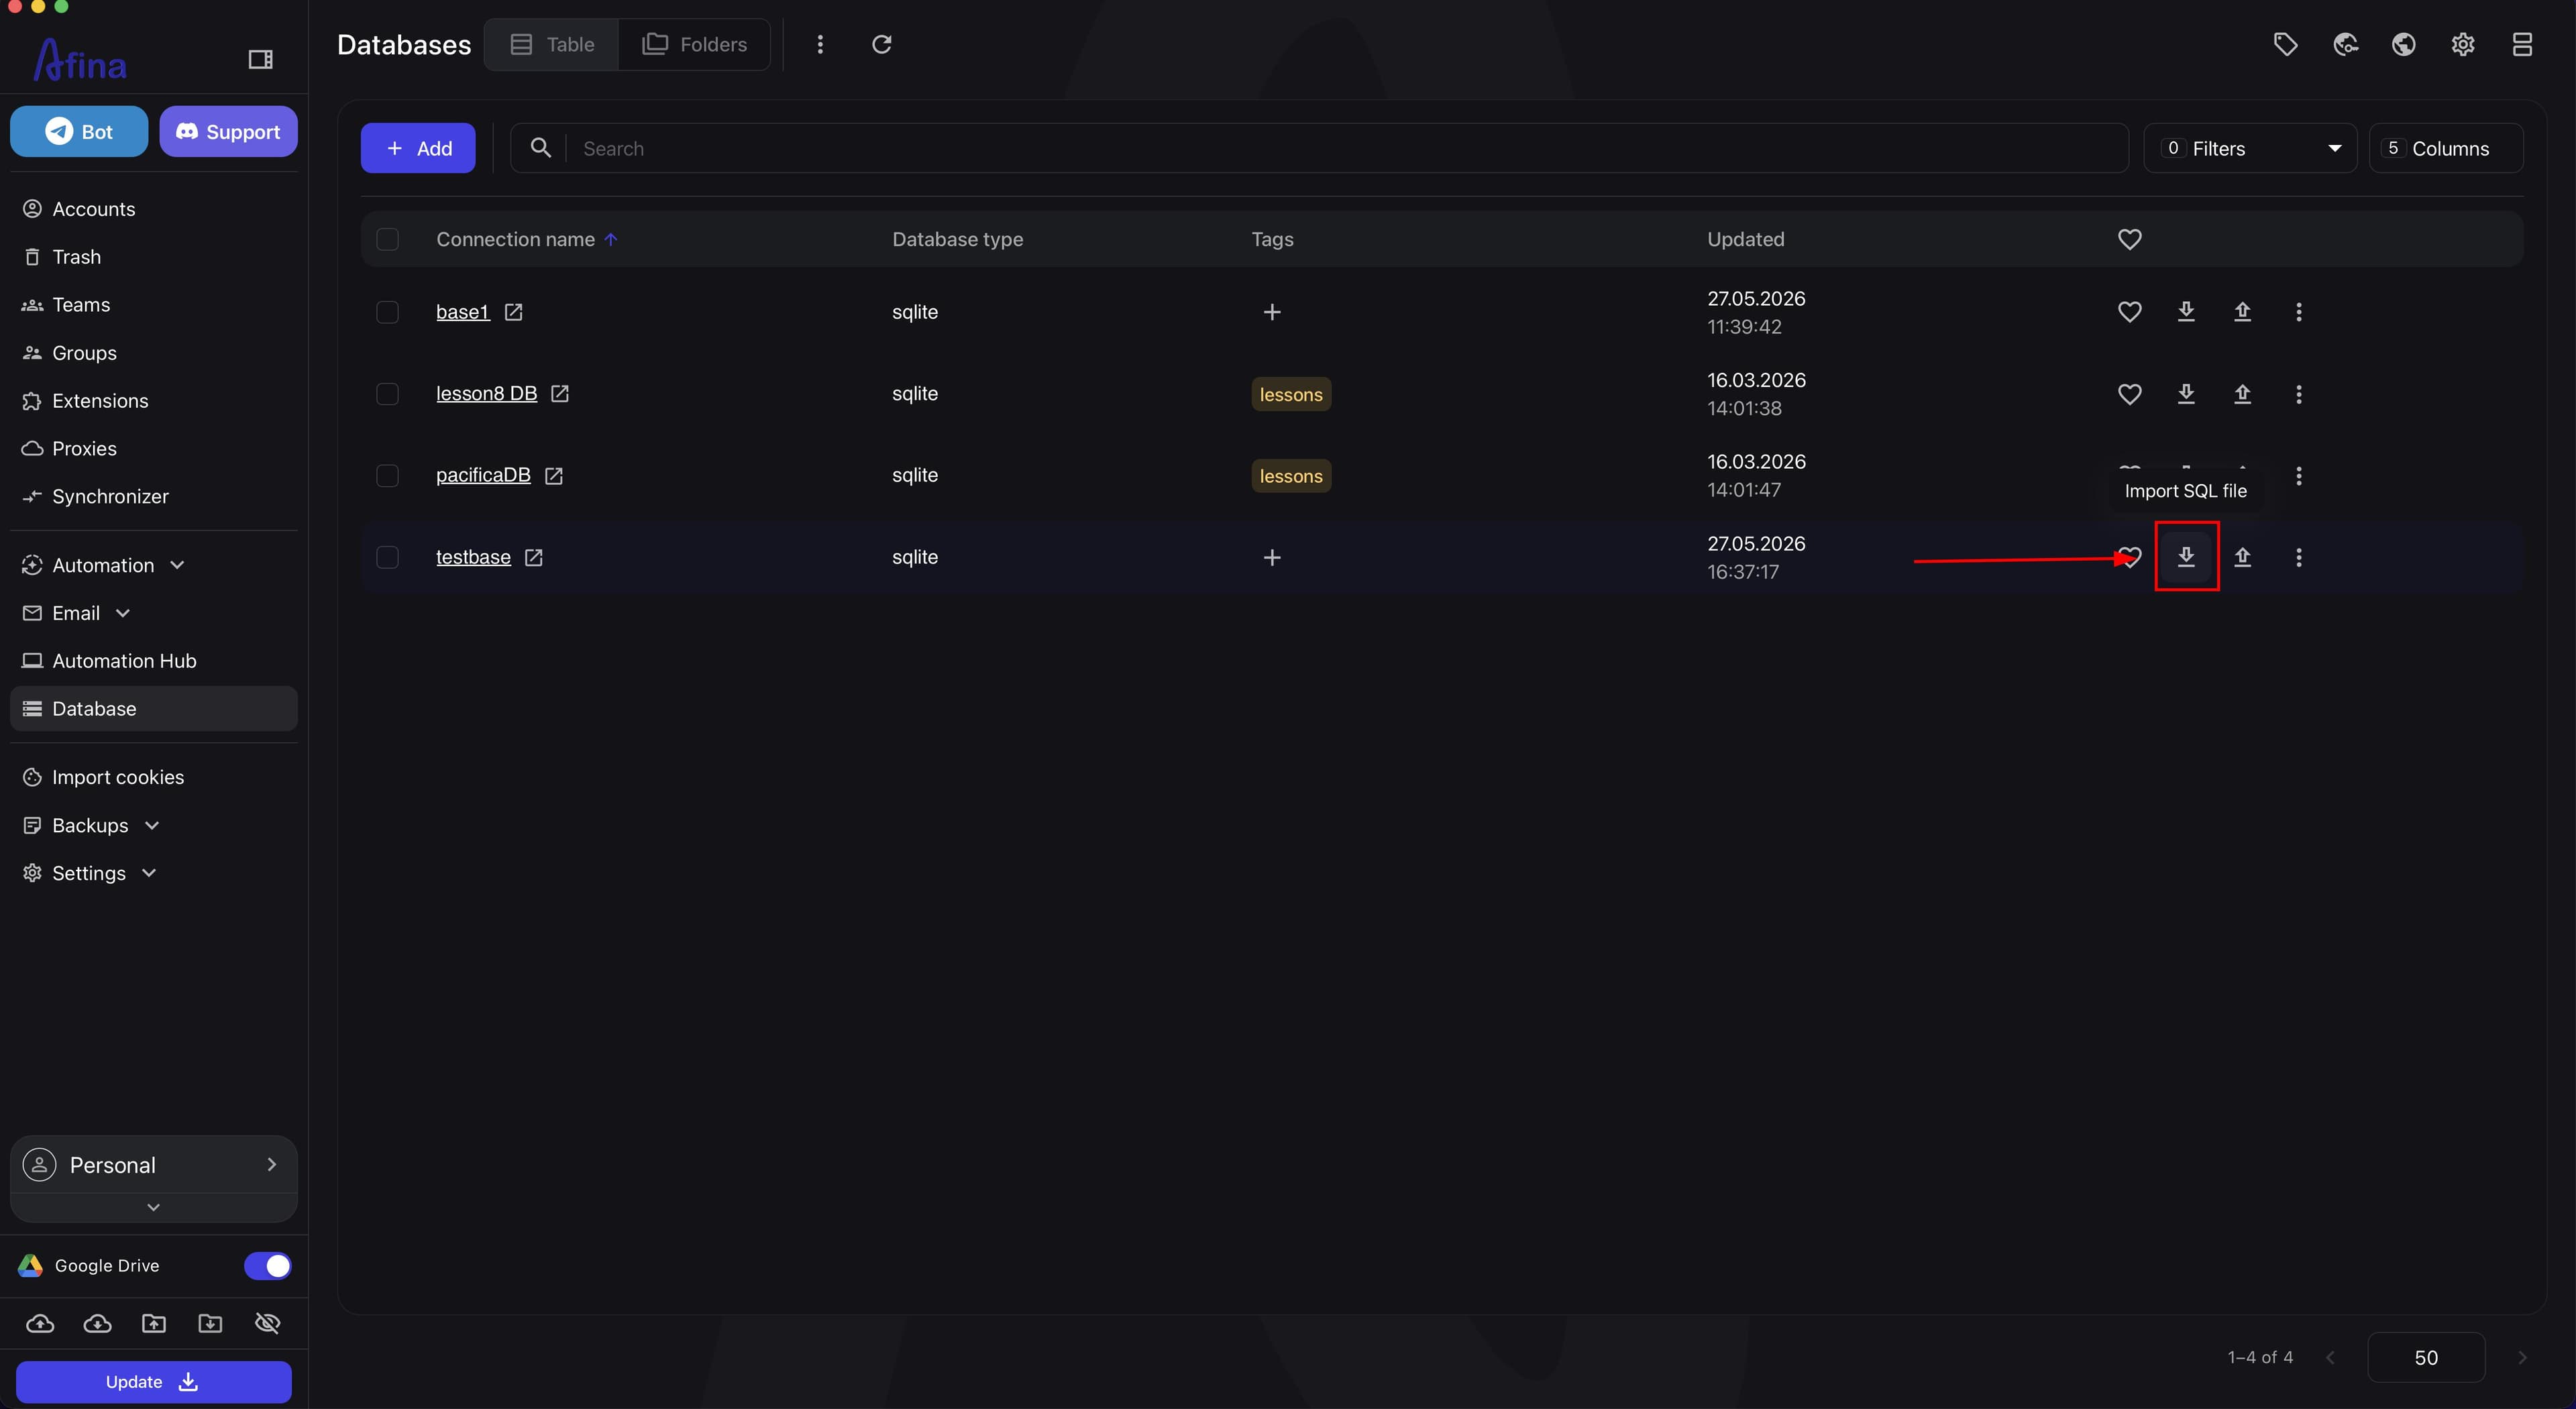
Hover over the required database if you want to import an
SQLfile into an existing.dbdatabase. -
Click the
SQLfile import button. -
Select a local
SQLfile.
After that, the SQL file will be imported into the existing database.
Before importing, it is recommended to make sure the database is not being used by another active process.
The screenshot below shows the list of databases with the SQL file import button highlighted in the row of the required database.
-
Hover over the required database if you want to export its current state.
-
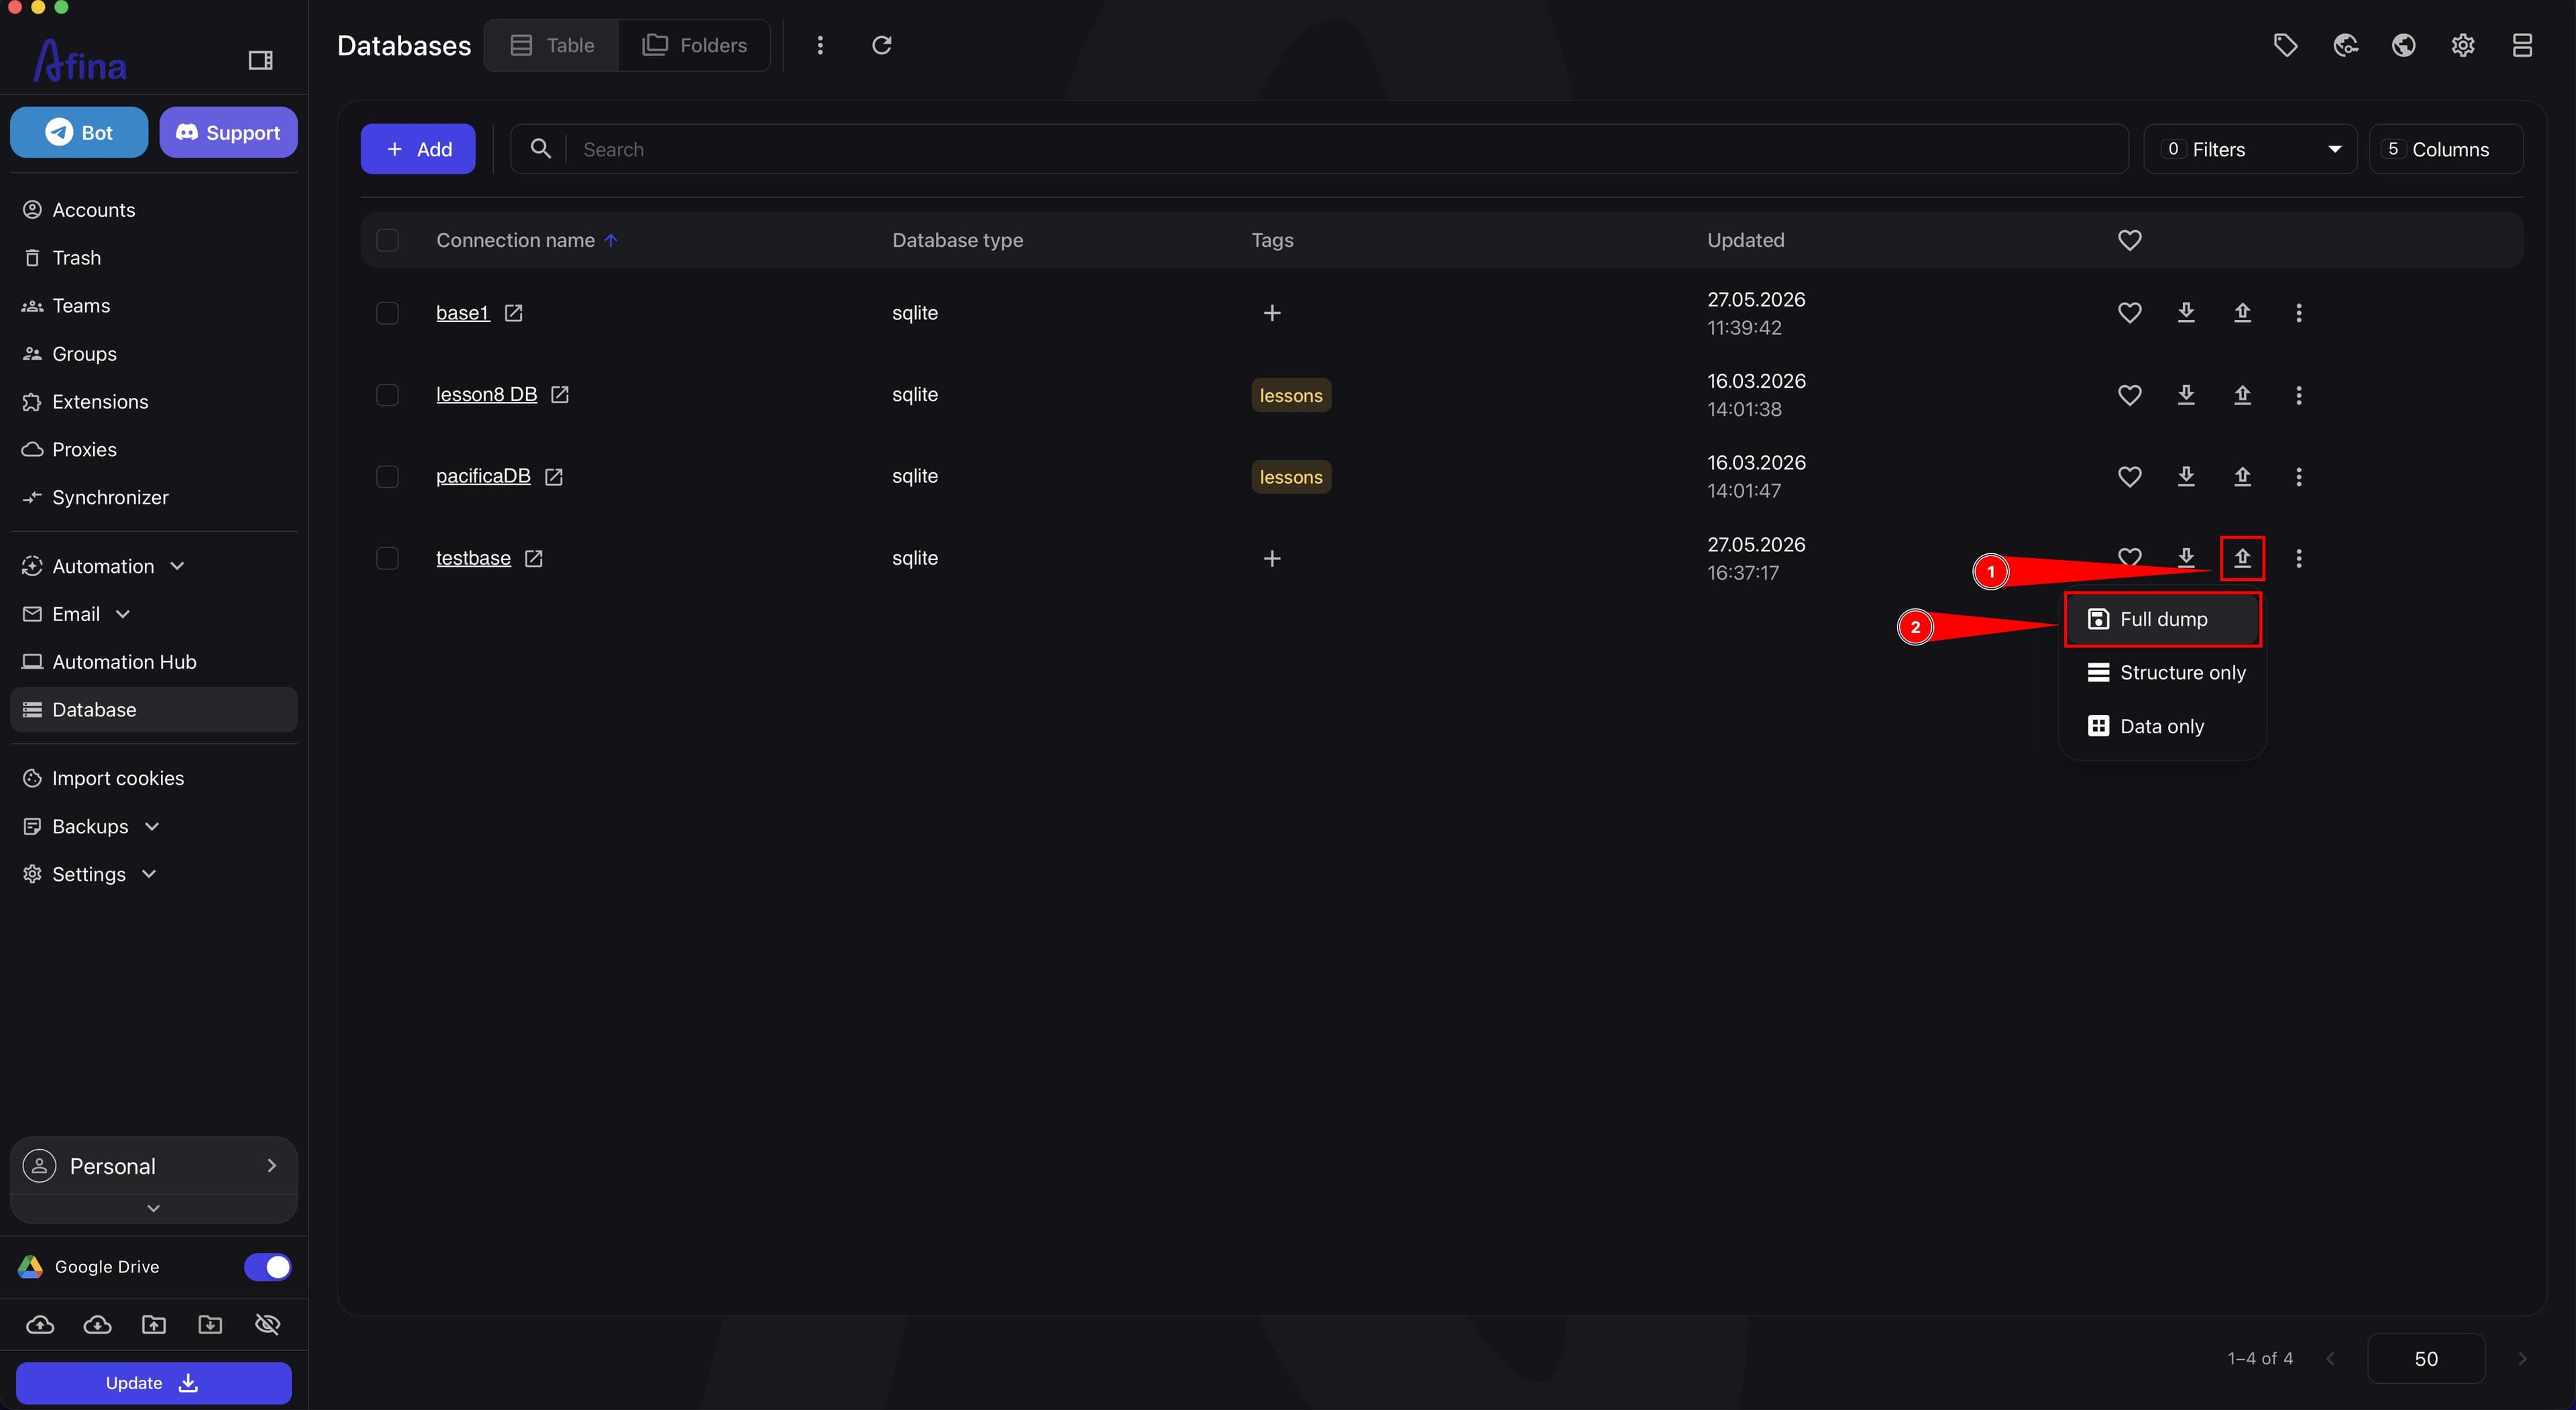
Click Download dump.
-
Select the required export option.
Most often, users export the entire database as SQL.
The next screenshot shows the database export menu with options for full export, schema only, or data only.
A full SQL export is suitable for:
- backup;
- moving a database;
- sending it to another user;
- restoring a database in the future.
You can also import or export by simply moving the .db file itself, which you created or received from another person.
Deleting and Opening a Database#
-
Find the required database in the table.
-
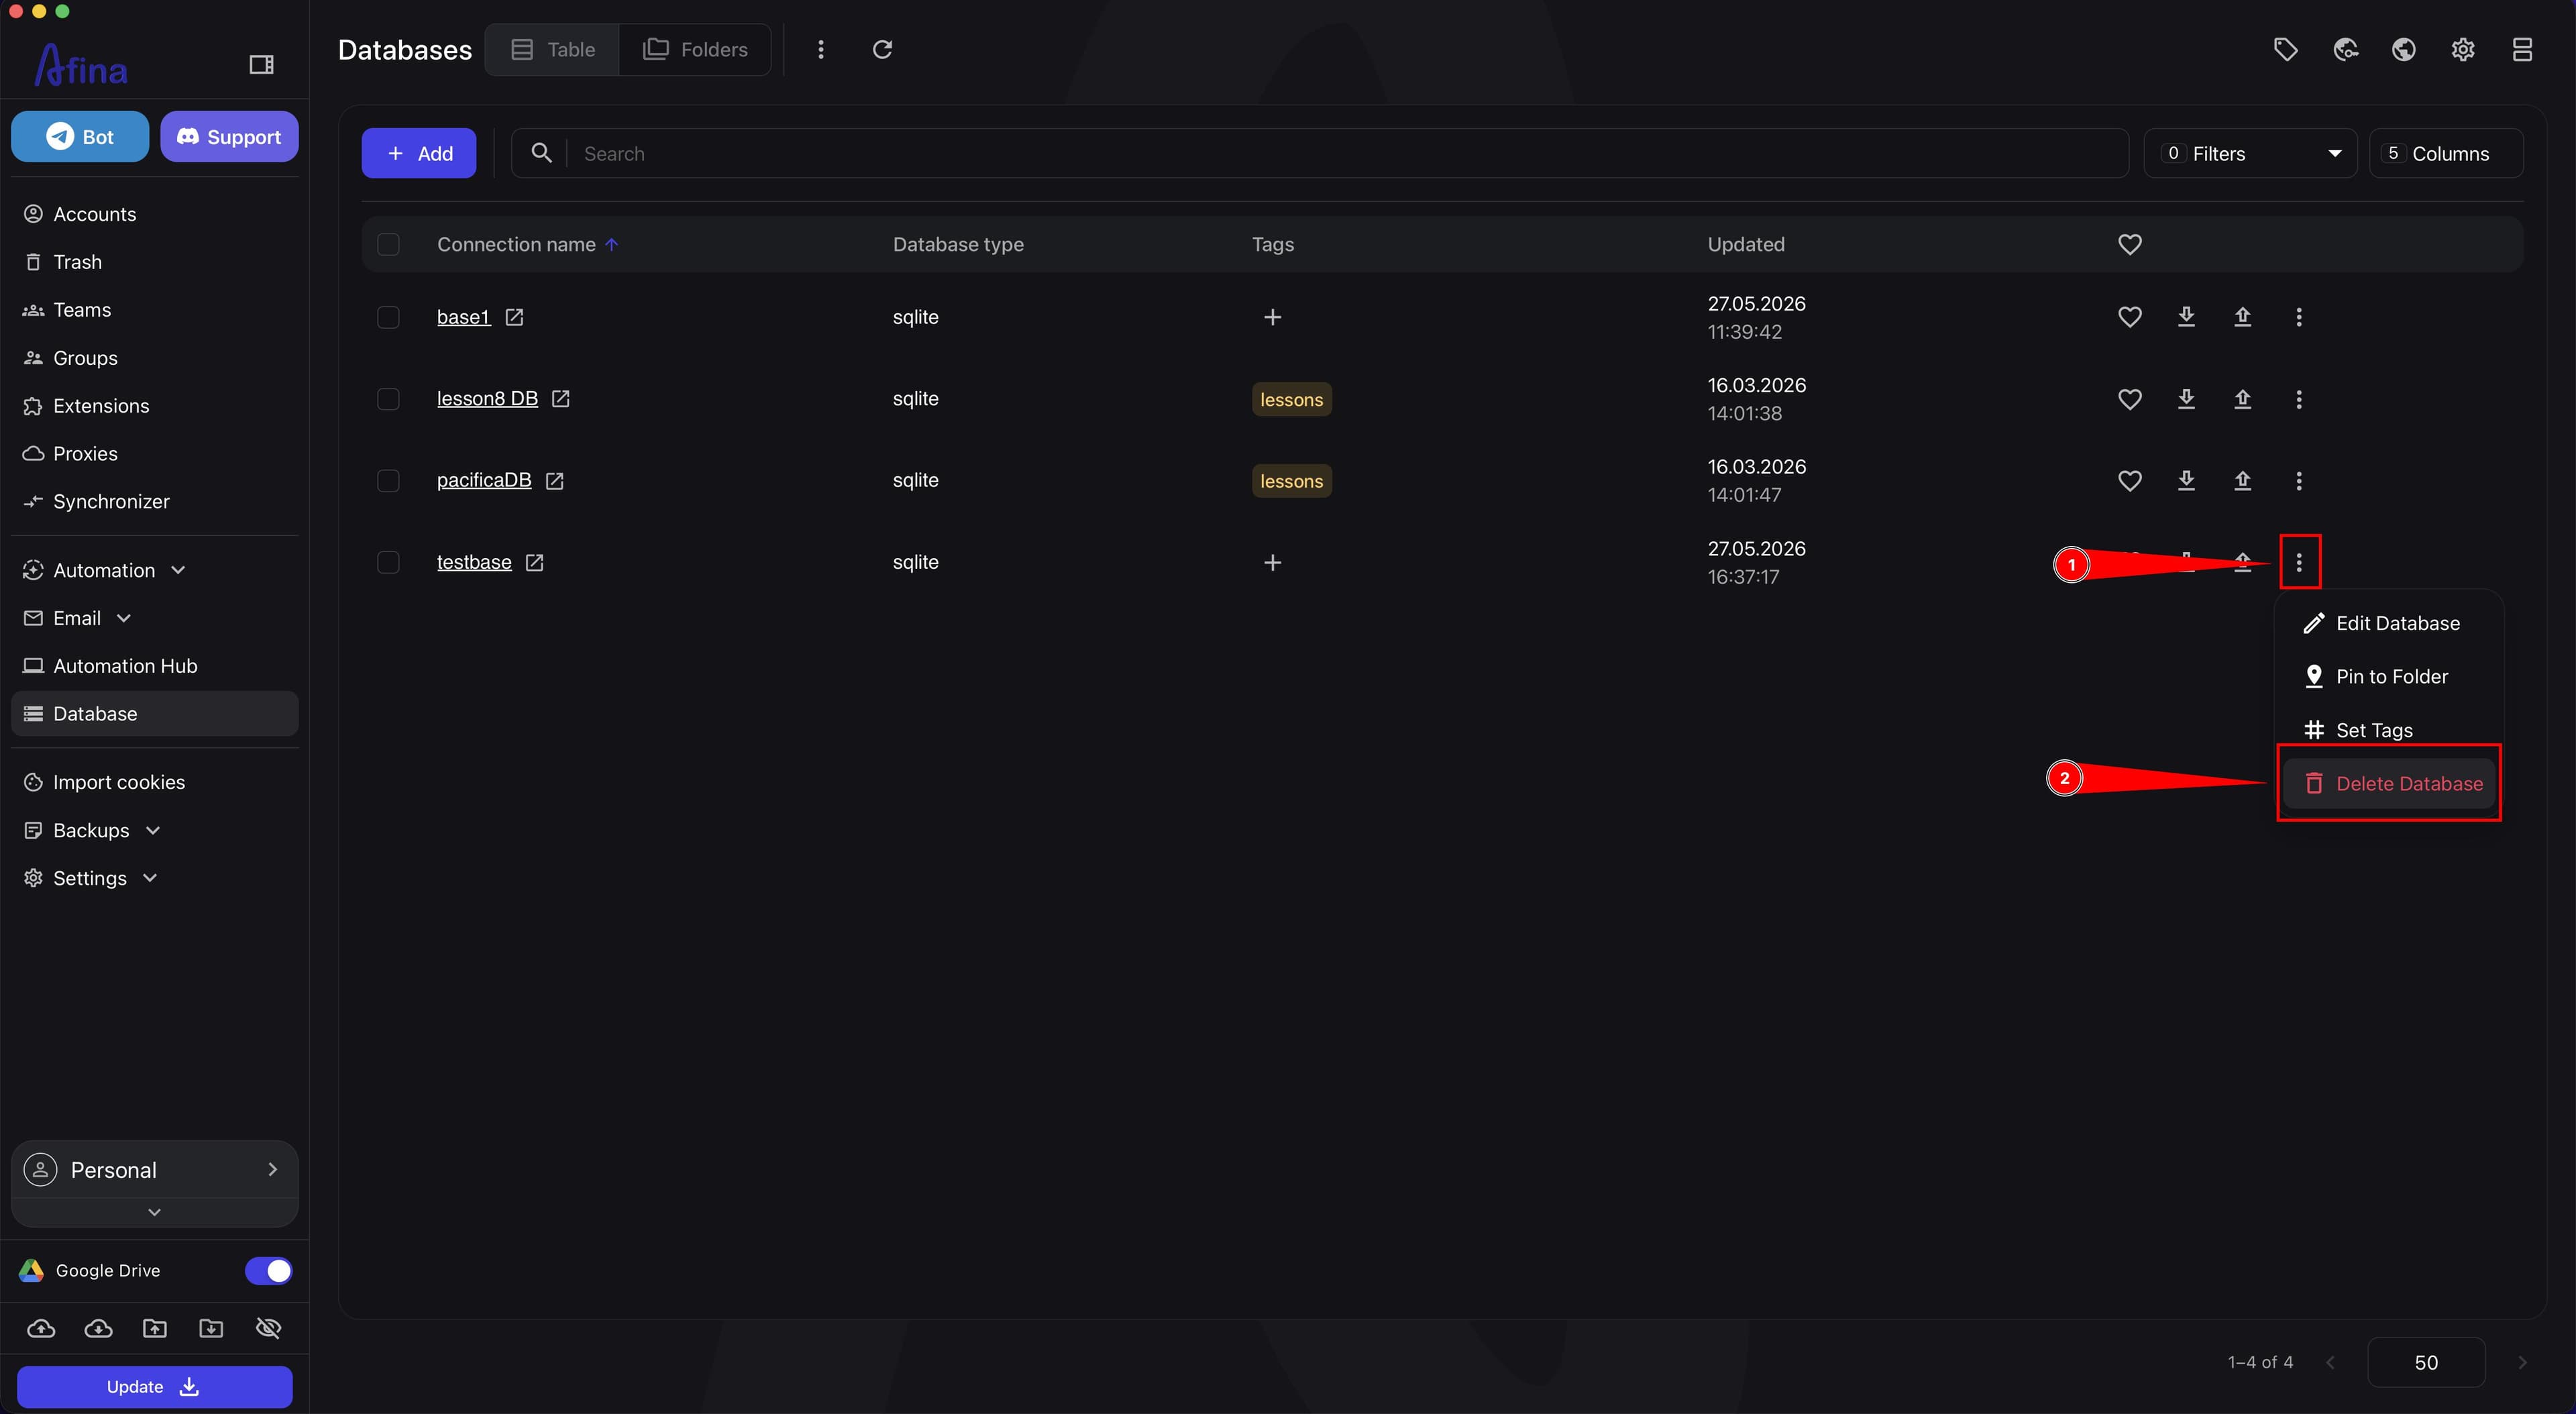
Click the ⋮ icon in the database card or row.
-
Select Delete Database.
-
Click Confirm.
After that, the database will be moved to the databases trash.
The screenshot below shows the database action menu with the "Delete Database" item.
-
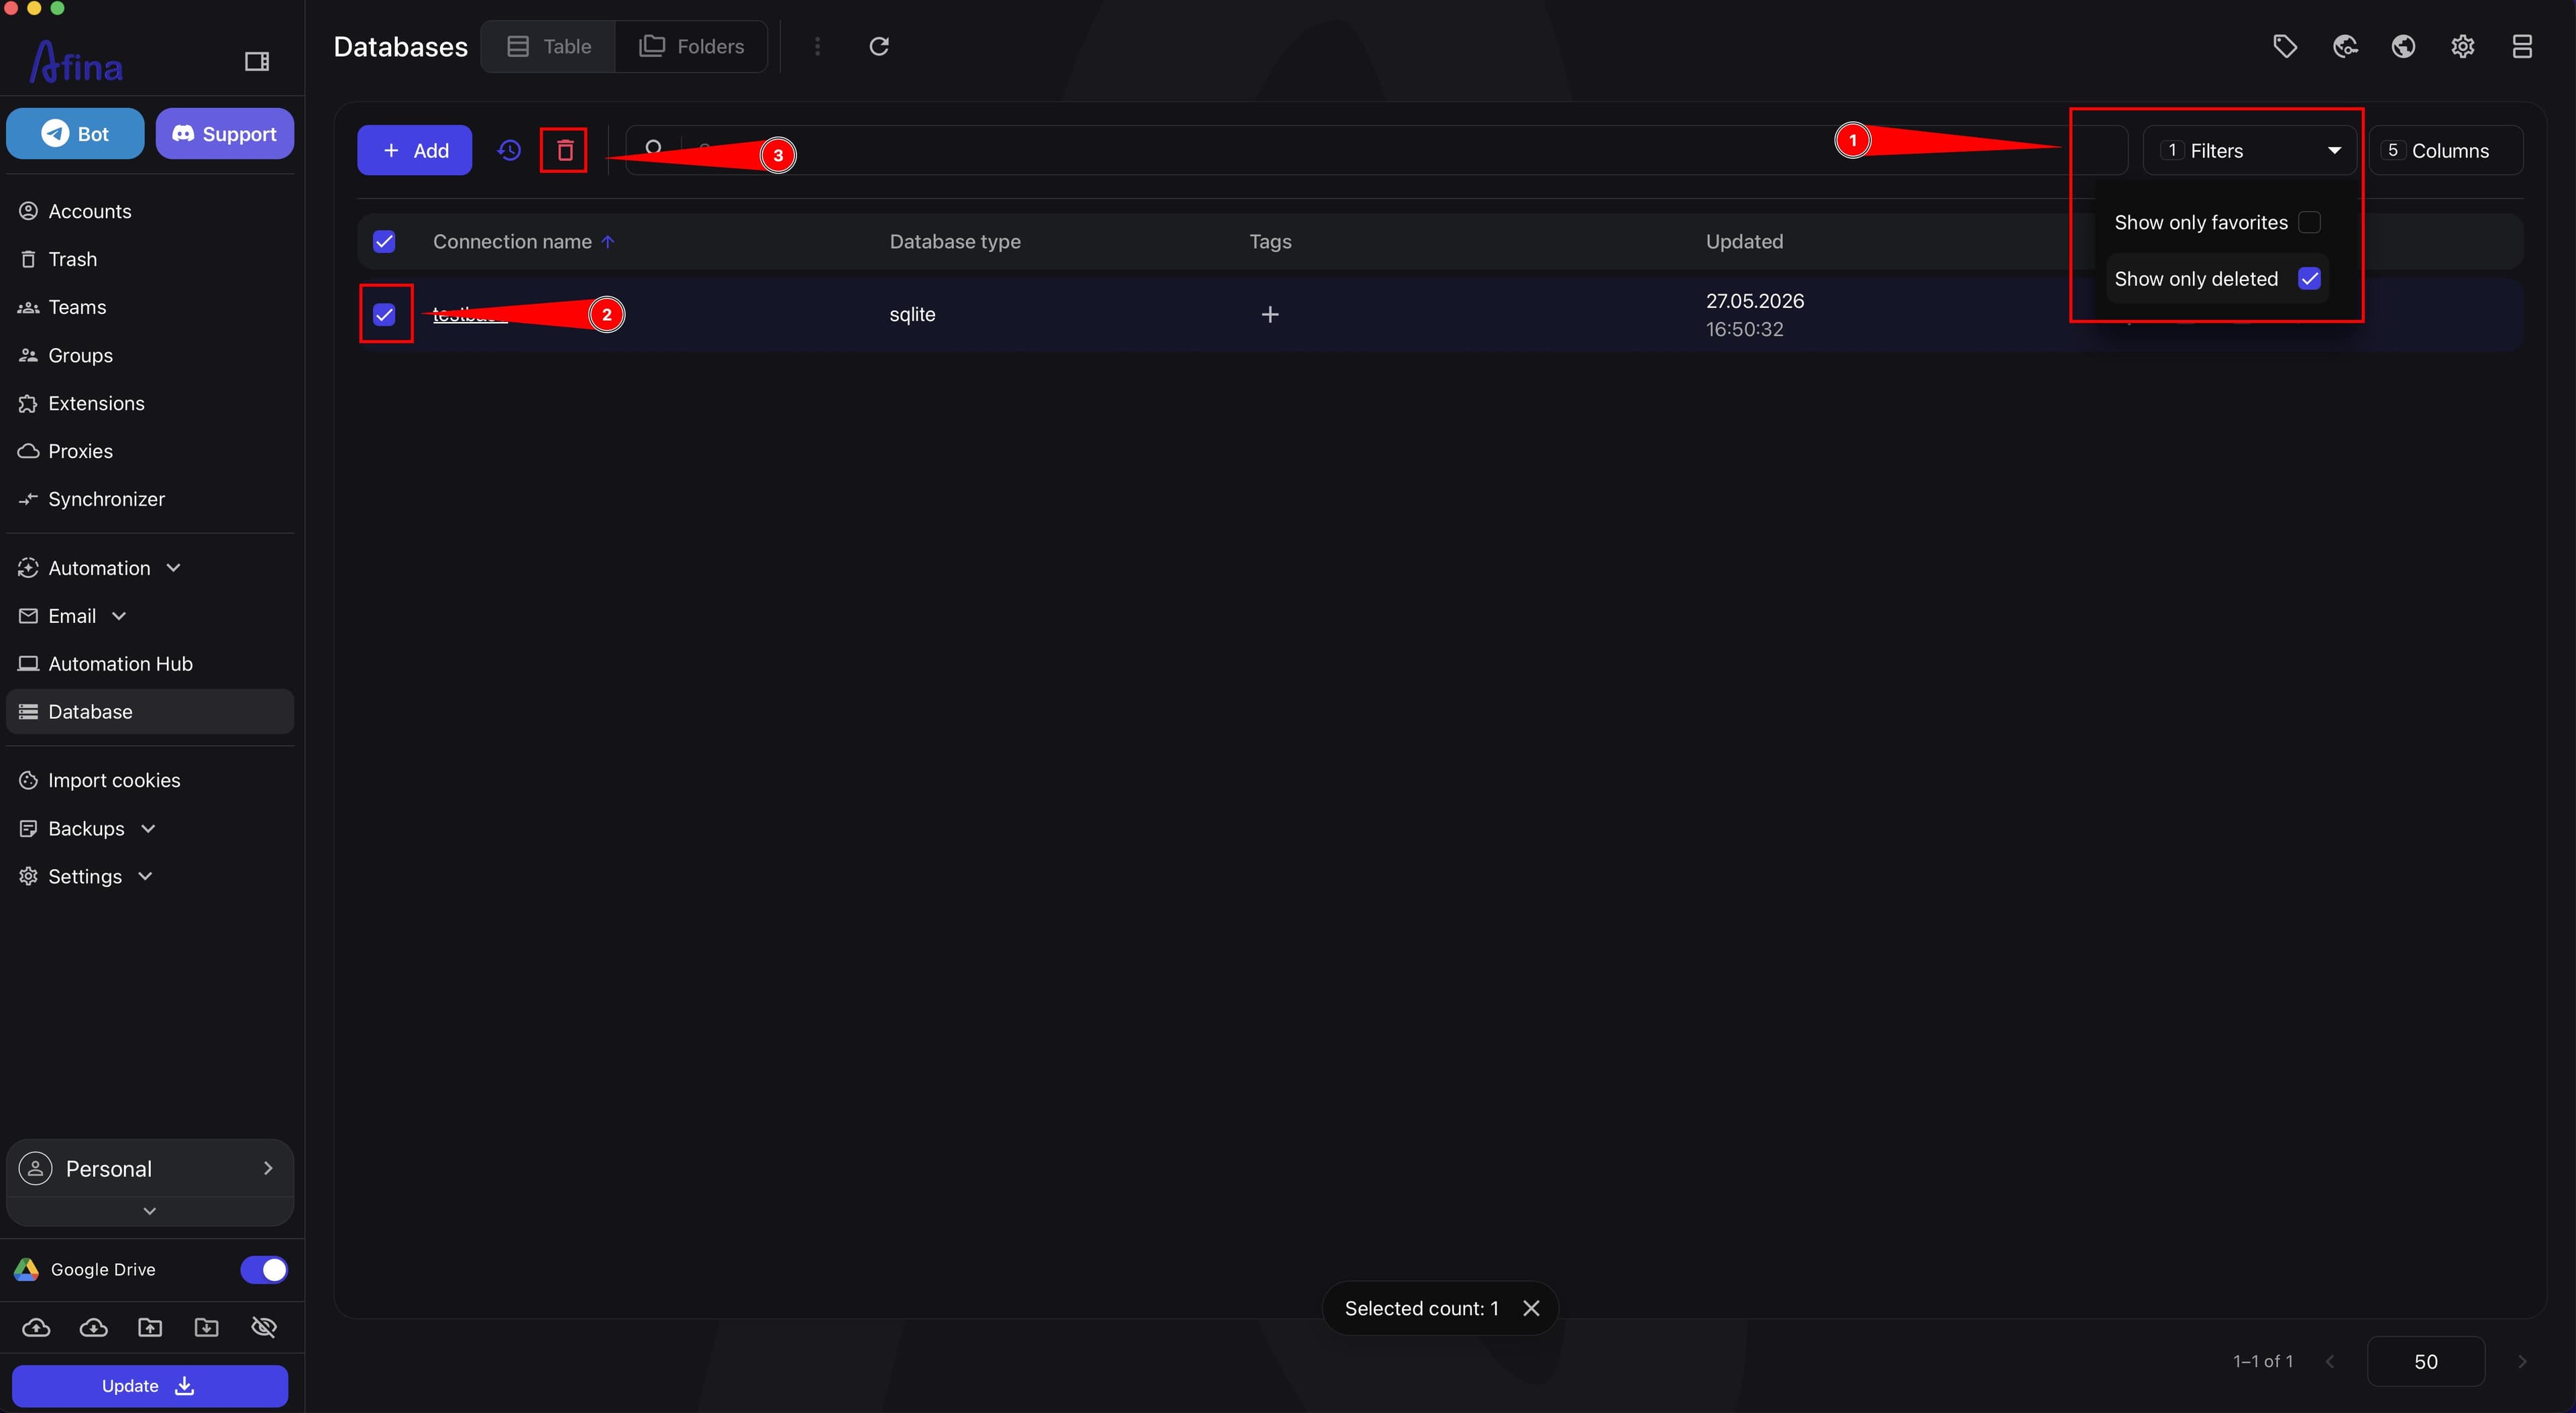
Click Filters if you want to open the databases trash.
-
Turn on the "Show only deleted" switch.
-
Select the required database in the list of deleted items using the checkbox.
-
Select Delete Without Restore if you want to permanently delete the database.
-
Click Confirm.
The next screenshot shows the list of deleted databases with the "Delete Without Restore" action.
Deleting a database is an irreversible action. If you may still need the database, create an SQL dump first.
-
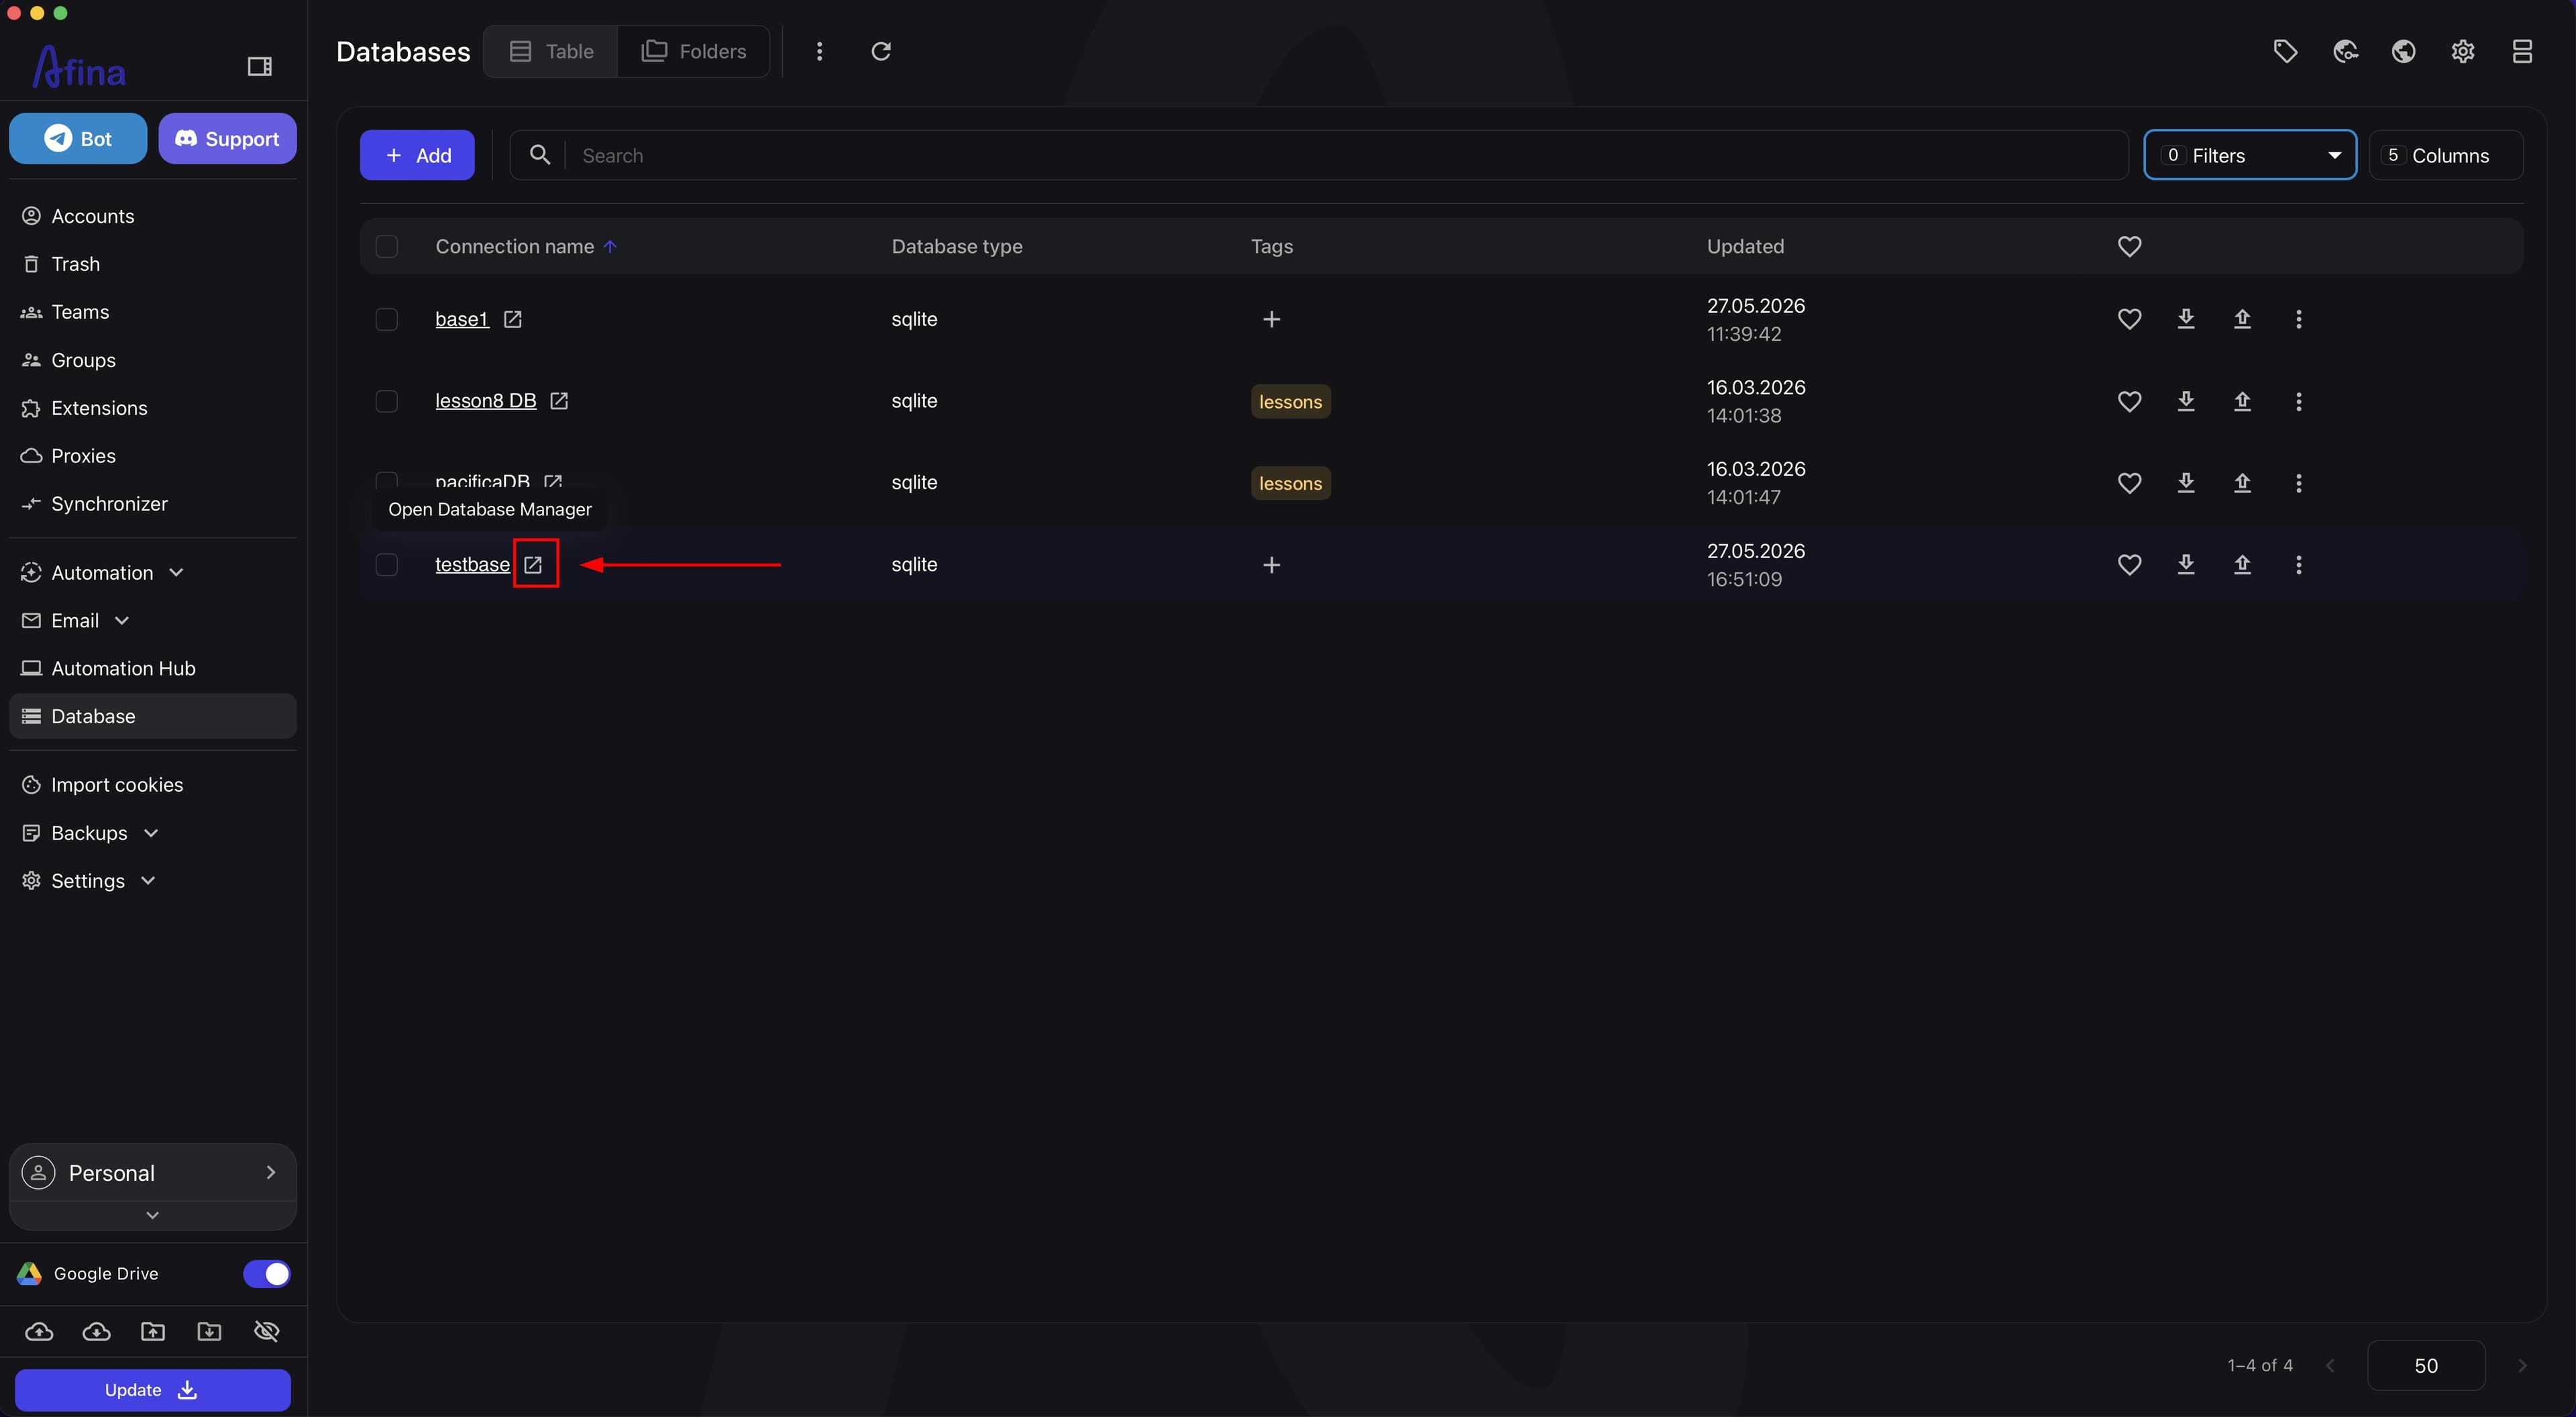
Find the required database in the list if you want to open it for work.
-
Open the database from the table or card.
-
Go to the workspace.
The workspace is where you work with tables and records.
This screenshot shows the list of databases with the icon for opening the database manager.
Tables and Data Types#
A table is a set of rows and columns.
Tables store all data in the database.
For example, separate tables can store:
- wallets;
- balances;
- statuses;
- action history;
- auxiliary technical data.
For basic work, it is enough to understand these types:
INTEGER- whole numbers;REAL- fractional numbers;TEXT- text values;BLOB- binary data;NULL- no value;NUMERIC- a numeric or universal type, if the interface supports it.
The most important constraints:
NOT NULL- the value is required;DEFAULT- the default value;UNIQUE- duplicate values are not allowed;PRIMARY KEY- a unique row identifier;AUTOINCREMENT- automatic value increment if this field isid.
Simple practical examples:
- a wallet address is often made
UNIQUE; - a
statusfield often hasDEFAULT 0; - an
idfield is usually madePRIMARY KEYandAUTOINCREMENT.
Creating and Changing Tables#
-
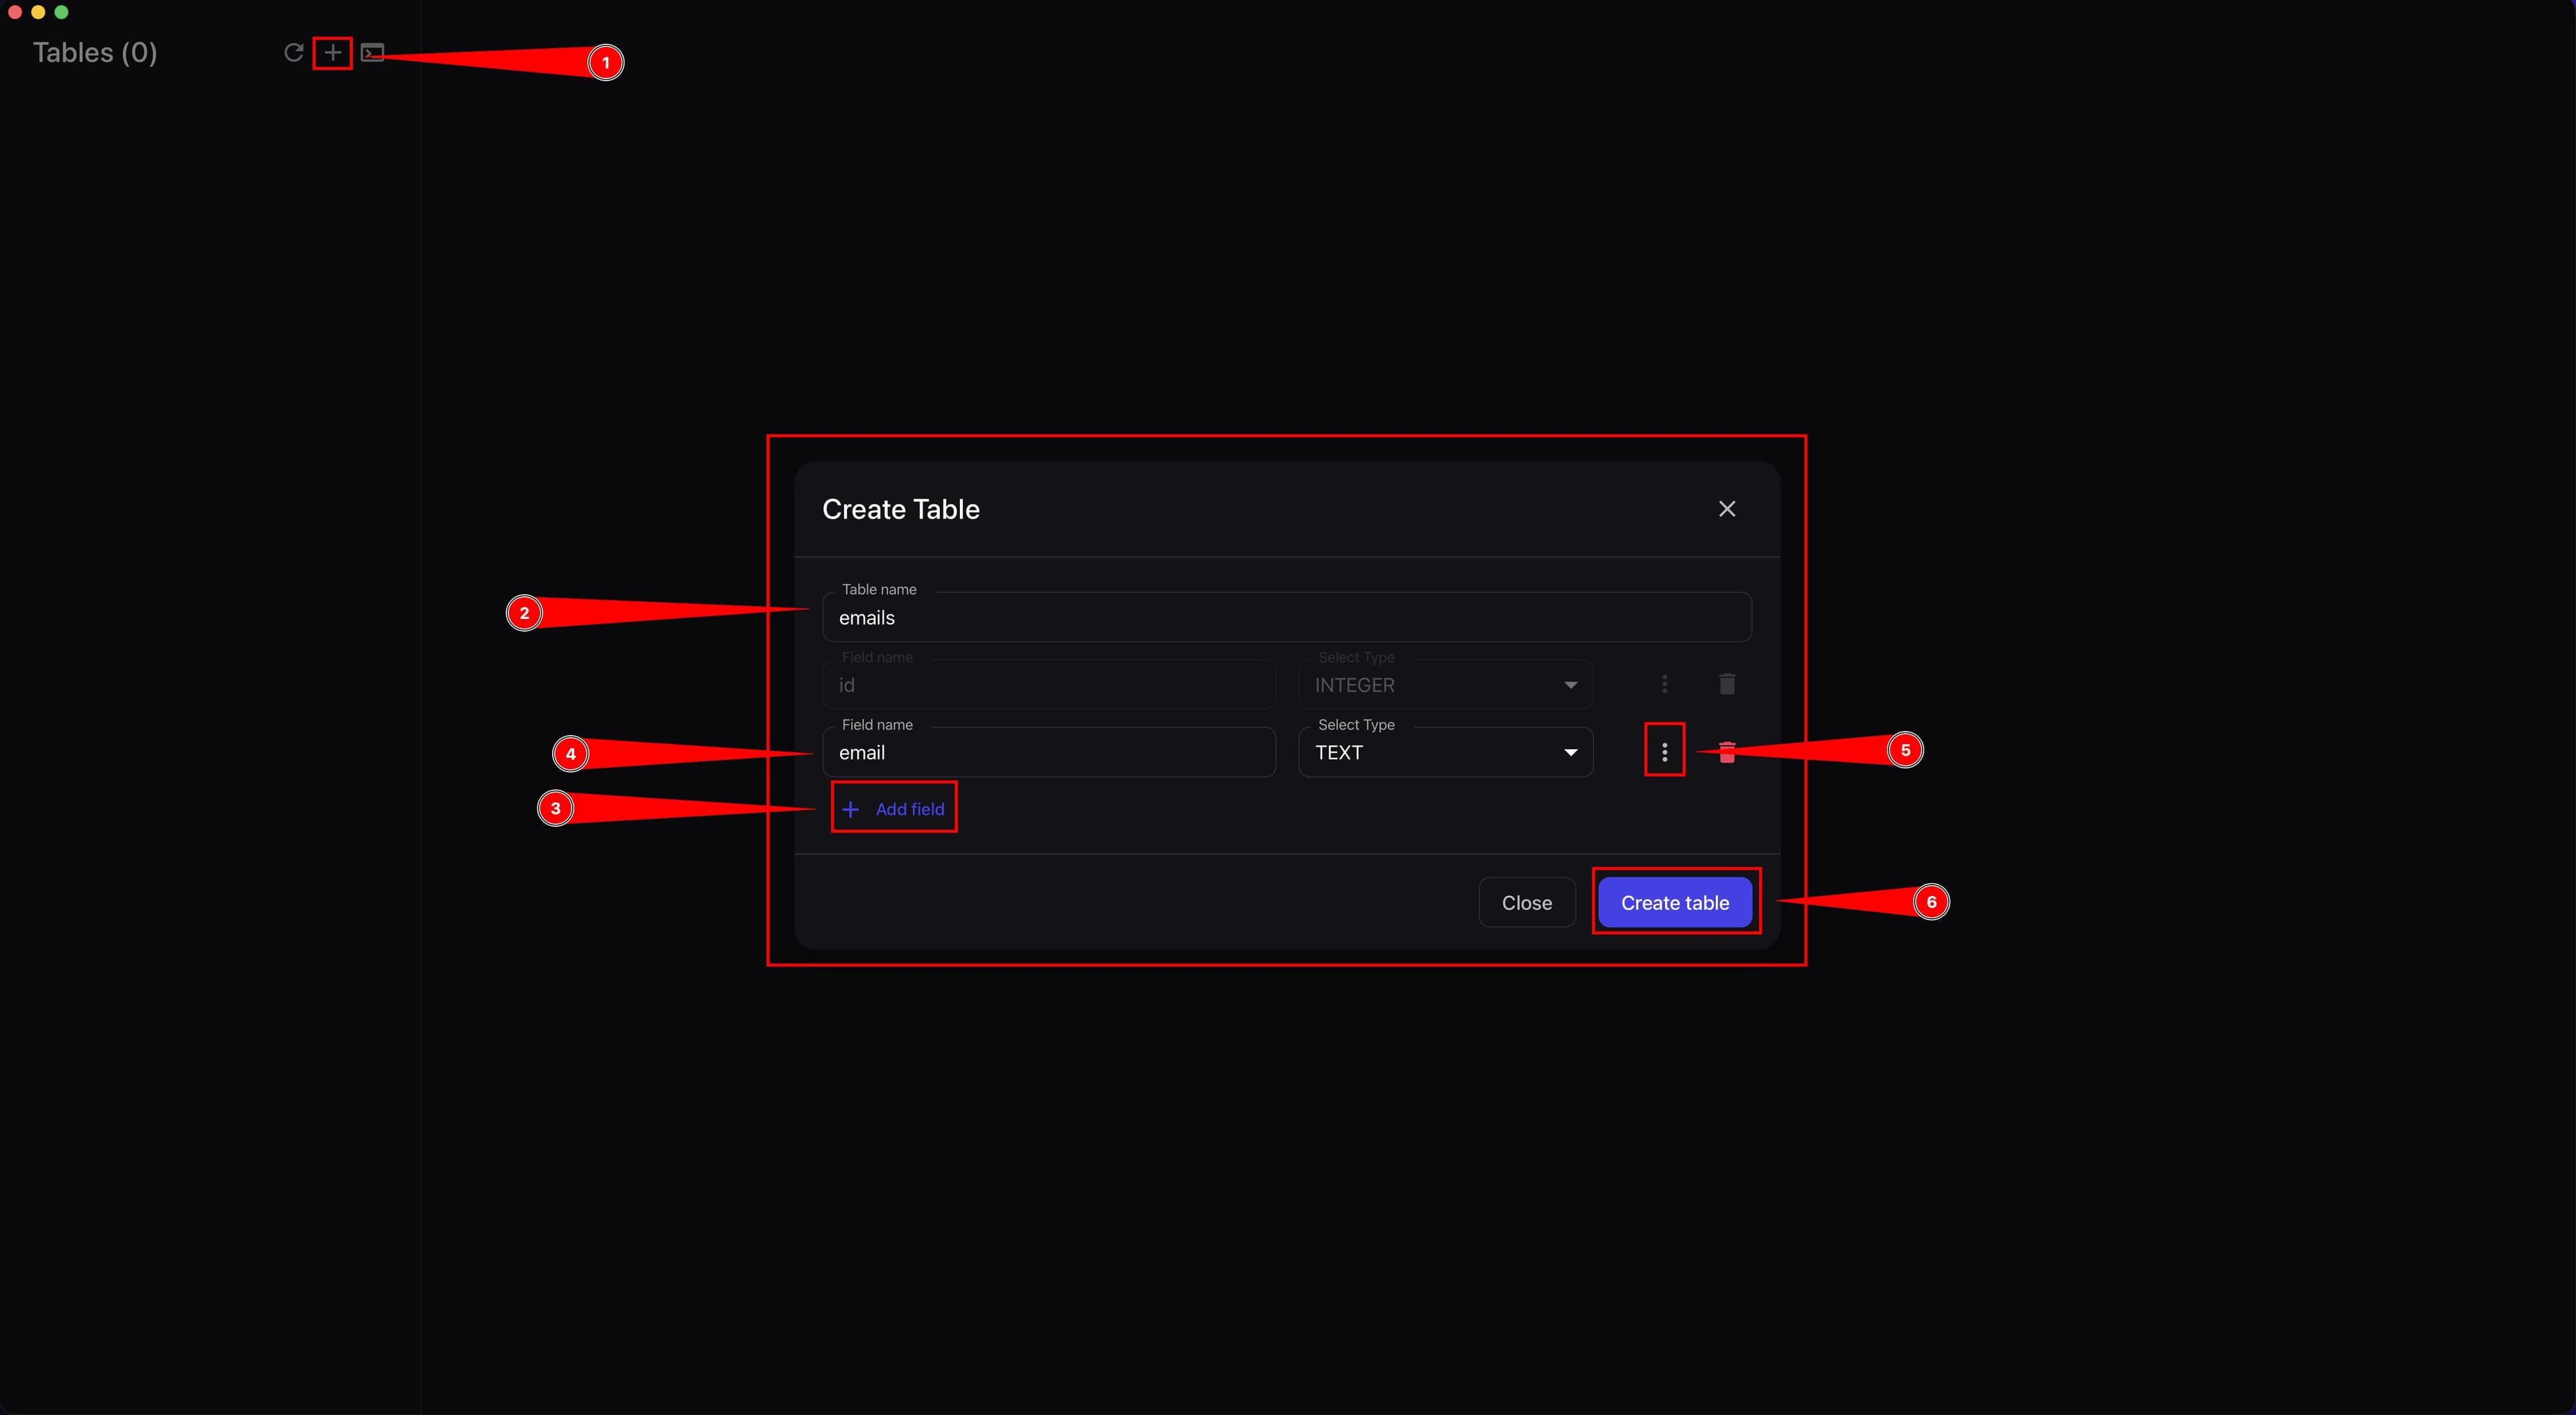
In the left "Tables" panel, click the + icon if you need to create a table manually.
-
In the "Create Table" window, enter the table name.
-
Click Add field.
-
Set a name for each field.
-
Select a type for each field.
-
Set additional properties if needed.
-
If needed, turn on the "Primary key", "Not NULL", "Unique", and "Auto increment" switches.
-
Click Create table.
You will not be able to create a table until its name is set and at least one field has a name and type.
The screenshot below shows the "Create Table" window with fields, types, and additional properties.
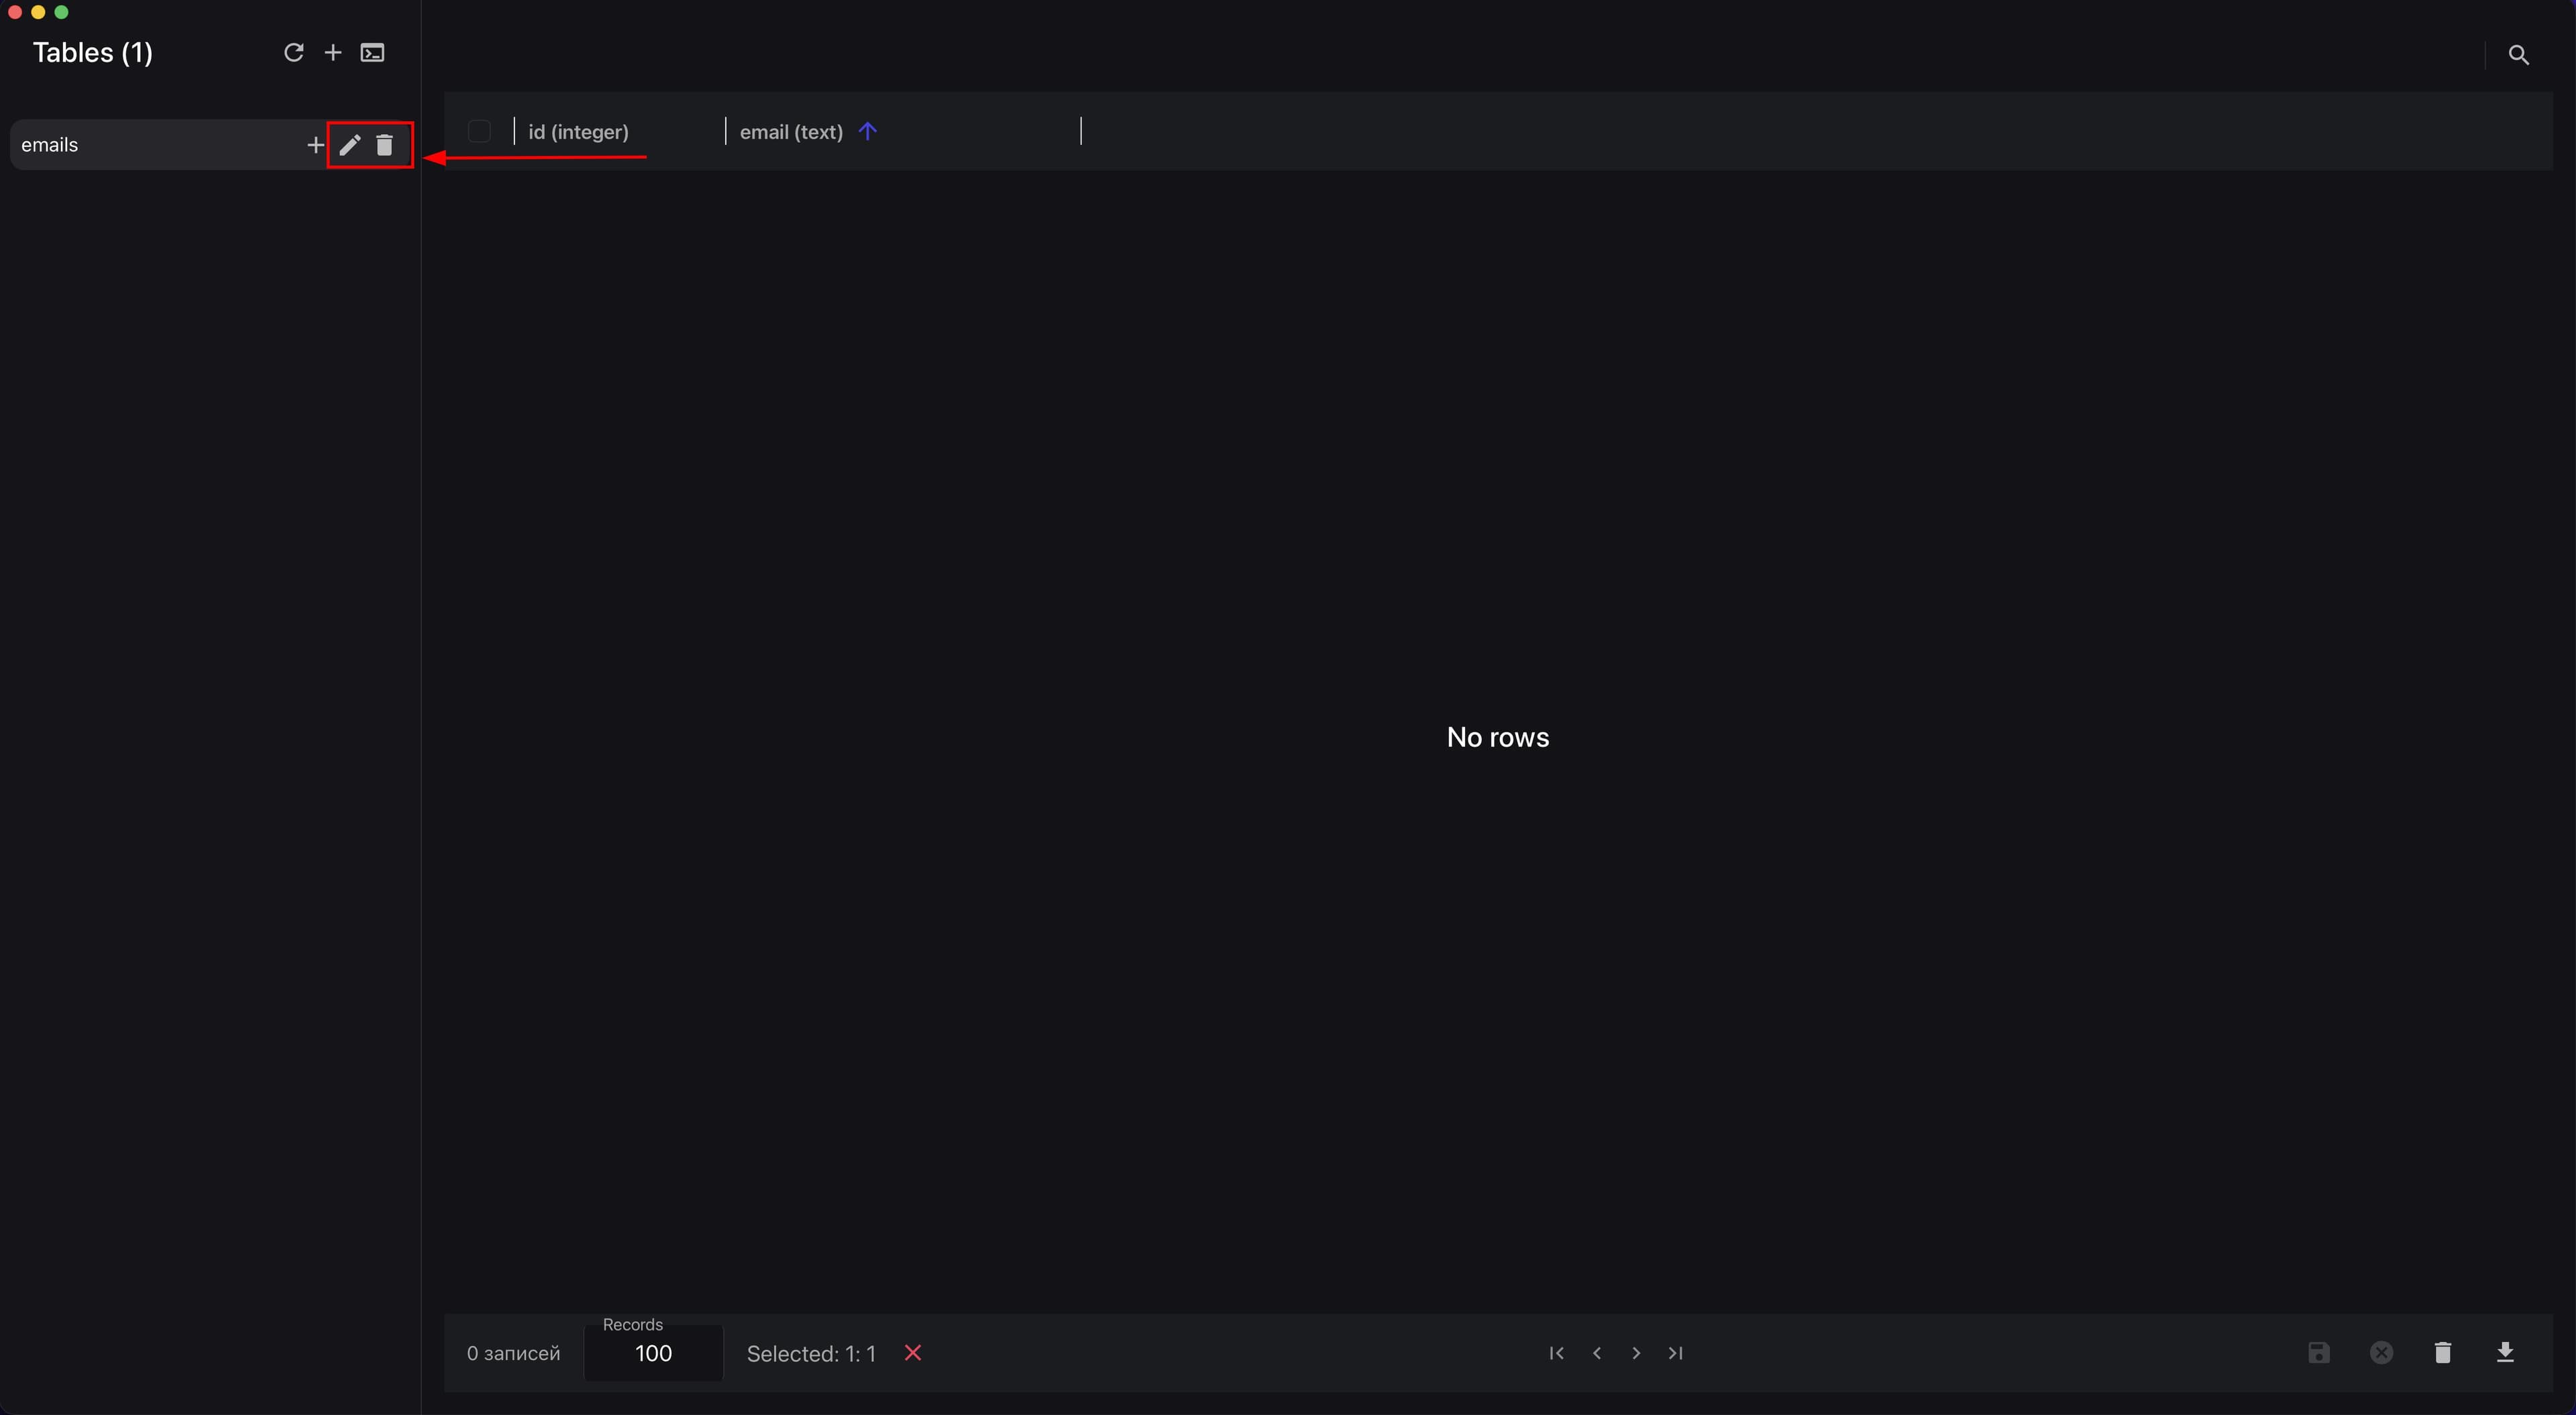
- Click the edit icon in the table row if you need to change its structure.
Through the edit icon, you can usually:
- change the table name;
- add new fields;
- delete unnecessary fields;
- change field properties.
- Click the trash icon in the table row if you need to delete the table completely.
After deleting a table, all records inside it will disappear. This action is irreversible.
The next screenshot shows a table row with icons for adding a record, editing, and deleting the table.
Adding and Editing Records#
There are two main ways to add data to a table.
Manually through the interface This option is suitable when there are not many records, you need to quickly check the logic, or you are creating test data.
-
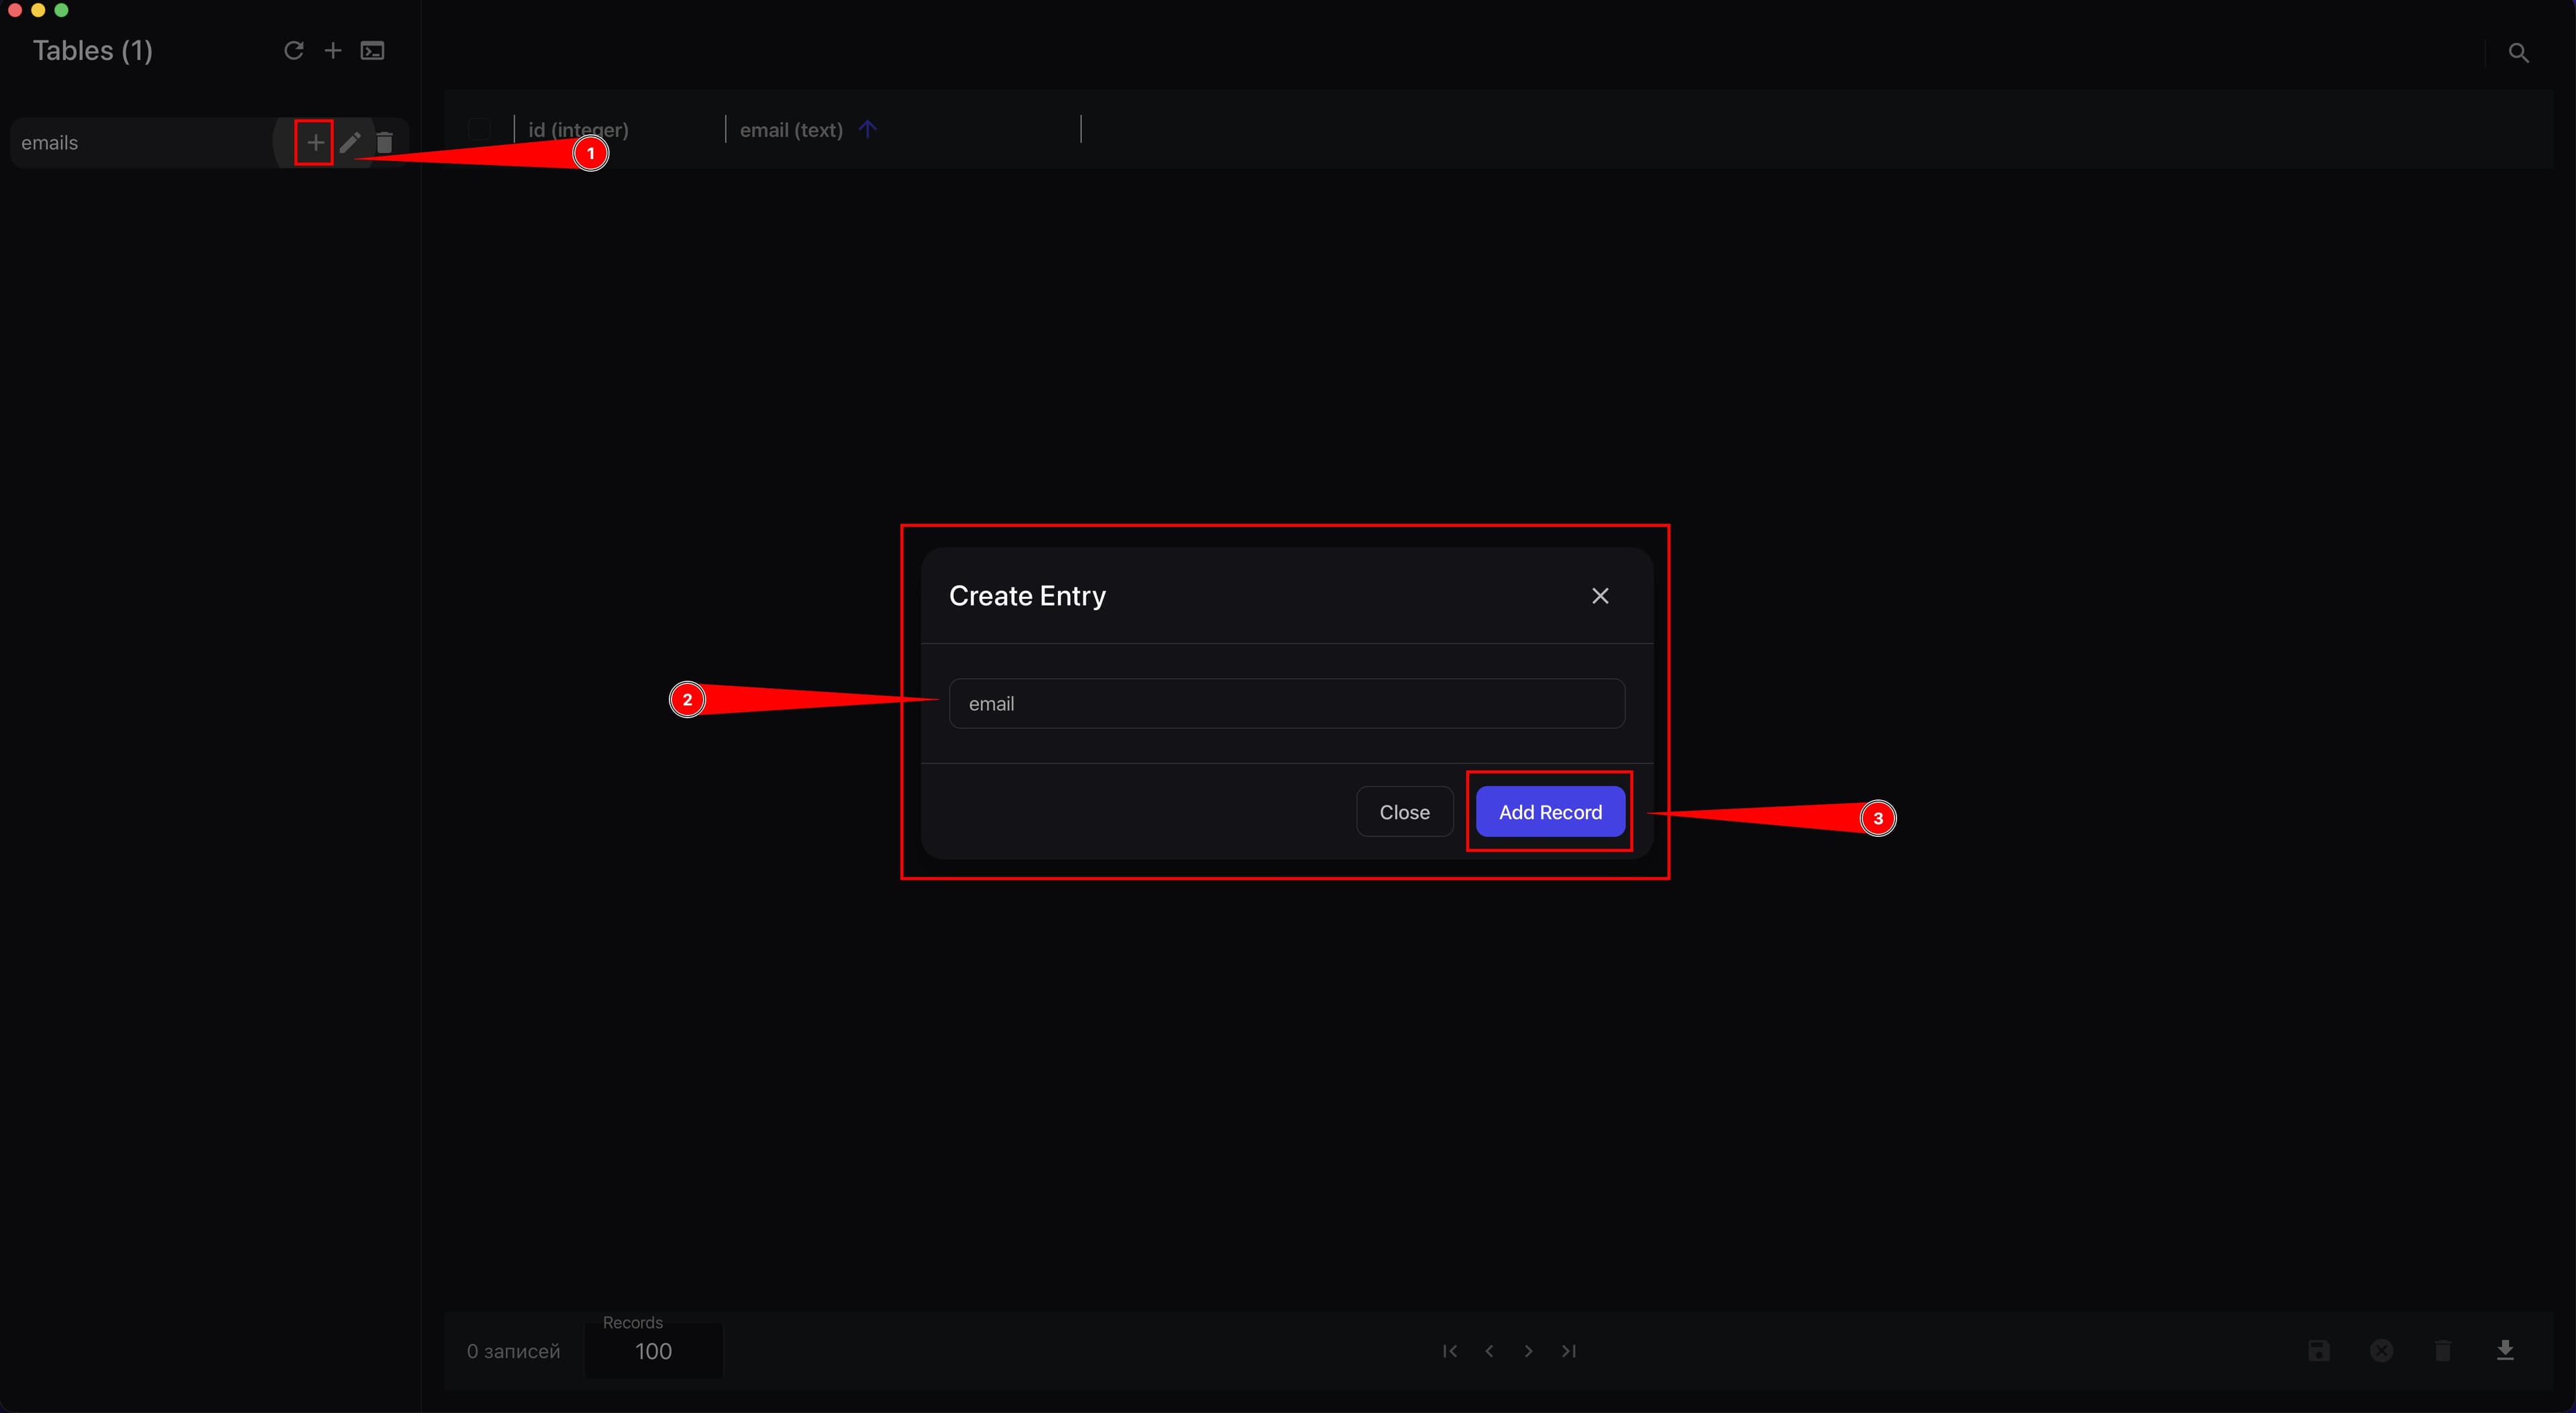
Select a table.
-
Click the add record icon.
-
Fill in the fields.
-
Click Add Record.
The screenshot below shows the "Create Entry" window for adding a new row.
Through import or pasting prepared data
This option is suitable when there is a lot of data, it already exists in Google Sheets or another spreadsheet, and you need to quickly load a large number of records.
-
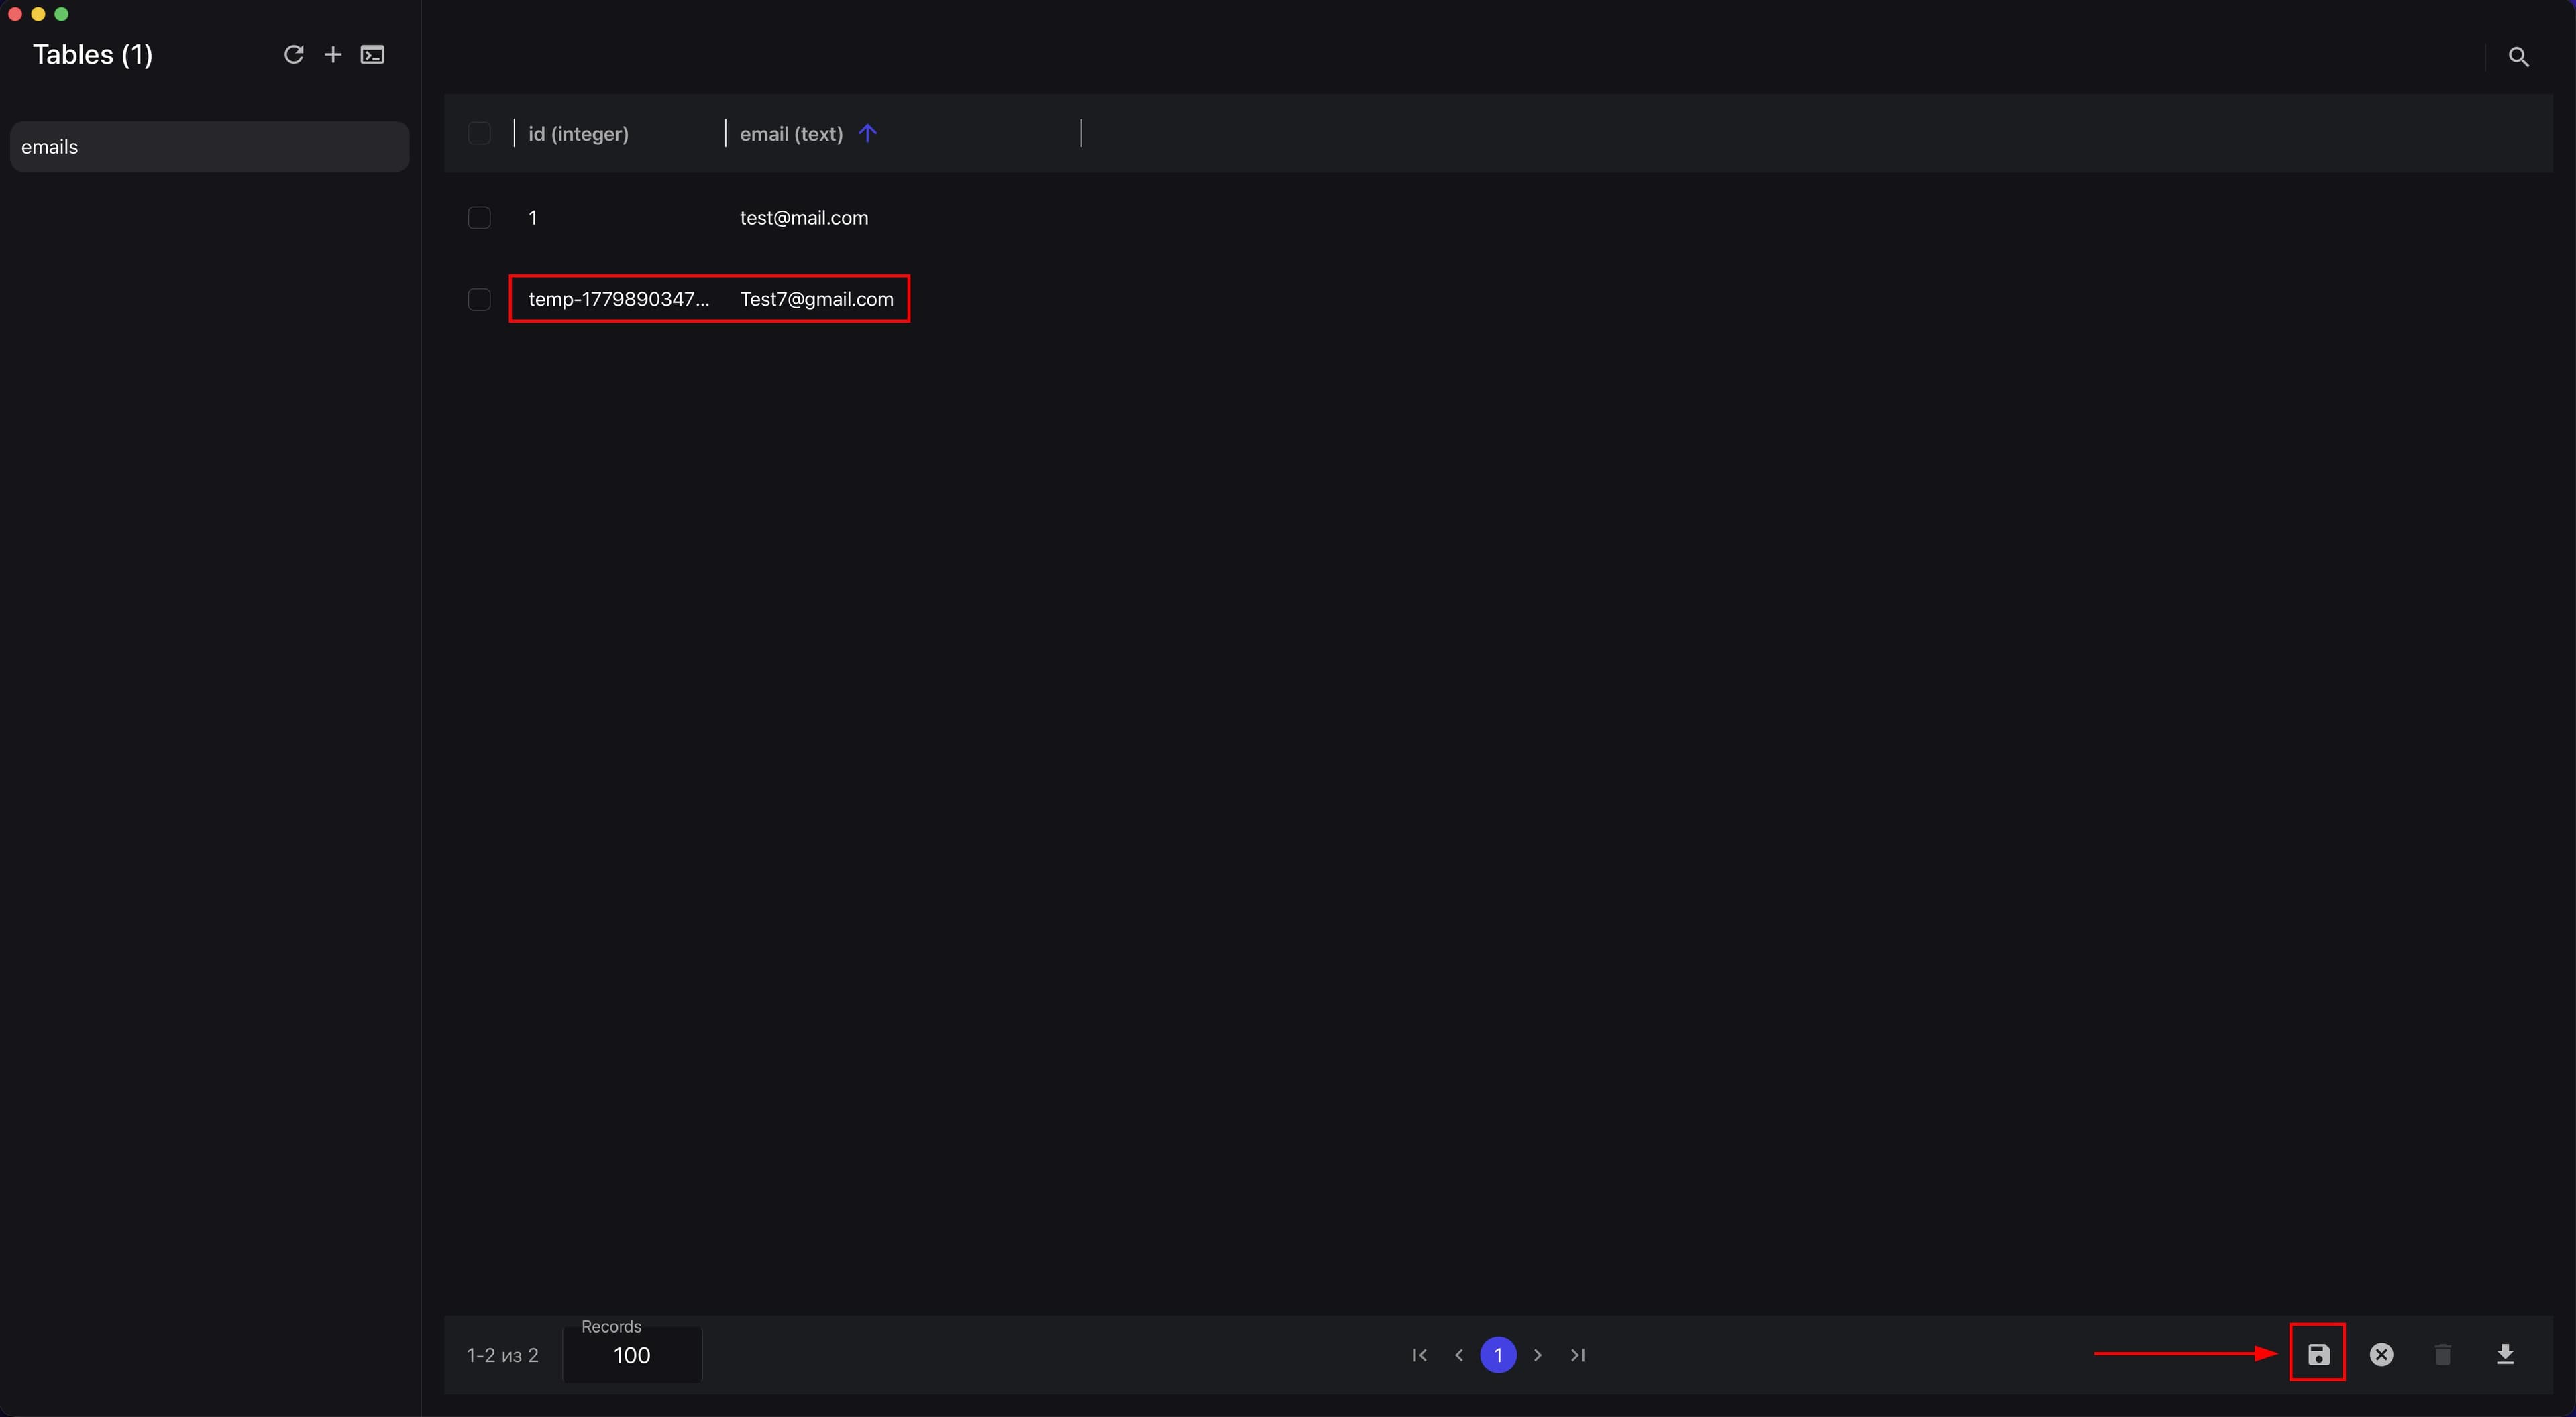
Copy the required data in
Google Sheetsin a format where the fields match the fields in the Afina table. -
Paste the data with
Ctrl+Vinto one of the fields. -
Click Save.
This screenshot shows a table with a new row after pasting data and the save changes button.
-
Double-click the required field in the data grid with the left mouse button if you need to edit a record.
-
Change the value as needed.
-
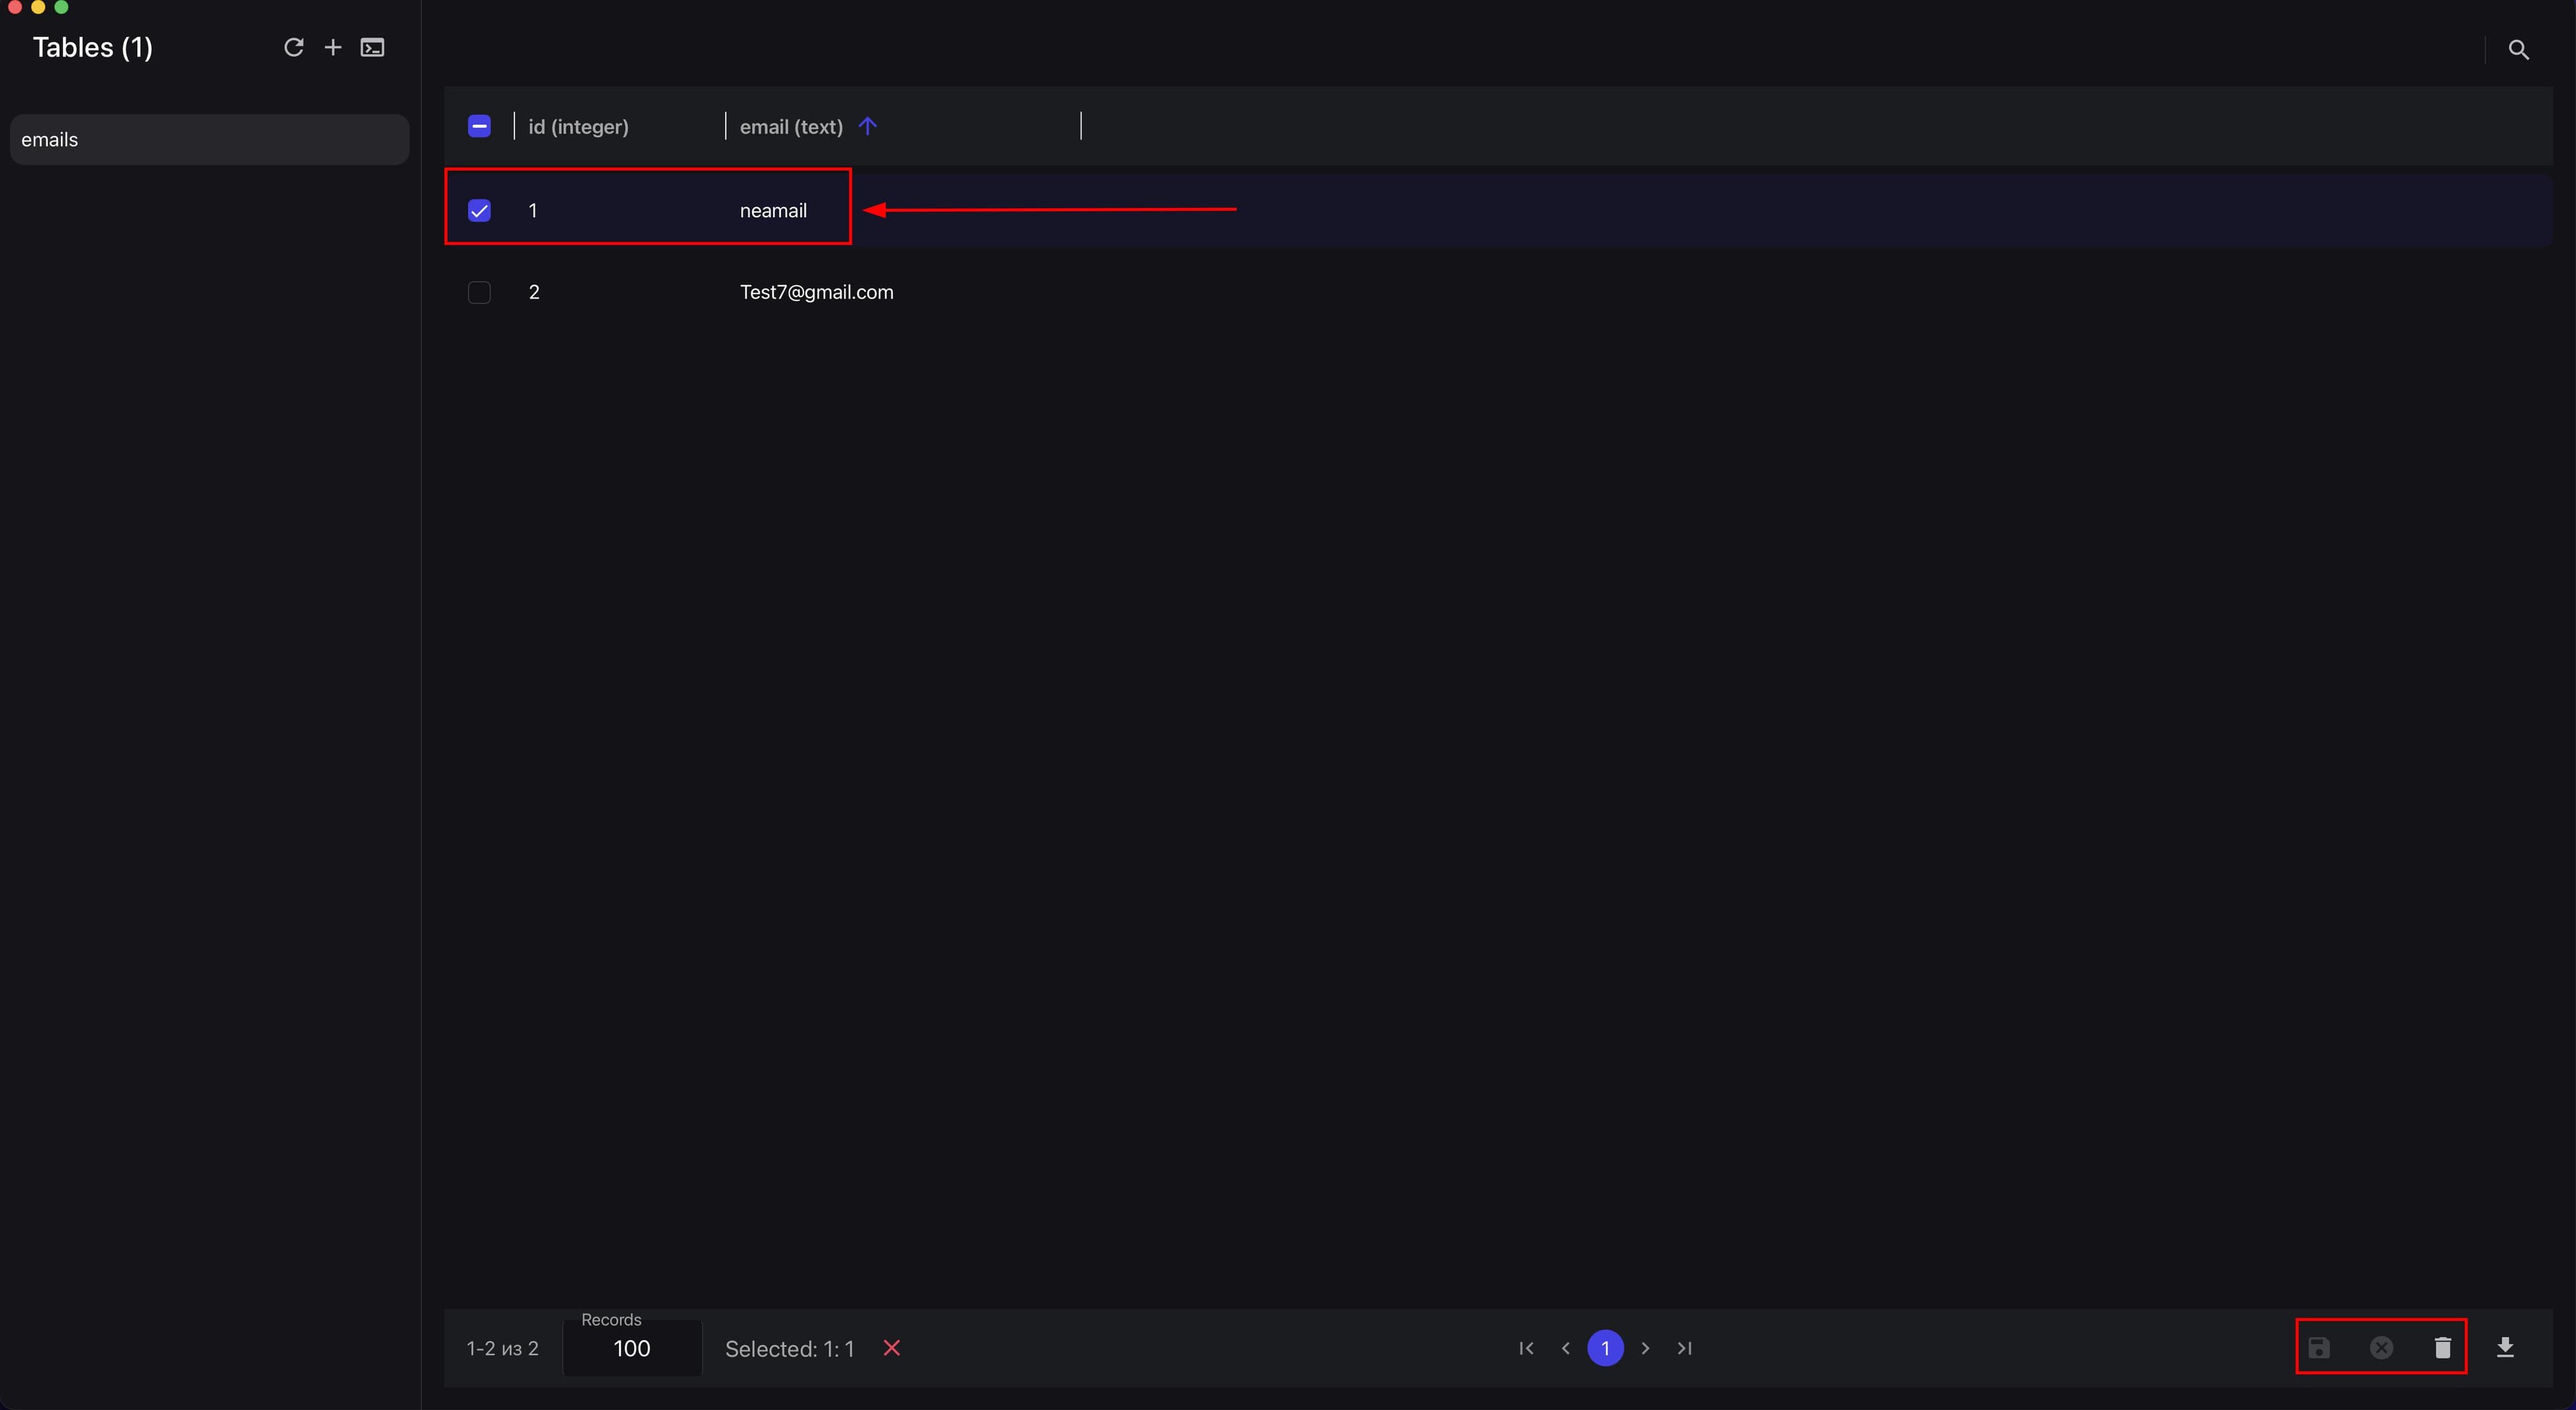
Use batch actions if you have selected several rows with checkboxes.
In this mode, the following actions may be available:
- save changes;
- cancel changes;
- delete selected records.
The next screenshot shows a data grid with a selected row and batch actions for saving, canceling, and deleting.
SQL and Work in a Script#
In addition to working through the interface, you can work with SQL directly in Afina.
This is done through the Database component in a script or through the "Query Terminal" inside the database itself.
For basic automation, it is enough to know 4 commands:
SELECT- get data;INSERT- add a record;UPDATE- update a record;DELETE- delete a record.
In practice, the most commonly used commands are:
SELECT, to check whether a record exists;INSERT, to create a new record;UPDATE, to change existing data.
It is better to move the connection to the database into a separate block at the beginning of the script.
This is important because:
- the connection is set once;
- then it is used throughout the script;
- when the database changes, you do not need to edit many places;
- the script logic becomes clearer.
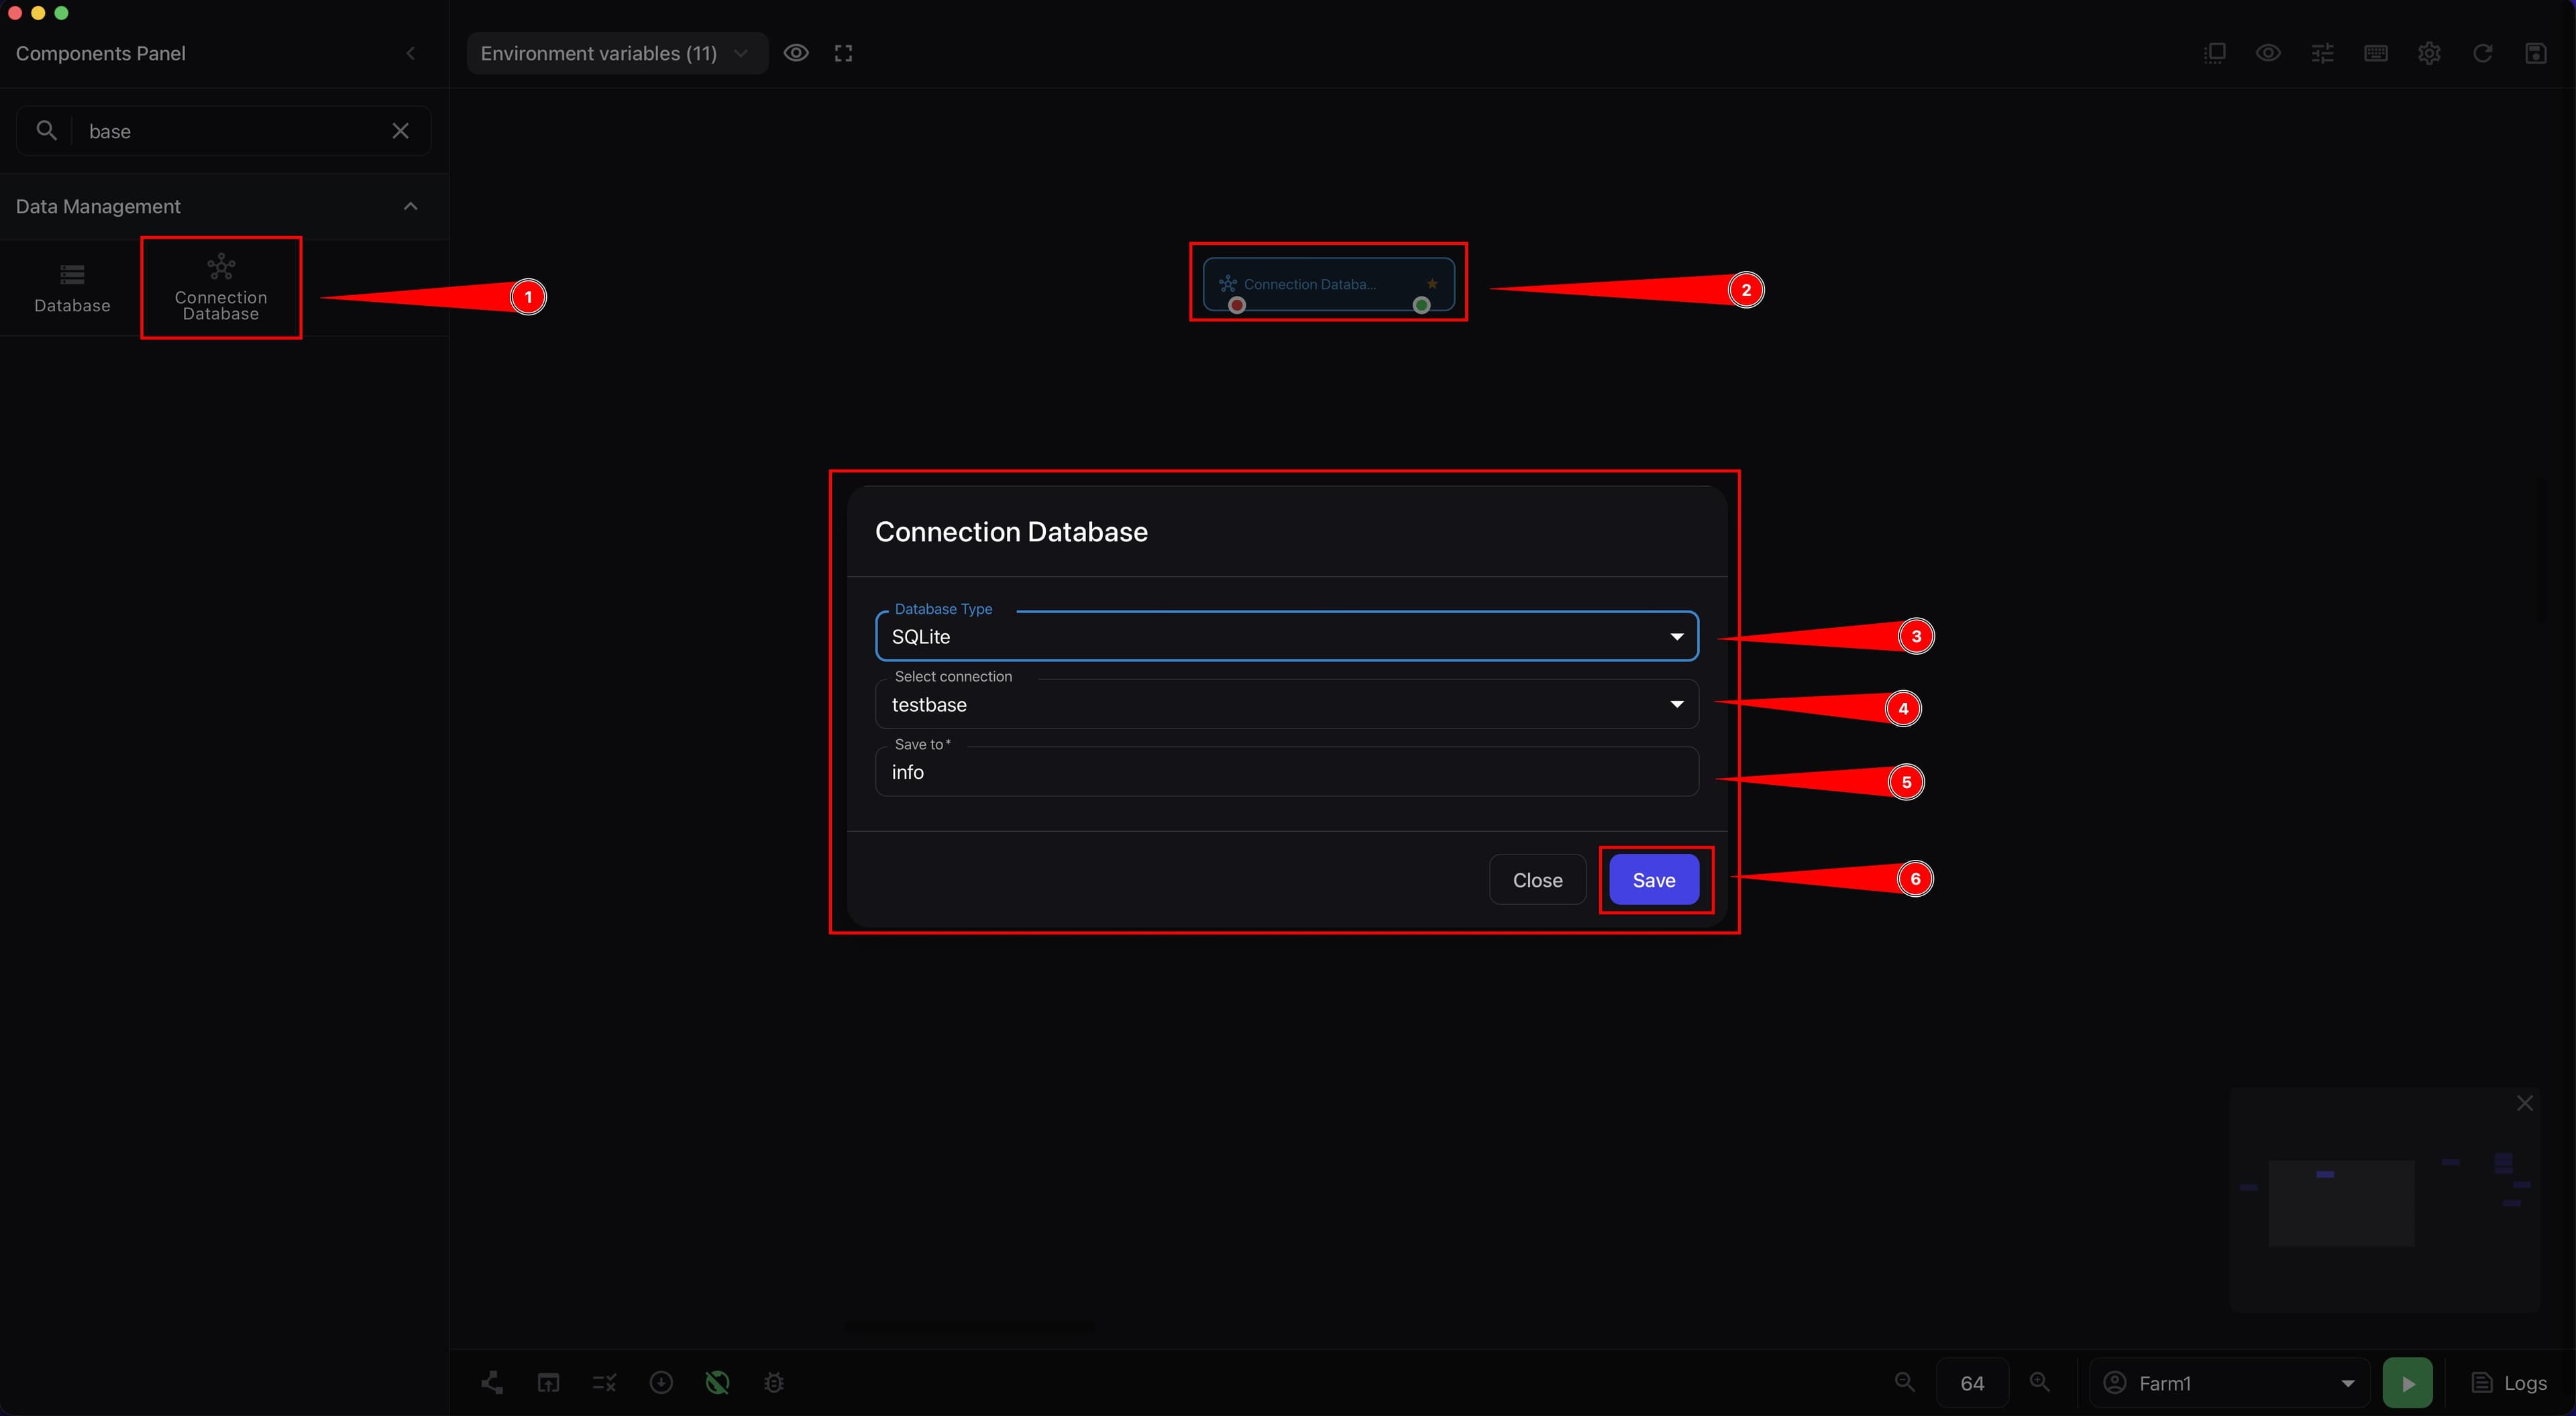
-
Go to the script canvas.
-
In the "Components Panel", find the "Connection Database" component.
-
Drag it onto the canvas at the start of the logic or to the part where work with the database begins.
-
In the "Database type" field, select
SQLite. -
In the "Select connection" field, select the required database from the list.
-
In the *"Save to " field, specify the variable name where the connection will be saved.
-
Click Save.
After that, a separate connection block will appear in the script, and you will be able to use it in other components that work with the database.
The screenshot below shows the "Connection Database" component on the script canvas with the selected SQLite type and connection.
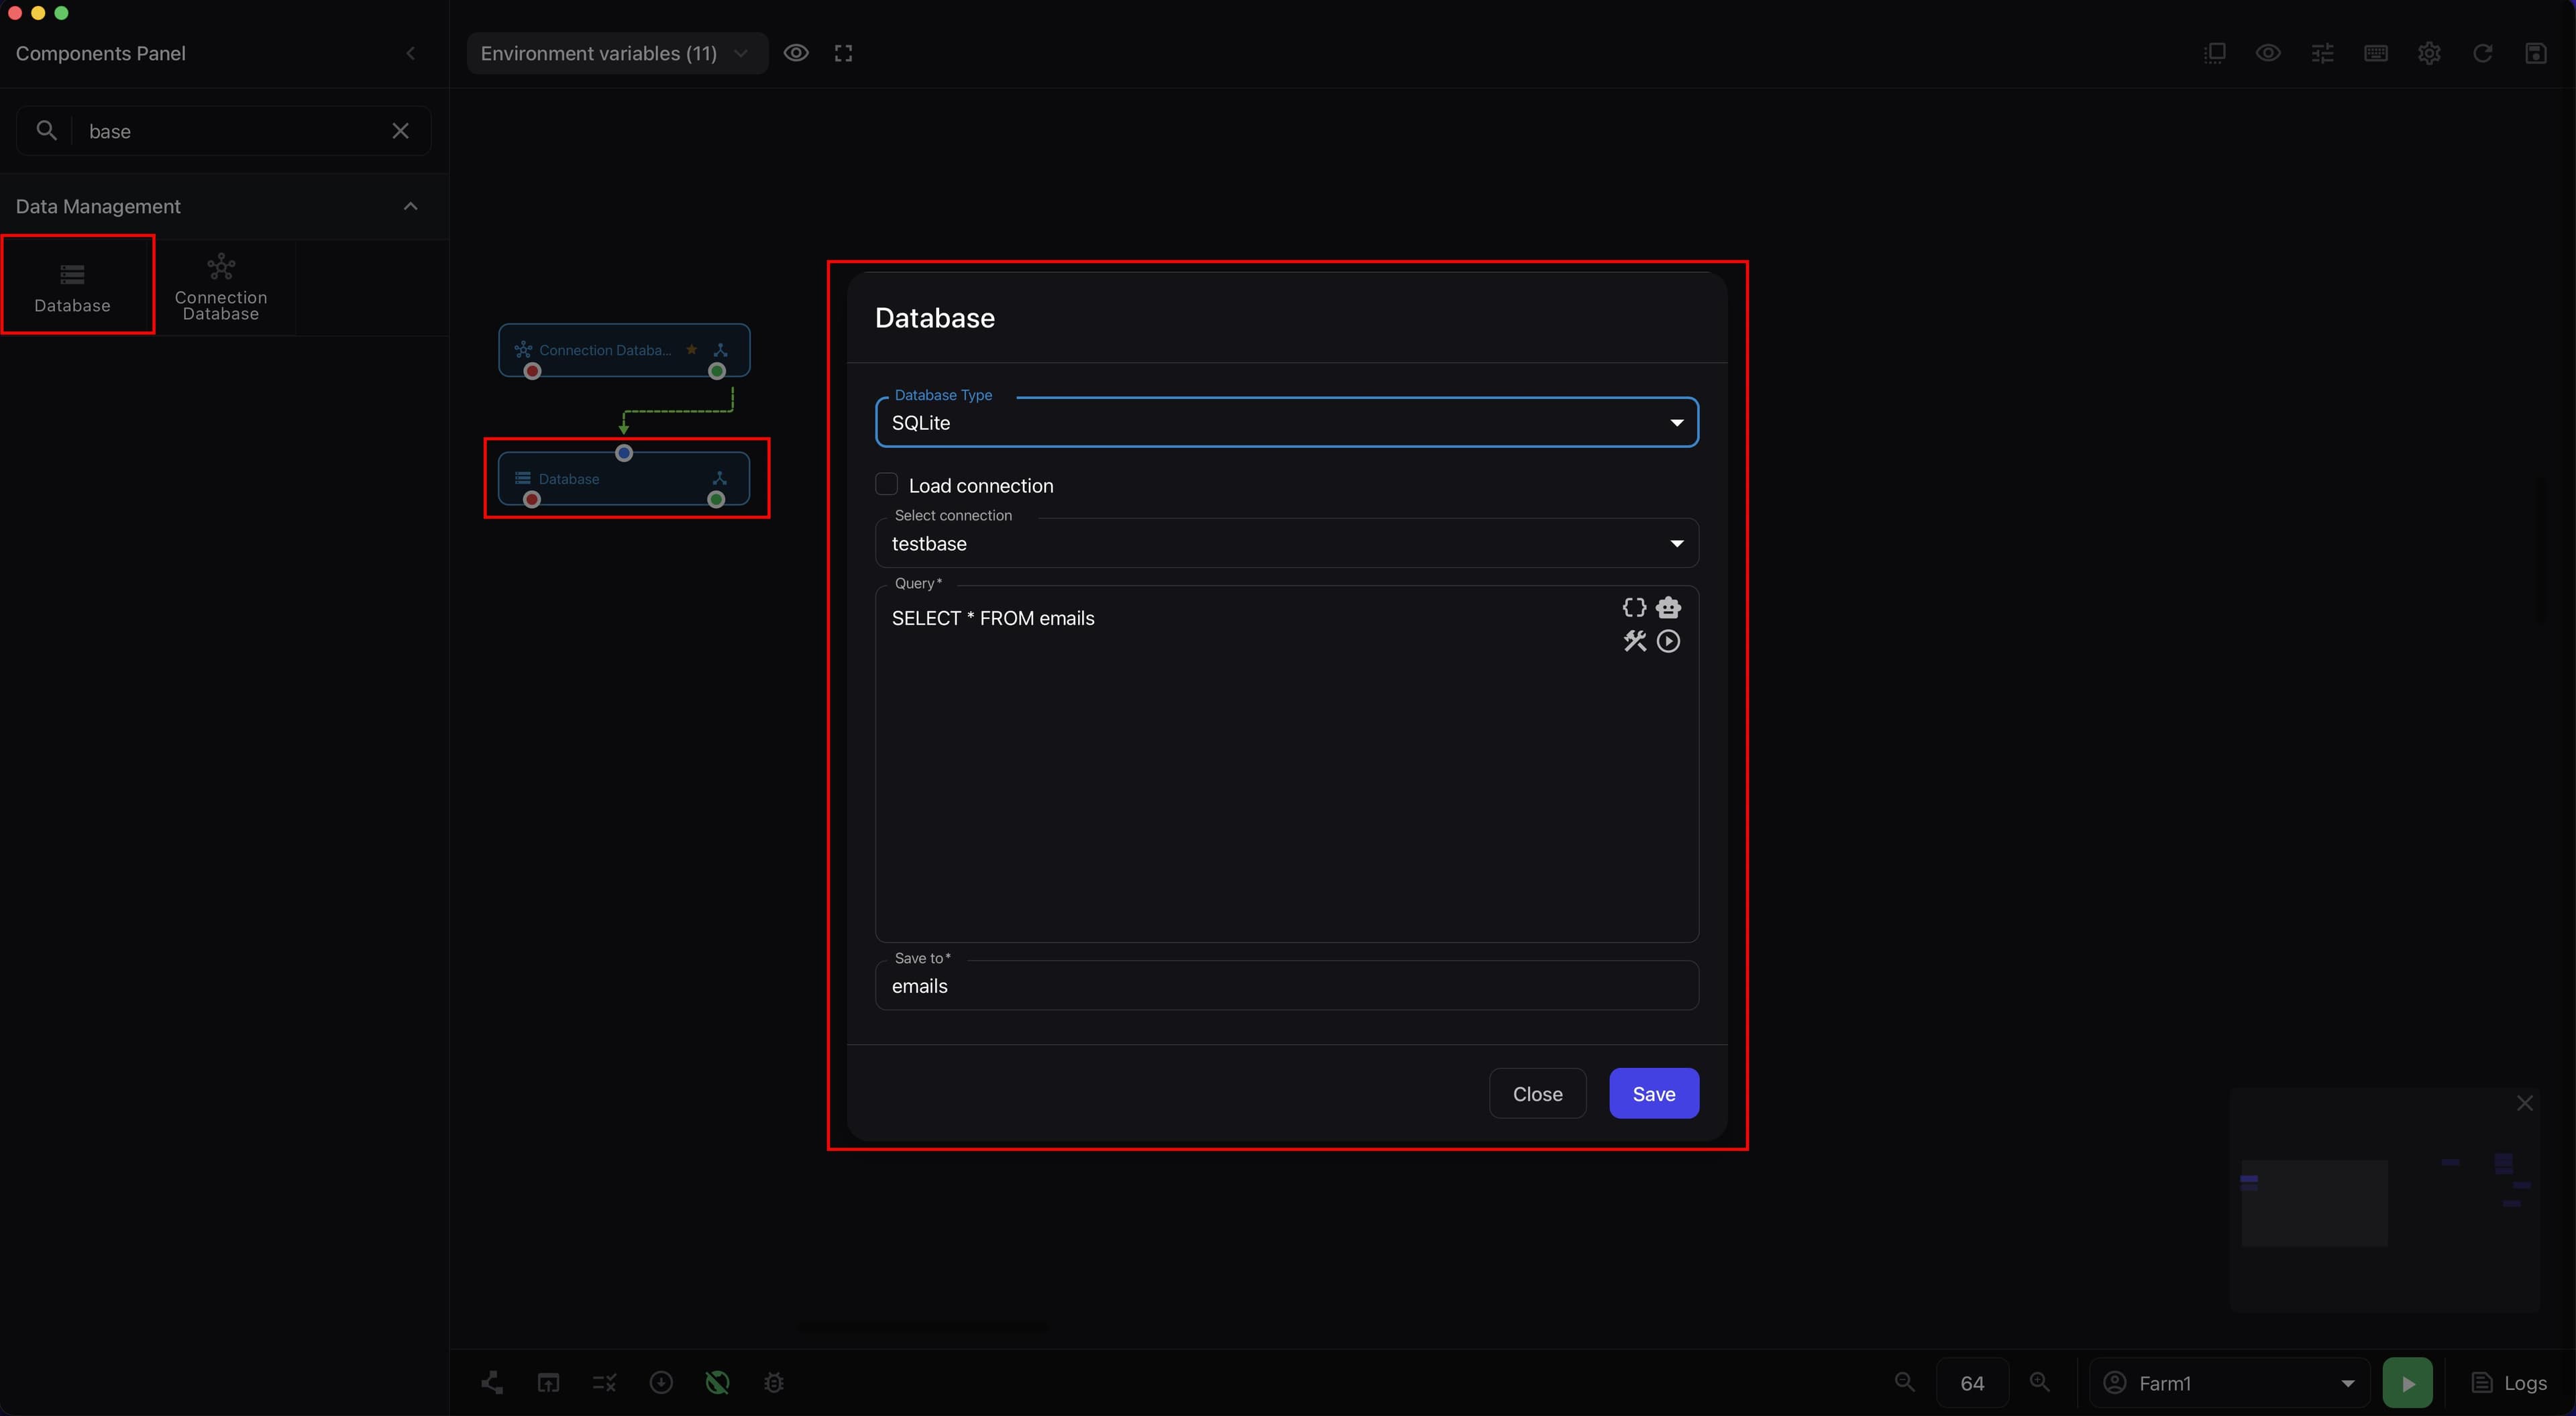
The Database component in a script usually contains:
- selection of the database type;
- connection selection;
- an SQL query field;
- saving the result to a variable.
The basic logic is:
- select a connection;
- set an SQL query;
- execute it;
- save the result to a variable;
- use the result in the next blocks.
The next screenshot shows the "Database" component on the script canvas with an SQLite connection, SQL query, and result variable.
Queries in Afina can be created:
- manually;
- through the built-in builder;
- through
ChatGPTor the built-inGPTif you have configuredAPI ChatGPTin Afina.
The builder is convenient for getting started because it helps assemble these without errors:
SELECT;INSERT;UPDATE;DELETE.
Testing Queries and Results#
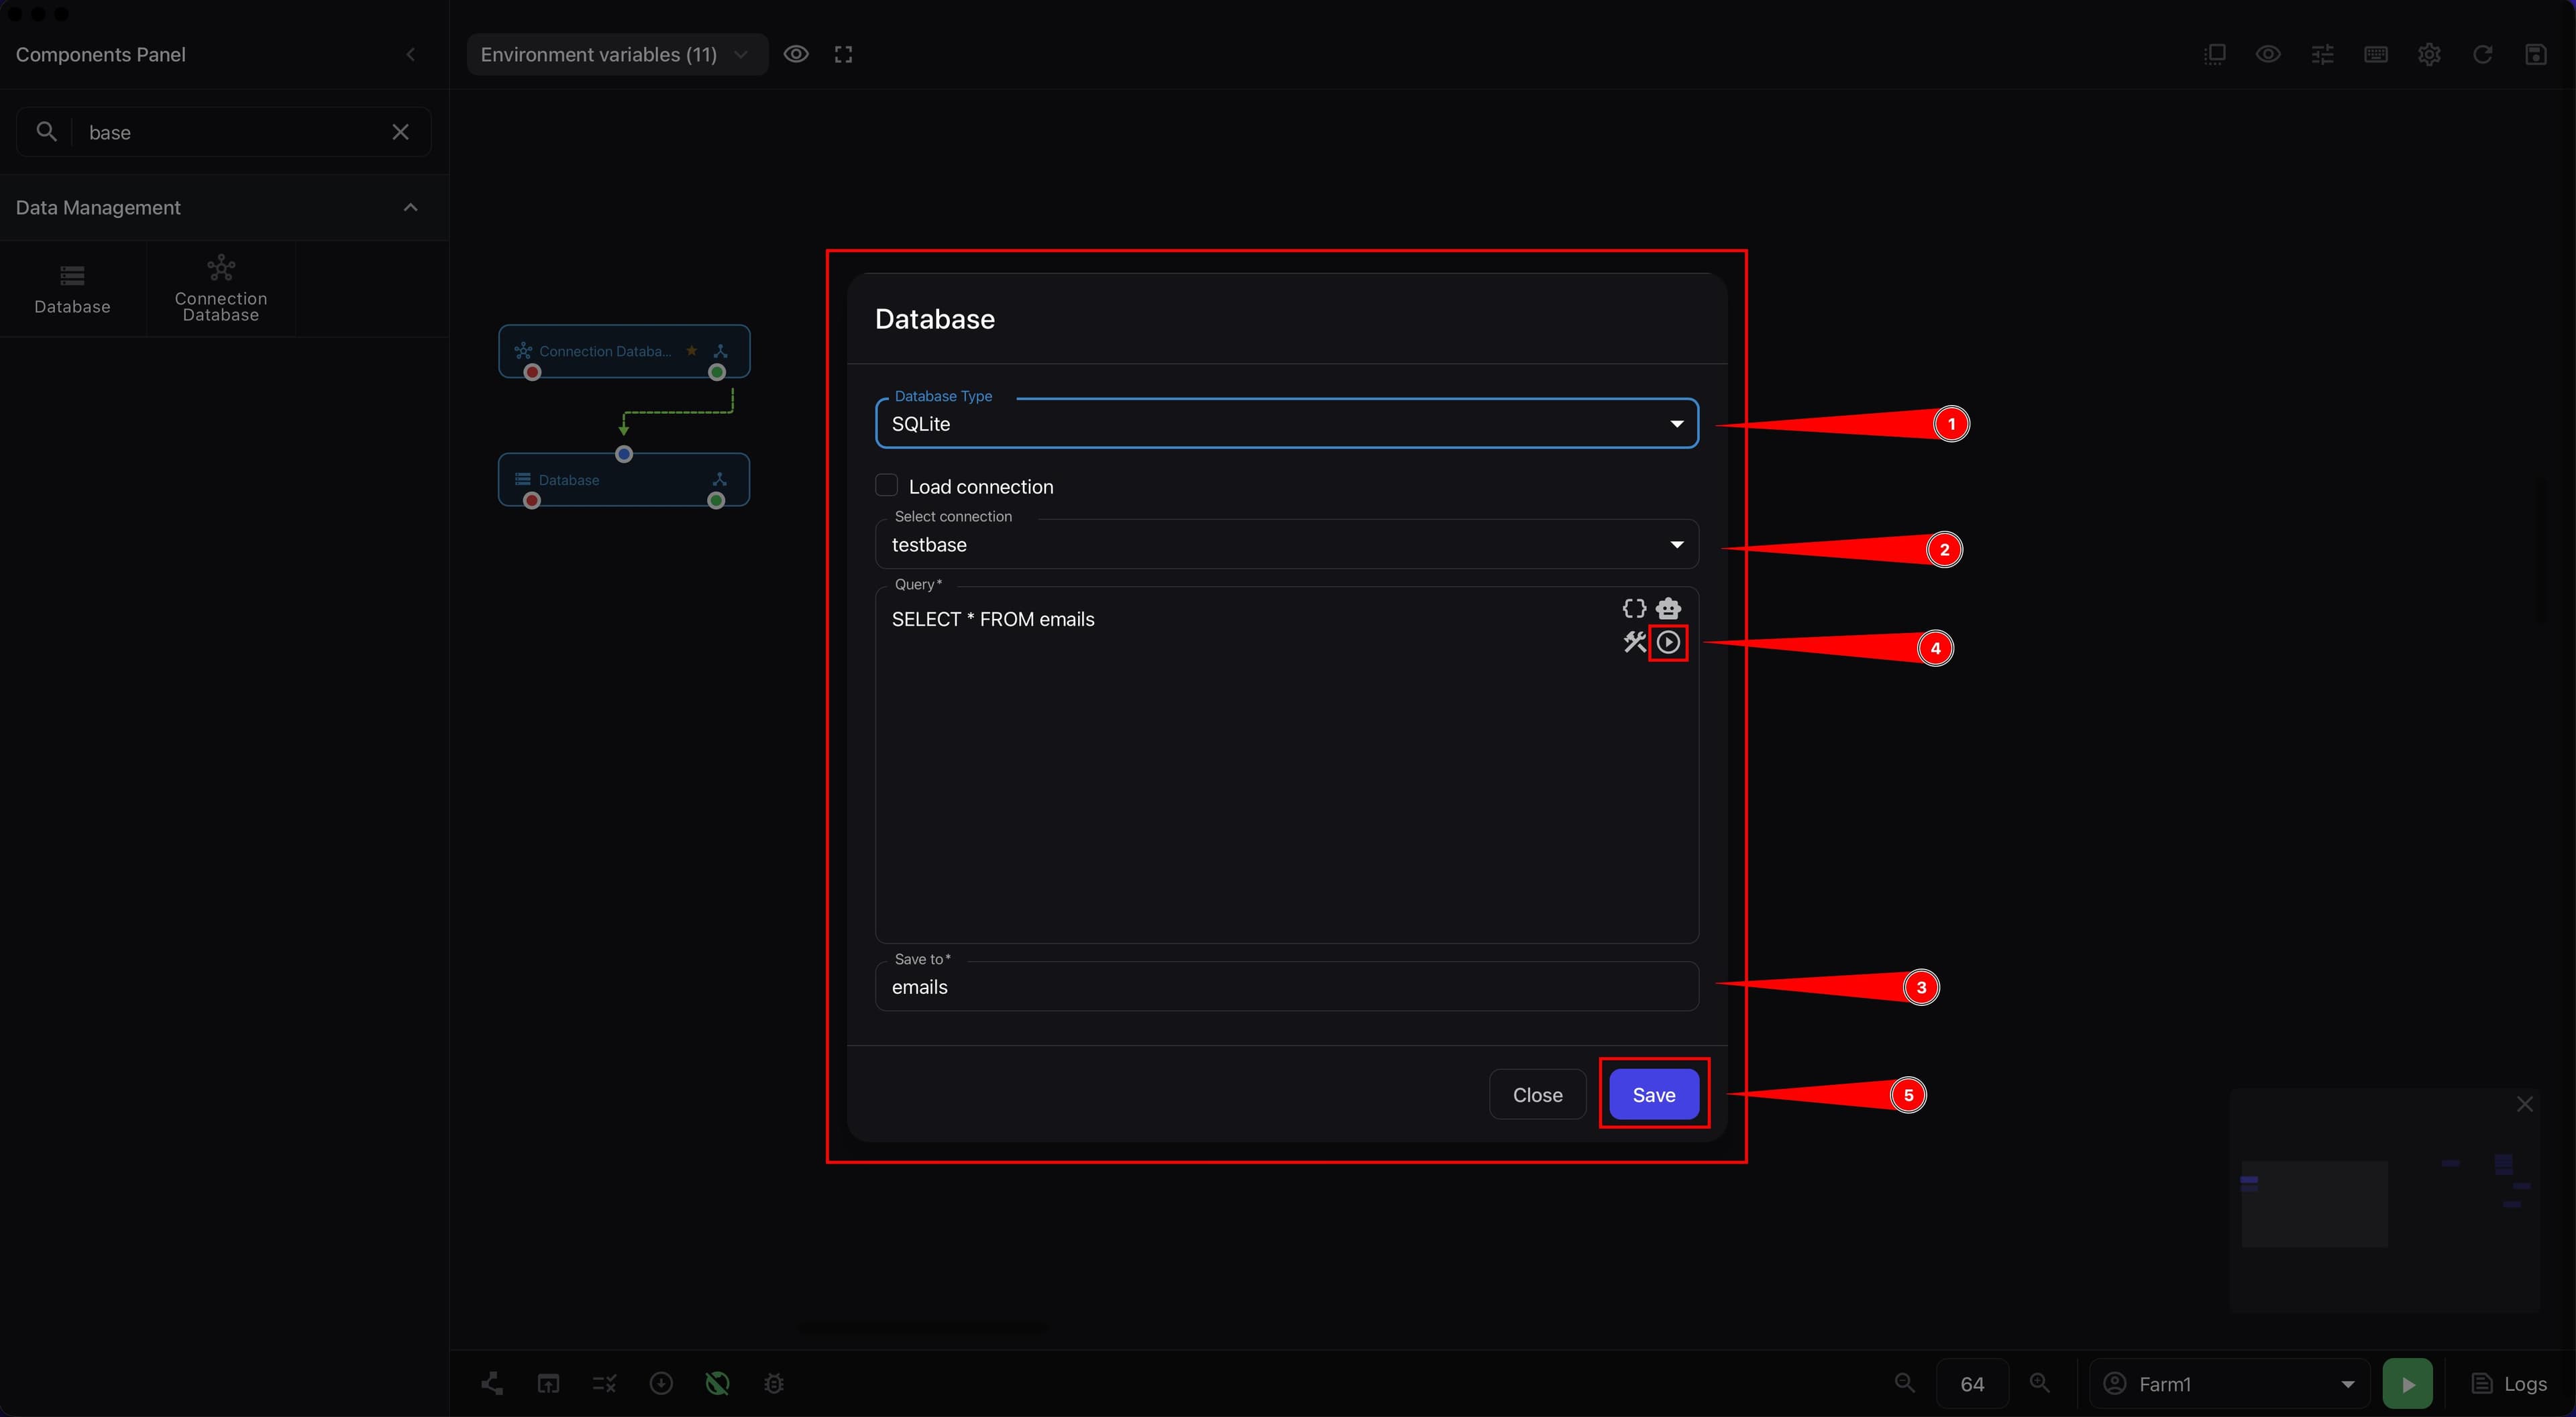
-
Add the "Database" component to the canvas if you want to test an SQL query separately.
-
In the "Database type" field, select
SQLite. -
In the "Select connection" field, select the required database.
-
In the *"Query " field, enter the SQL query you want to check.
For testing, it is most convenient to start with a simple SELECT, for example SELECT * FROM emails.
-
In the *"Save to " field, specify the variable name where the result will be saved, for example
emails. -
Click the test or execute query button in the component.
-
Review the query execution result.
If the query is correct, you will immediately see the result as an array of records.
This is convenient because you can:
- check whether the database is connected correctly;
- see exactly what data
SELECTreturns; - quickly find an error in the syntax or table name;
- avoid running the entire script just to check one query.
The screenshot below shows the "Test query" window with an SQL SELECT query and the execute button.
The next screenshot shows the result of a test SQL query as an array of records.
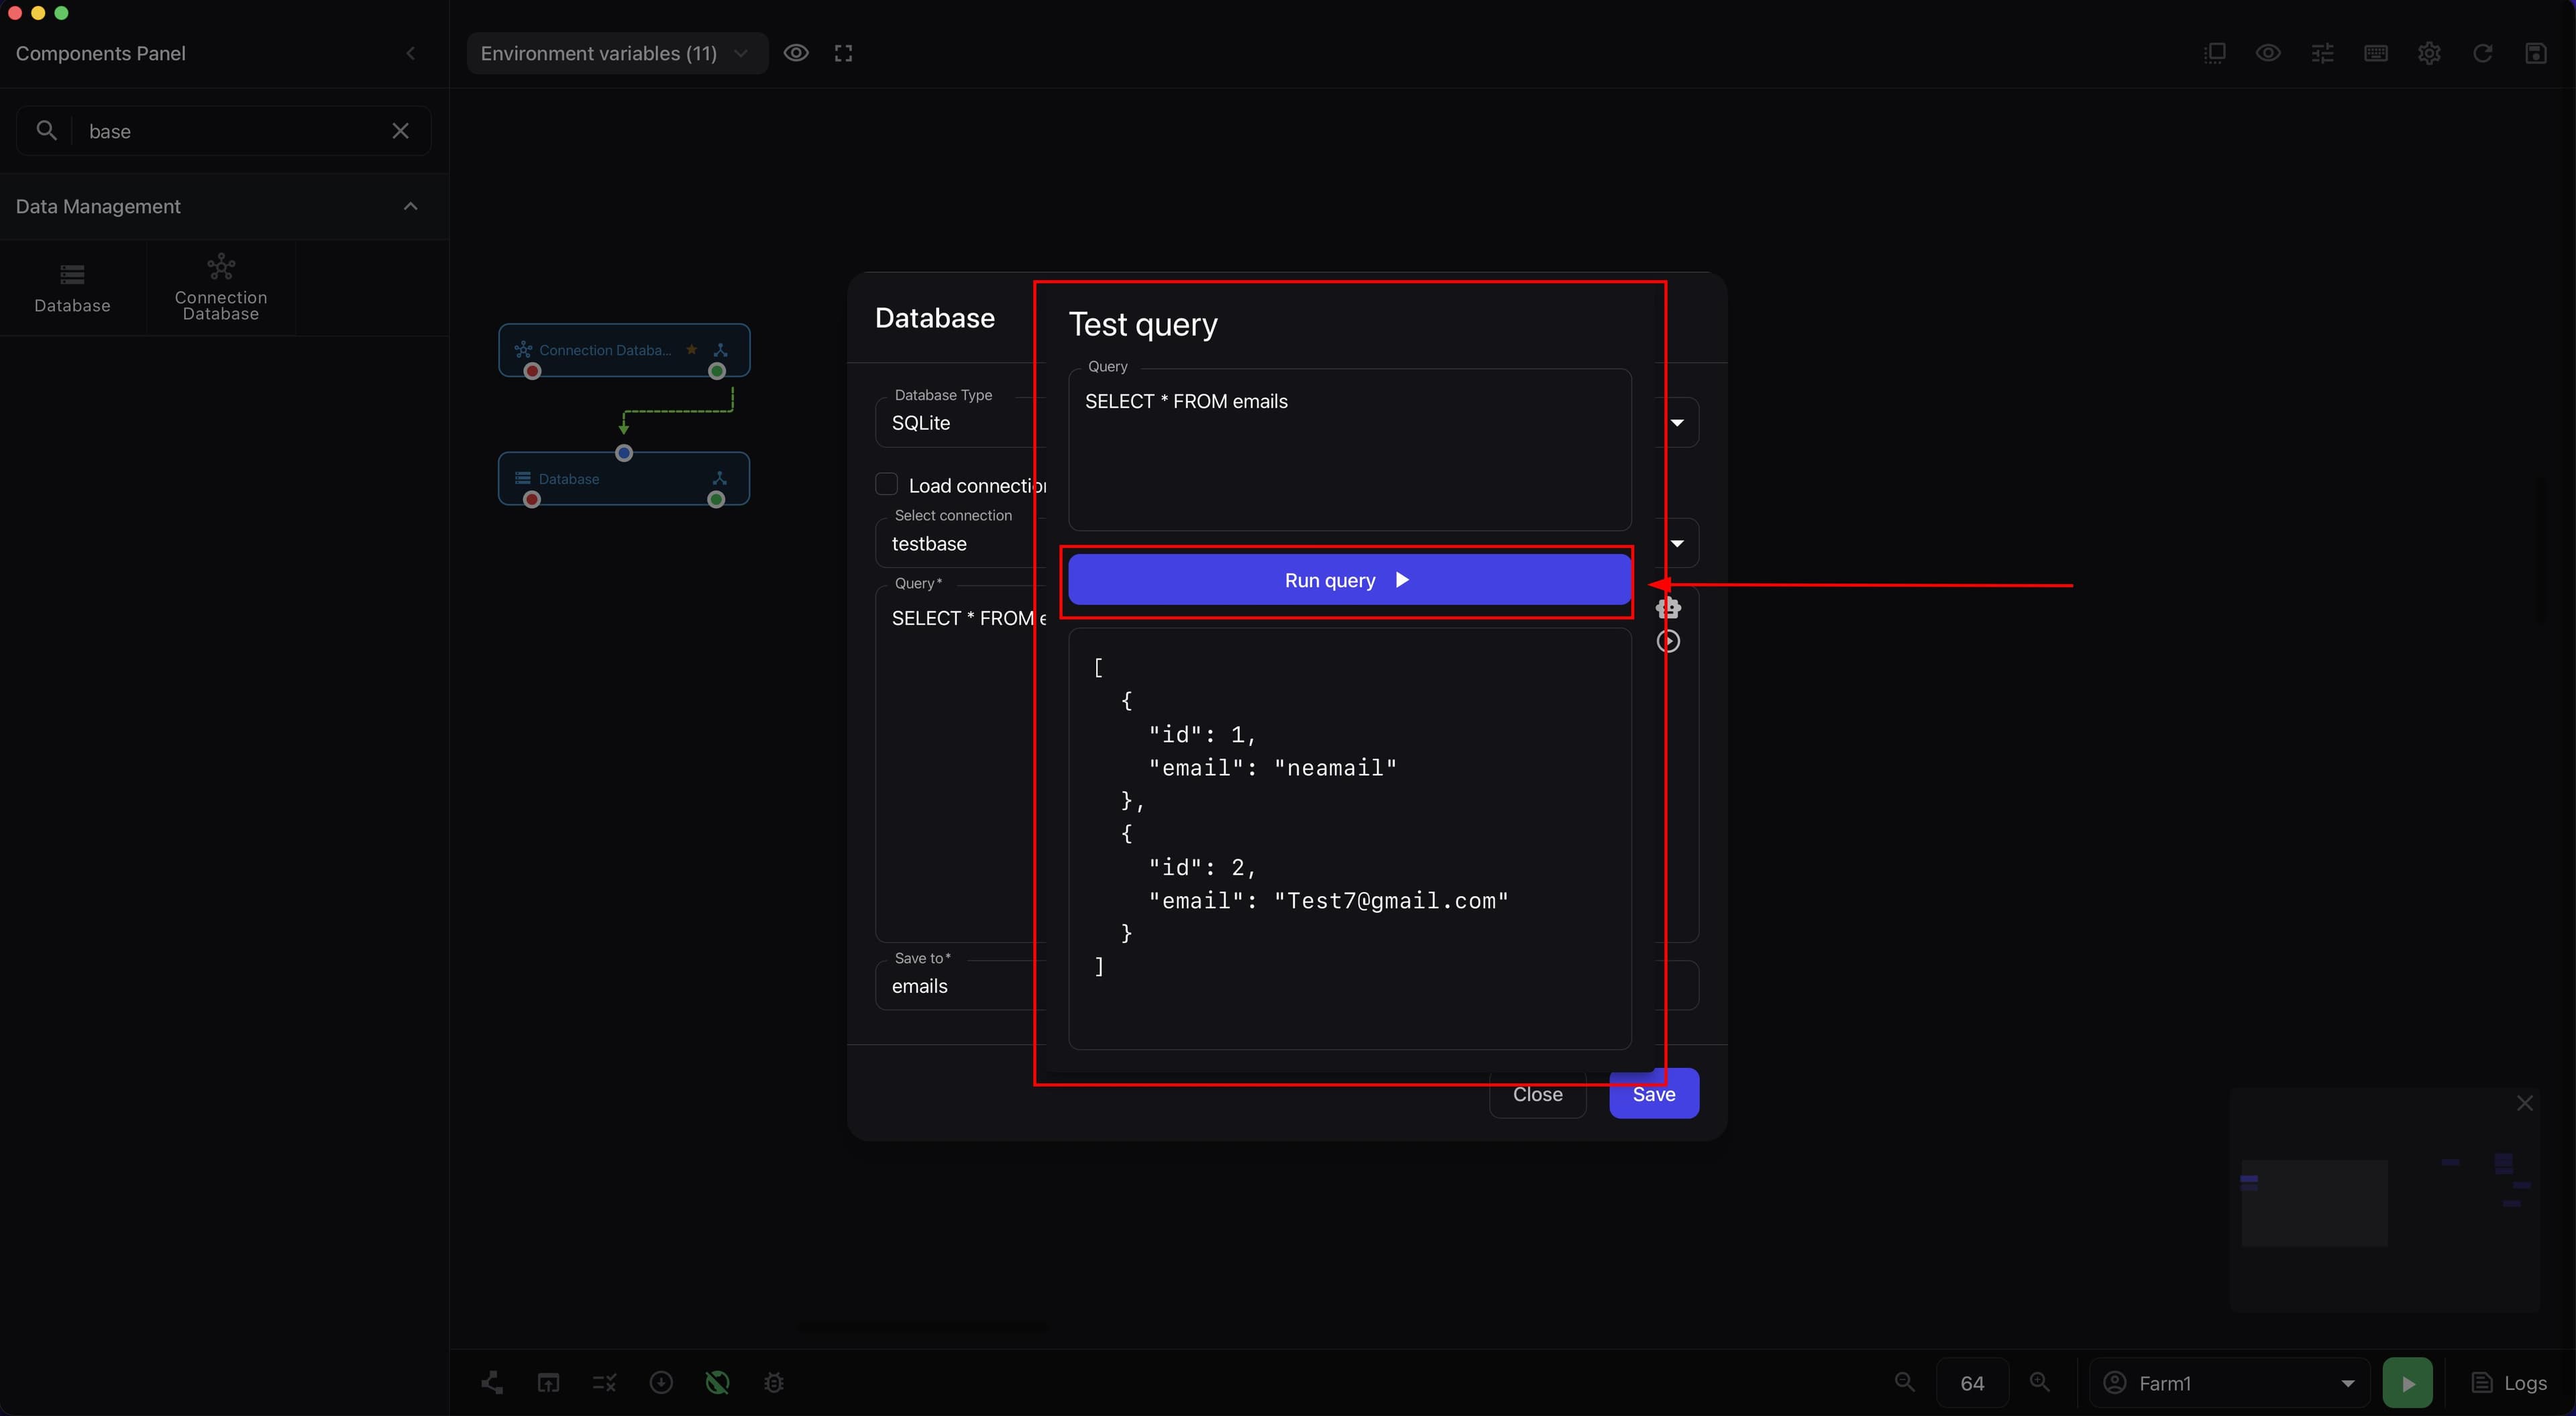
The SELECT result in Afina usually comes as an array of rows.
If you saved the result to the emails variable, access to values looks like this:
${emails[0].email};${emails[0].address};${emails[0].balance}.
Here:
[0]- the first row of the result;.email,.address,.balance- column names.
It is better to build the condition in IF not on the entire array, but on a specific field.
For example:
- whether
${emails[0].address}exists; - whether
${emails[0].balance}exists.
This is how users usually decide:
- whether to run
INSERT; - whether to run
UPDATE.
Result#
After completing these steps, you will have a complete basic workflow for working with databases in Afina: you will be able to create or connect a SQLite database, import or export it through SQL dump, create tables, add and edit records, run SQL queries, and use results in scripts through a separate connection block and the Database component.
Signs of a Successful Result
- you understand what a database is in the context of Afina;
- you know why Afina works conveniently with a local
.dbfile; - you understand what
SQLiteis; - you can create a new database;
- you can connect an existing
.dbfile; - you understand what
SQL dumpis; - you can create a table manually;
- you can add a record;
- you understand how
SELECT,INSERT,UPDATE, andDELETEwork; - you know how to get a value from a
SELECTresult; - you understand when and why to use
SQL dump.
If Something Does Not Work as Expected
- if the
SELECTresult exists but the value is not retrieved, access it in the format${yourVariable[0].column_name}; - if duplicates appear in a table, add
UNIQUEfor critical fields and check the record withSELECTbeforeINSERT; - if after changing a database you have to edit a script in several places, move the connection to a separate block or variable;
- if you cannot create a table, check that there is a table name and at least one field with a name and type;
- if import or export works incorrectly, close active processes, check the file, and repeat the operation;
- if you do not see the required database in the list, clear the search field, check filters, and refresh the list.