How to create and use modules in Afina#
In this guide, you will create a simple module for Afina using a percentage-of-a-number calculation as an example, prepare it correctly with ChatGPT or another AI model, add it to Afina, and check the result. The guide also covers the basic details of working with modules: file structure, tags, folders, signature, re-signing, use in scripts, export, import, and safe work with AI models.
Before you start#
- Prepare a code editor for working with module files.
- For a start, it is most convenient to use VS Code or Cursor.
- If you plan to create a module with ChatGPT or another AI model, do not start by generating the structure from scratch.
A module is JS code that becomes a custom component for developing scripts in Afina. In simpler terms, modules are needed for tasks that:
- cannot be implemented with standard Afina components;
- or are very difficult or inconvenient to build with standard components.
Modules in Afina are created in JavaScript. The "Modules" section is used to create, store, organize, import, export, and reuse modules.
Modules can be created:
- manually, if you know programming;
- or with ChatGPT or another AI model.
This guide focuses specifically on working with AI models so you can implement simple and medium-complexity ideas faster.
If you do not have a code editor yet, the simplest free option to start with is VS Code.
Do not ask an AI model to invent an Afina module from scratch without an example of the real structure. This most often leads to incorrect files, the wrong format, or import errors.
A module or script without an up-to-date signature will not work. If you manually changed module or script files, check the signature status before launch and re-sign only after checking the code.
Module preparation#
This guide uses a simple module called "Percentage of a Number" as an example. Its logic is:
- the user enters a number;
- the user enters a percentage;
- the module calculates the result using the formula
number × percentage / 100; - the module returns the finished value.
This example is convenient because it makes it easy to show the full workflow:
- creating a module;
- preparing the structure;
- generating code with an AI model;
- saving files;
- checking in Afina;
- export and repeated import.
- Go to the Modules section in the left navigation panel.
The screenshot below shows the "Modules" section in the left Afina menu with an empty list.
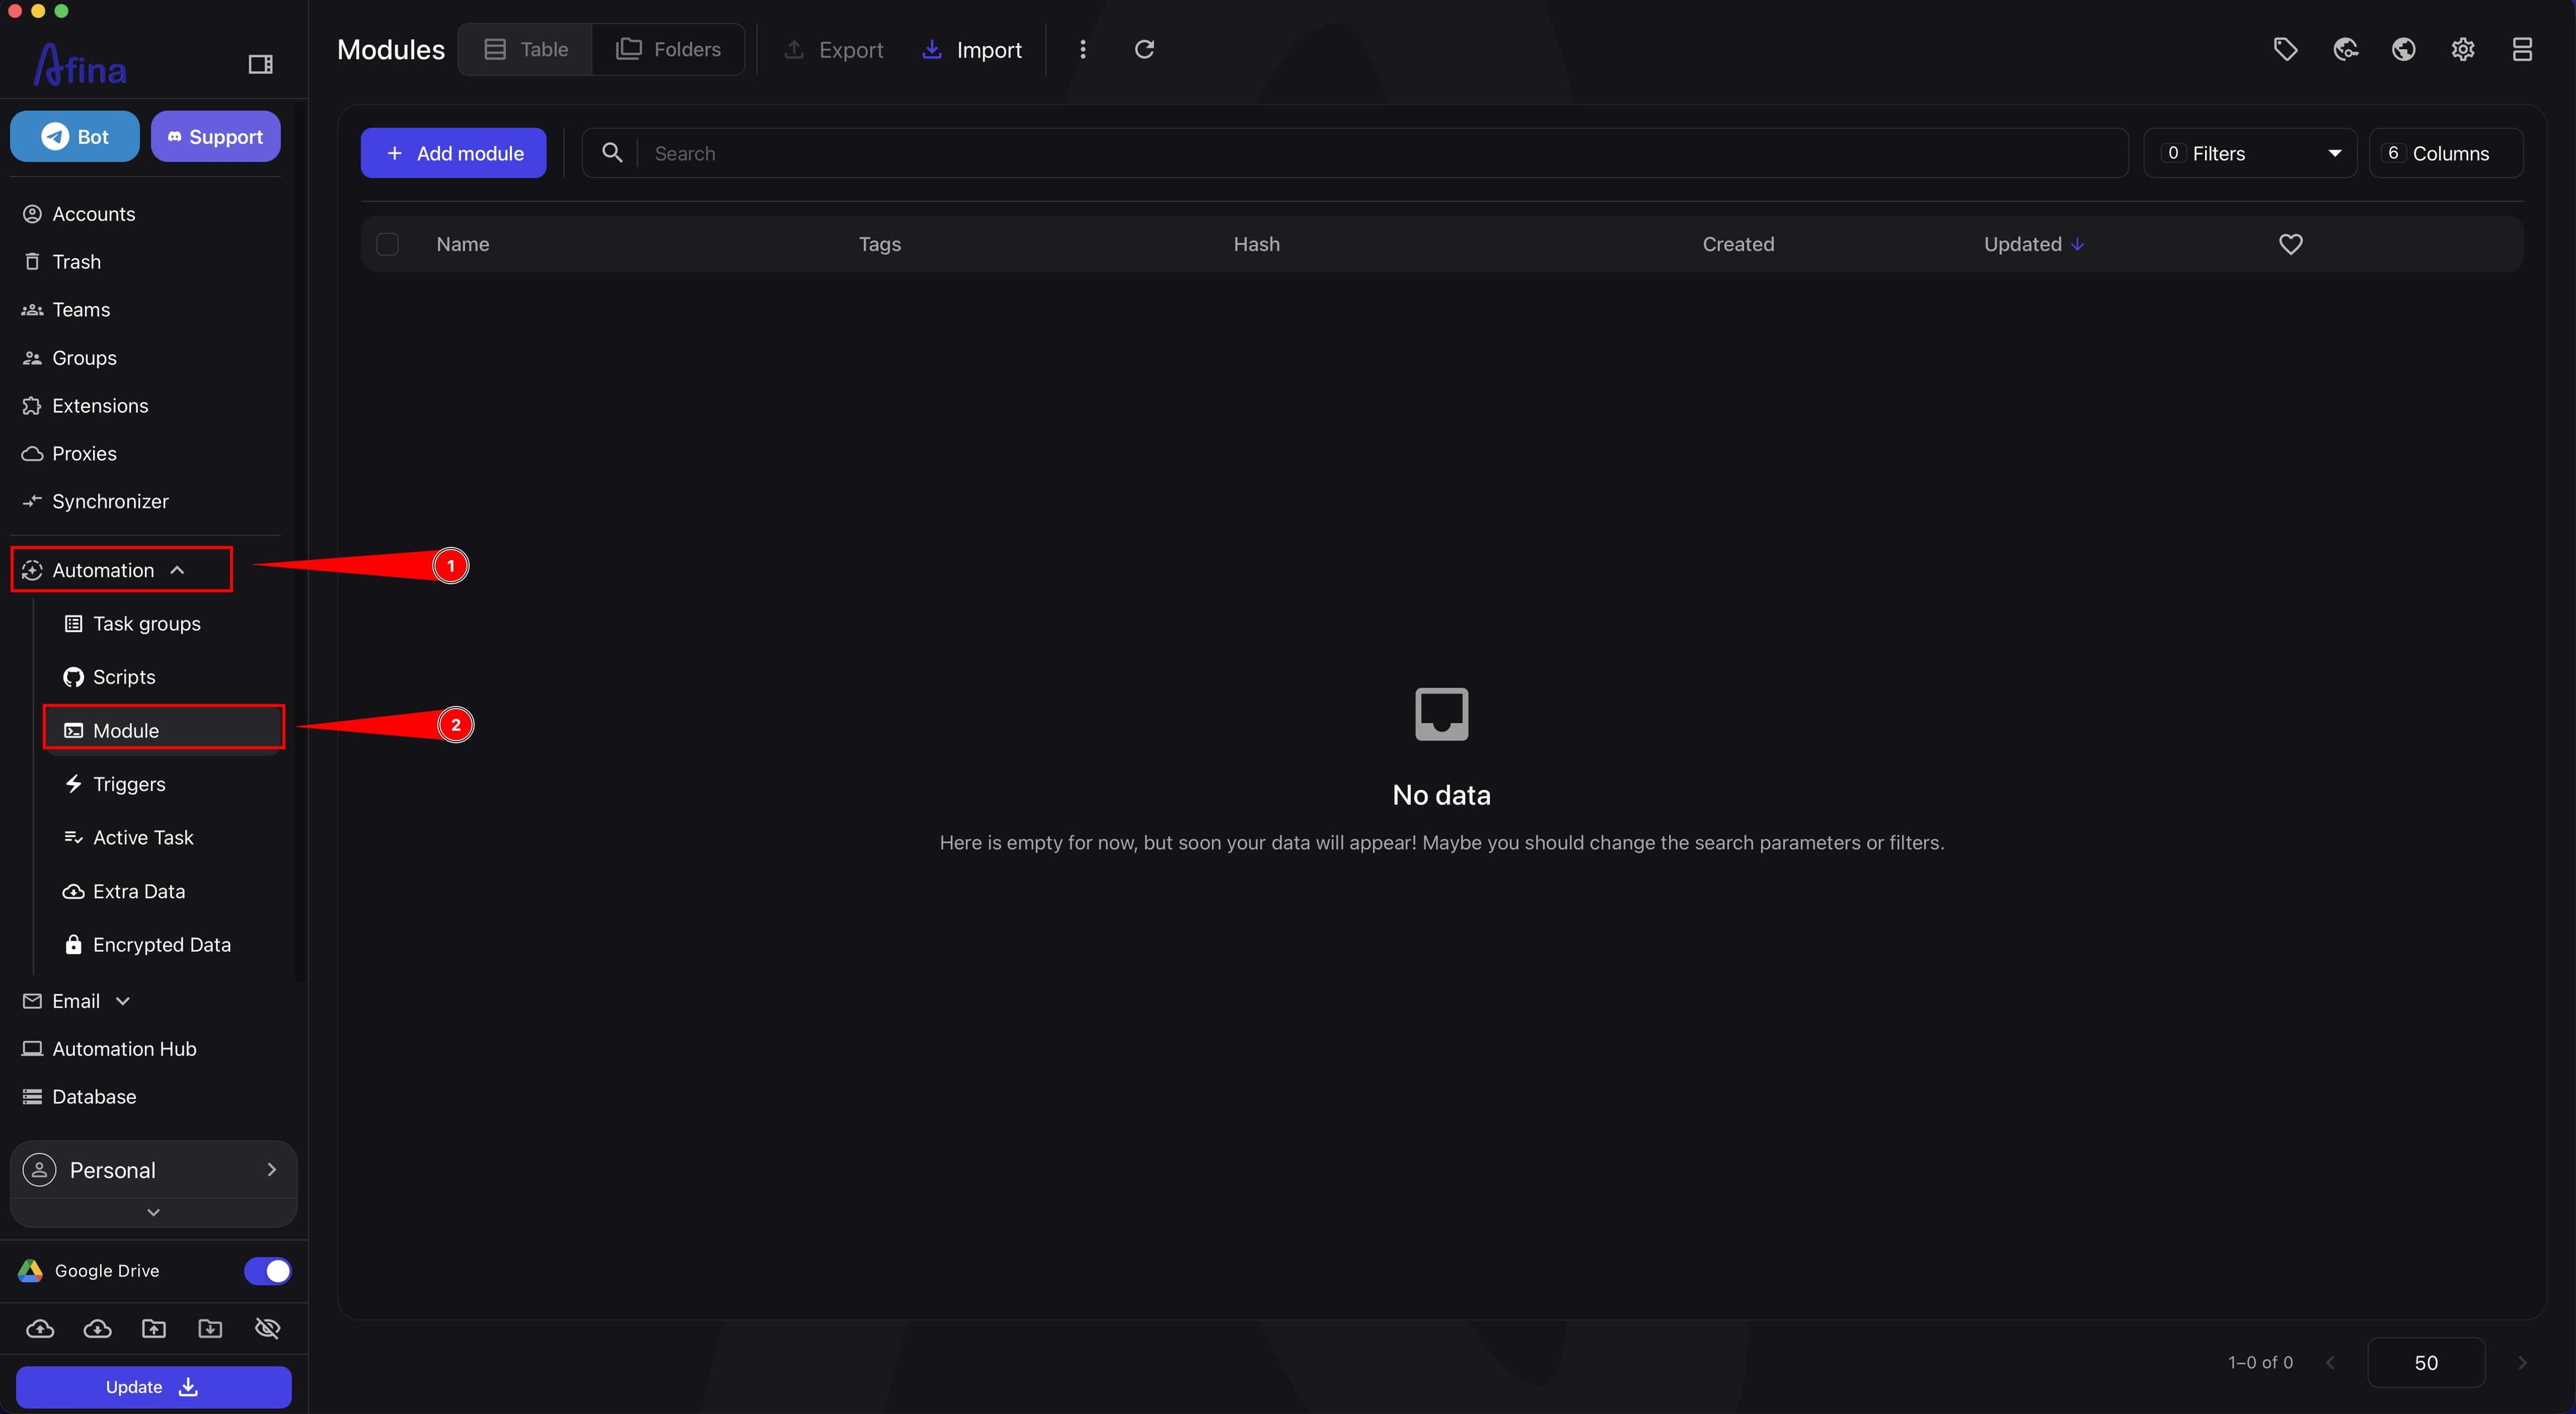
The "Modules" section in the left Afina sidebar is similar in many ways to the "Scripts" section. Use two view modes as needed:
- "Table" - if it is more convenient to work with a list, tags, hash, and dates;
- "Folders" - if you need to arrange modules by directories and navigate the structure more easily.
For the first module creation, it is usually more convenient to start with the table view.
Fast actions are also available in a module row or card: add a tag, copy the ID, add the module to Favorite, or open the local folder. Through the three-dot menu, you can pin the module to a folder, copy it, export it, update the hash, or delete it.
Updating the hash changes the module identifier. After this action, old links with scripts may stop working, so the module will have to be added again to every script where it was used.
-
Click Add module.
-
In the "Name" field, enter the module name, for example
Percentage of a Number. -
Enable the "Use custom folder" checkbox only if you already have module files in your own location on disk.
-
In the "Tags" field, add tags such as
math,example,testif you want to organize modules more conveniently. -
Click Save.
The screenshot below shows the "Add module" window with name and tag fields and the custom folder switch.
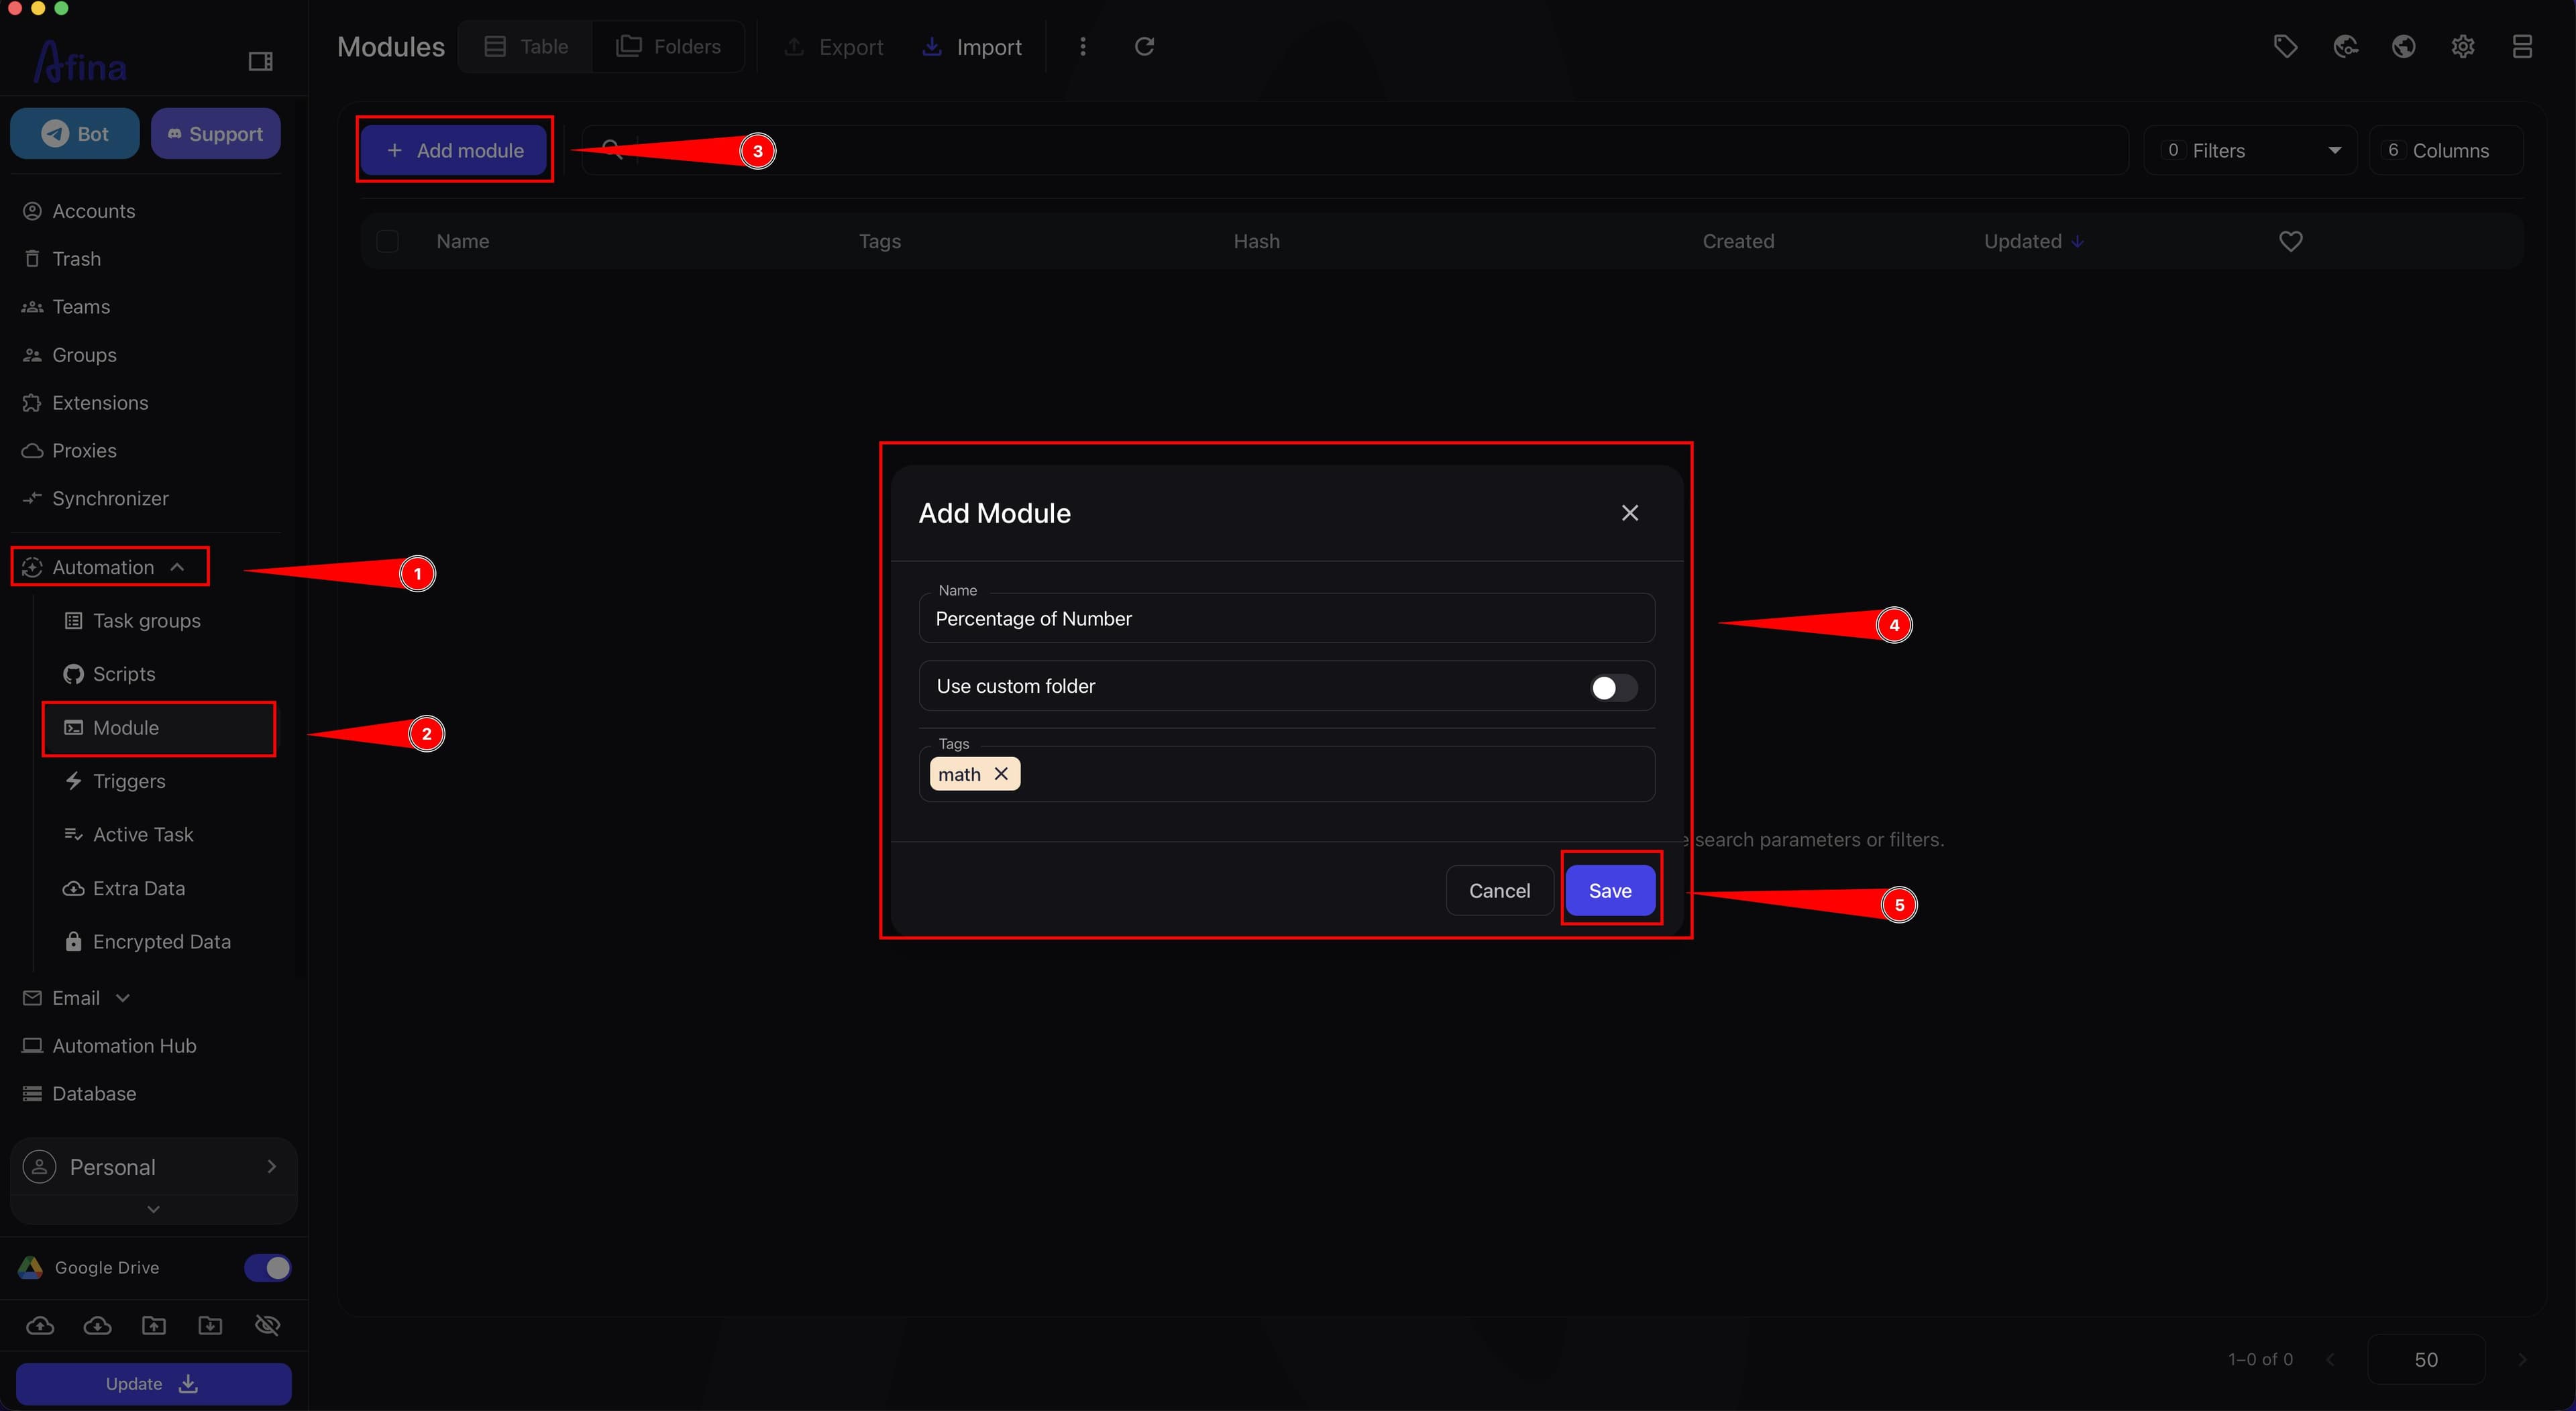
If you do not specify a custom folder, Afina will save the module in the standard module directory inside its data structure.
If you create a module through Custom folder, Afina may not create the standard files automatically. In most cases, it is more convenient to use the standard folder for the first module.
Tags can be added not only when creating a module. For one module, use the tag add icon on the card or in the row. For several modules, select them with checkboxes and apply the Set tags action in the top menu. This lets you add, replace, clear, or remove specific tags.
In "Folders" mode, you can create a multi-level directory structure and assign colors to folders. If you delete a folder, the modules themselves are not deleted. They move to the "Without folder" category.
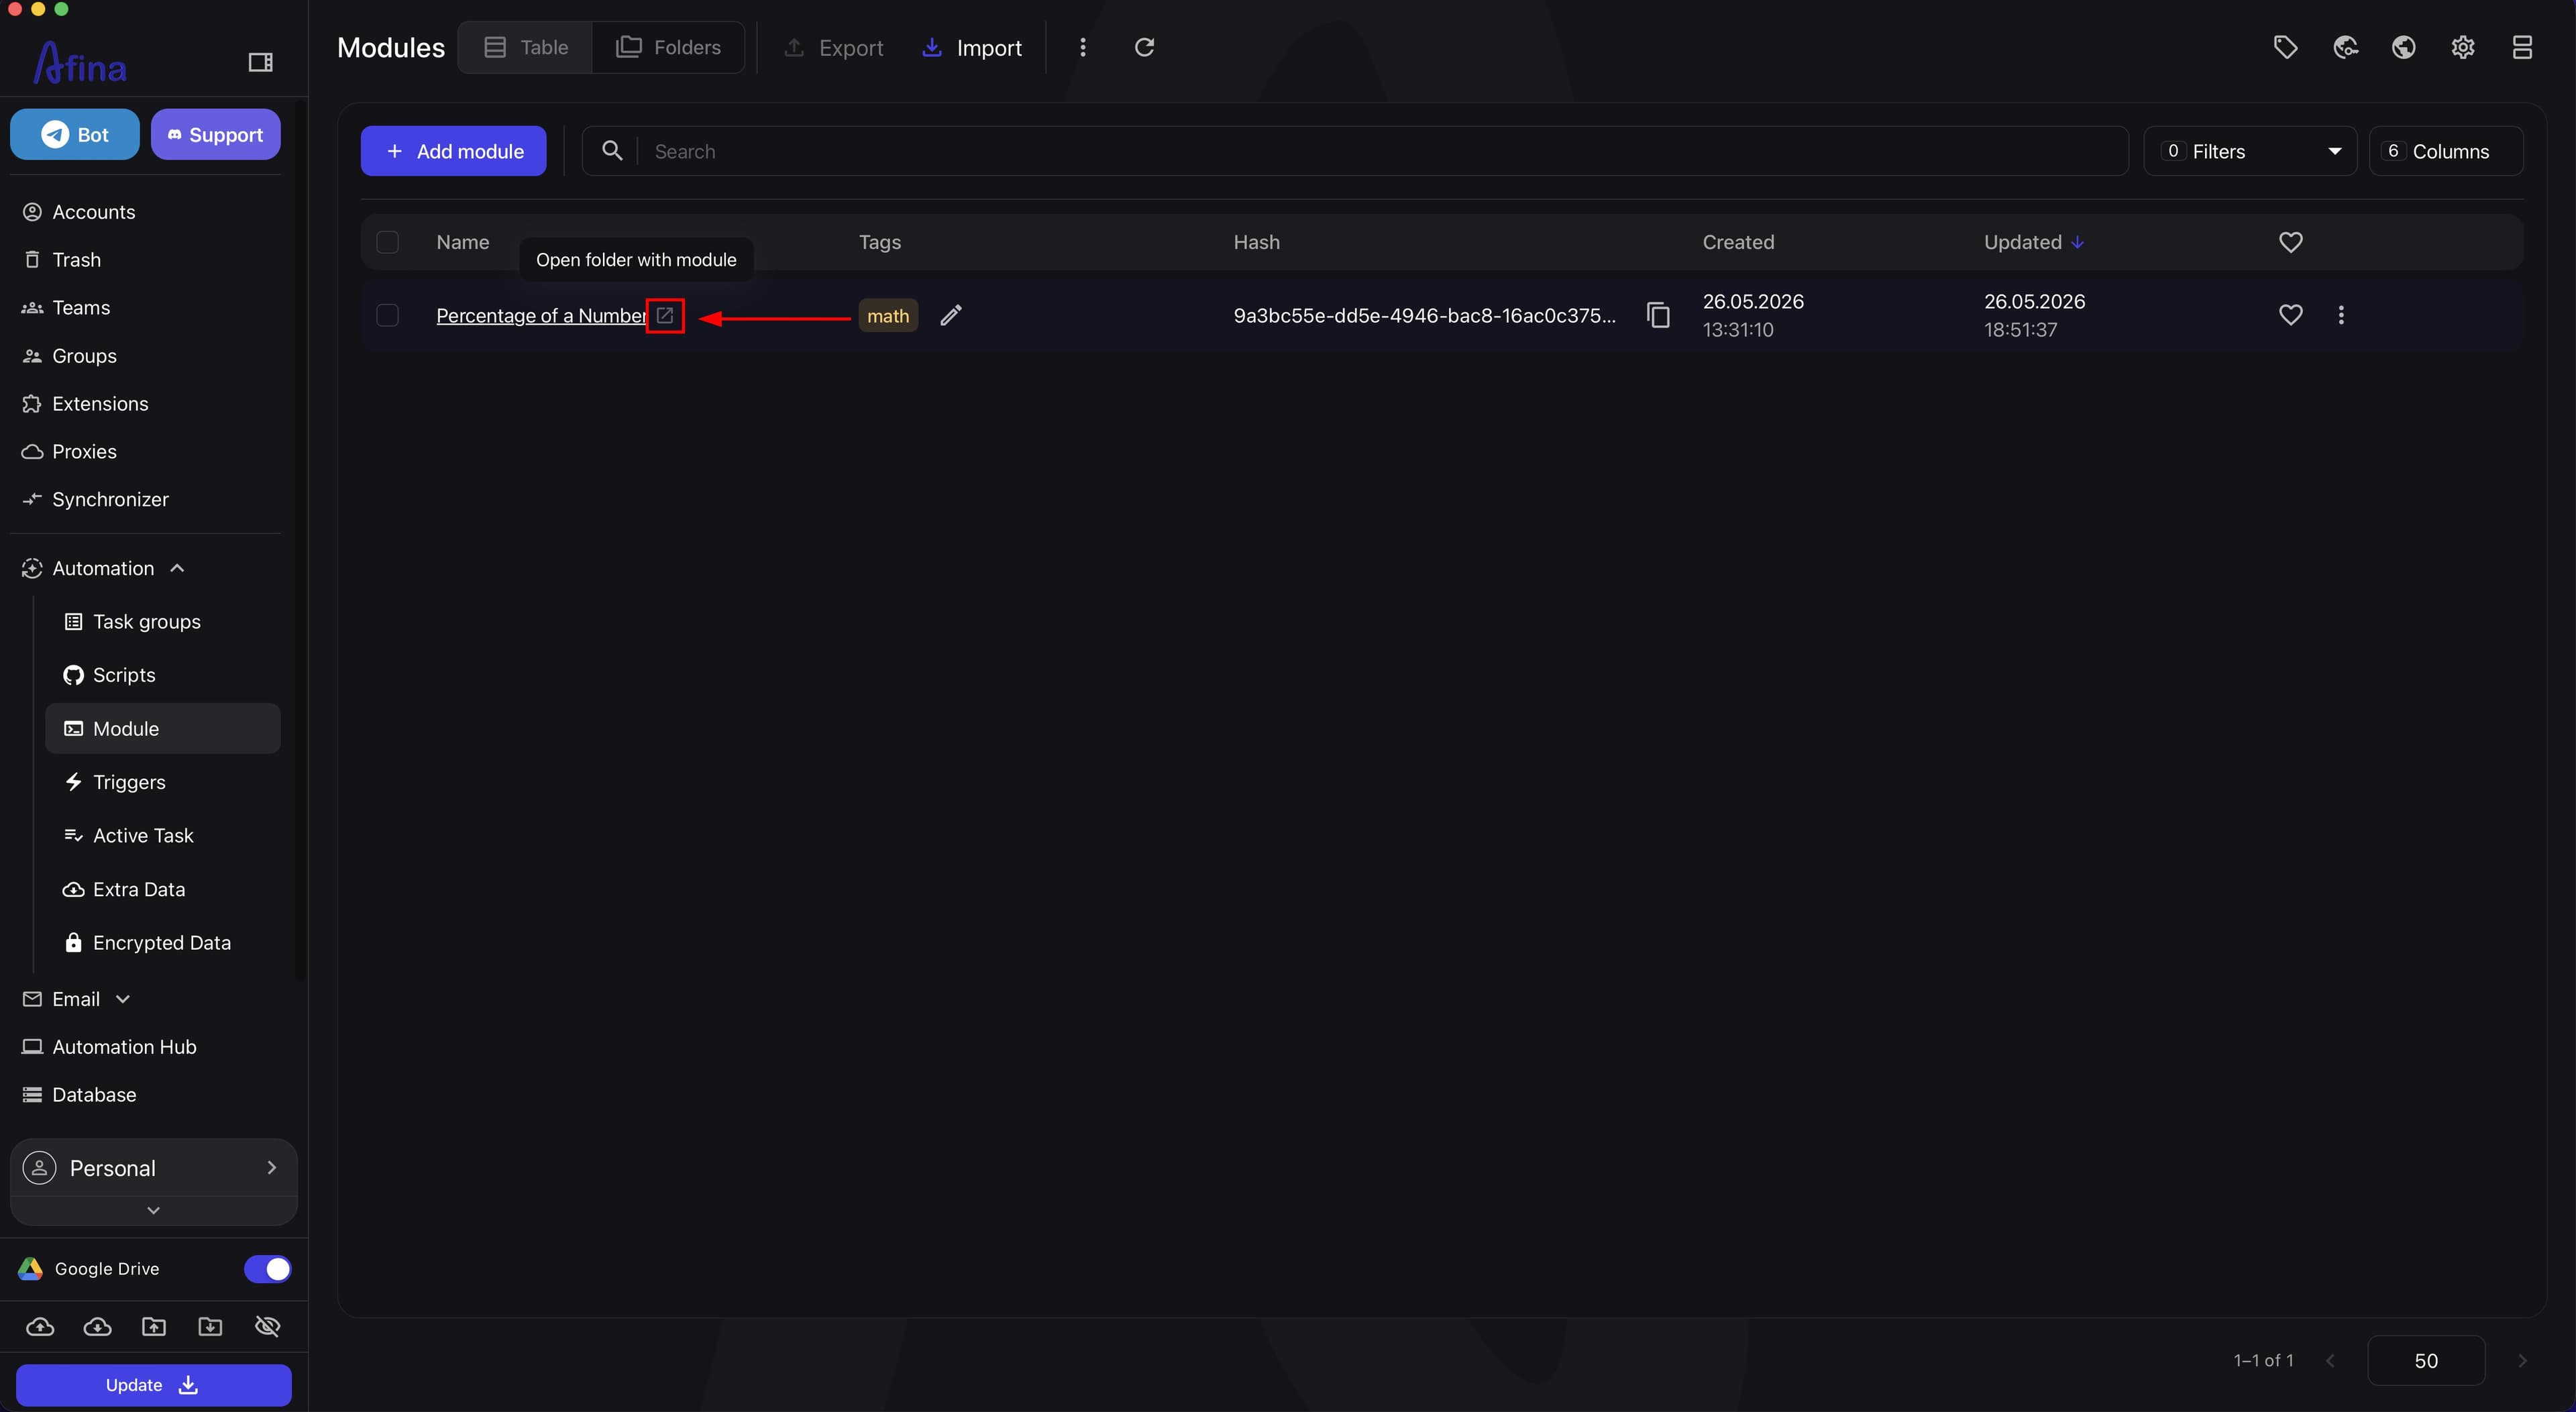
- Click the Open folder with module icon in the table or on the module card.
The screenshot below shows the module list with the local folder open icon.
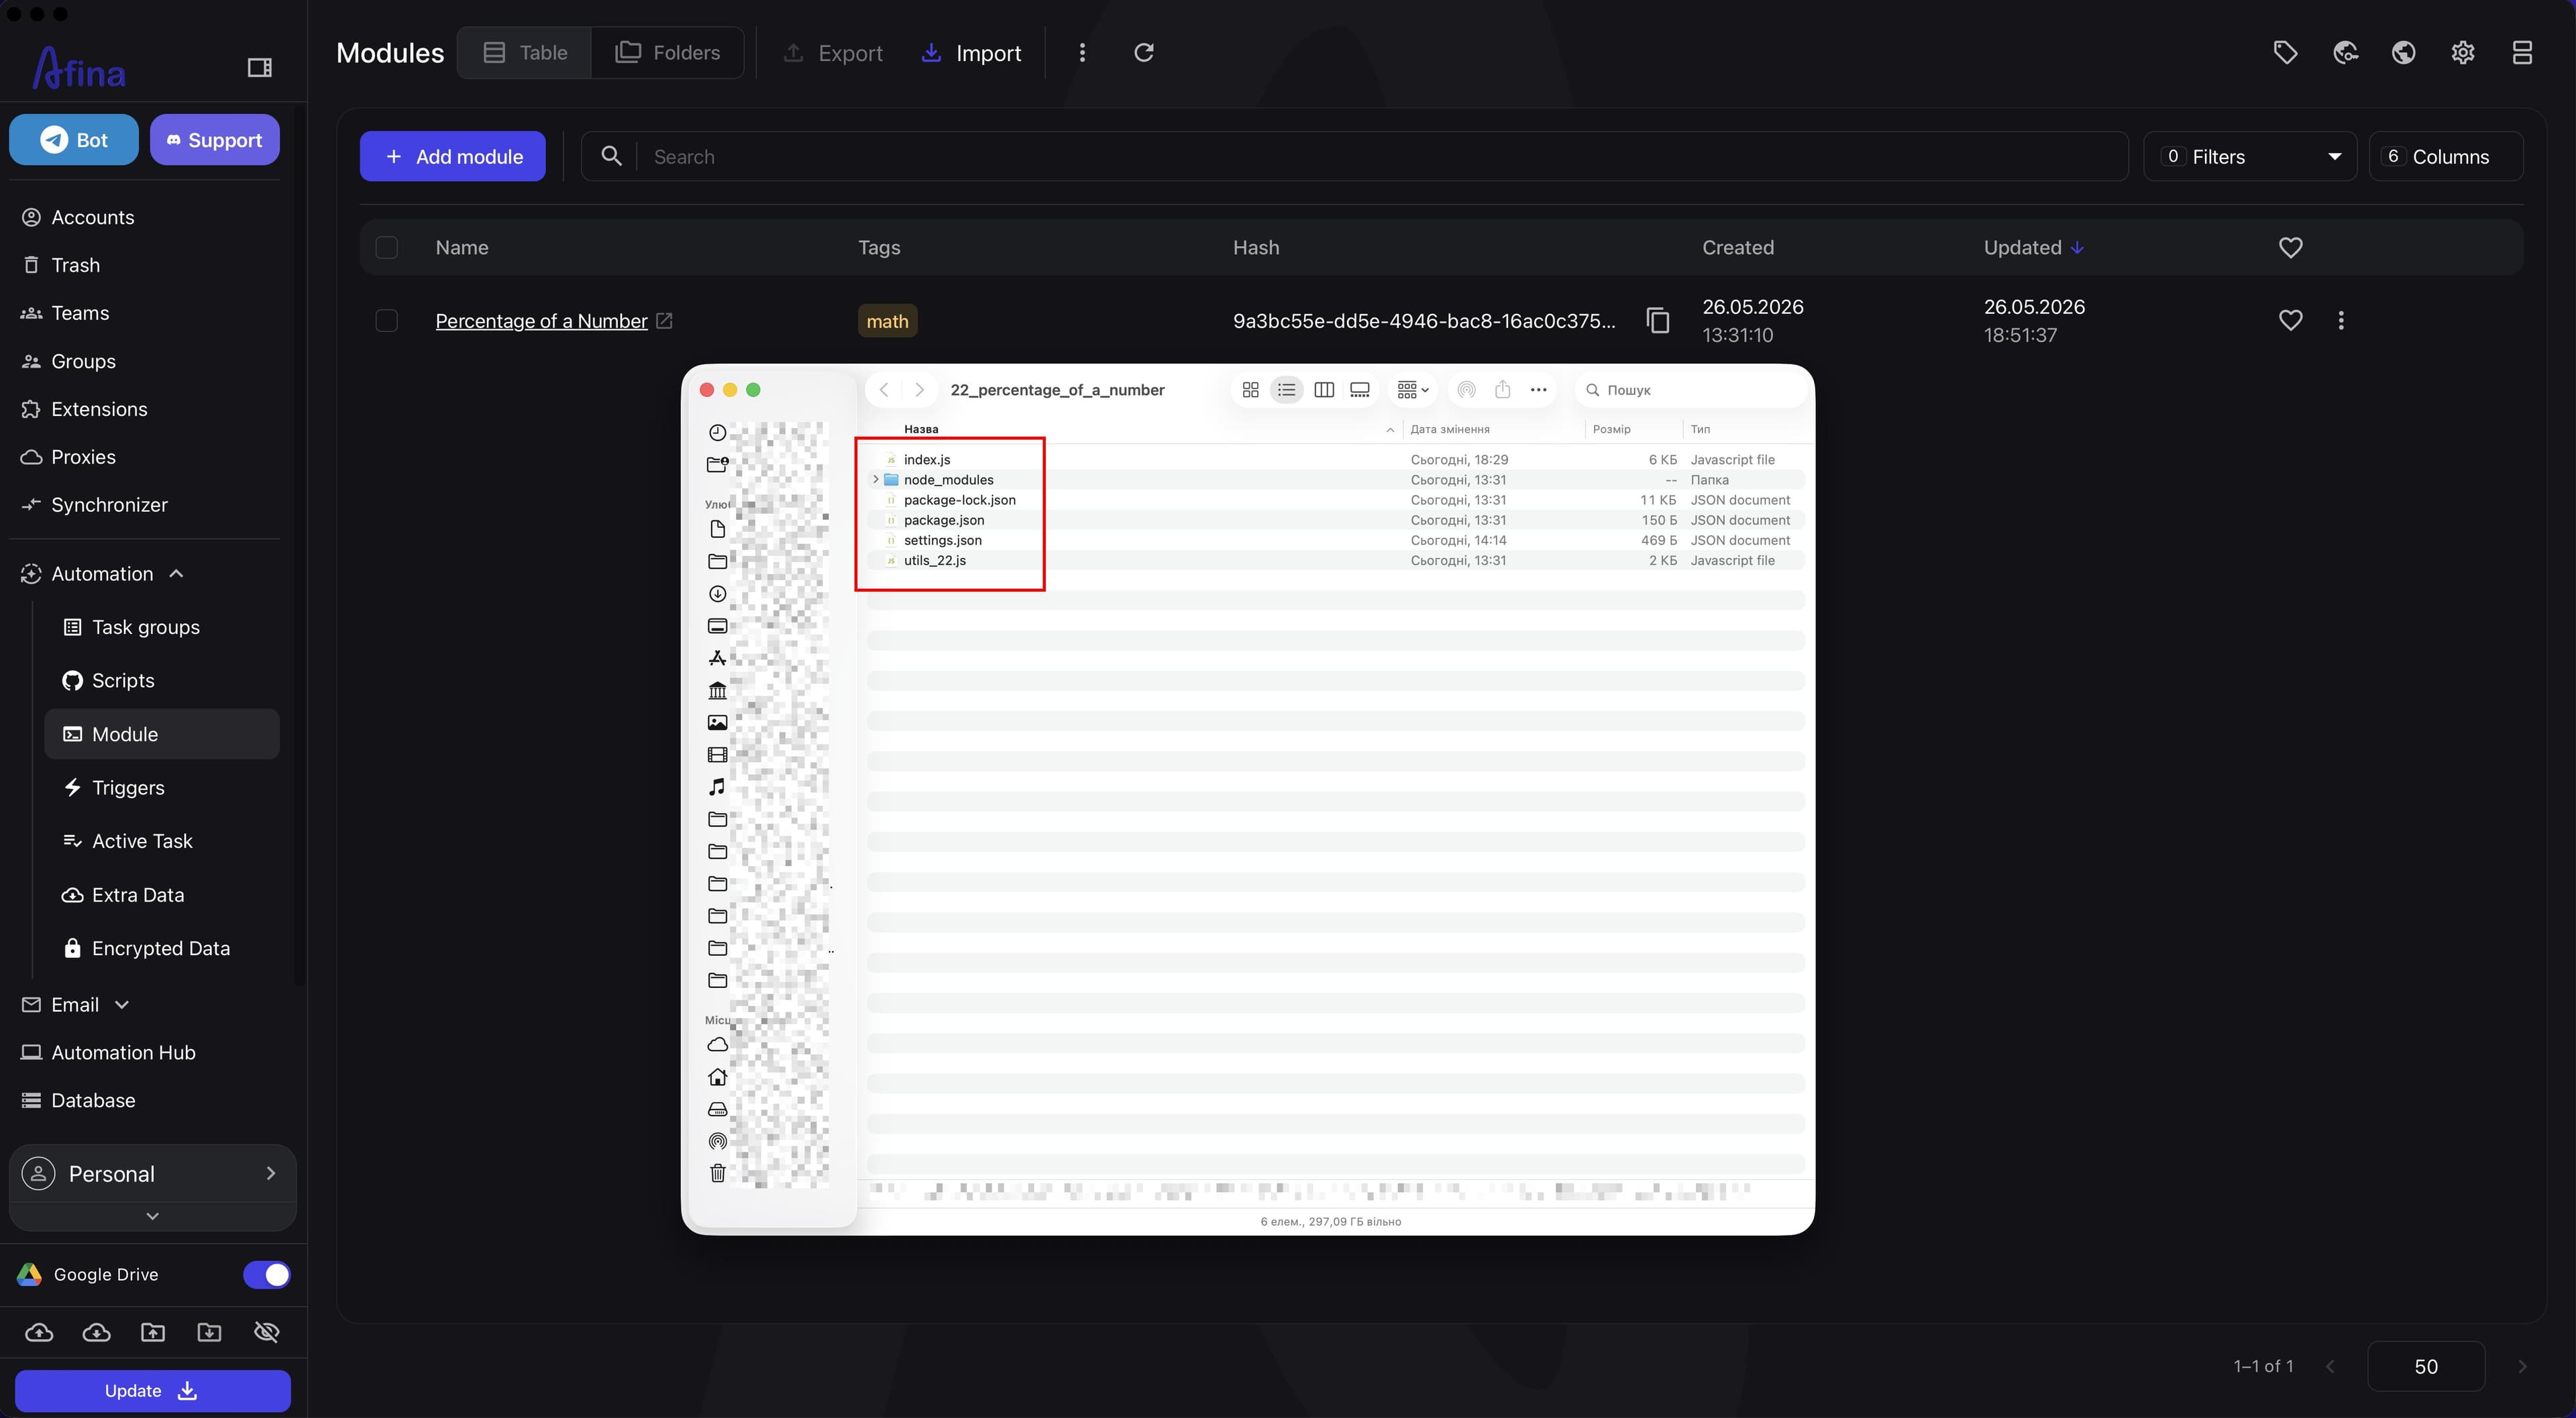
- Open the local module folder in your code editor.
The next screenshot shows the local module folder with a list of files.
- Open the
index.jsandsettings.jsonfiles.
This screenshot shows the index.js and settings.json files opened side by side in the code editor.
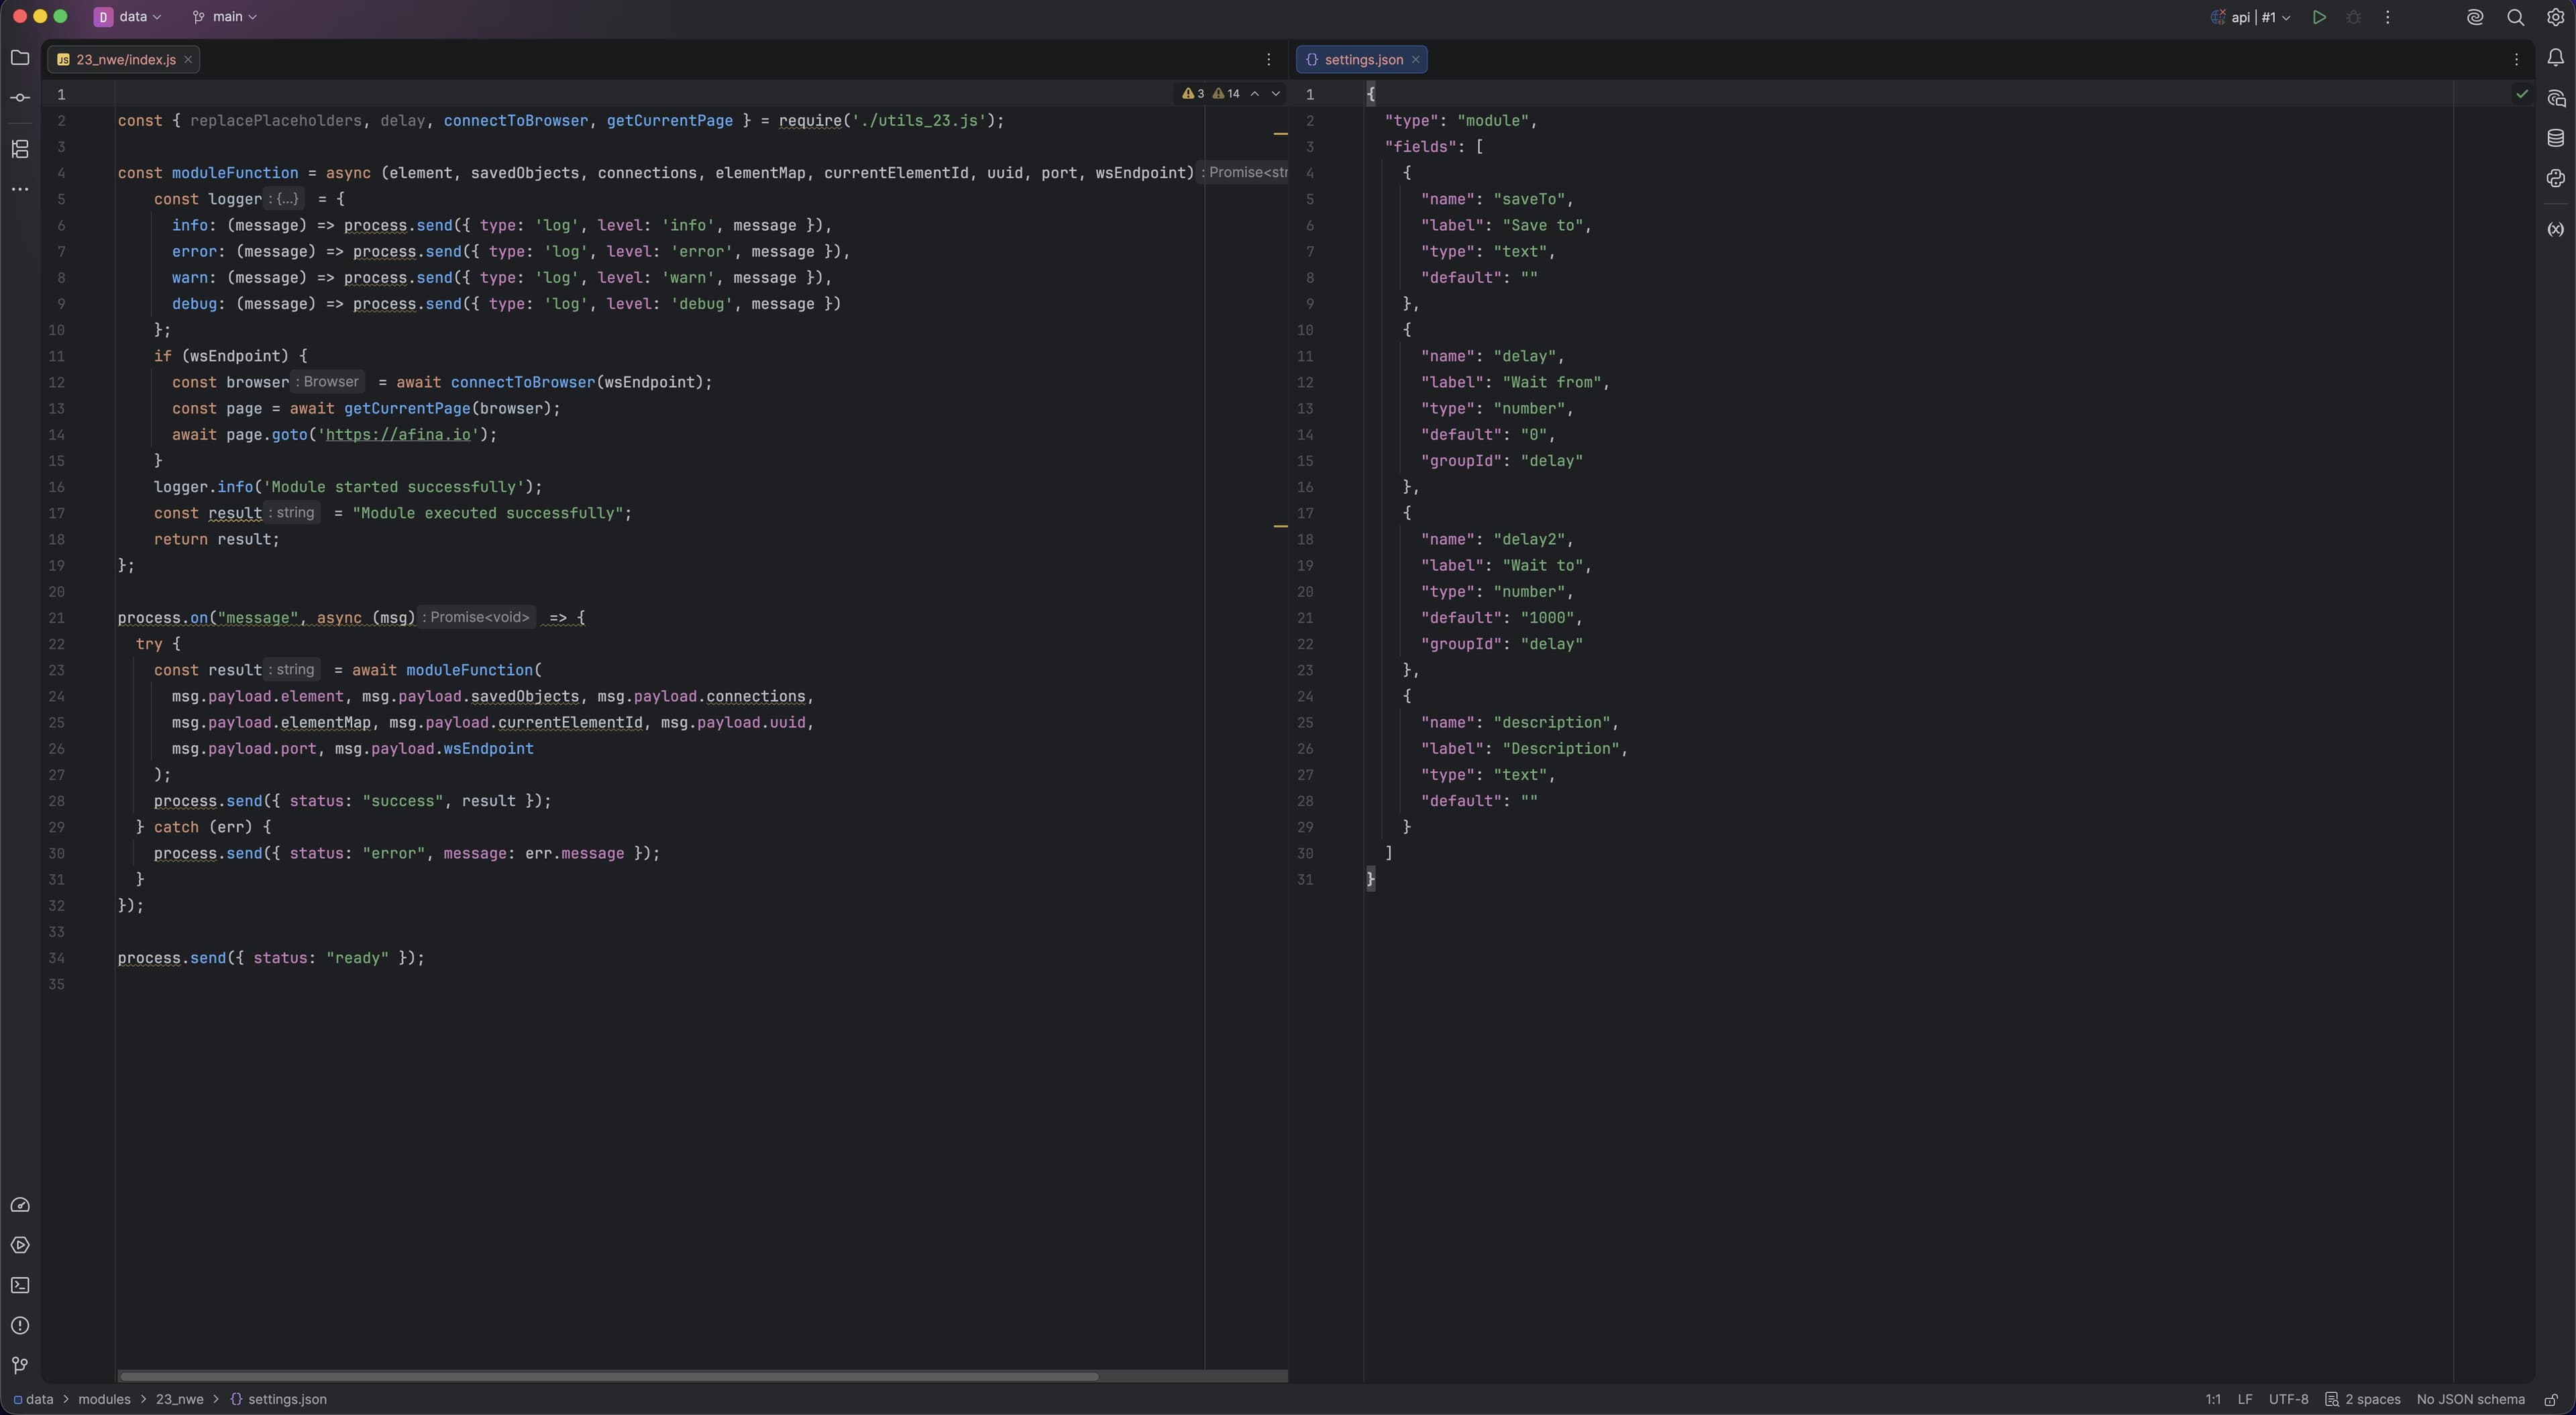
At this stage, your task is not to rewrite everything manually, but first to understand:
- which files Afina created automatically;
- which of them describe the module;
- where the main code is located;
- which service files should not be broken without need.
Module file structure#
After creating a module in Afina, you work not with one file but with a small project. The most important parts are:
settings.json- the module settings file;index.js- the main module logic file;package.json- dependency and metadata description;package-lock.json- exact dependency version lock;node_modules- installed packages;utils_<id>.jsor theutilsfolder - helper functions, if they exist in the structure.
What settings.json does
settings.json defines which input fields and parameters the user sees in the Afina interface when using the module.
This is where the following are usually described:
inputfields;selectlists;checkbox;textarea;- other control elements.
A typical structure of one field may look like this:
{
  "name": "maxSpeed",
  "label": "Maximum speed",
  "type": "number",
  "options": {},
  "loadTo": "Where to load the value",
  "isVisible": "backgroundColor === 'White'"
}
What the main fields mean:
name- the unique variable name by which the code accesses the value;label- the name the user sees in the interface;type- the field type;options- the list of values forselect;loadTo- where to pass the value for further use in the module;isVisible- the condition that determines when this field should be shown.
Common field types:
text;number;select;checkbox;textarea.
If a module has input parameters, settings.json usually determines how these parameters will be shown in Afina.
What index.js does
index.js is the main module file that interacts with Afina and runs the core logic.
This is where the main module behavior is usually located: calculations, input processing, helper function calls, and result return.
Do not delete or rewrite the service IPC block process.on('message', ...) and process.send({ status: 'ready' }). It is required by the module template for correct interaction with Afina.
You can create additional files and folders inside the module. This is normal if:
- you import them correctly;
- you do not break the main structure;
- the main logic is still connected to the module correctly.
What package.json, package-lock.json, and node_modules are for
package.json is a kind of project passport. It usually contains:
- name;
- version;
- dependencies;
- dev dependencies;
- service scripts;
- technical parameters such as
typeorengines.
package-lock.json locks exact dependency versions and is needed to reproduce the environment consistently.
node_modules physically contains installed packages.
It is important to understand:
node_modulesis usually not added togit;- these packages can usually be restored with
npm iif the module structure supports it; package-lock.jsonis usually better to keep if you work with dependencies.
What utils_<id>.js or the utils folder is for
A file such as utils_22.js or the utils folder often contains prepared helper functions.
In a simple example, it may not be needed at all, but in more complex modules this is a normal place to move part of the logic.
Preparing AI context#
The best approach to working with ChatGPT or another AI model is:
-
First, create an empty module in Afina itself.
-
Open its local folder.
-
Show the AI model the real files of this module.
-
Only after that, ask it to generate code or change the structure.
-
Prepare the module name and task for the AI model.
-
Add the contents of the empty module files created by Afina to the prompt.
-
Write in the prompt that it should not invent a new format, but should modify the existing structure.
-
Describe the expected module logic.
Example of a good prompt:
I have a module for Afina. Below I provide the real files of an empty module created by Afina itself. Do not change the structure format, do not invent new service files, and edit only what is necessary.

I need to make a simple "Percentage of a Number" module.

Logic:
- a number is passed as input;
- a percentage is passed as input;
- result = number * percentage / 100;
- the module must return the finished result.

Here are the files of my empty module:
[insert the file contents here]
index.js, settings.json, package.json, package-lock.json, utils_22.js.
The screenshot below shows a ChatGPT prompt with the module description and attached files.
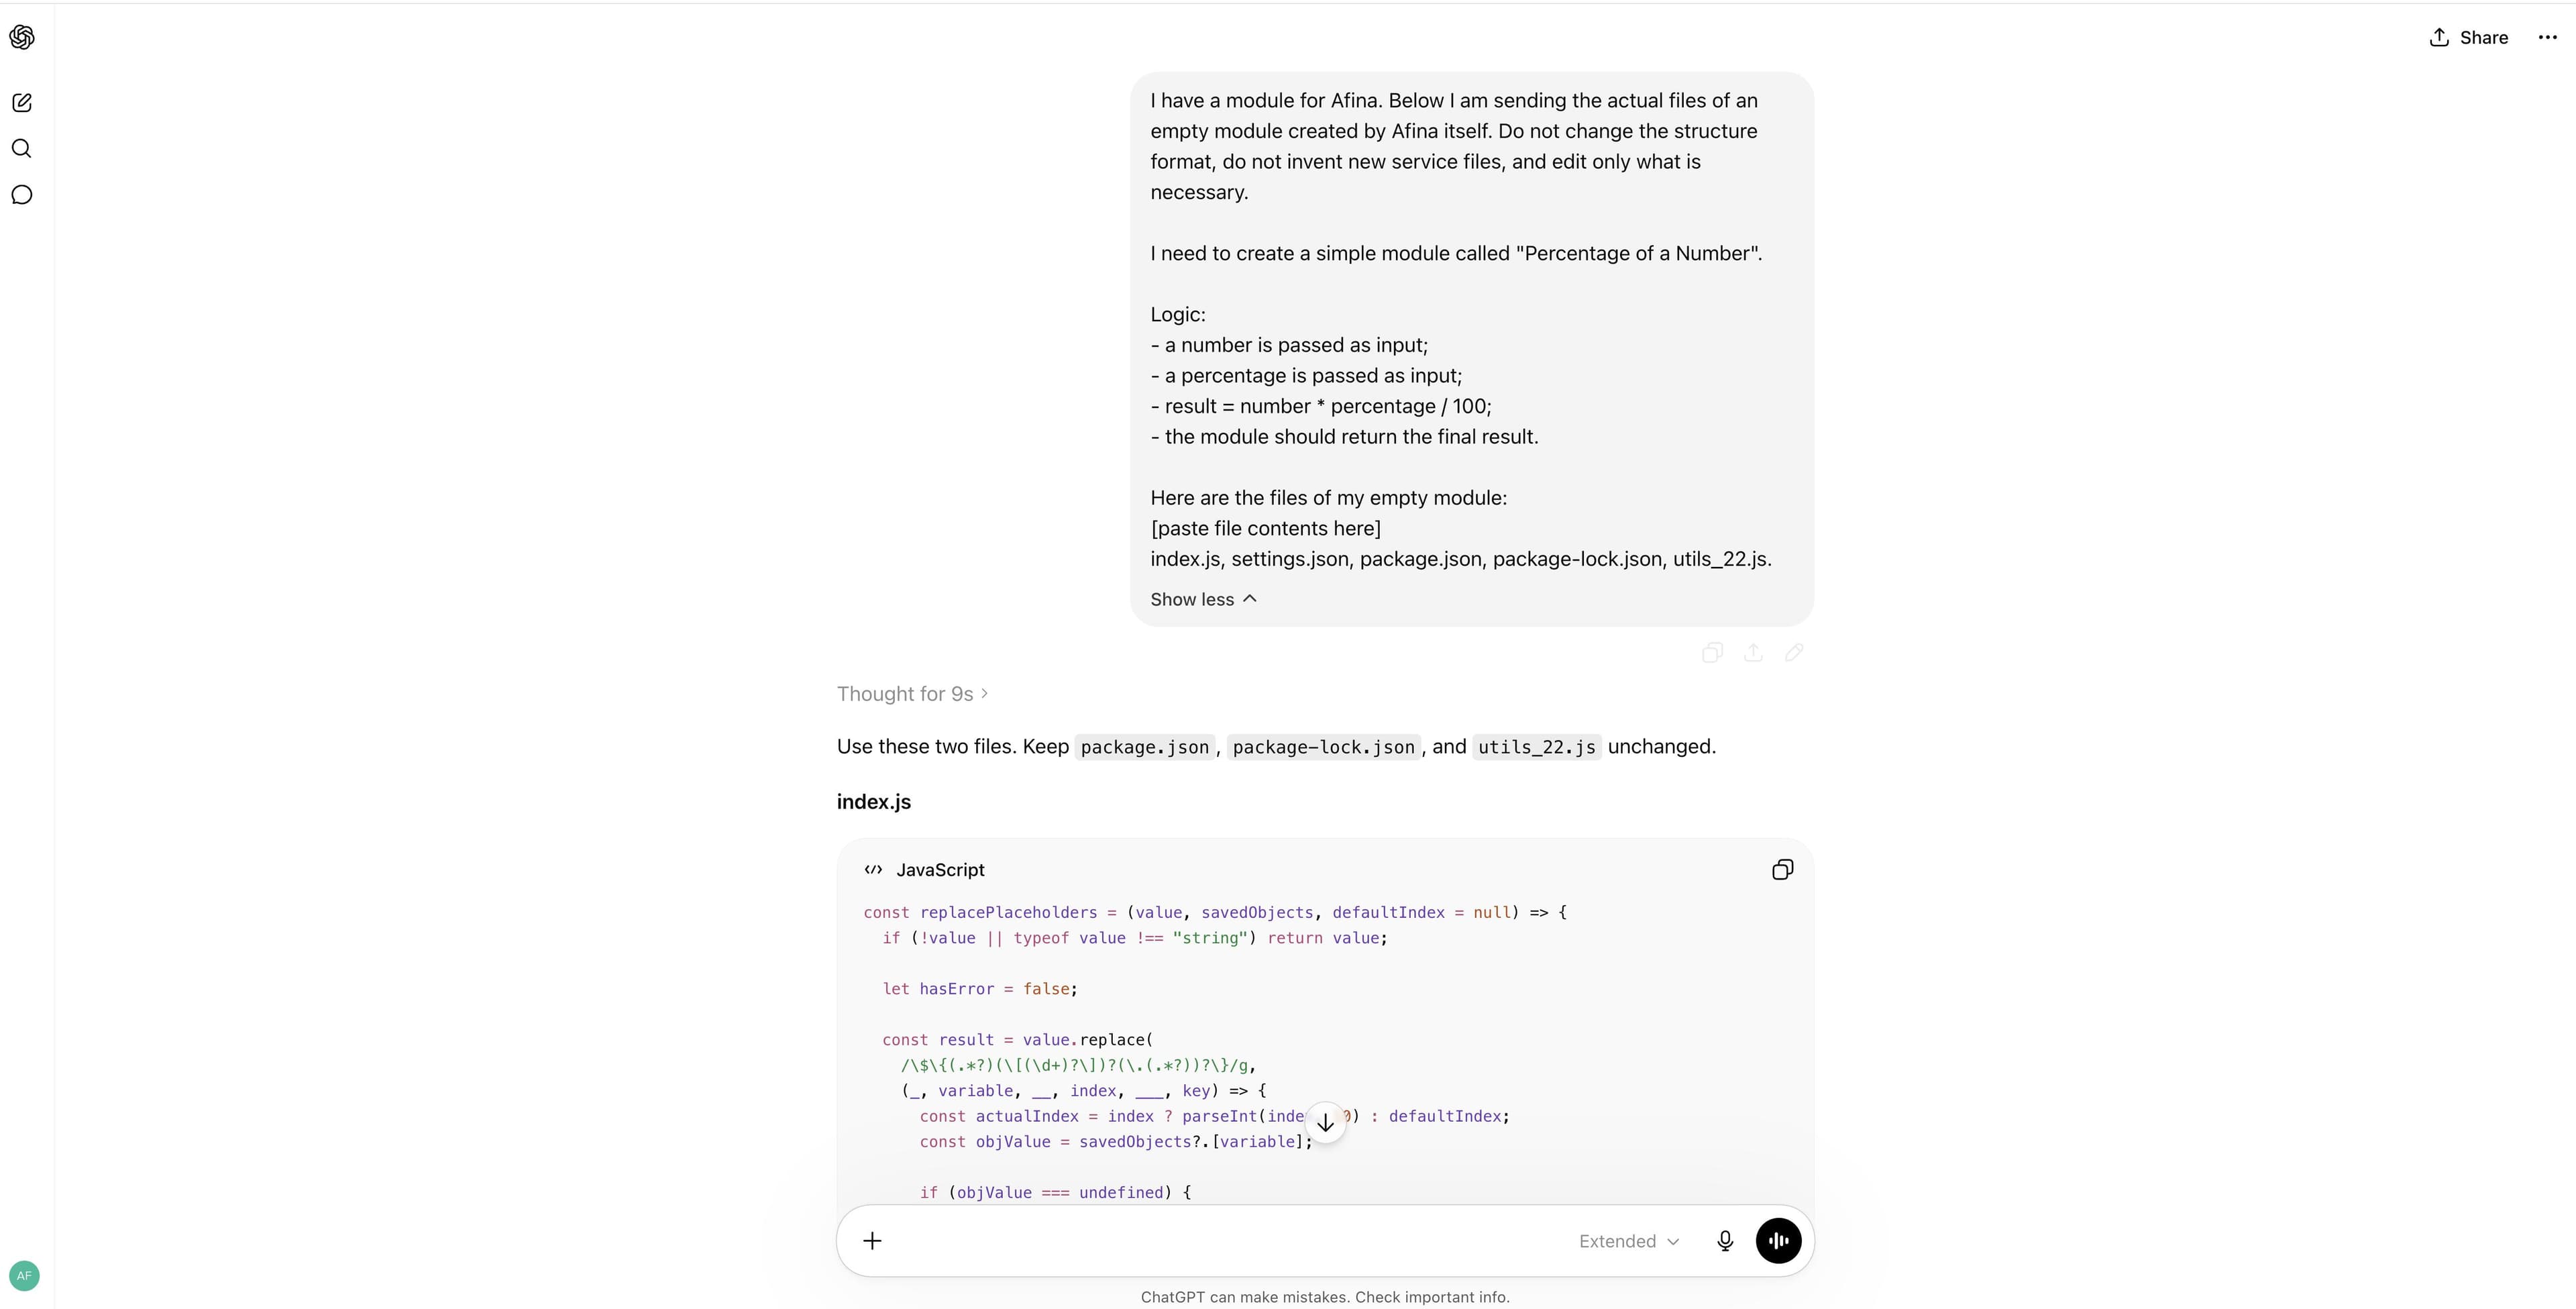
If you simply write "make an Afina module" in ChatGPT or another AI model, it may generate code that looks logical but does not match the real structure of your module.
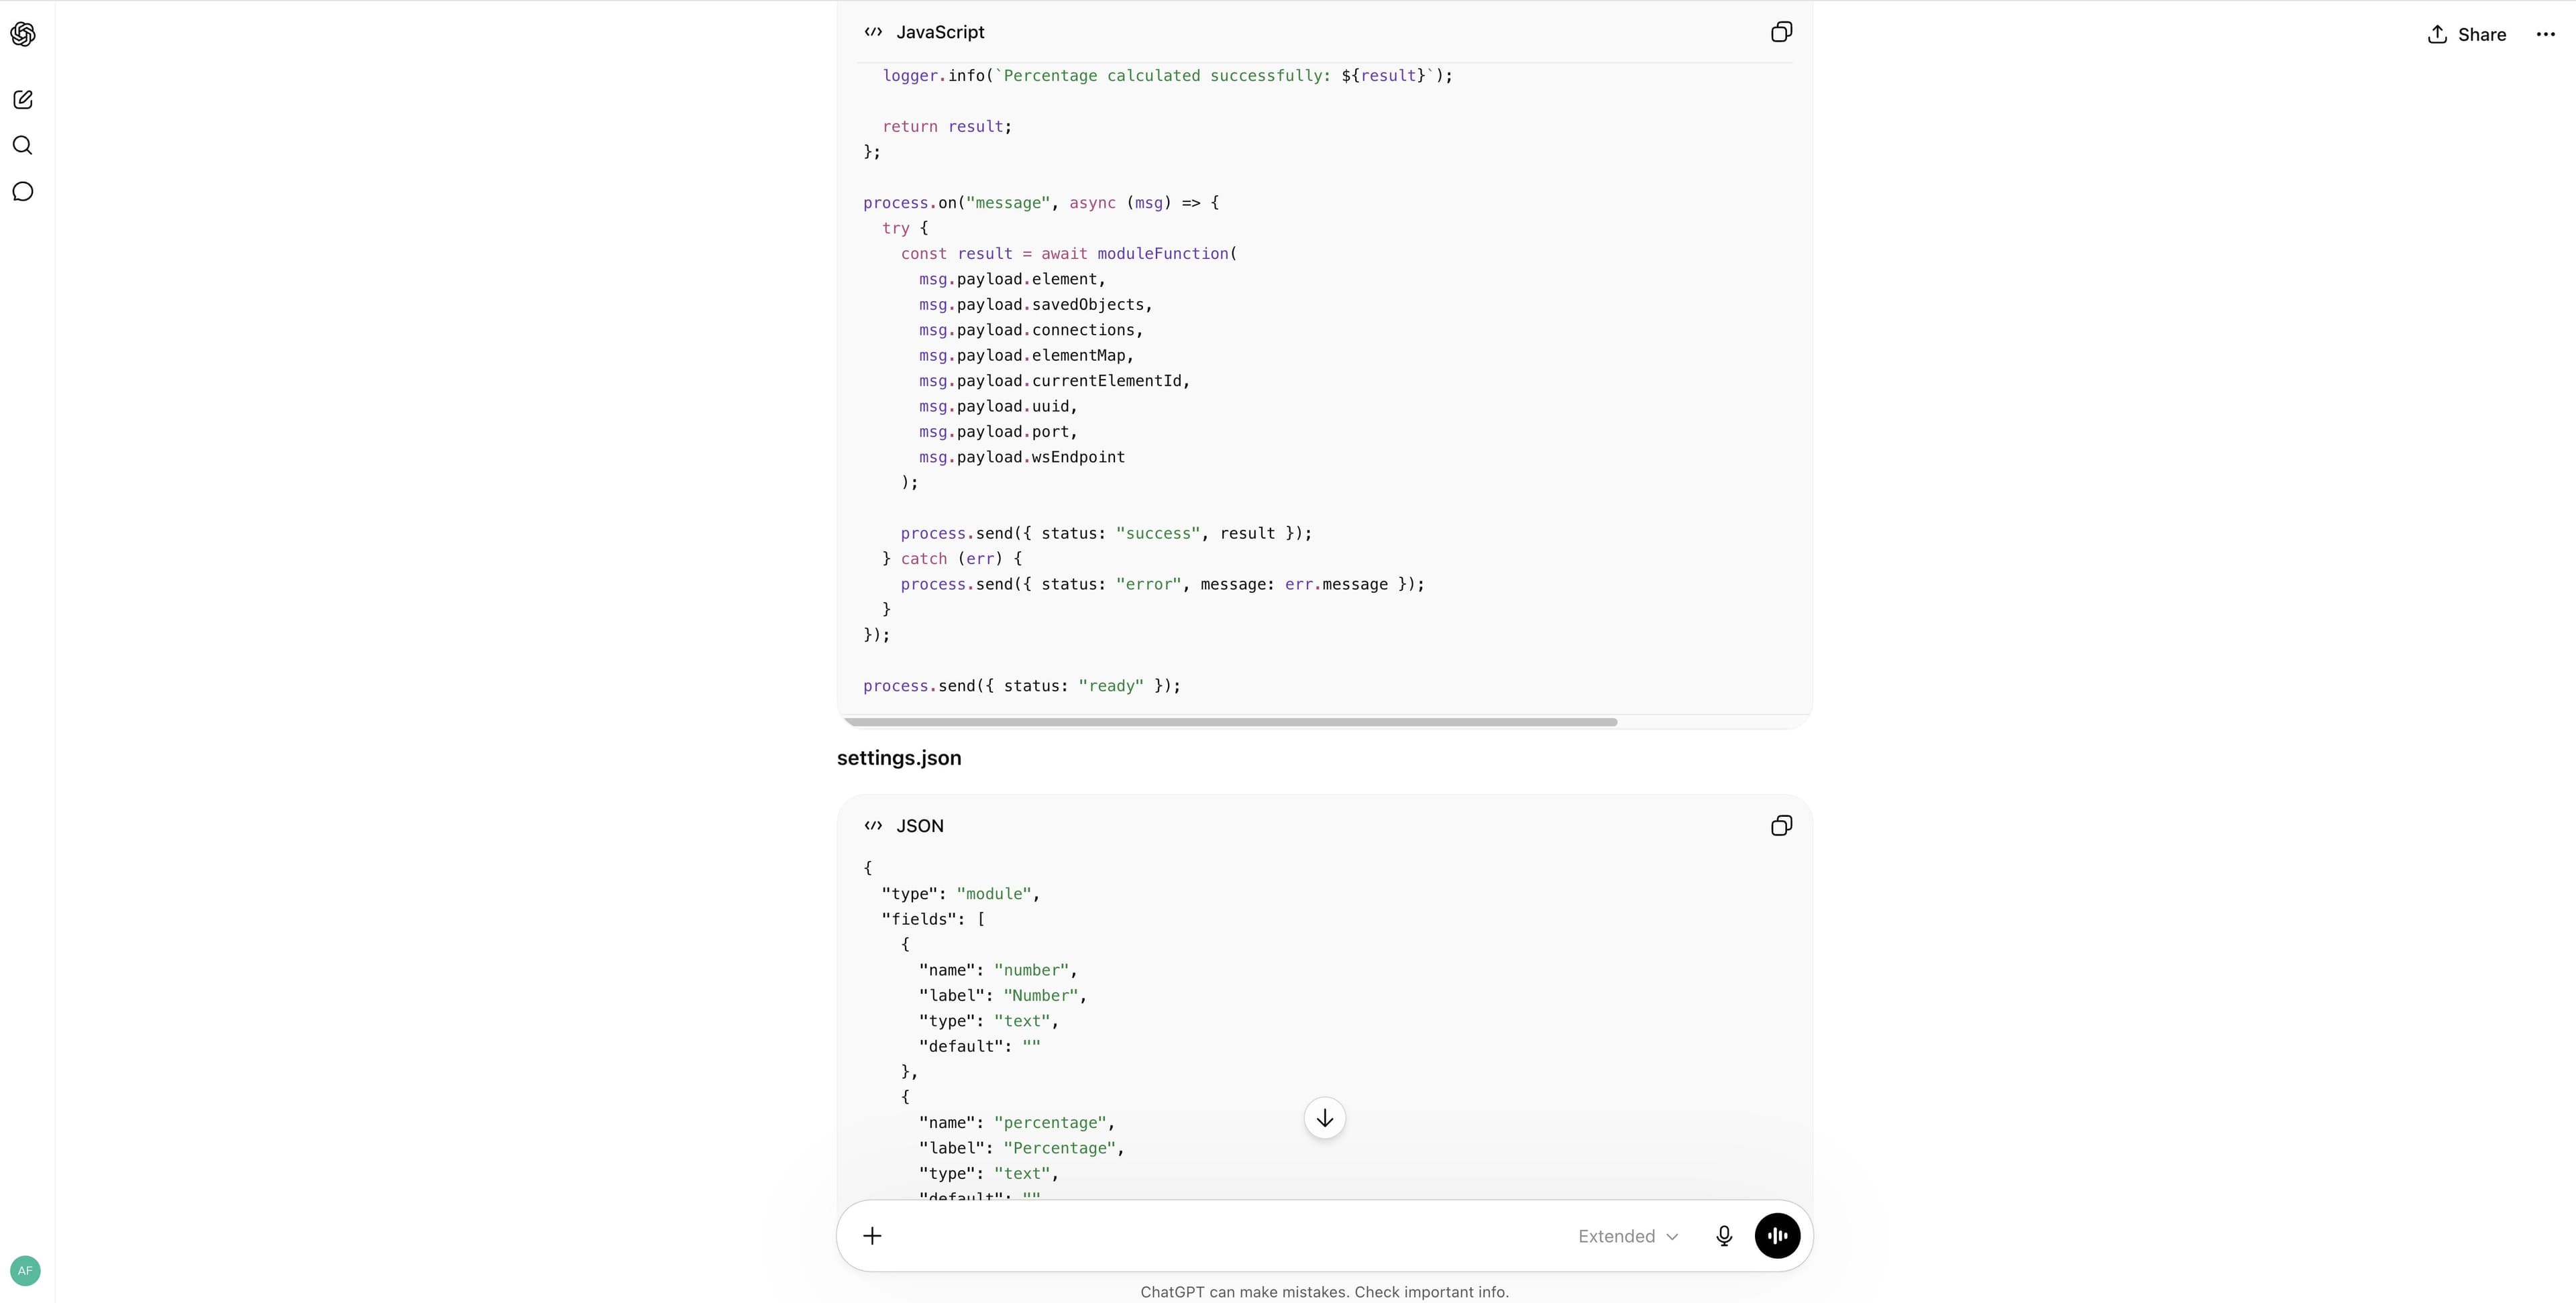
- Ask the AI model not only to generate code, but also to explain:
- which file it changed;
- what each change is responsible for;
- which fields are inputs;
- what result the module returns;
- what needs to be checked before import or launch.
This lets you not just paste code, but also understand what it does.
- Before saving, check:
- whether the base file structure has changed;
- whether the service fields created by Afina have disappeared;
- whether the service IPC block
process.on('message', ...)andprocess.send({ status: 'ready' })is still in place; - whether entities are named consistently across files;
- whether the AI model added unnecessary libraries or dependencies that you do not have;
- whether the logic matches your task.
Saving the module#
- Replace or edit the
index.jsandsettings.jsonfiles in the local module folder.
The screenshot below shows a ChatGPT response explaining the changes in the module files.
The next screenshot shows the updated index.js and settings.json files with the Number and Percent fields in the code editor.
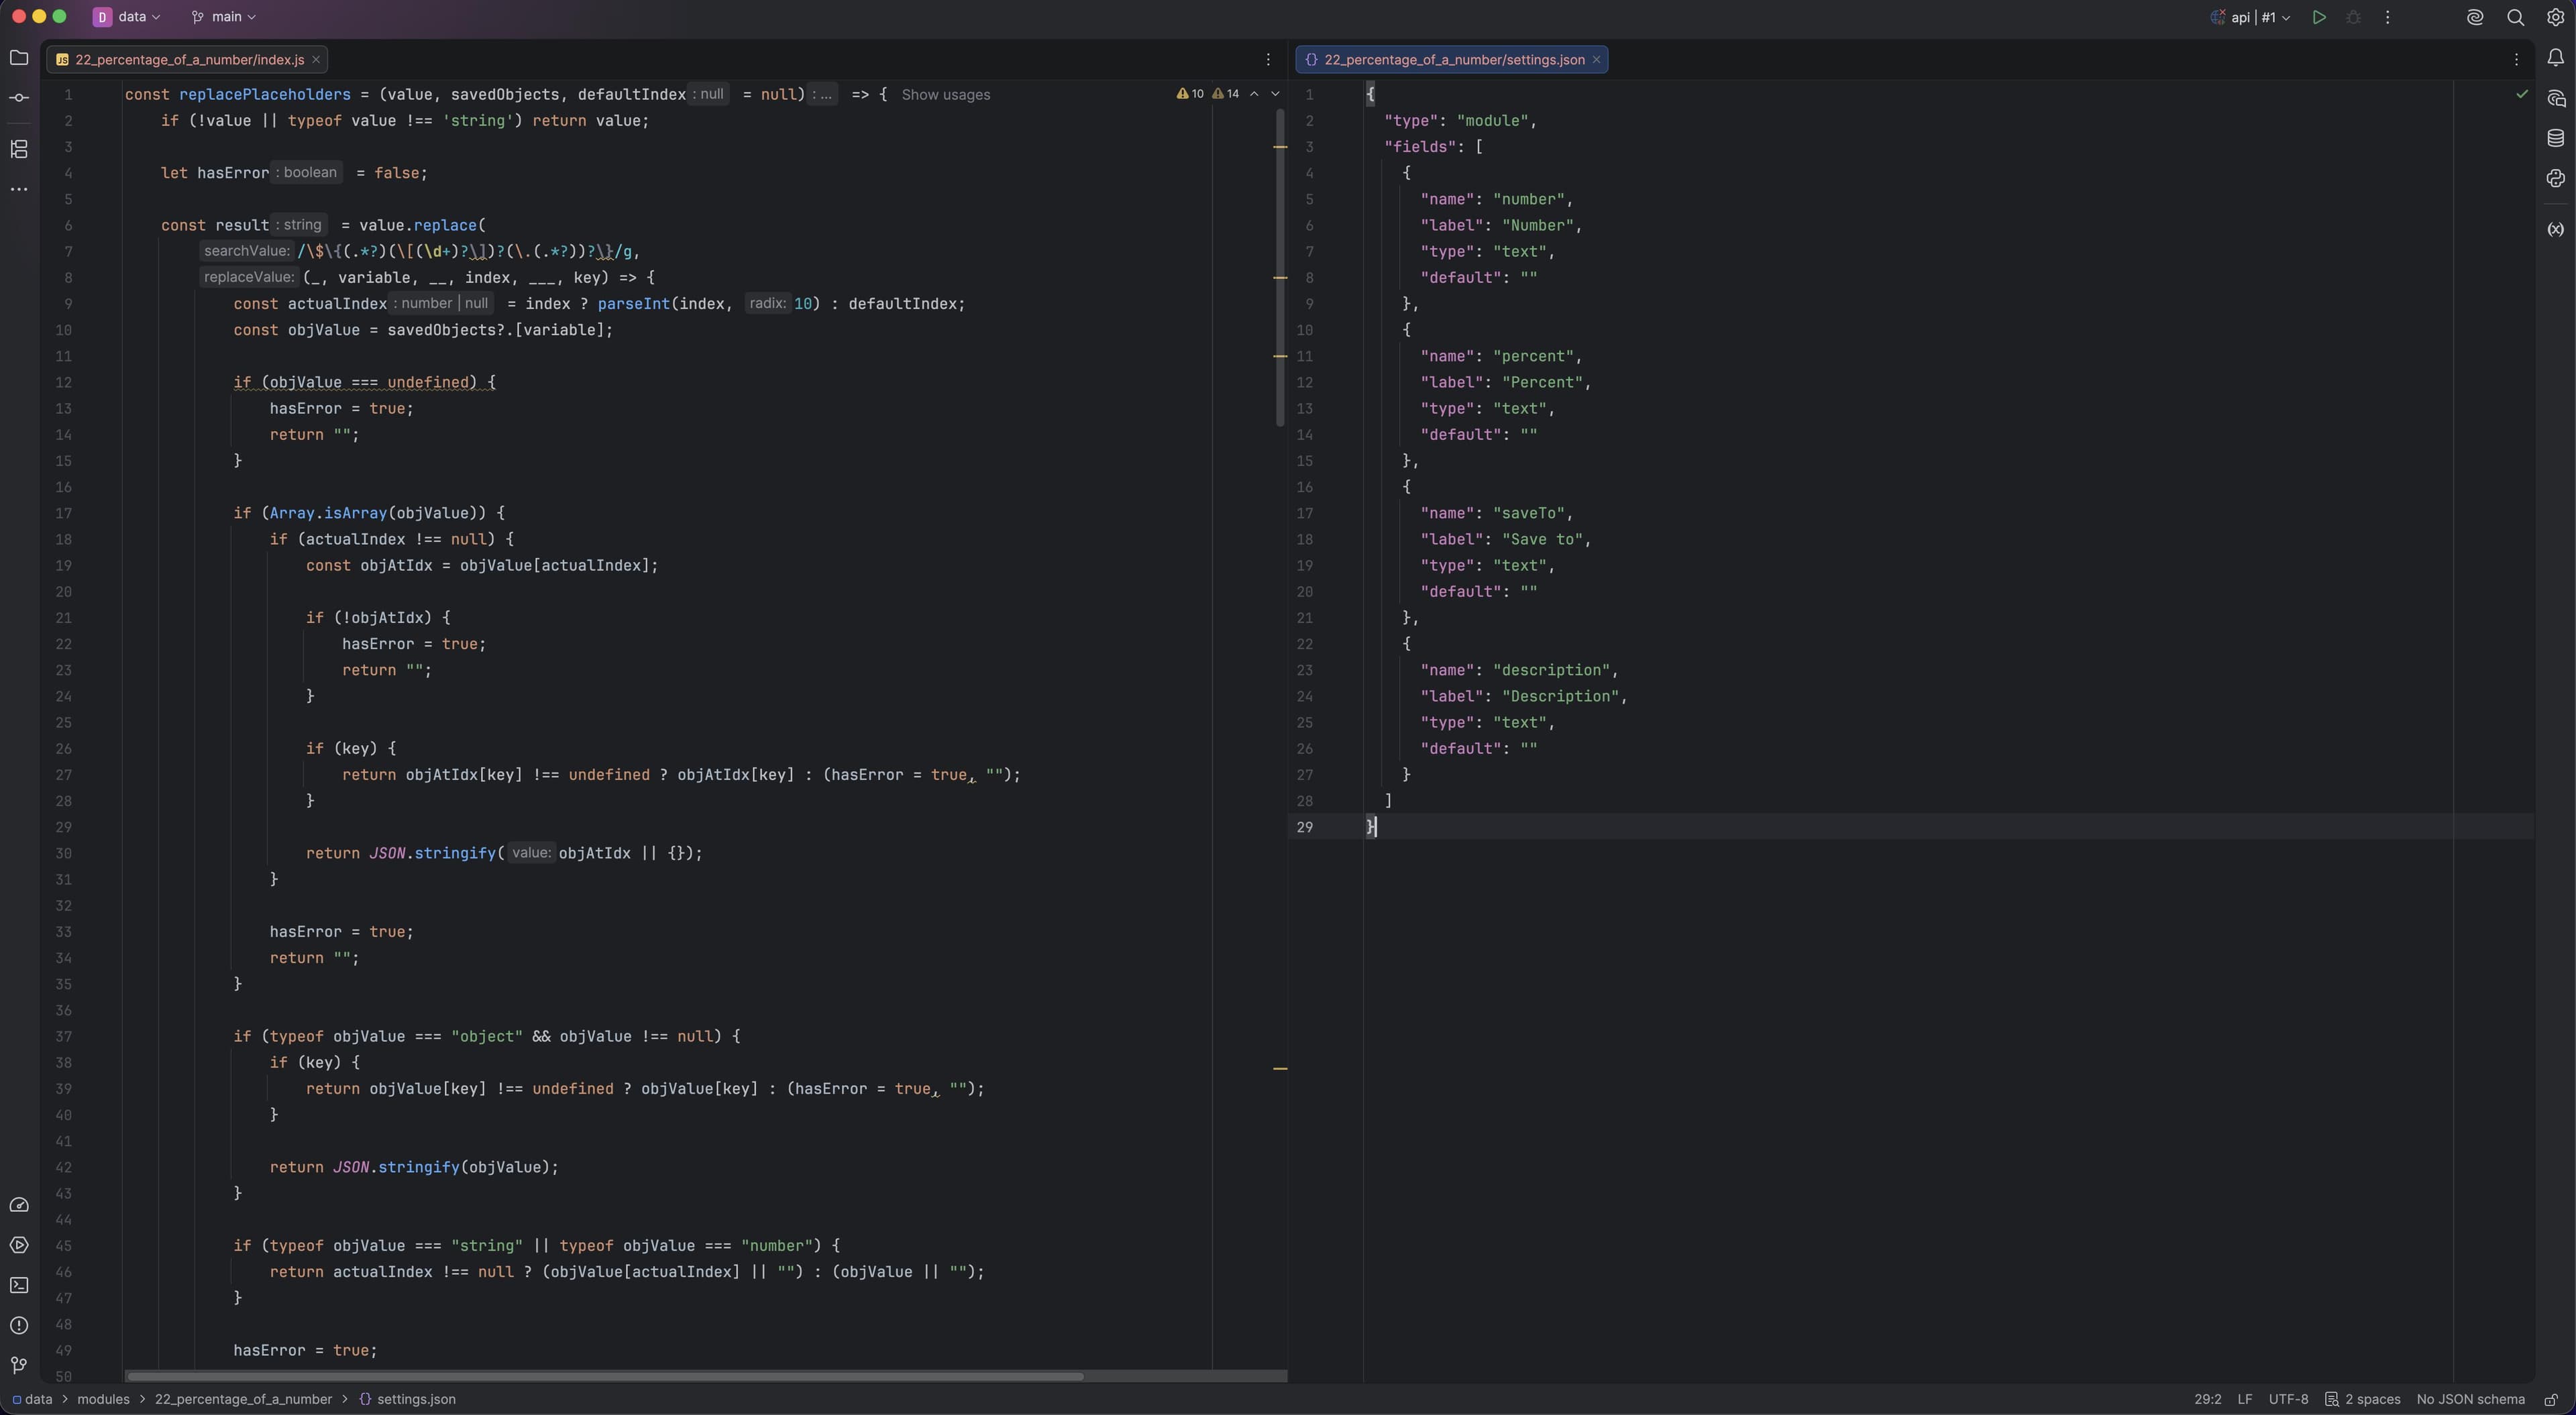
Usually, we change only the index.js and settings.json files. Work carefully:
- do not rename files without need;
- do not delete service files if you do not understand their role;
- do not mix the old and new module versions in one folder;
- if you are testing, it is better to make a copy of the module first.
-
Return to the Modules section in Afina.
-
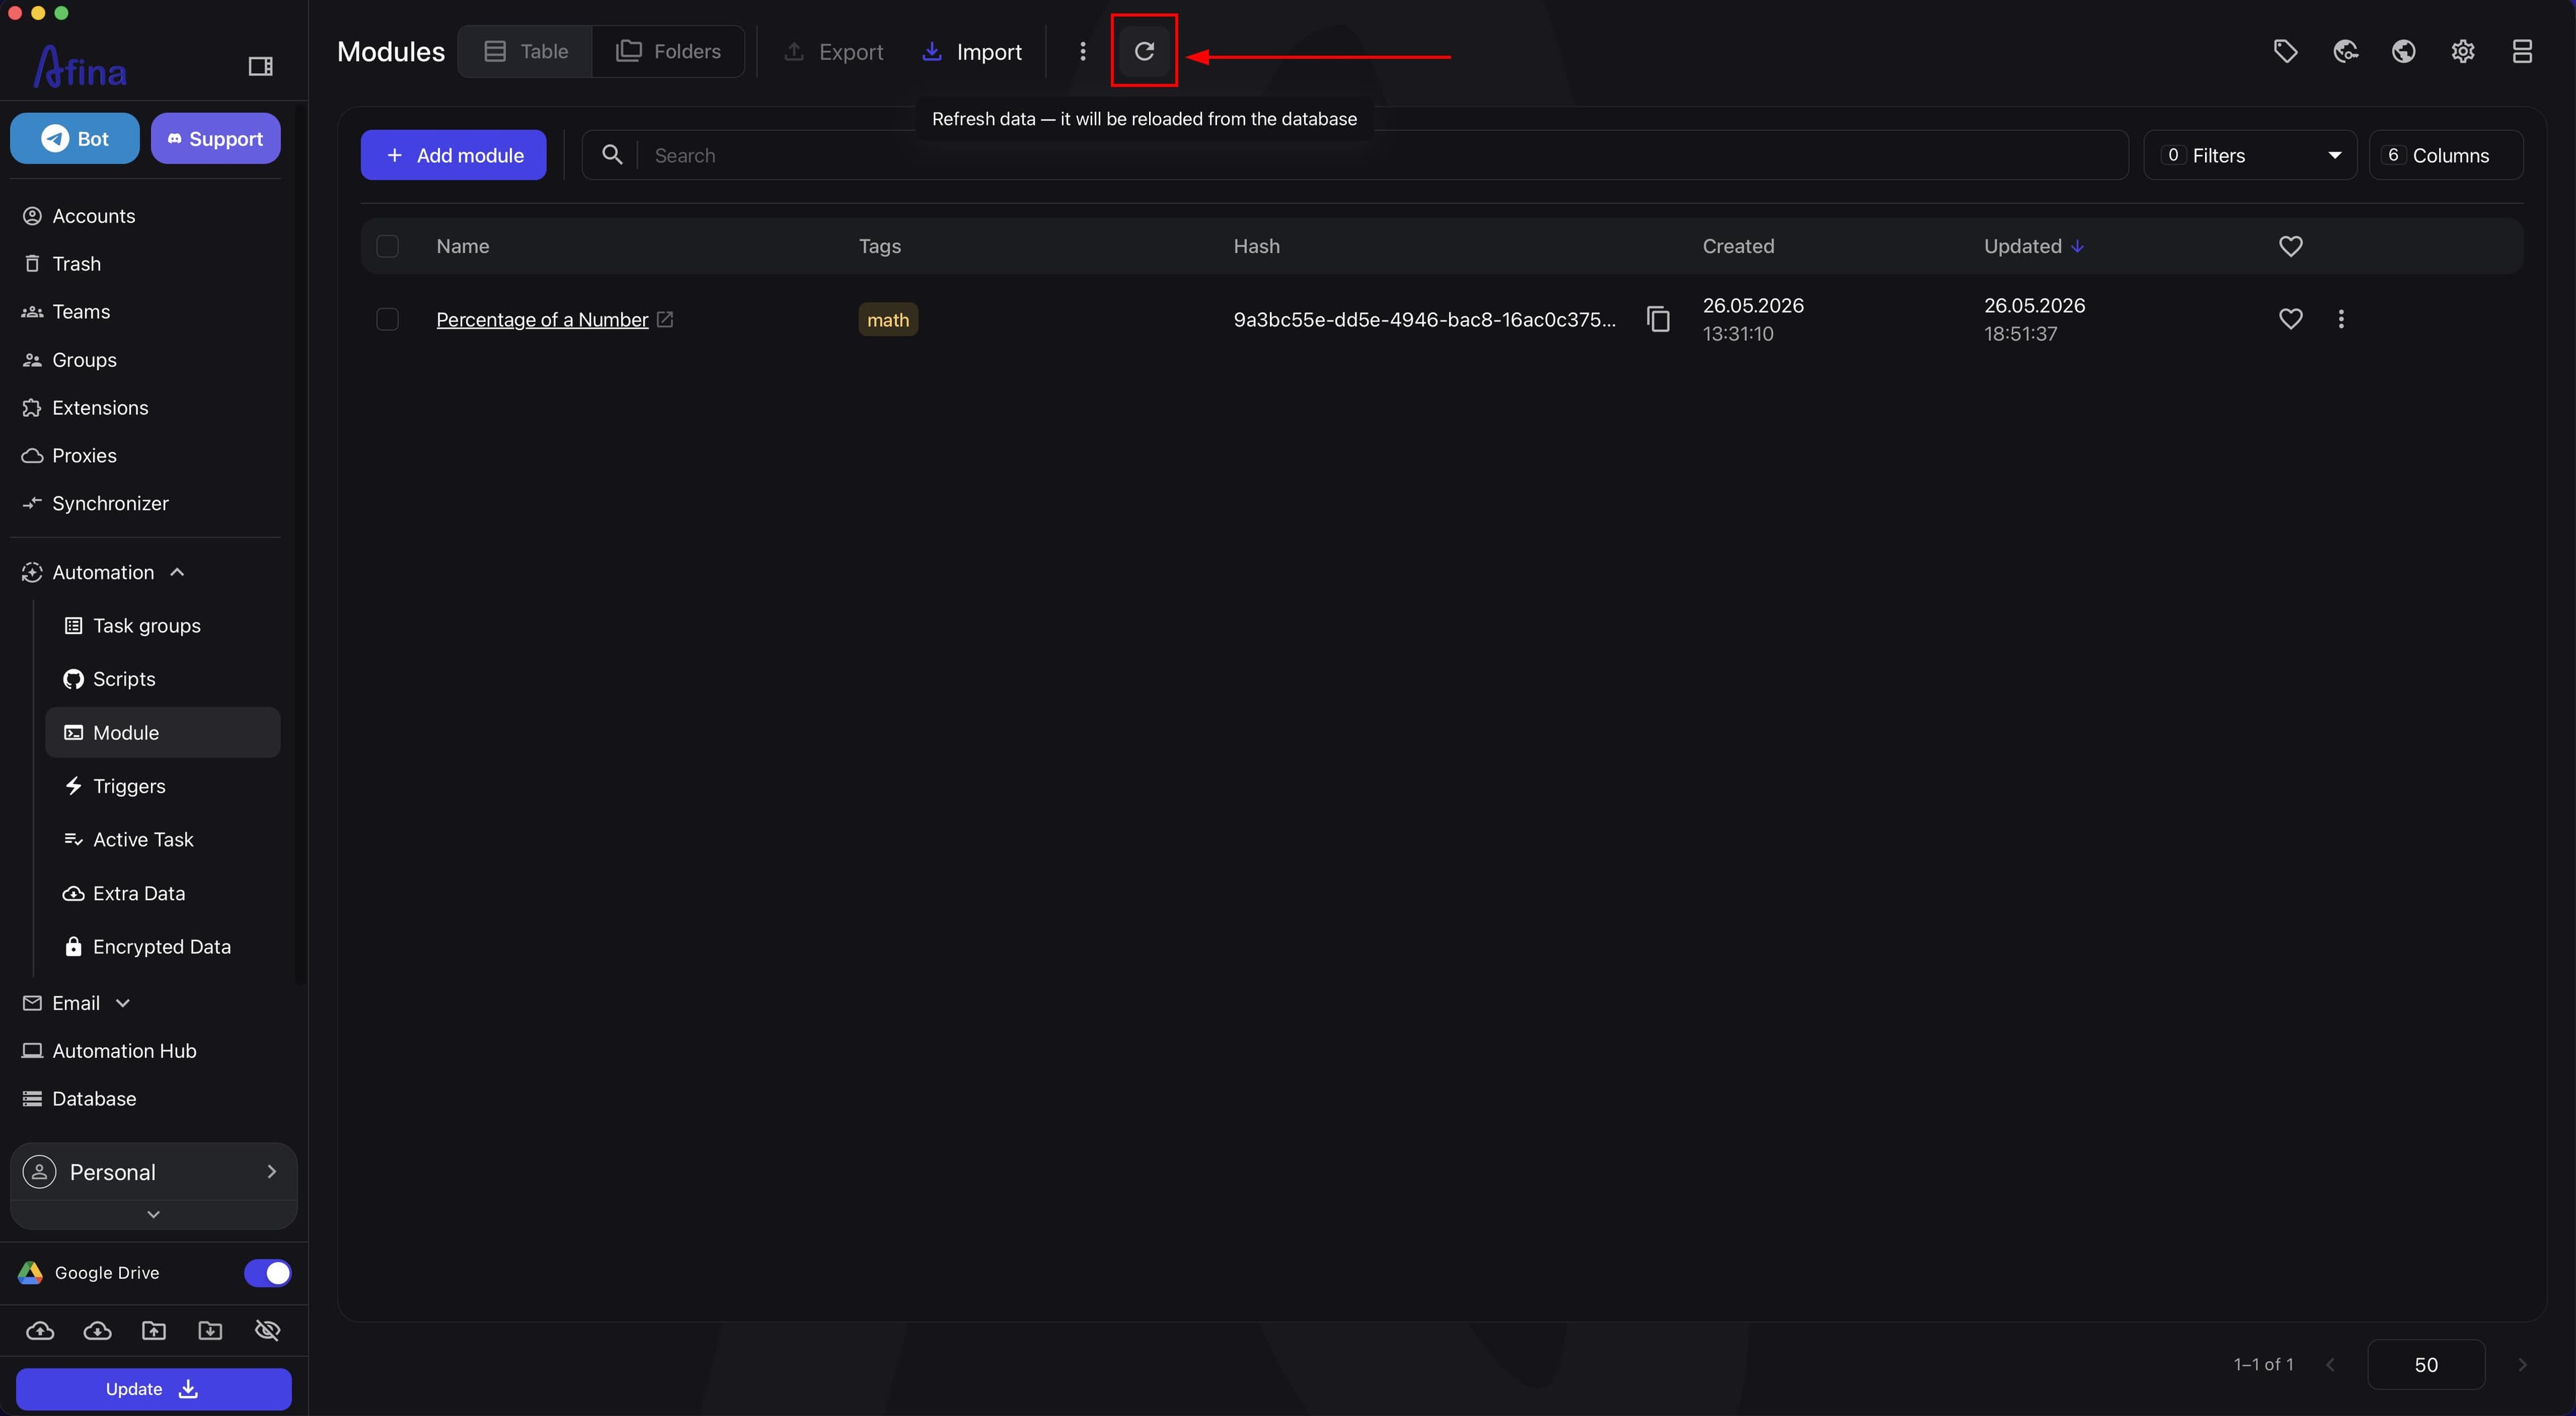
Click the Update icon.
The screenshot below shows the button for updating the module list in the "Modules" section.
- Click the red re-sign icon next to the module if the system shows that the module needs re-signing.
A module or script without an up-to-date signature will not work. After manually changing index.js, settings.json, package.json, or other module files, you need to update the list, check the red icon, and re-sign. Re-sign only when you trust the current contents of the local folder and understand exactly what was changed.
The signature protects the module from unnoticed changes in files and is based on the Ed25519 digital signature. Immediately after creating a module, the signature may not appear instantly if Afina is still finishing background dependency installation.
Using the module in a script#
-
Open the required script in the development environment.
-
Drag the
Add moduleblock onto the canvas. -
Click this block.
-
Select the required module from the list.
-
Fill in the parameters required for the module to work.
-
Click Save.
The screenshot below shows the "Add module" dialog in the script development environment with the Percentage of a Number module selected and its parameters.
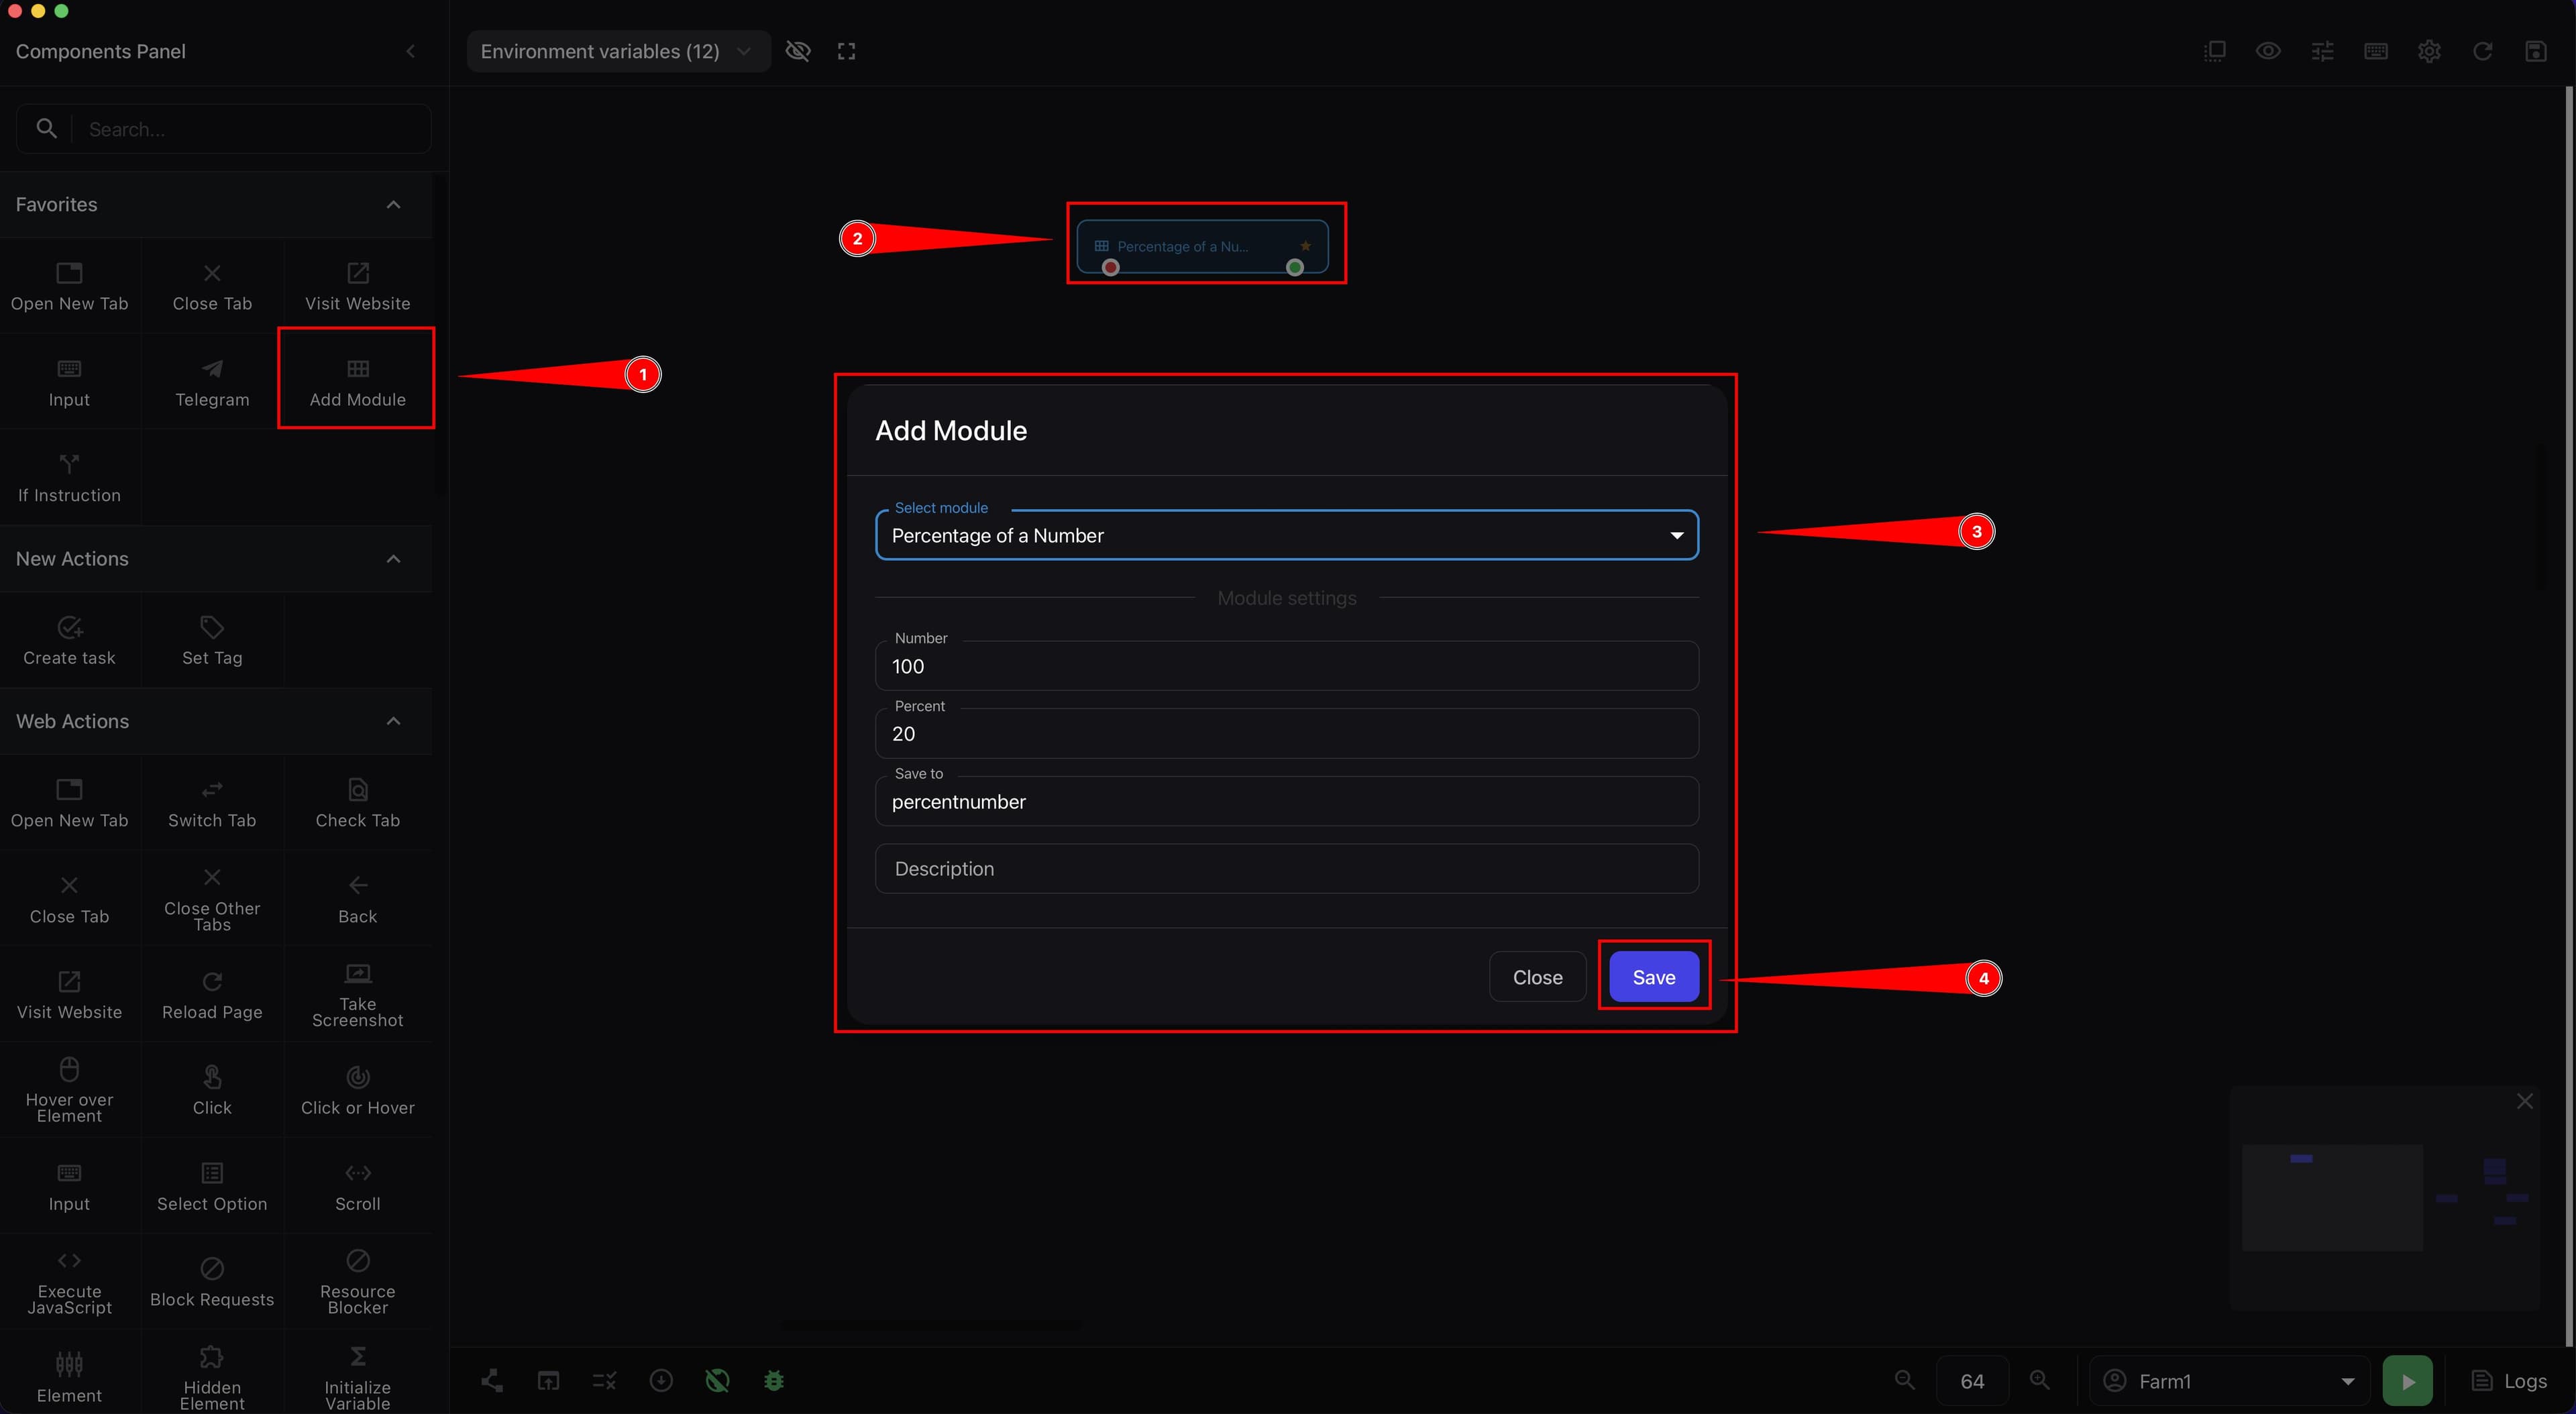
After this, the module will be available in the script as a separate component with its own fields and logic. Technically, this component calls the module through the executeModule block and binds to it by a unique hash.
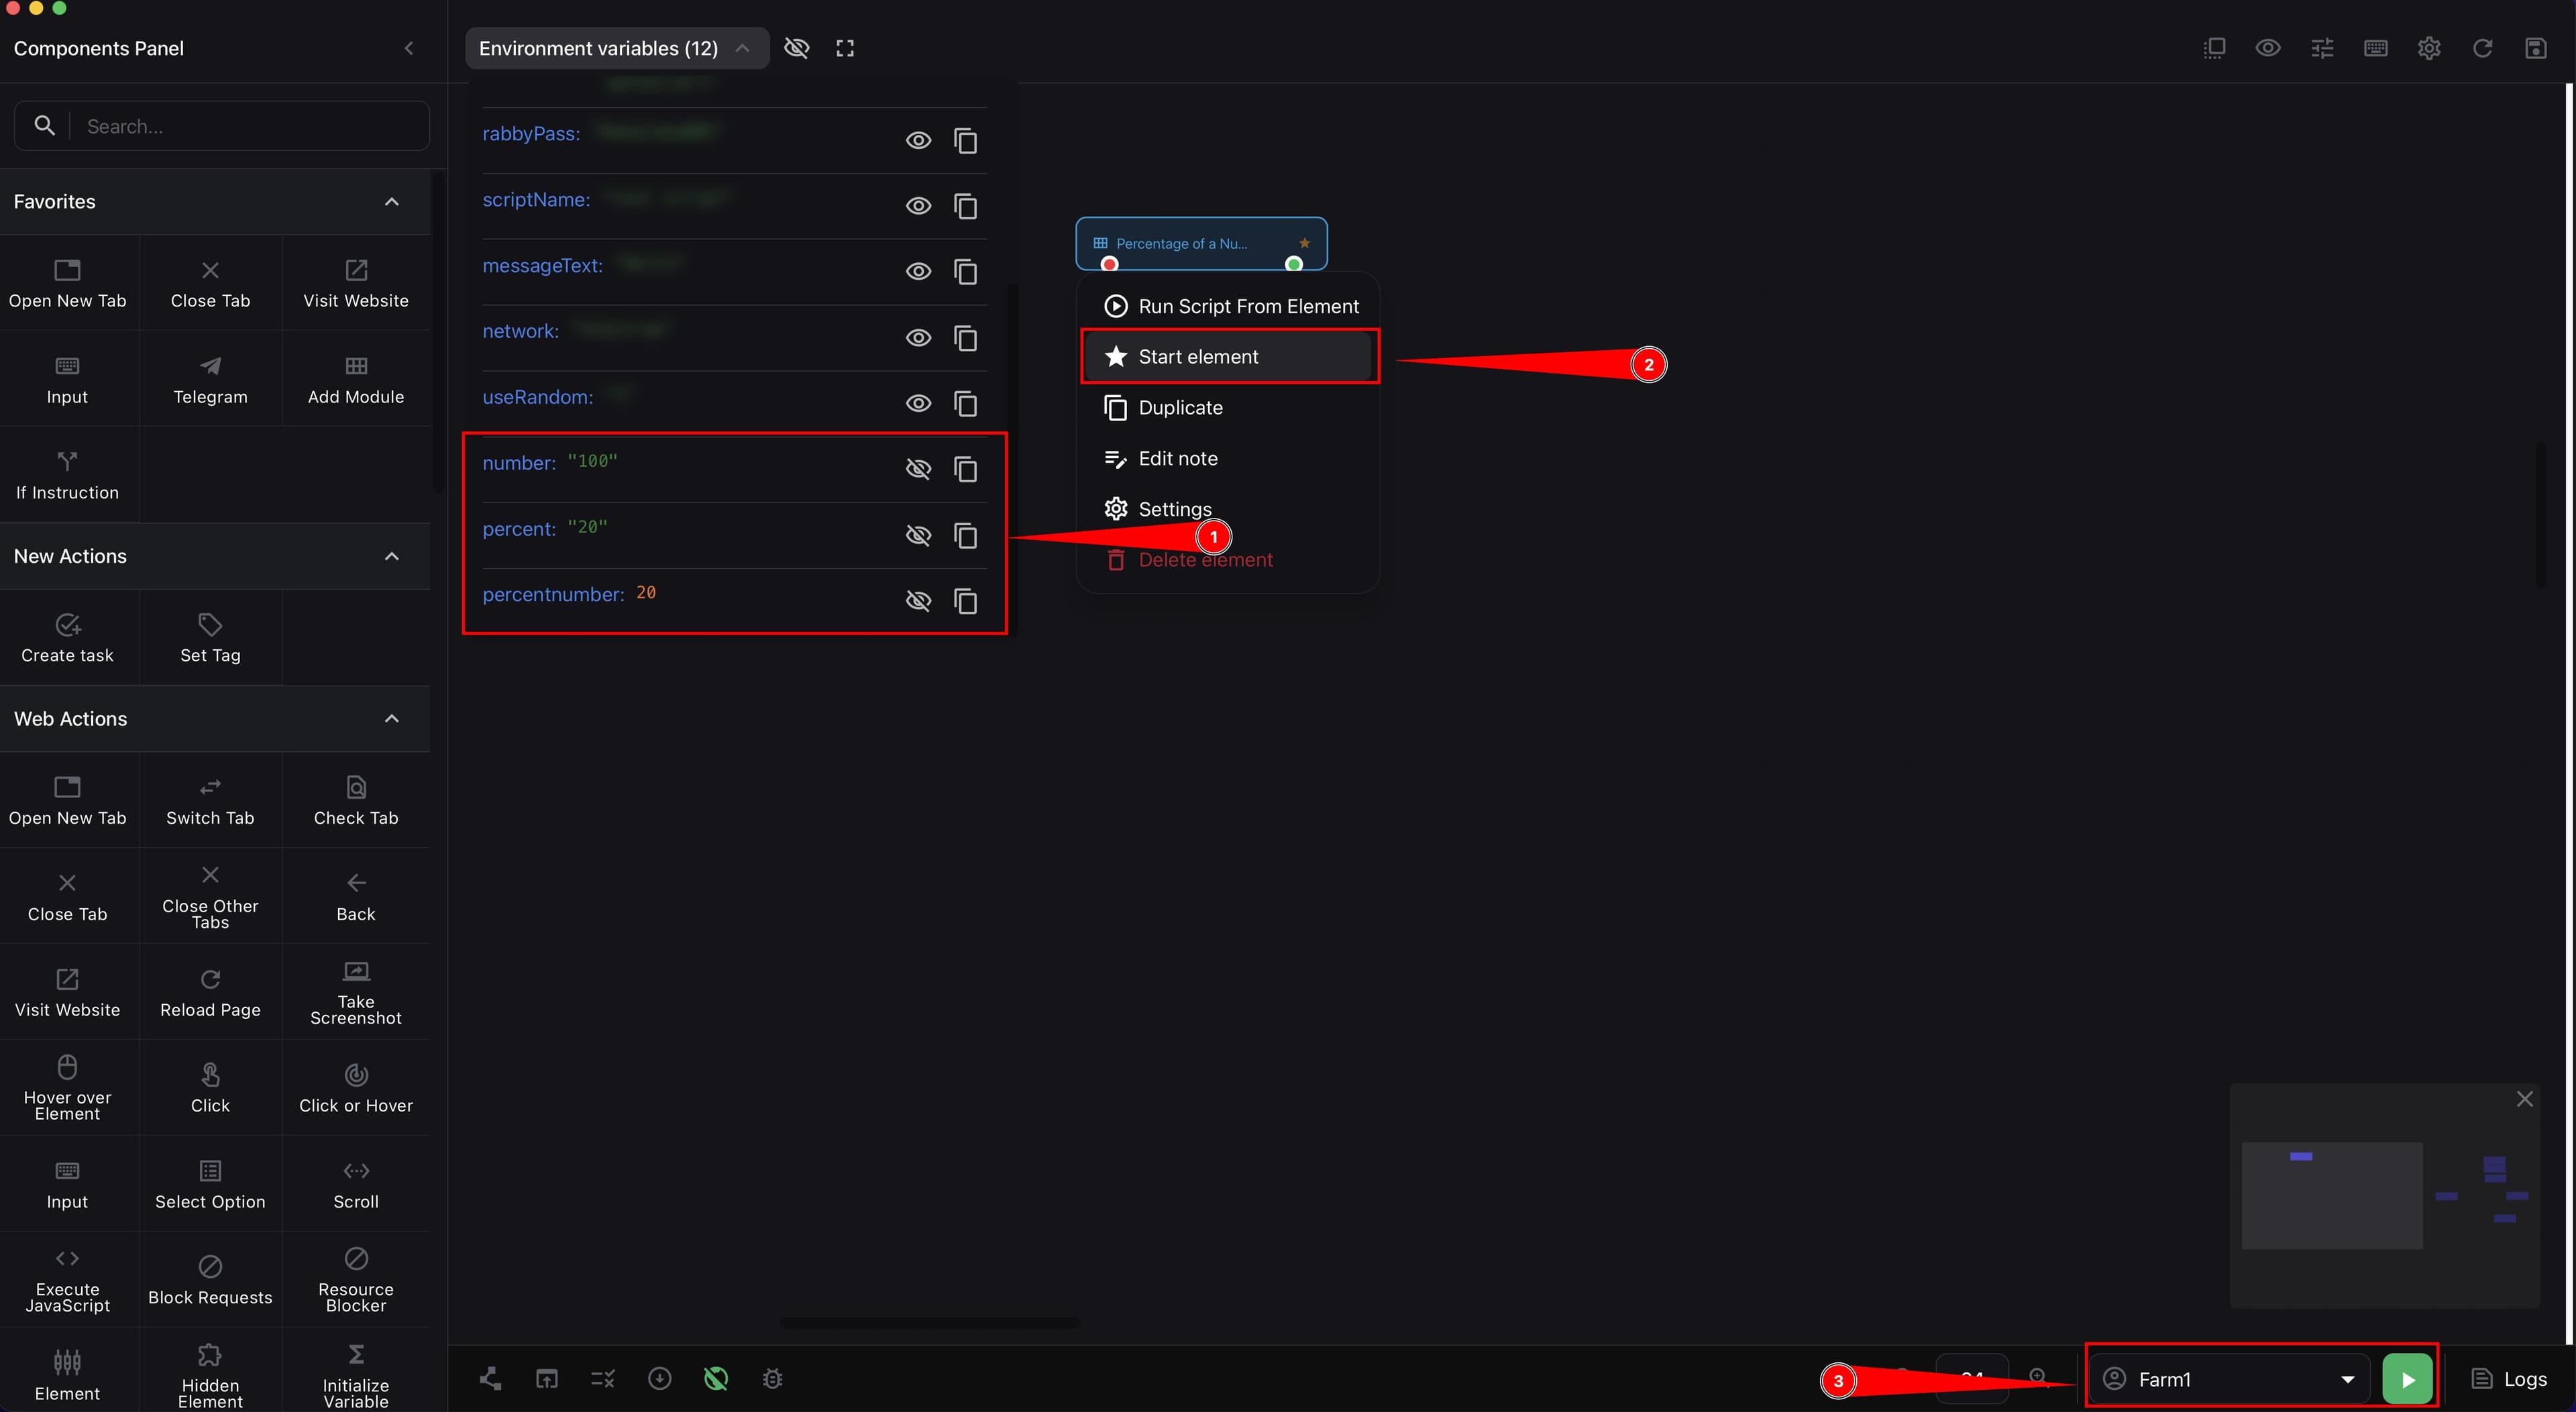
-
Right-click the module.
-
Select the "Start element" action.
-
Enable Browserless mode if this module does not need a browser.
-
Select any account for testing.
-
Click Start.
The next screenshot shows the module context menu with the "Start element" item and environment variables with the calculation result 20.
-
Open "Environment variables" and make sure the module worked correctly.
-
Use these variables later in your script if the result is correct.
-
Open "Logs" if the module does not work during execution.
The screenshot below shows the logs window in the script development environment with module messages and error text.
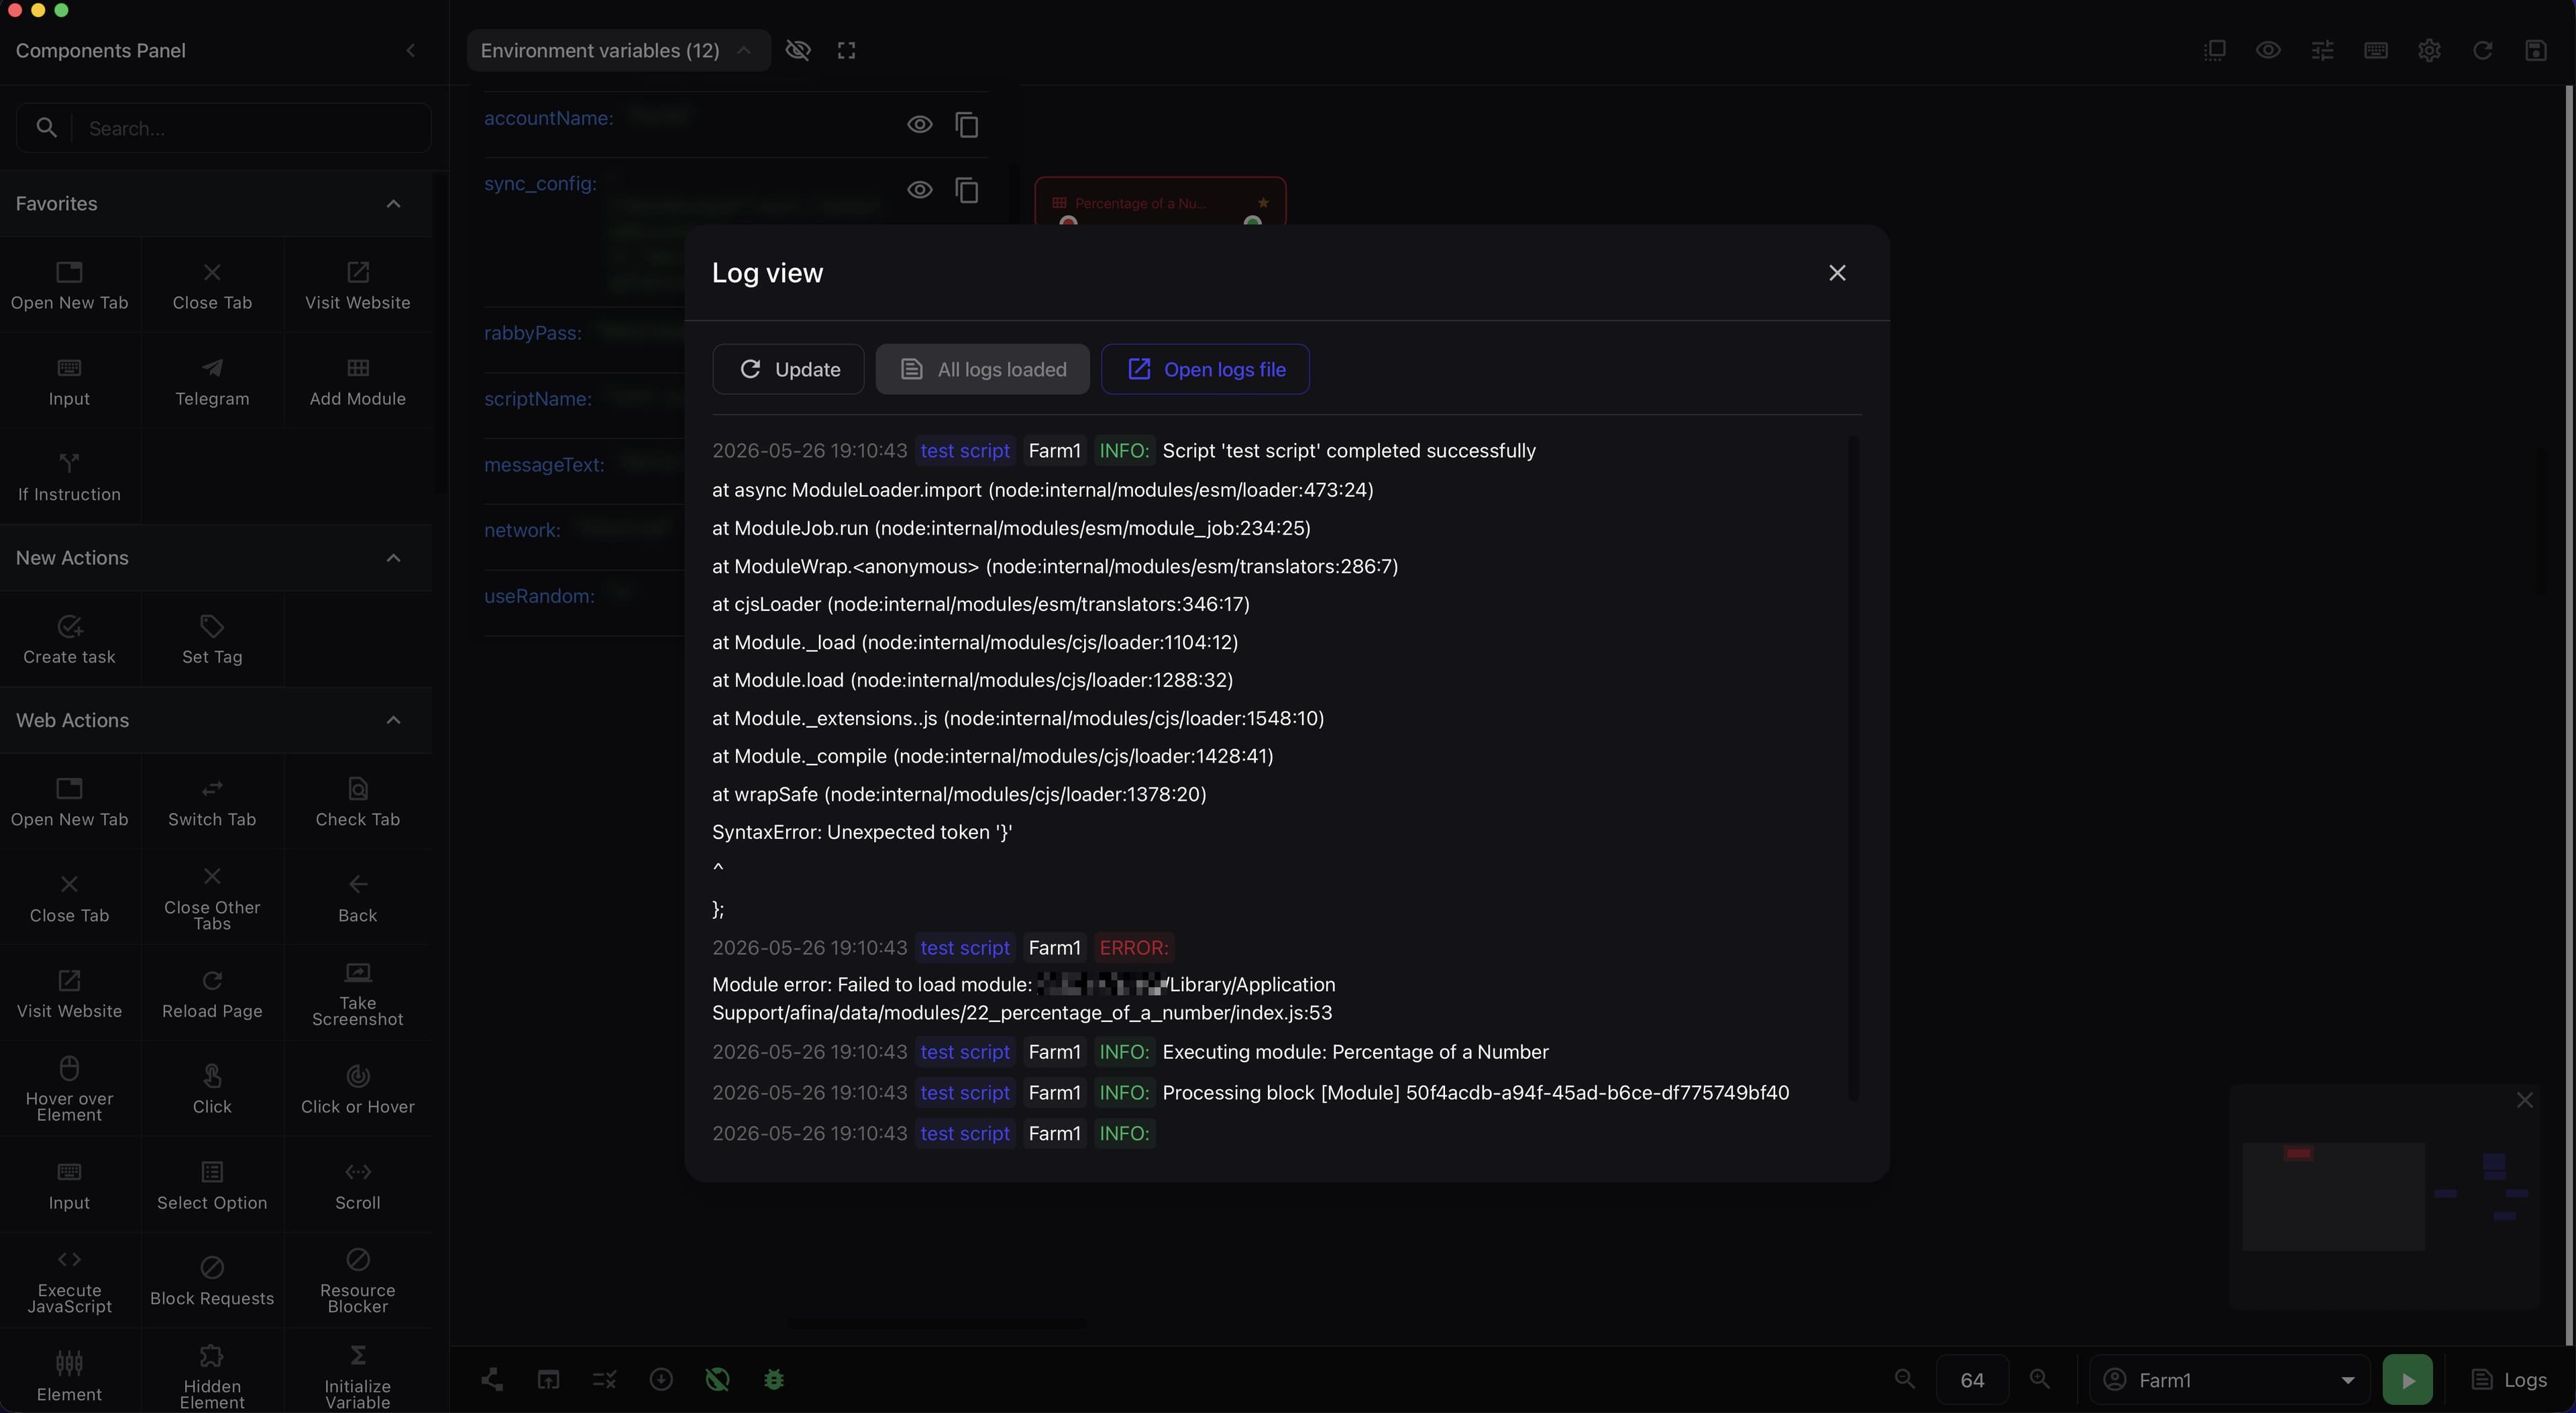
If the module does not work during execution, you need to check the logs, copy them, and paste them into your AI model to continue solving the issue.
If a script or module is not signed, launch will not work correctly. Before testing, check that there is no red re-sign icon next to the module or the script itself.
If the module runs long logic, check the "Maximum module execution time (ms)" setting in the main Afina settings section. If the limit is too low, Afina may forcibly stop the module before it finishes.
Export and import modules#
When the module already works normally, you can export it as a backup or for transfer.
Export through the top panel
-
Select the required module with the checkbox.
-
Click Export.
-
Choose to export the selected modules to your local computer or to Google Drive.
Export through the row or card menu
-
Click the three-dot icon in the module row or card.
-
Select Export module.
After export, you will receive a ZIP archive that may contain:
JSONfiles;JSfiles;- libraries;
- other files related to the module.
Export to Google Drive works only if Google Drive has already been connected in Afina settings.
Import a module from a local computer
-
Click Import.
-
Select the module import item.
-
In the system window, select the ZIP archive.
-
Wait for the import to finish and for the green result notification.
Import a module from Google Drive
-
Click Import.
-
Select module import from Google Drive.
-
Select the required files.
-
Click Import.
After successful import, the module will appear in the table as new. Import may run in the background, so do not close the process until the completion notification appears.
Import is needed when you:
- transfer a module to another local computer;
- restore a backup;
- received a module from another user.
Practical details#
Here is what actually helps avoid problems when creating a module with an AI model:
- do not ask an AI model to generate a module without a real template;
- first create an empty module through Afina;
- give the AI model only current files, not a verbal description;
- ask it not to change the service structure without need;
- test the module on simple numbers with an obvious result;
- make a copy of the module before serious changes;
- after manual changes, check whether re-signing is needed;
- do not update the hash without need if the module is already used in scripts;
- for long operations, check the module execution time limit.
Result#
After completing these steps, you will have a ready working module for Afina with the correct file structure, clear logic, and a verified result in the script. You will also have a full workflow for future modules: creation, editing through an AI model, checking, re-signing, use in scripts, export, and import.