How to create your first script in Afina#
In this guide, you will create your first script in Afina, open the visual script builder, add basic blocks, and check execution through logs. The "Scripts" section also lets you assign key bindings, add scripts to favorites, group them with tags and filters, and run ready-made logic on a selected account.
Before you start#
- Make sure you have at least one account for a test run of the script.
- For your first attempt, use a simple test script, not a production scenario.
For the first run, it is better to use Default mode so you can see the browser and immediately understand which step the scenario is executing.
Creating a script#
-
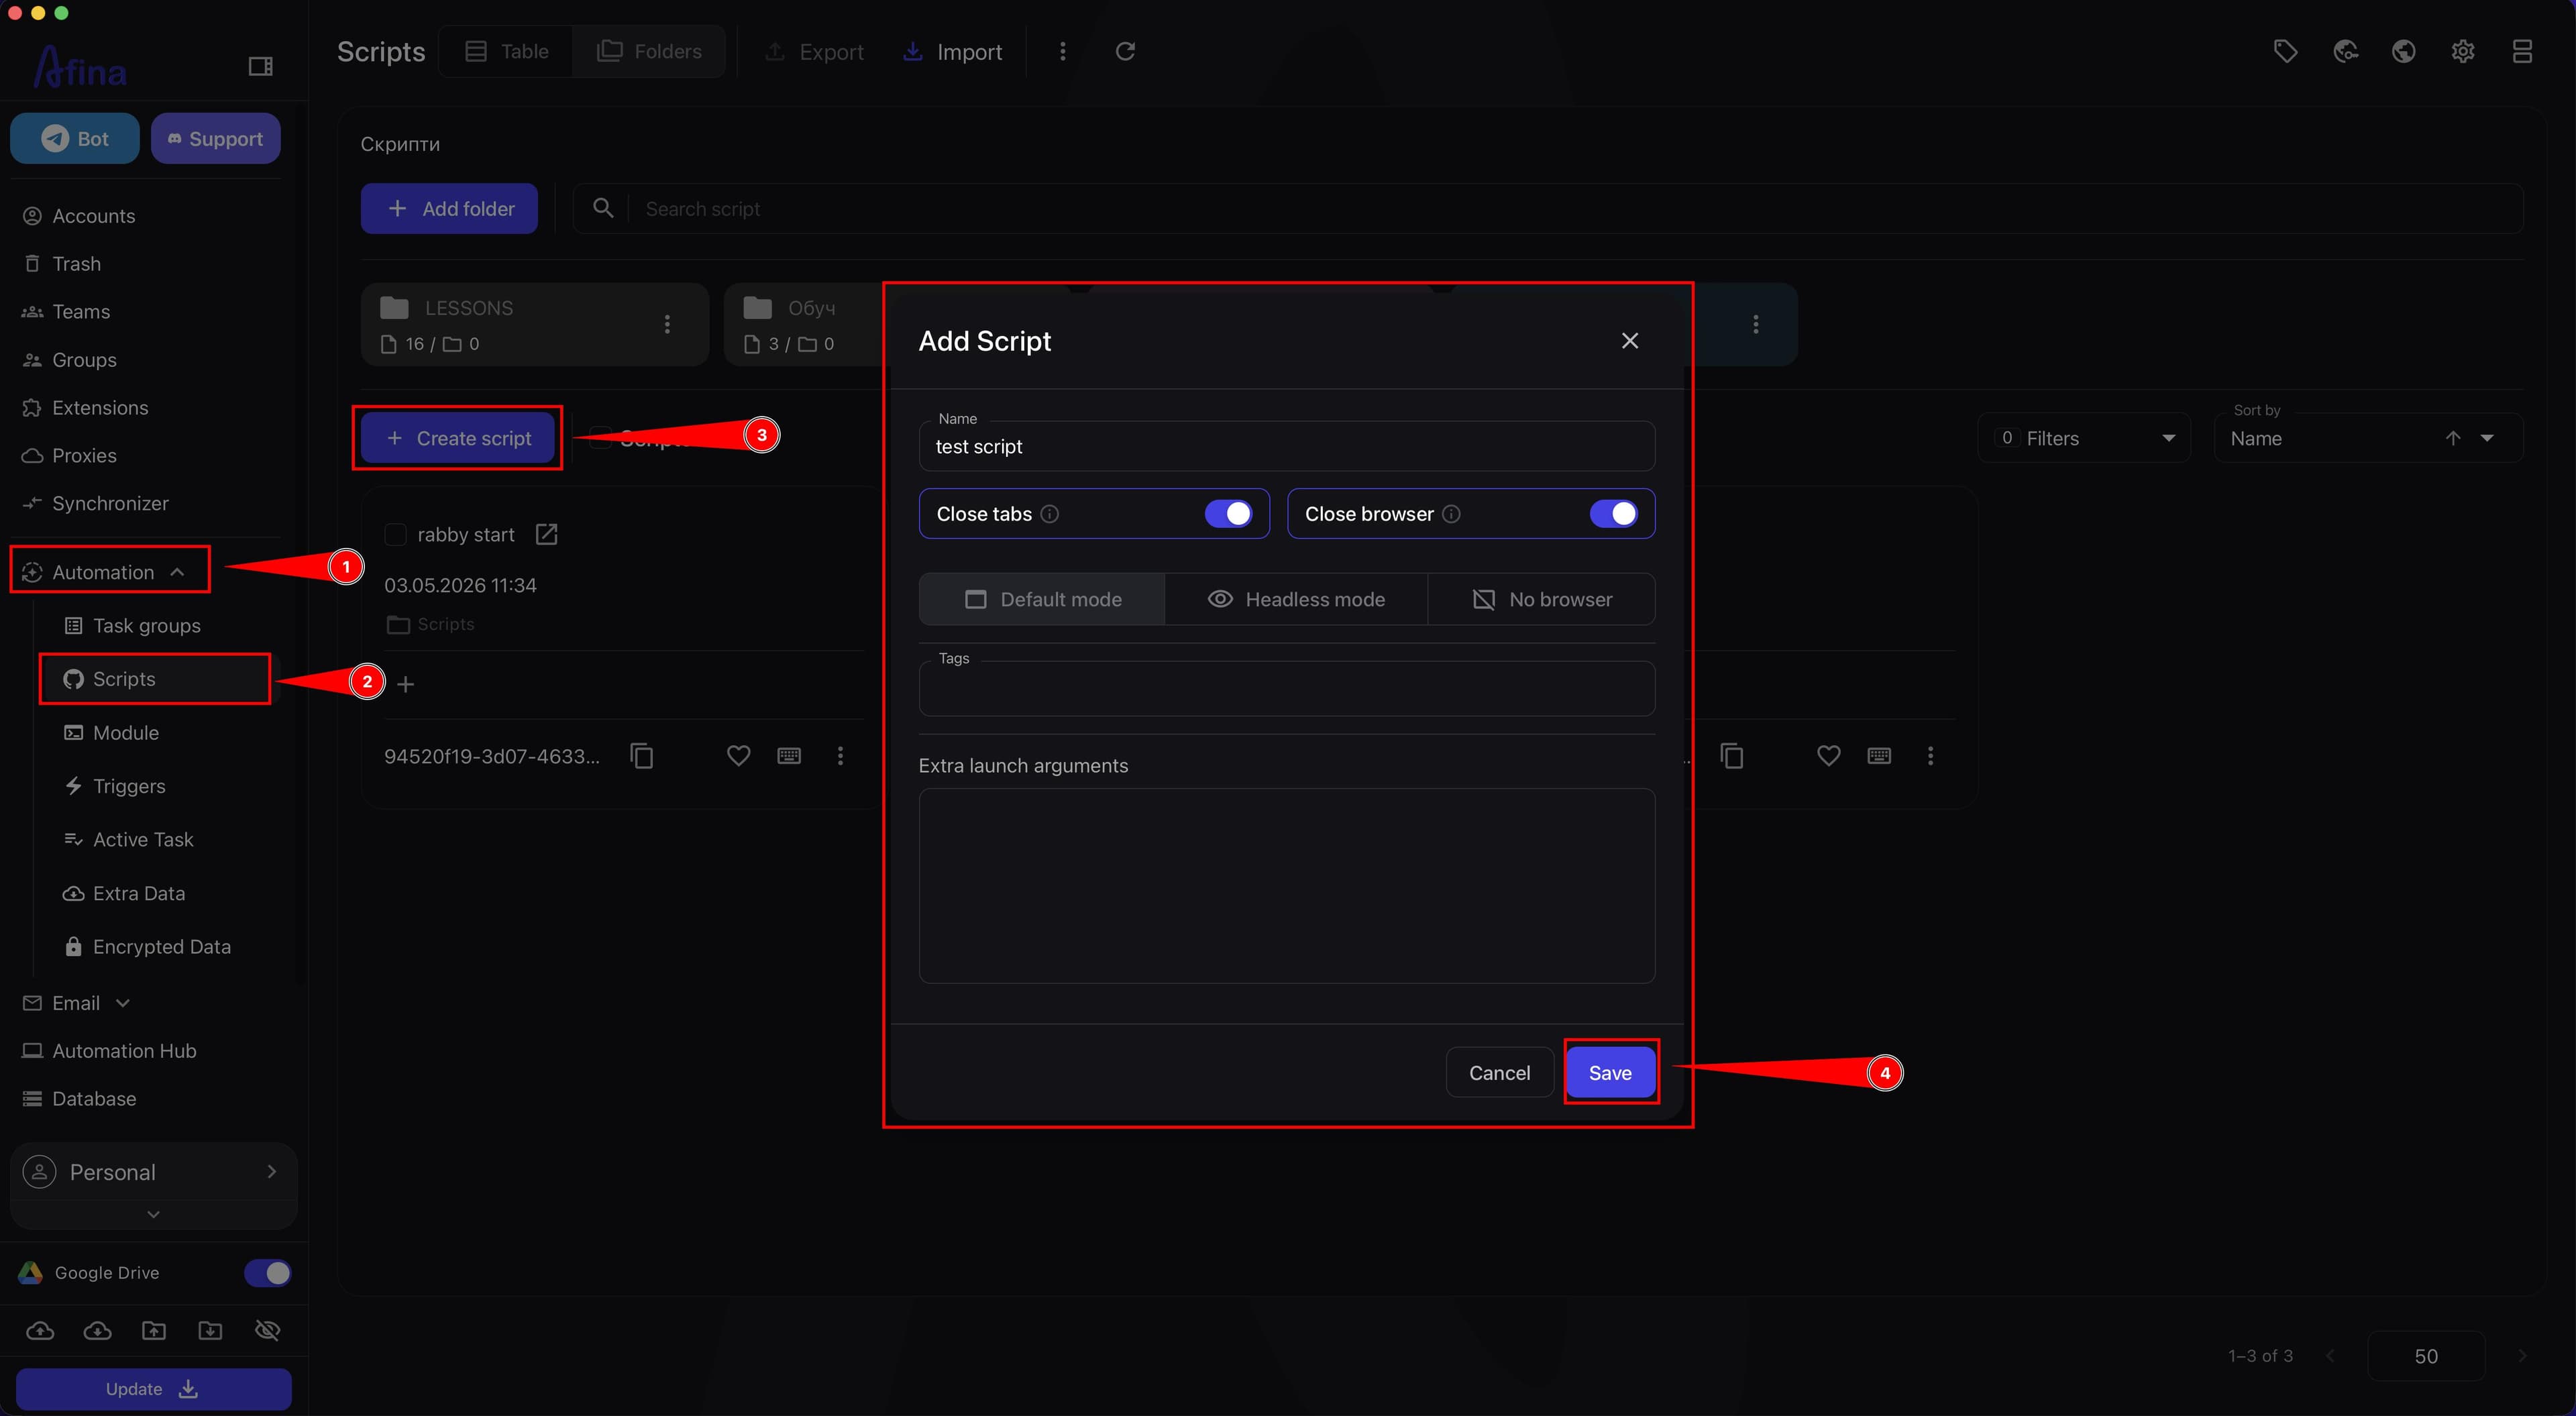
Go to the Automation section.
-
Open the "Scripts" tab.
-
Click Create script.
-
In the "Name" field, enter the script name, for example
test script. The name is required and must be 3 to 25 characters long. -
Enable the "Close tabs" checkbox if tabs should close automatically after the scenario finishes.
-
Enable the "Close browser" checkbox if the browser should close automatically after the scenario finishes.
-
In the launch mode block, select "Default mode" if you are creating your first test script.
-
In the "Tags" field, add tags if you want to group the script for later filtering.
-
In the "Extra launch arguments" field, enter parameters only when needed. This field is used for Chromium arguments, so do not add random values there.
-
Click Create.
The screenshot below shows the "Scripts" page with the create button and the "Add Script" window with the basic fields.
Launch modes
Use "Default mode" when you need to see the browser and visually control the script actions.
"Headless mode" is suitable for scenarios where the browser should not take up space on the screen, but the logic still runs through the browser. It is convenient for simple scenarios and often reduces system load, but popups and wallets are less stable in this mode.
Use "No browser" only for scenarios that do not require visual interaction with the browser. This mode is suitable for data processing, calculations, or separate on-chain actions without opening a browser window.
Headless mode is convenient for simple scenarios, but popups and wallets often work unstably in it. Use No browser mode only for scenarios that do not require visual browser interaction.
Incorrect extra launch arguments can affect browser stability. Fill in this field only when you clearly understand which Chromium parameter your scenario needs.
Key bindings and favorites#
-
Find the created script in the table.
-
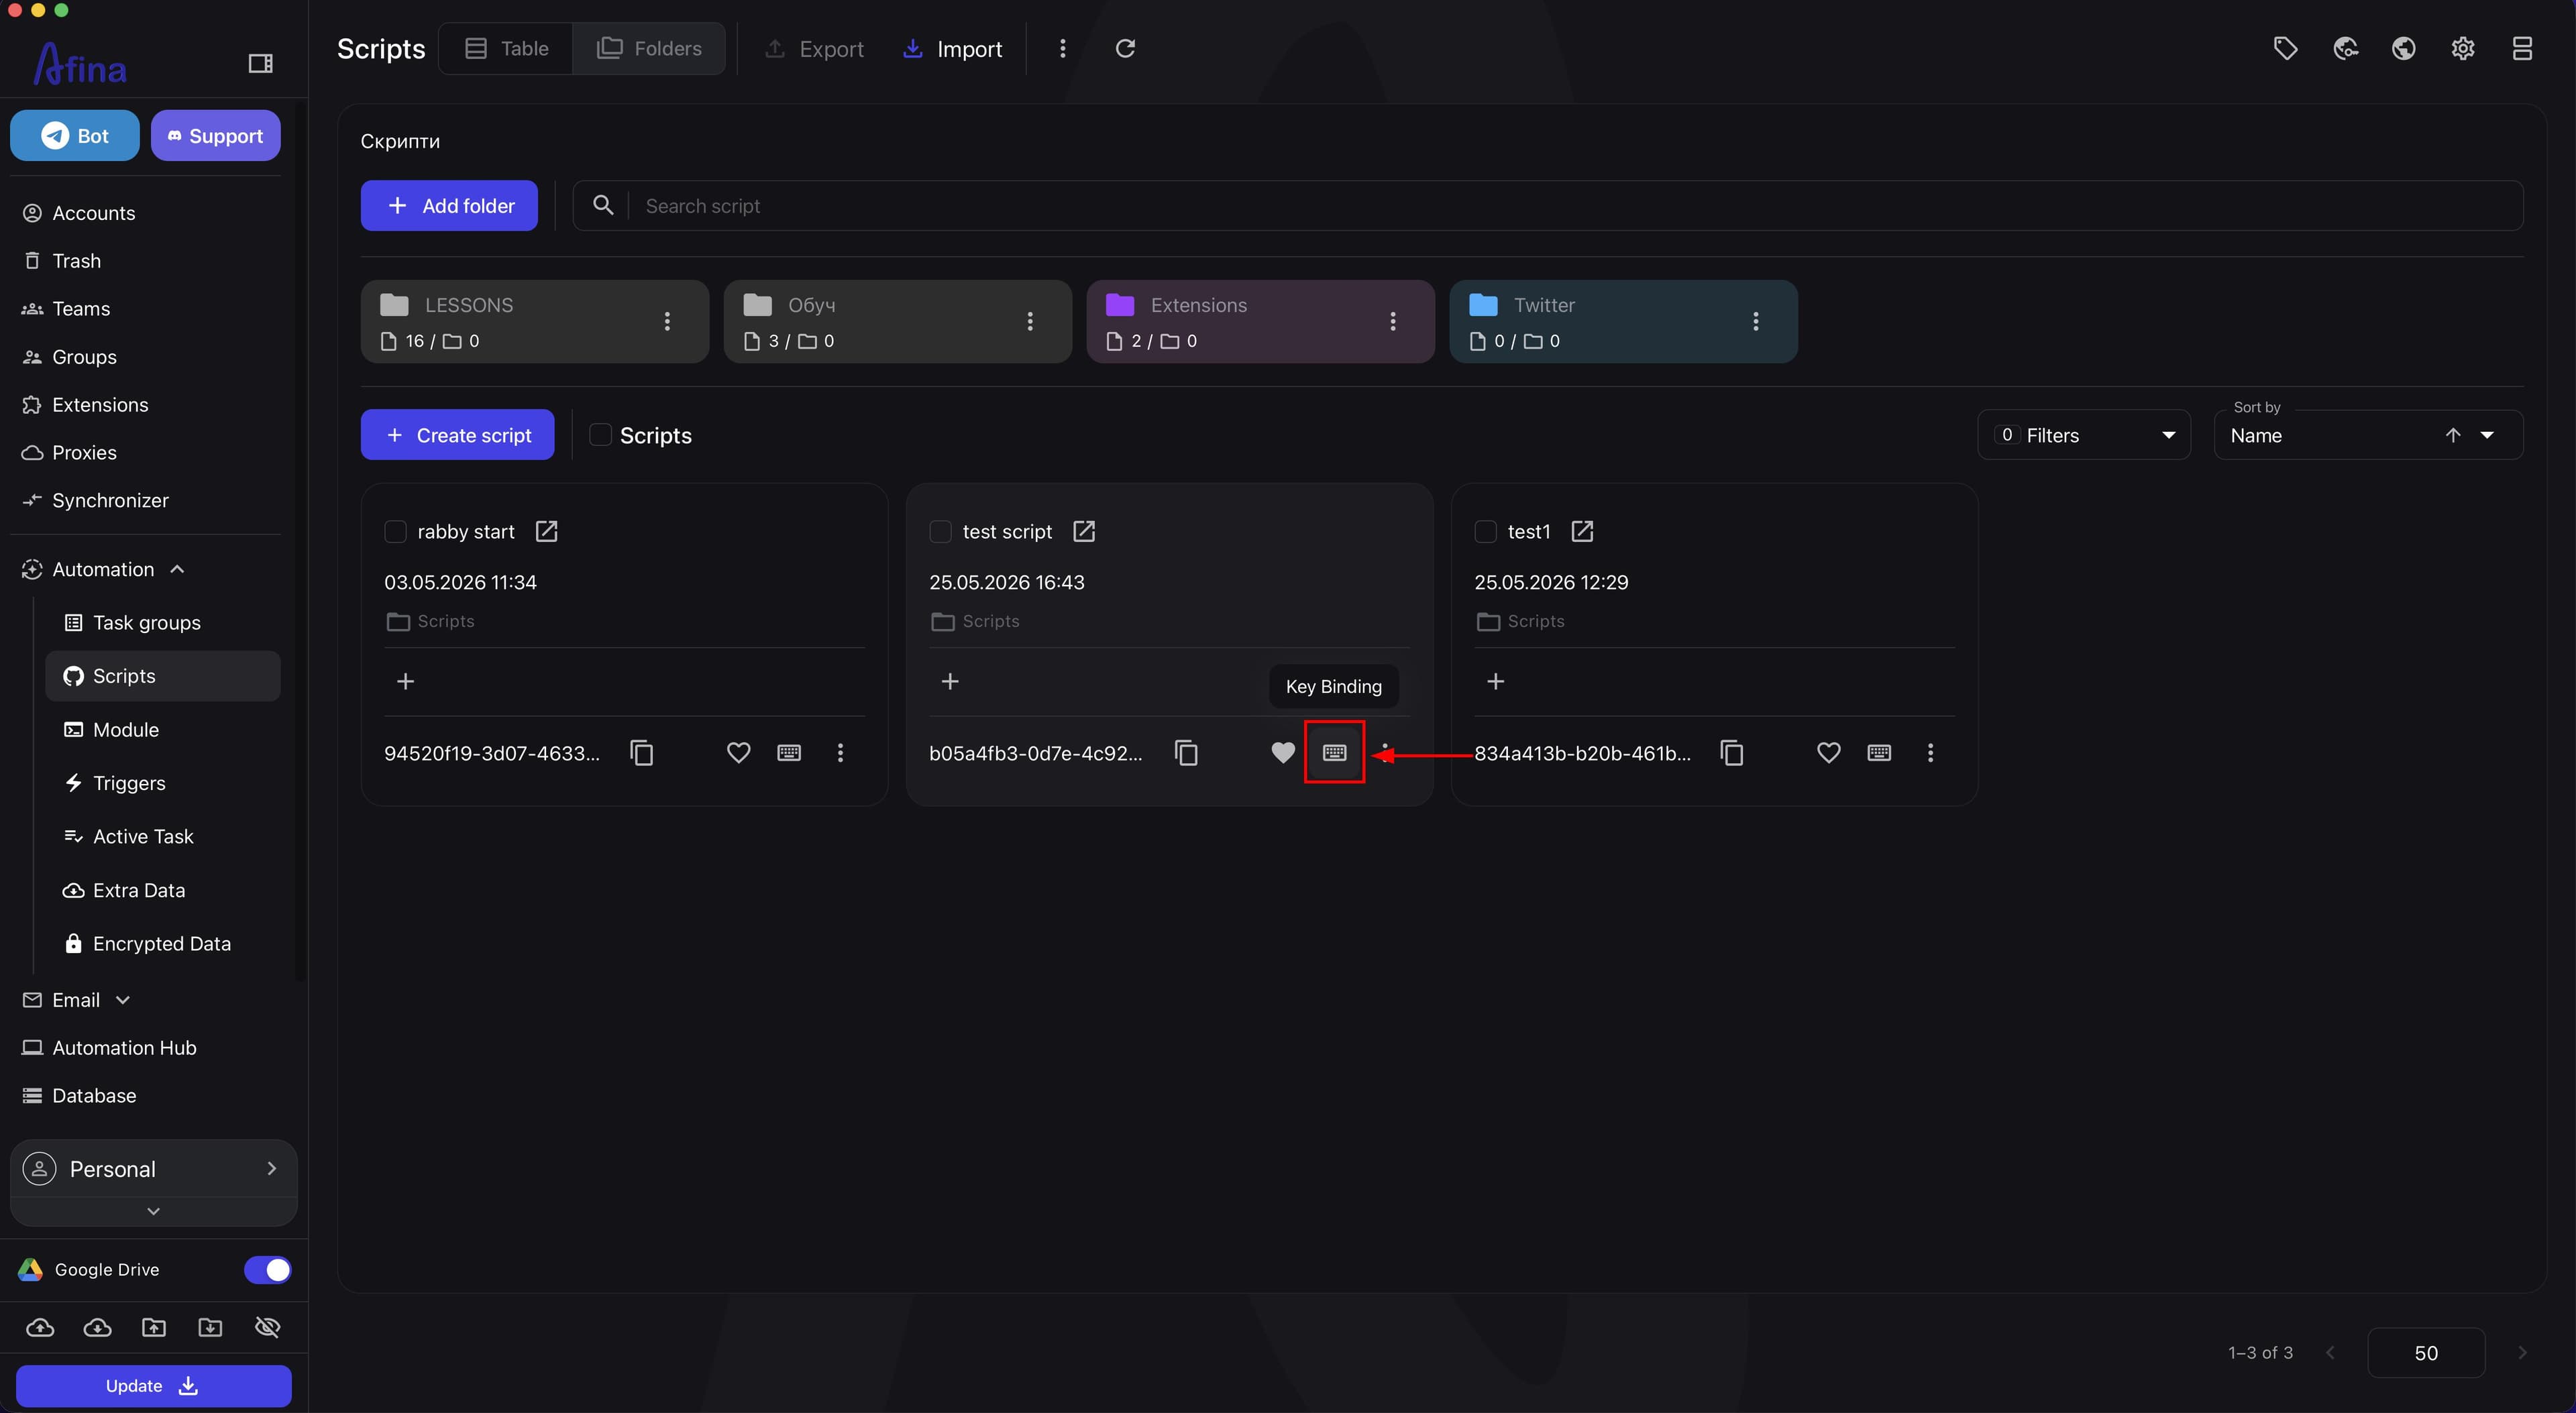
Click the key binding icon in the script row if you want to run it with a quick shortcut.
The screenshot below shows exactly where the key binding icon is located in the scripts list.
-
In the "Key Binding Test" window, press the key combination you want.
-
Click Save.
The next screenshot shows the key binding window with a selected combination and the save button.
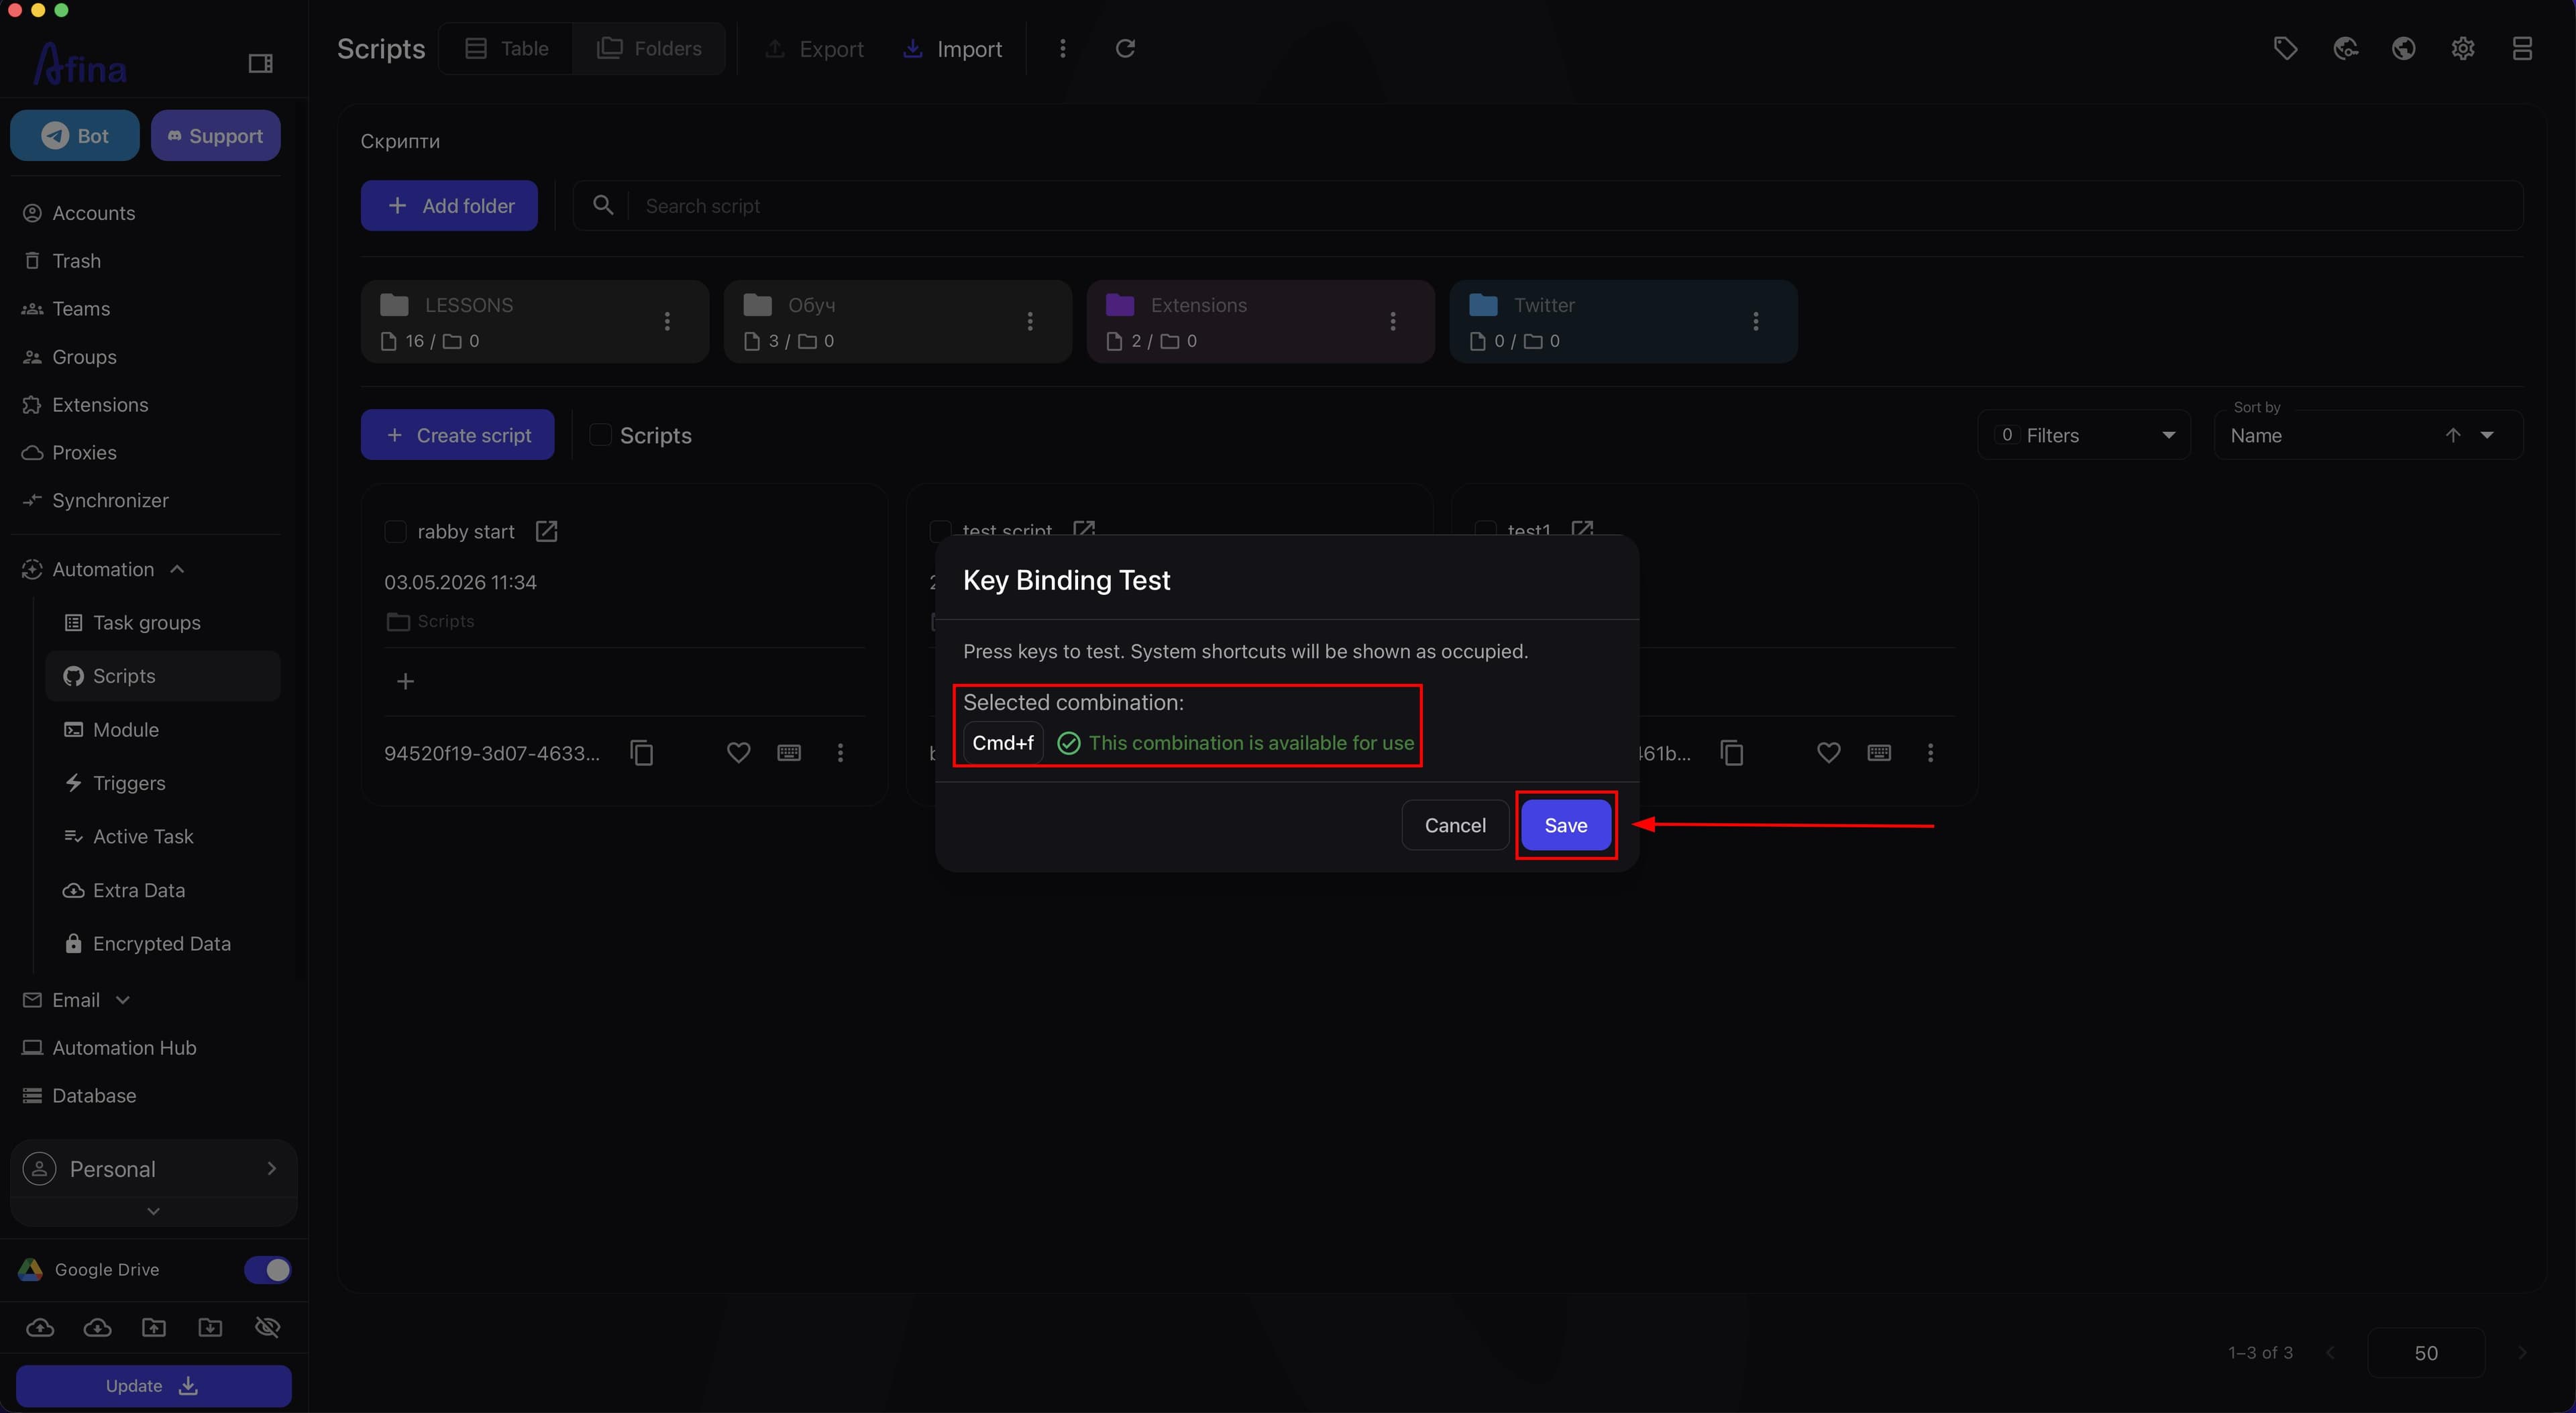
A key binding is useful for quickly running a script manually on an already opened account without returning to the scripts list.
If the key binding is not assigned, the combination is most likely already in use. Choose another combination and save it again.
- Click the add to favorites icon in the script row if you want to find it quickly through filters or run it in other workflows.
This screenshot shows the icon for adding a script to favorites.
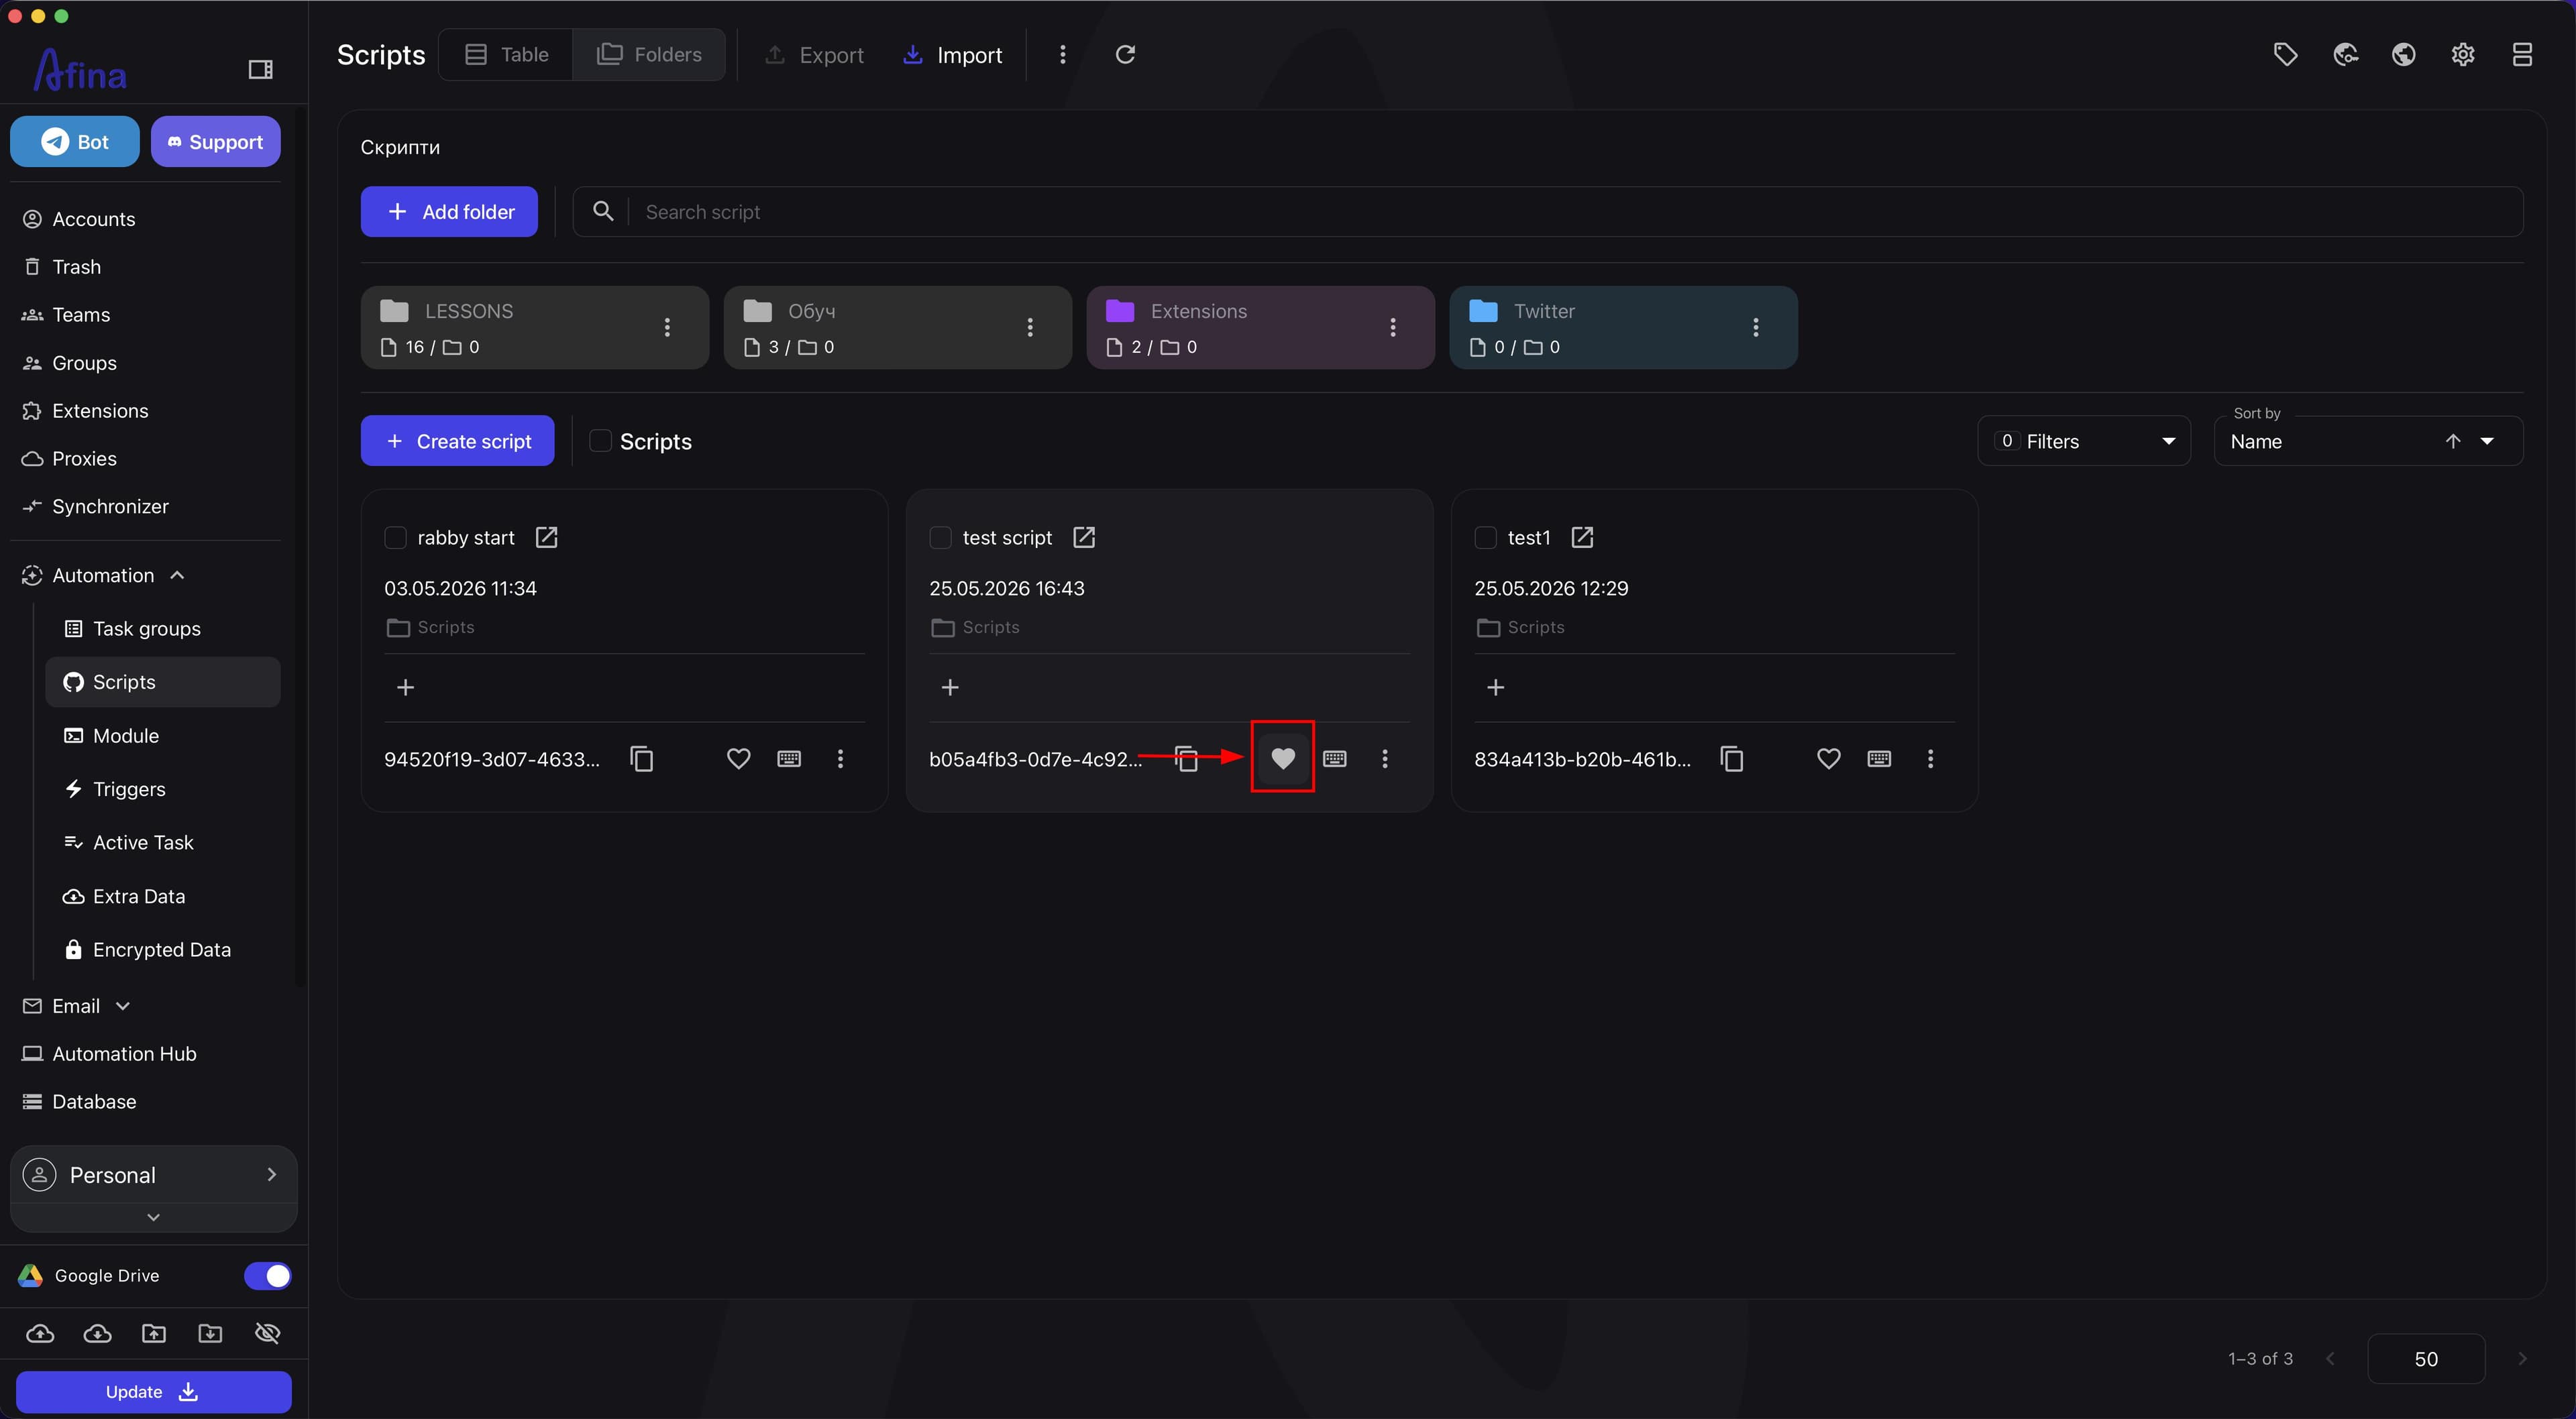
- Click Filters and enable the "Show only favorites" checkbox if you want to quickly find scripts added to favorites.
Opening the builder#
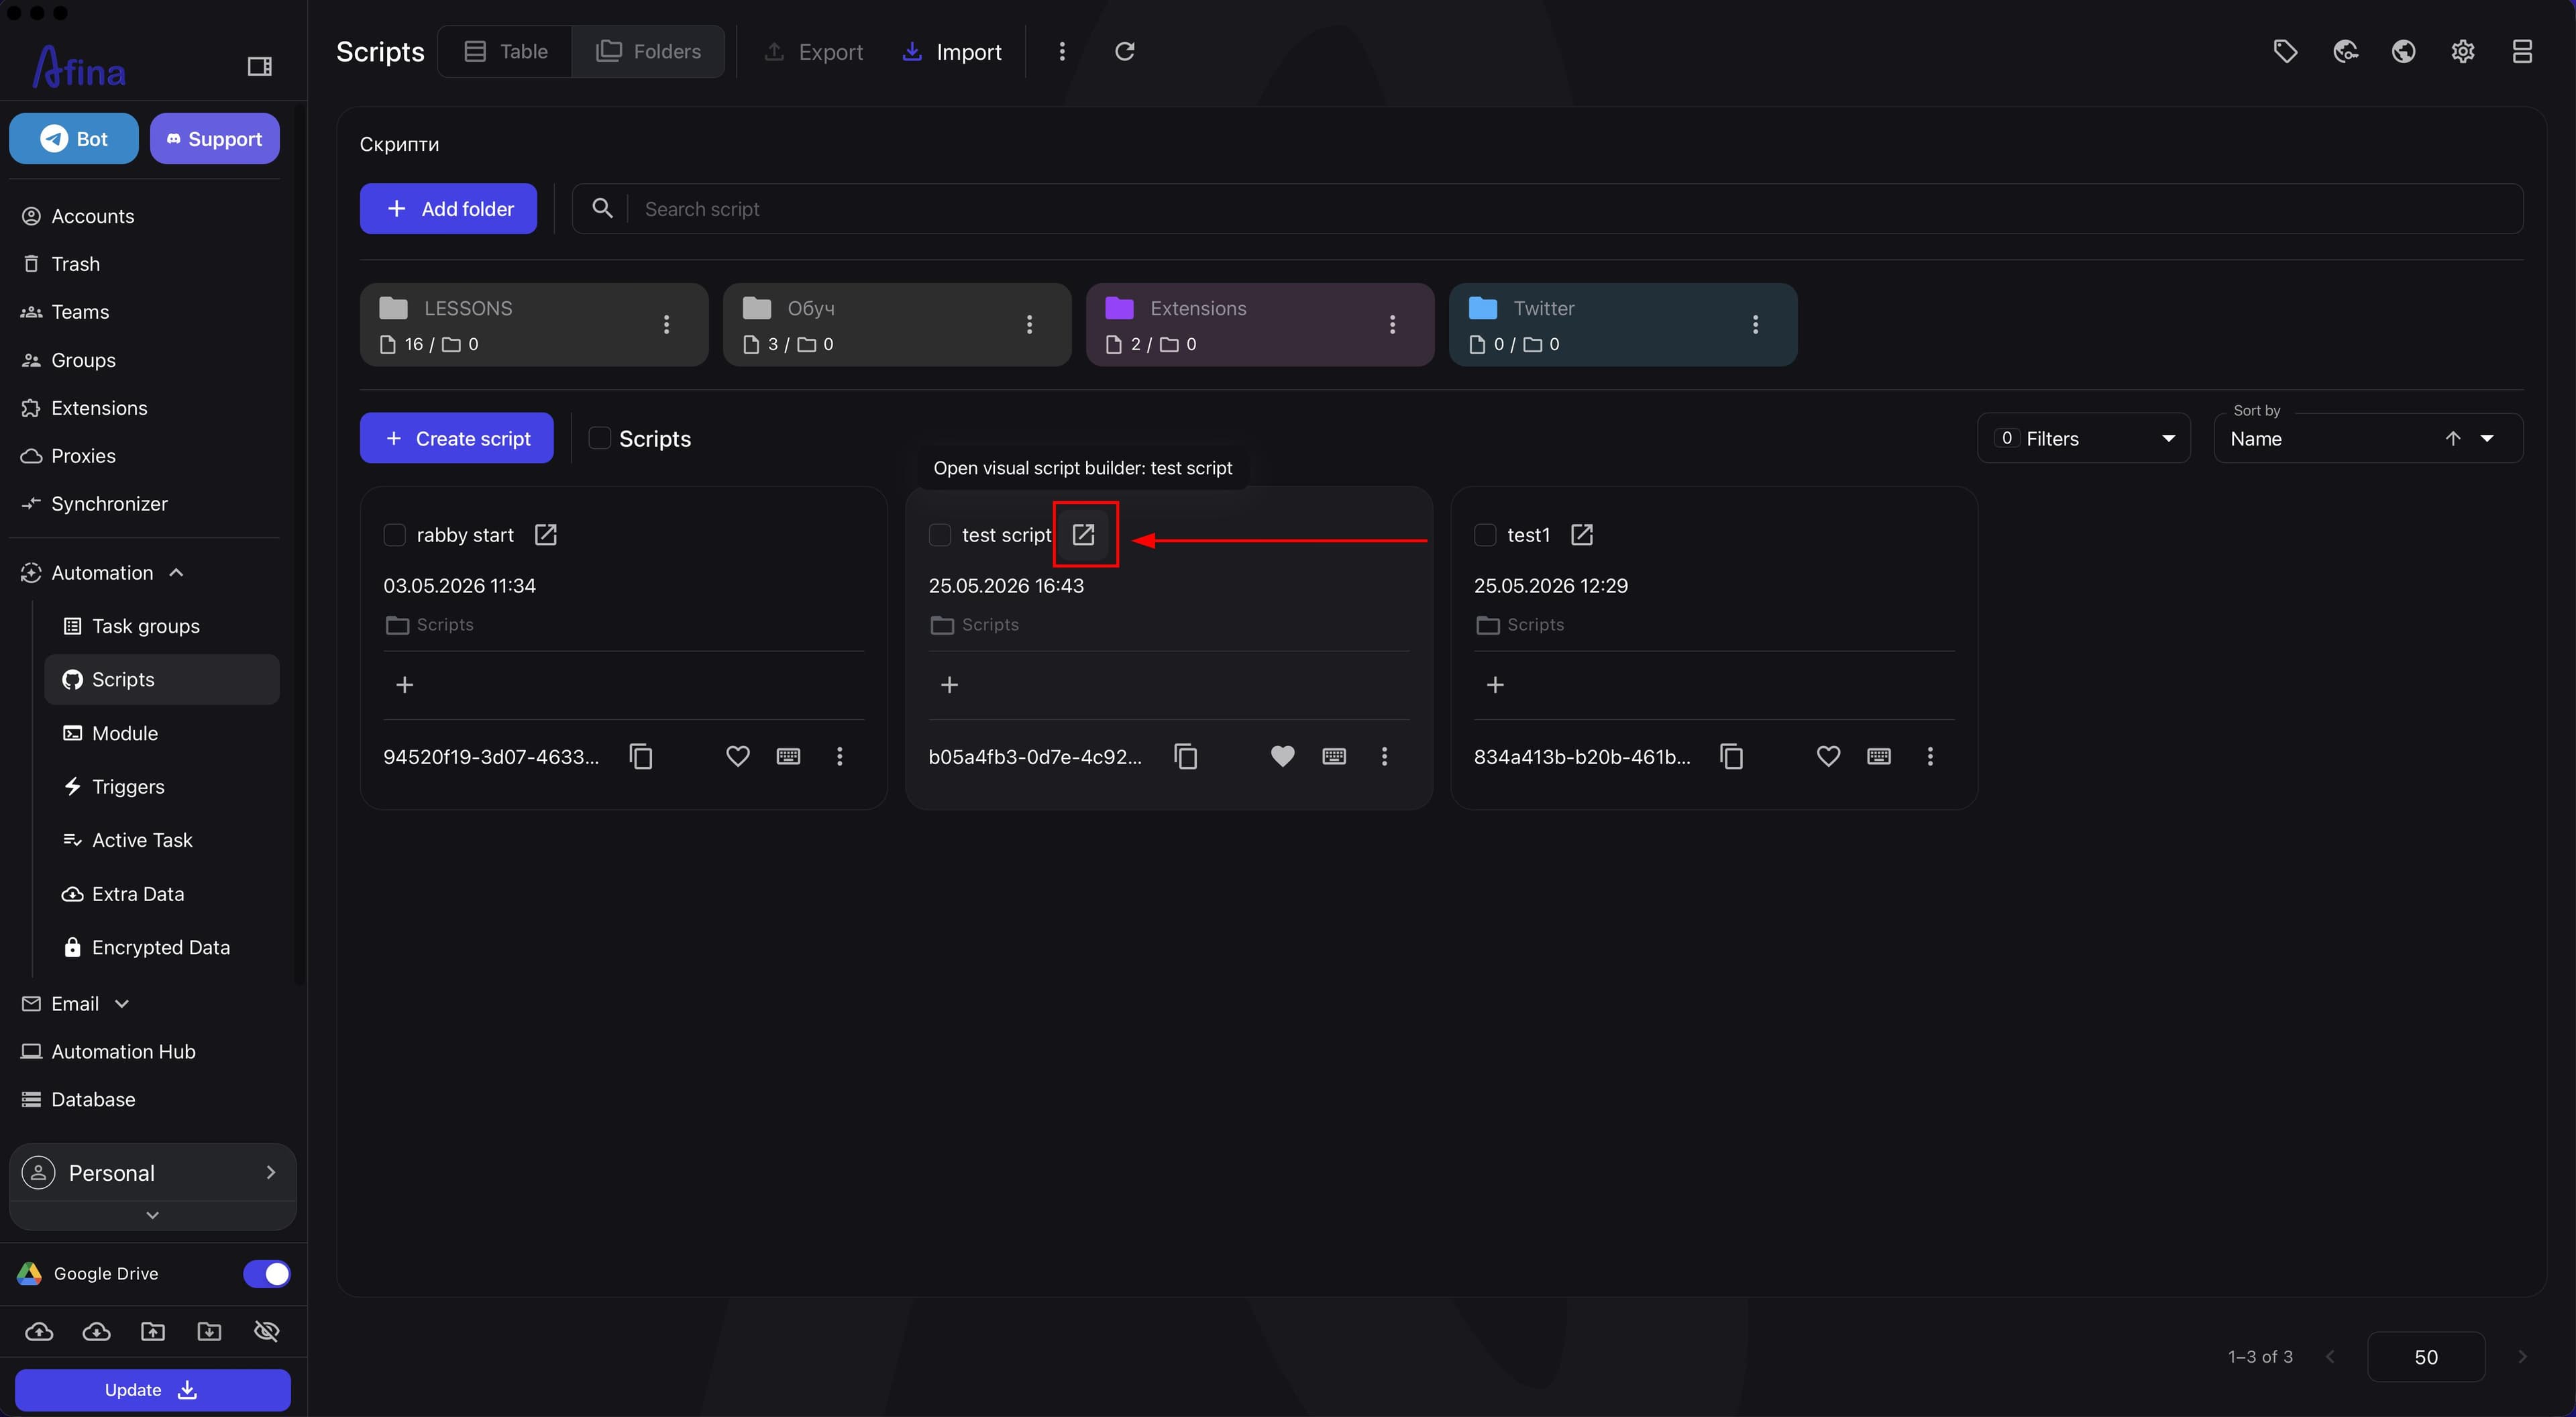
- Click the open visual script builder icon in the row of the needed script.
The screenshot below shows the builder opening icon in the scripts list.
- Make sure the visual script builder opens with the Components Panel on the left, the Canvas in the center, and the lower launch panel.
The next screenshot shows the main builder zones you will work with later.
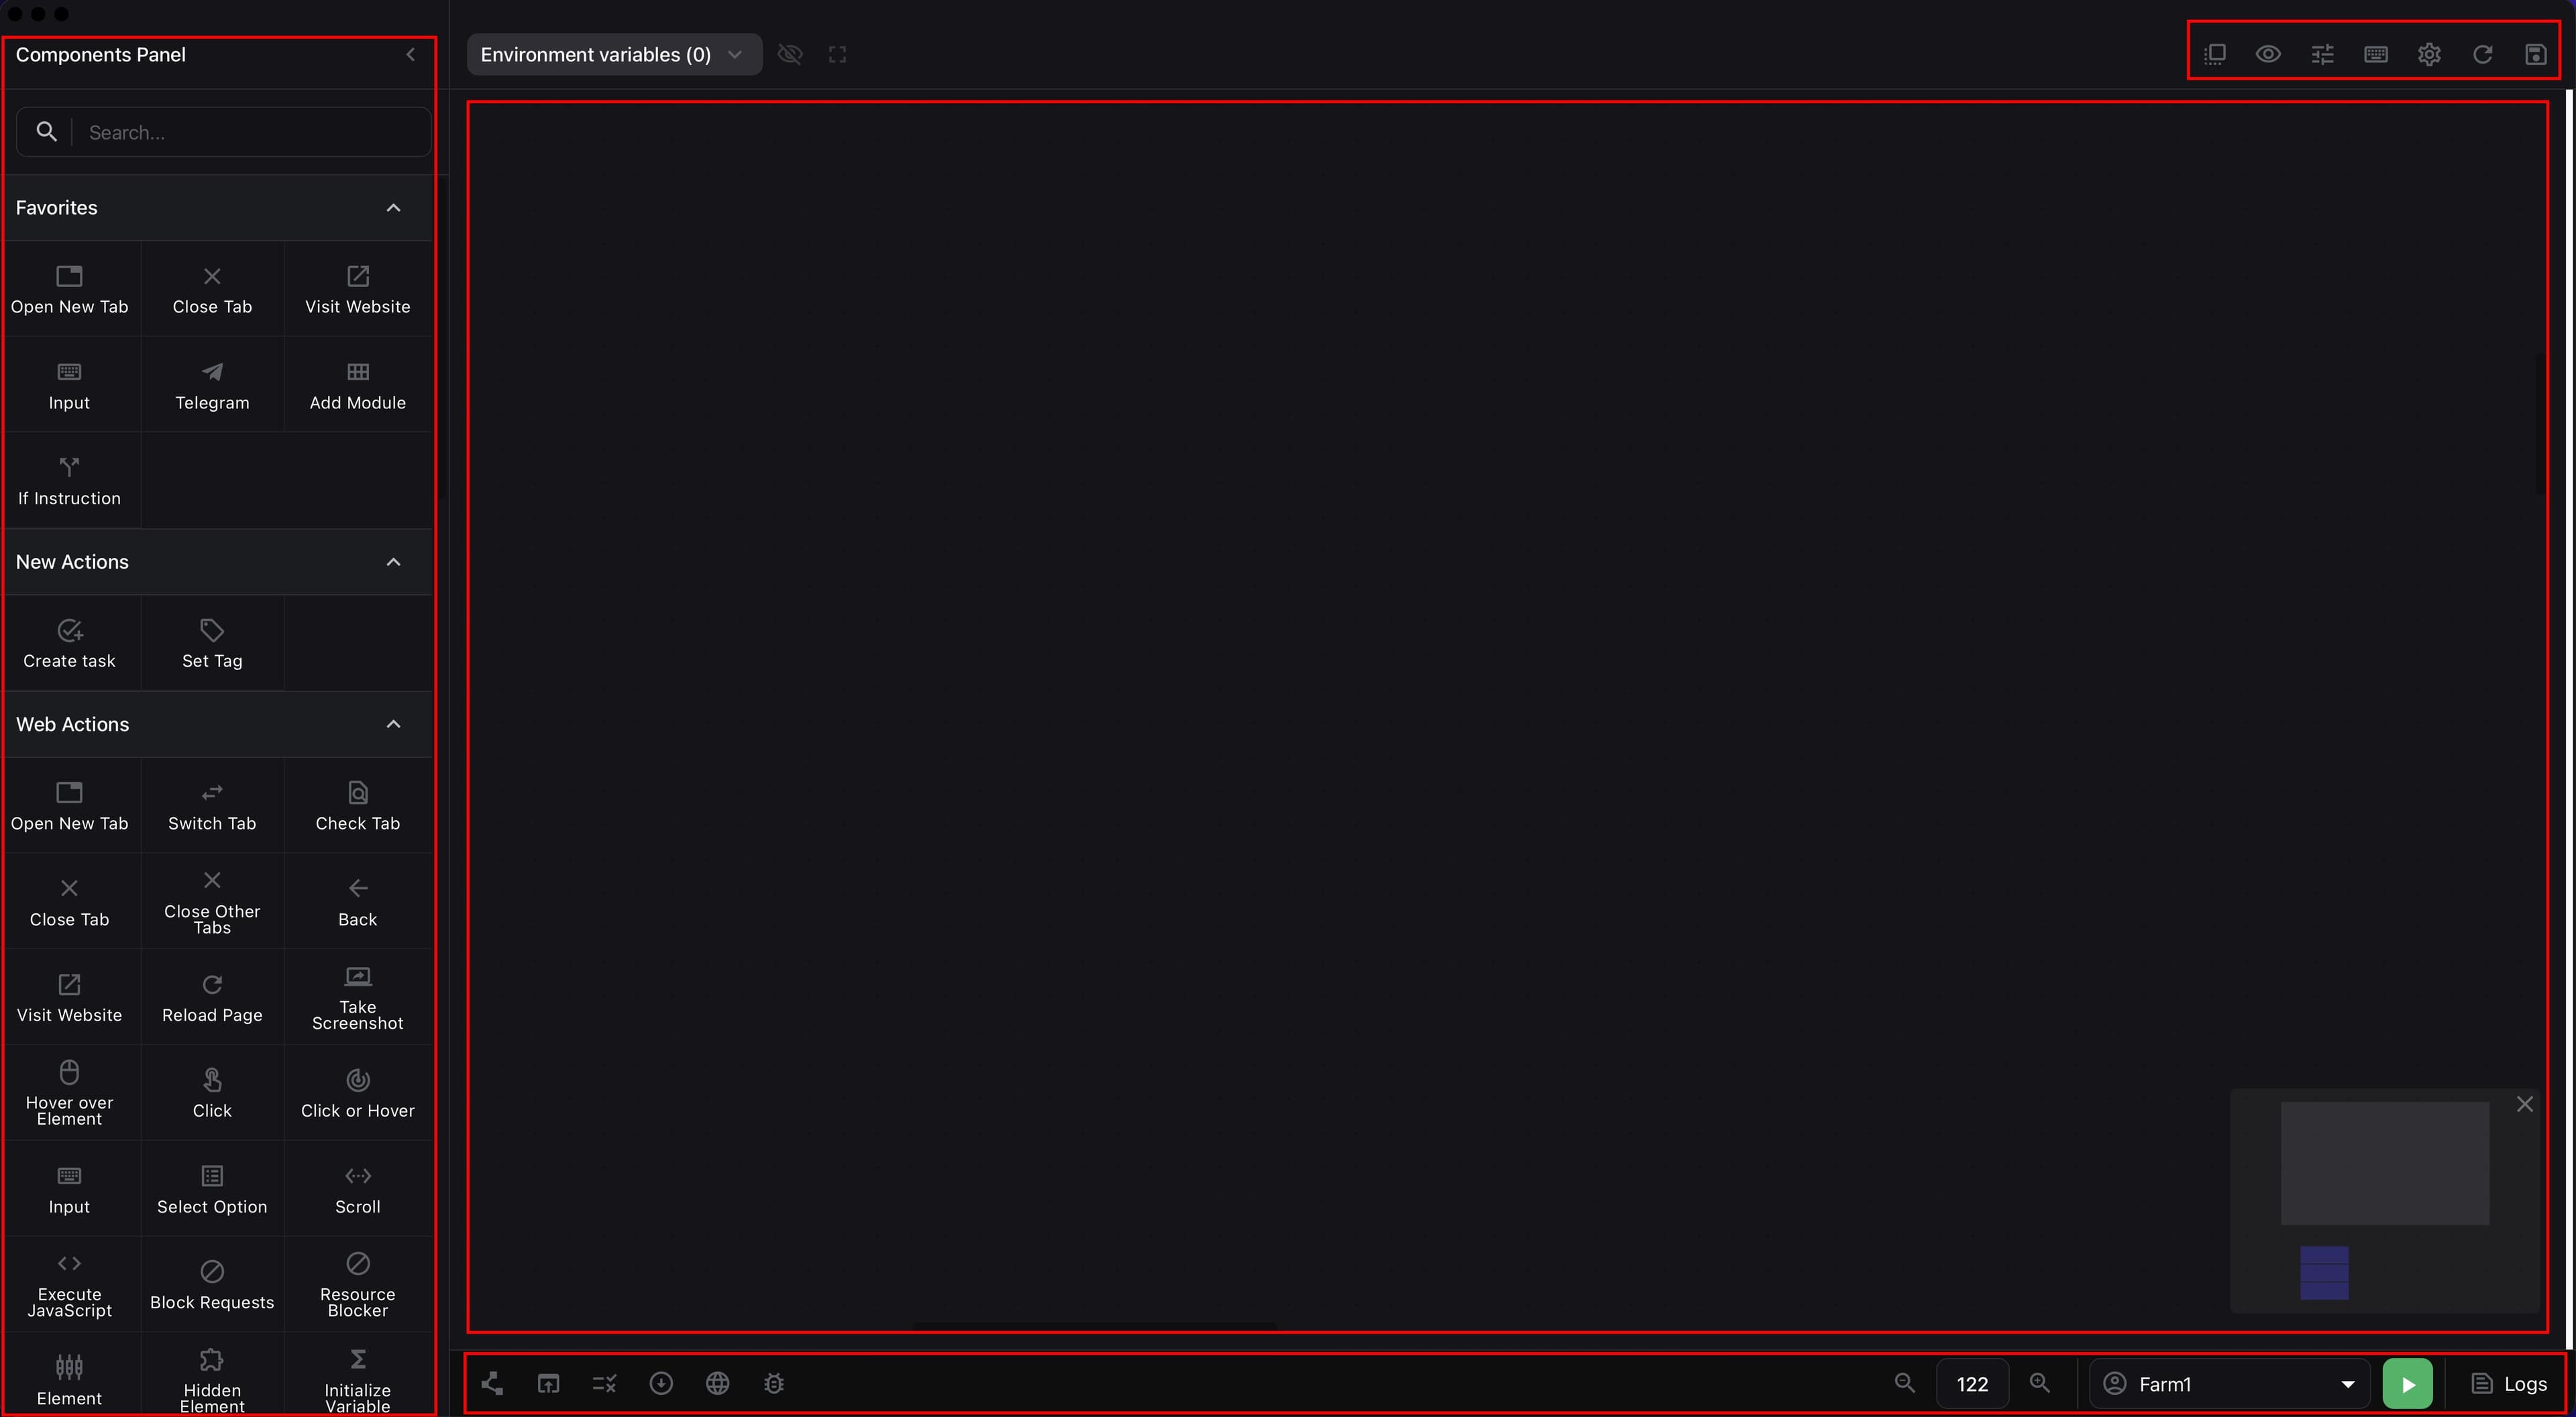
For beginners, it is important to understand these four zones first and only then move on to more complex logic.
Main builder buttons#
-
Find the Script settings button in the upper-right part of the builder if you need to return to the basic settings of the current script.
-
Find the Quick commands button if you need to view the available builder shortcuts.
-
Find the Settings button if you need to add Input, Select, or Checkbox parameters.
-
Click Save script after making changes on the canvas.
-
Use Refresh all data only after saving if you need to reload the script from the database.
The screenshot below shows the upper-right builder panel with service buttons, saving, and refreshing.
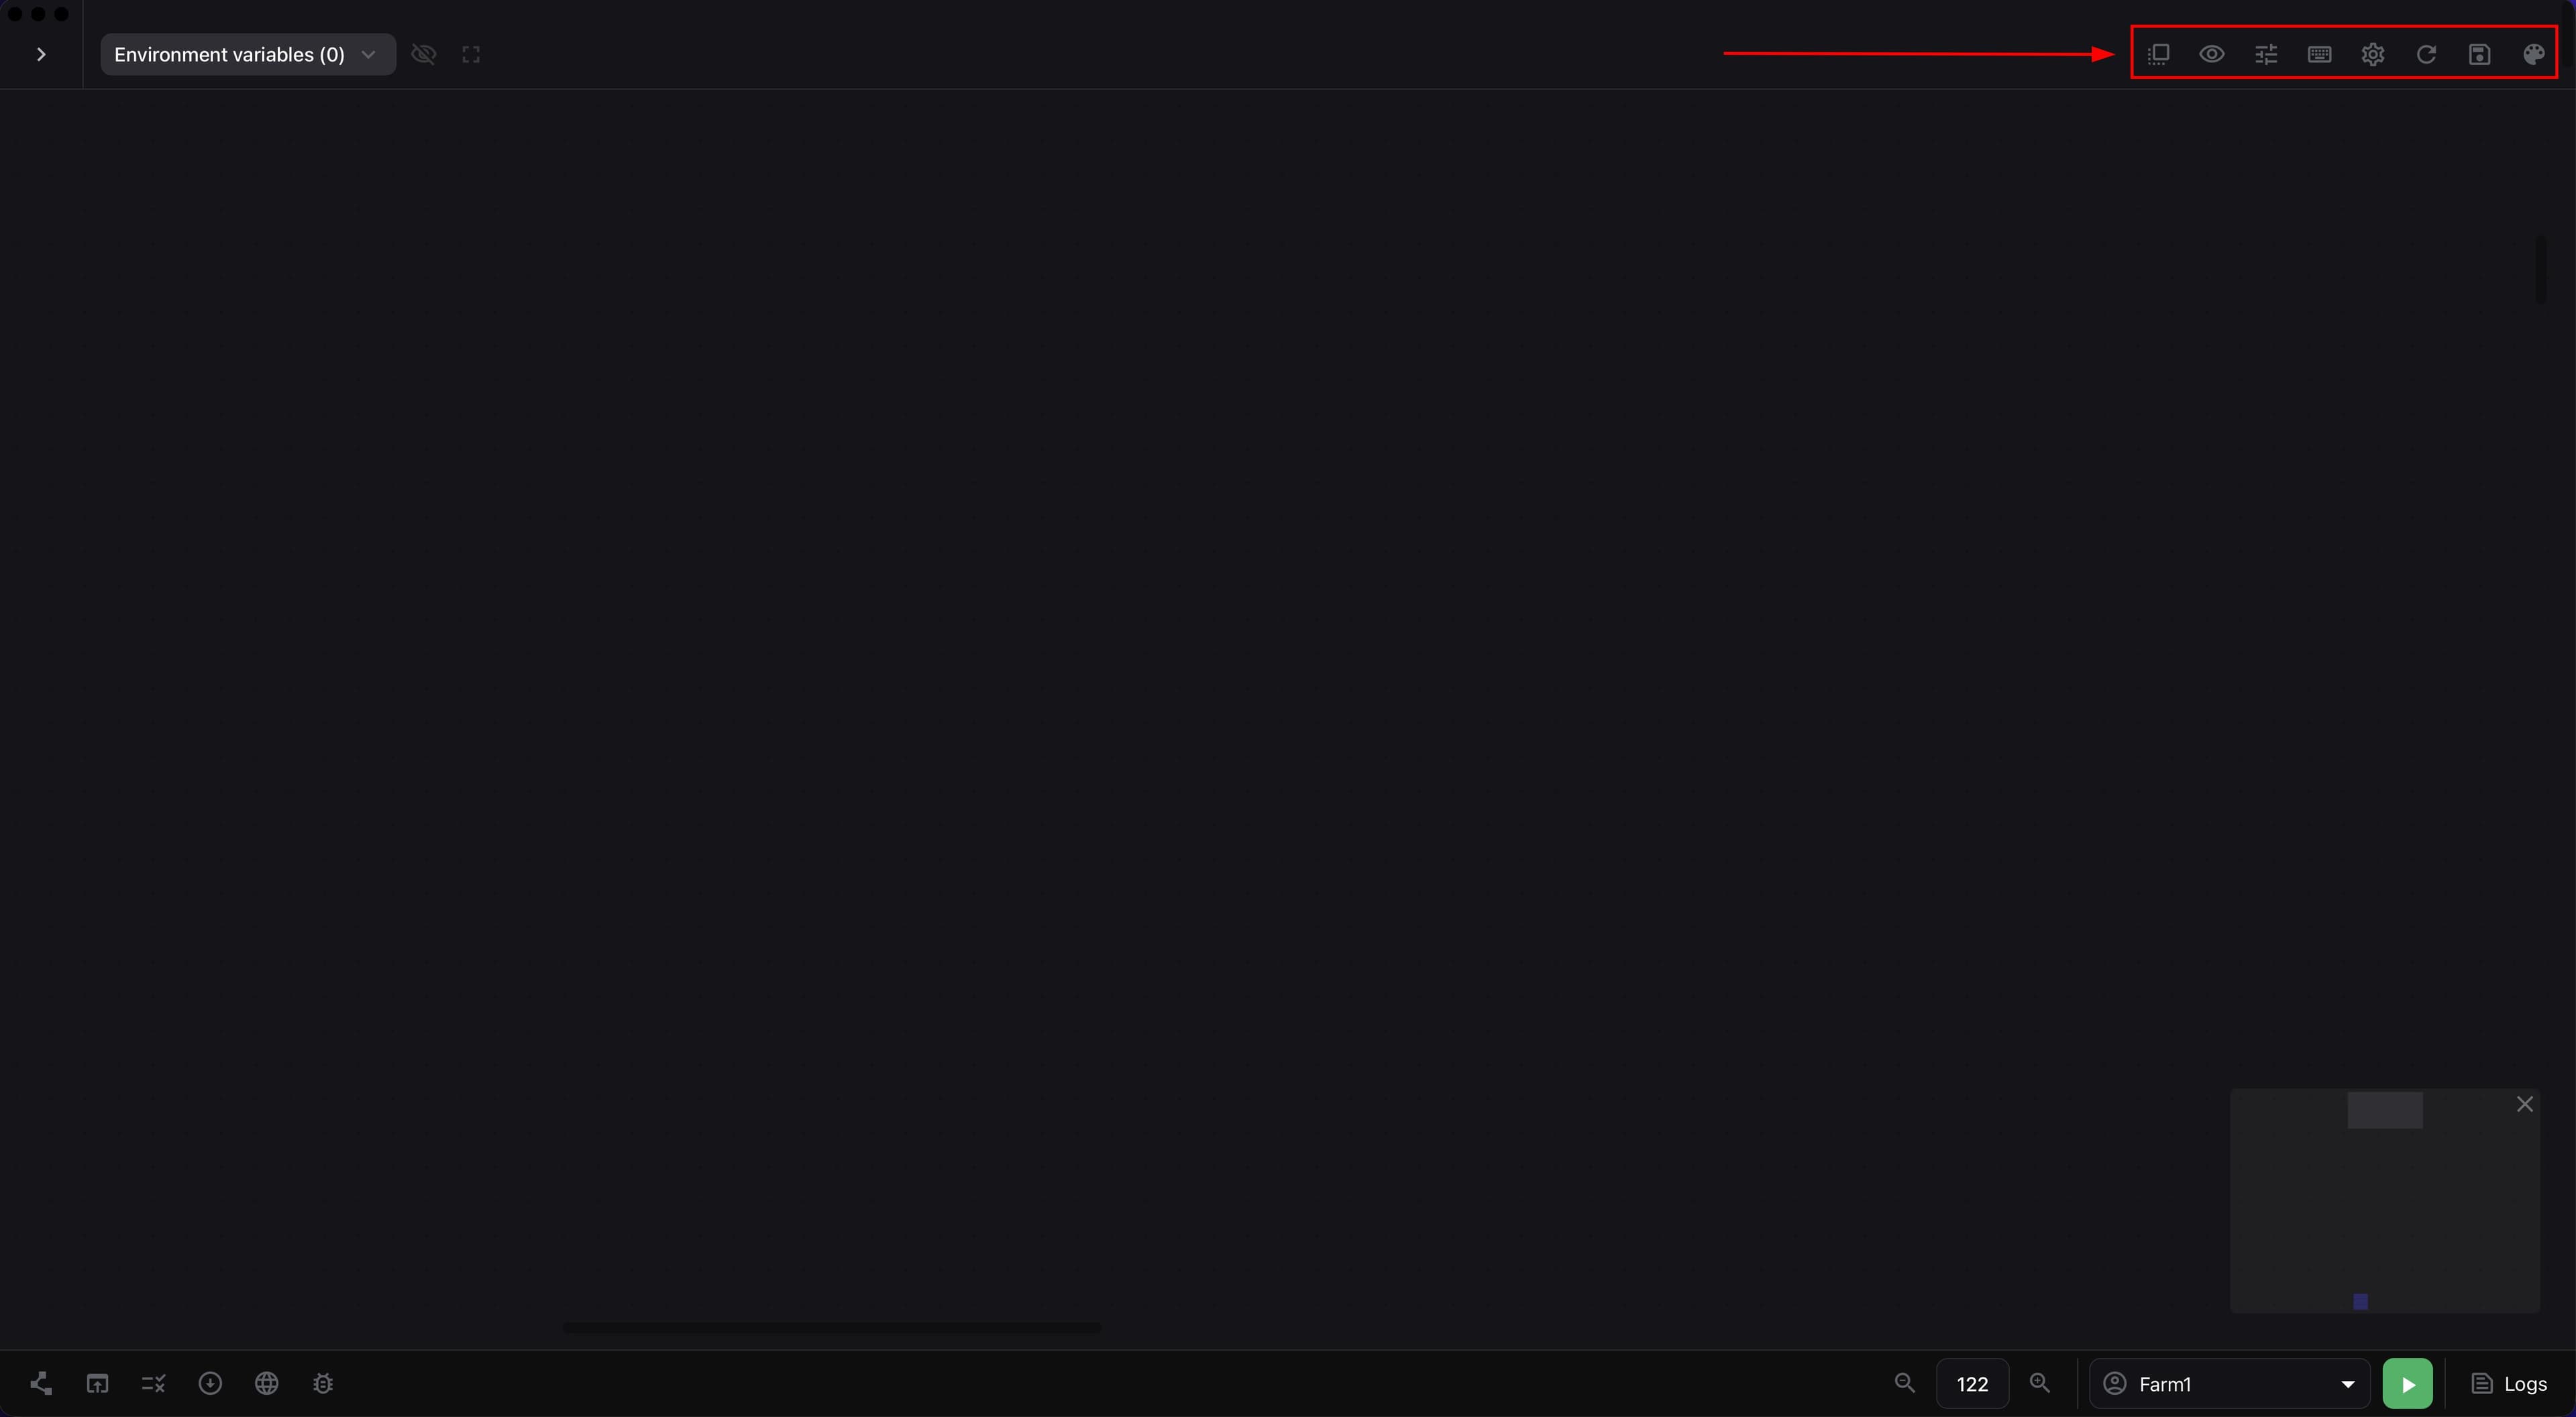
What else is in the upper-right area This area also includes Switch browser window for switching between open script windows, Enable screen capture protection for hiding the builder during recording, and Select color for visually marking blocks.
If you changed the canvas, click Save script first and only then use Refresh all data. Otherwise, unsaved changes will be lost.
Builder quick commands#
The Quick commands button shows the main key combinations for working with the canvas. They help you edit the scheme faster without constantly going back to the menu.
Ctrl (Command) + S- save the script.Ctrl (Command) + F- find an element.Ctrl (Command) + A- select all components in the workspace.Ctrl (Command) + Z- undo an action.Ctrl (Command) + Y- redo an action.Ctrl (Command) + C- copy.Ctrl (Command) + V- paste.Ctrl (Command) + B- align selected components vertically.Ctrl (Command) + H- align selected components horizontally.Ctrl (Command) + D- distribute selected components evenly horizontally and set the same distance between them.Ctrl (Command) + E- distribute selected components evenly vertically and set the same spacing between them.
You can select multiple components with a mouse selection frame or add them to the selection one by one by holding Shift and clicking the needed blocks.
Adding blocks#
-
Find the needed block in the Components Panel.
-
Drag the block onto the Canvas.
-
Drag another block onto the Canvas if you want to create a simple action chain.
-
Connect the output of the first block to the next block.
-
Press
Deleteif you need to remove an unnecessary block.
The screenshot below shows a simple chain of several connected blocks on the builder canvas.
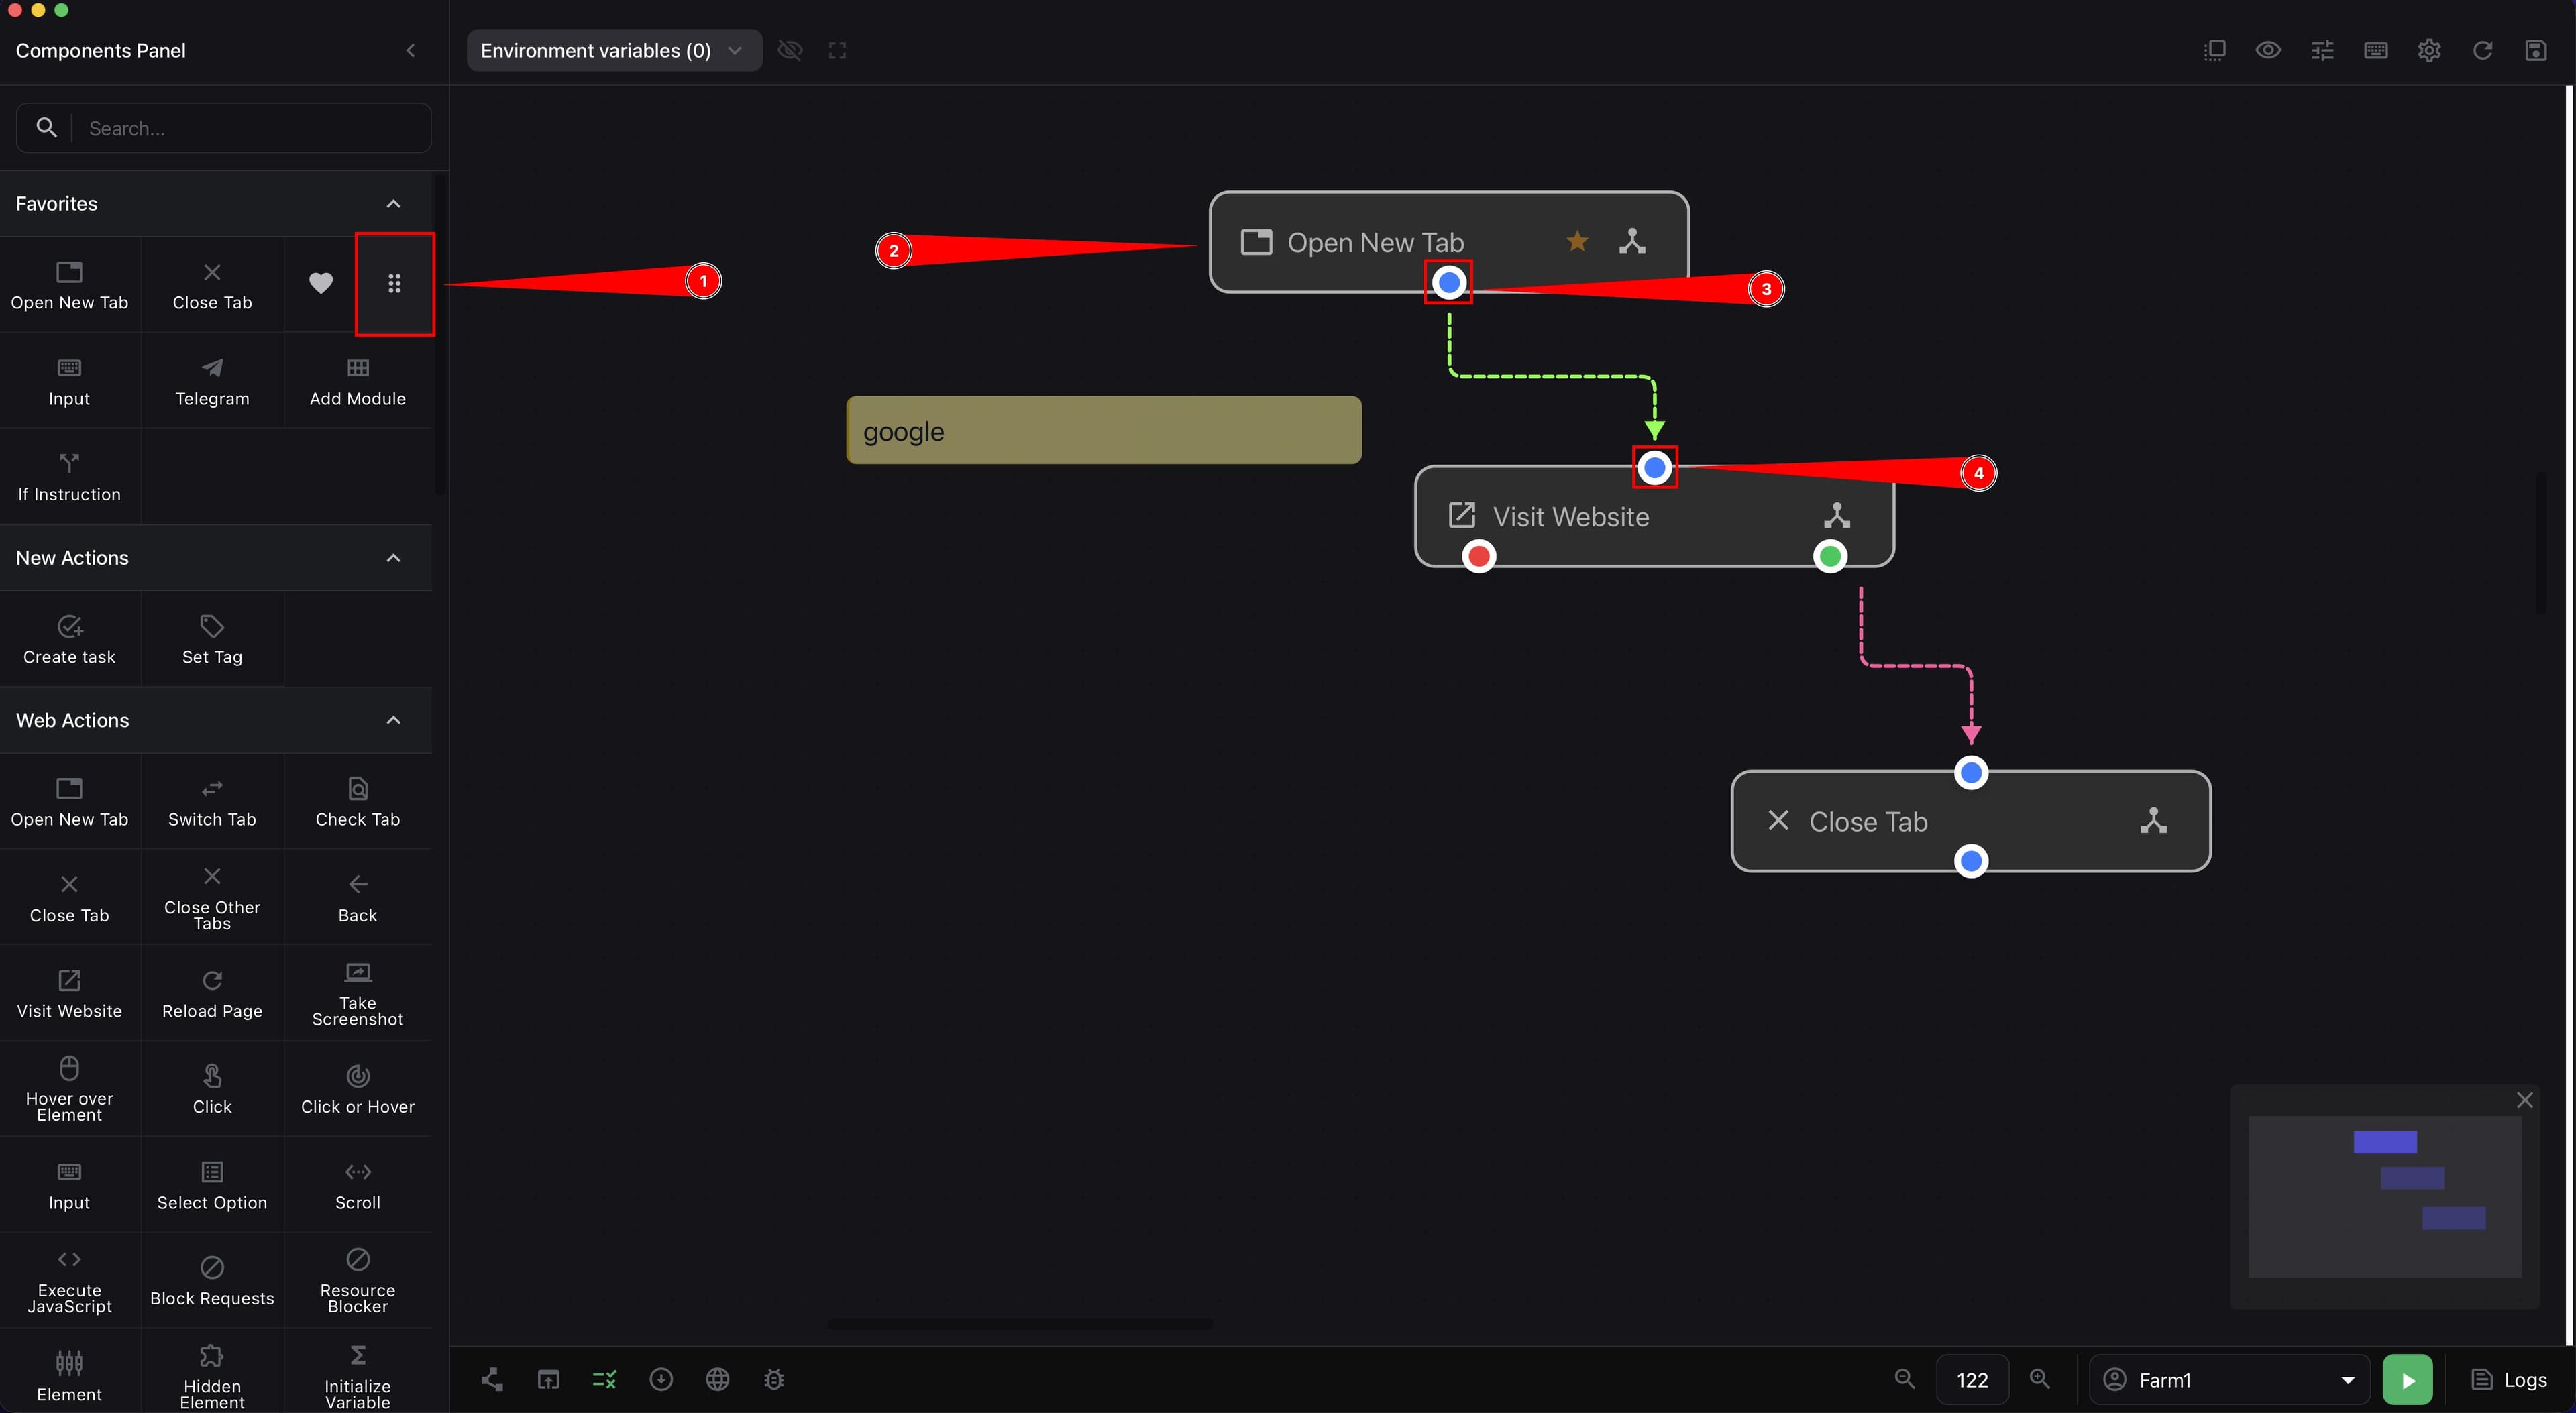
For your first script, a short sequential chain is enough to understand the basic principle of building a scheme.
-
Hover over a component in the Components Panel.
-
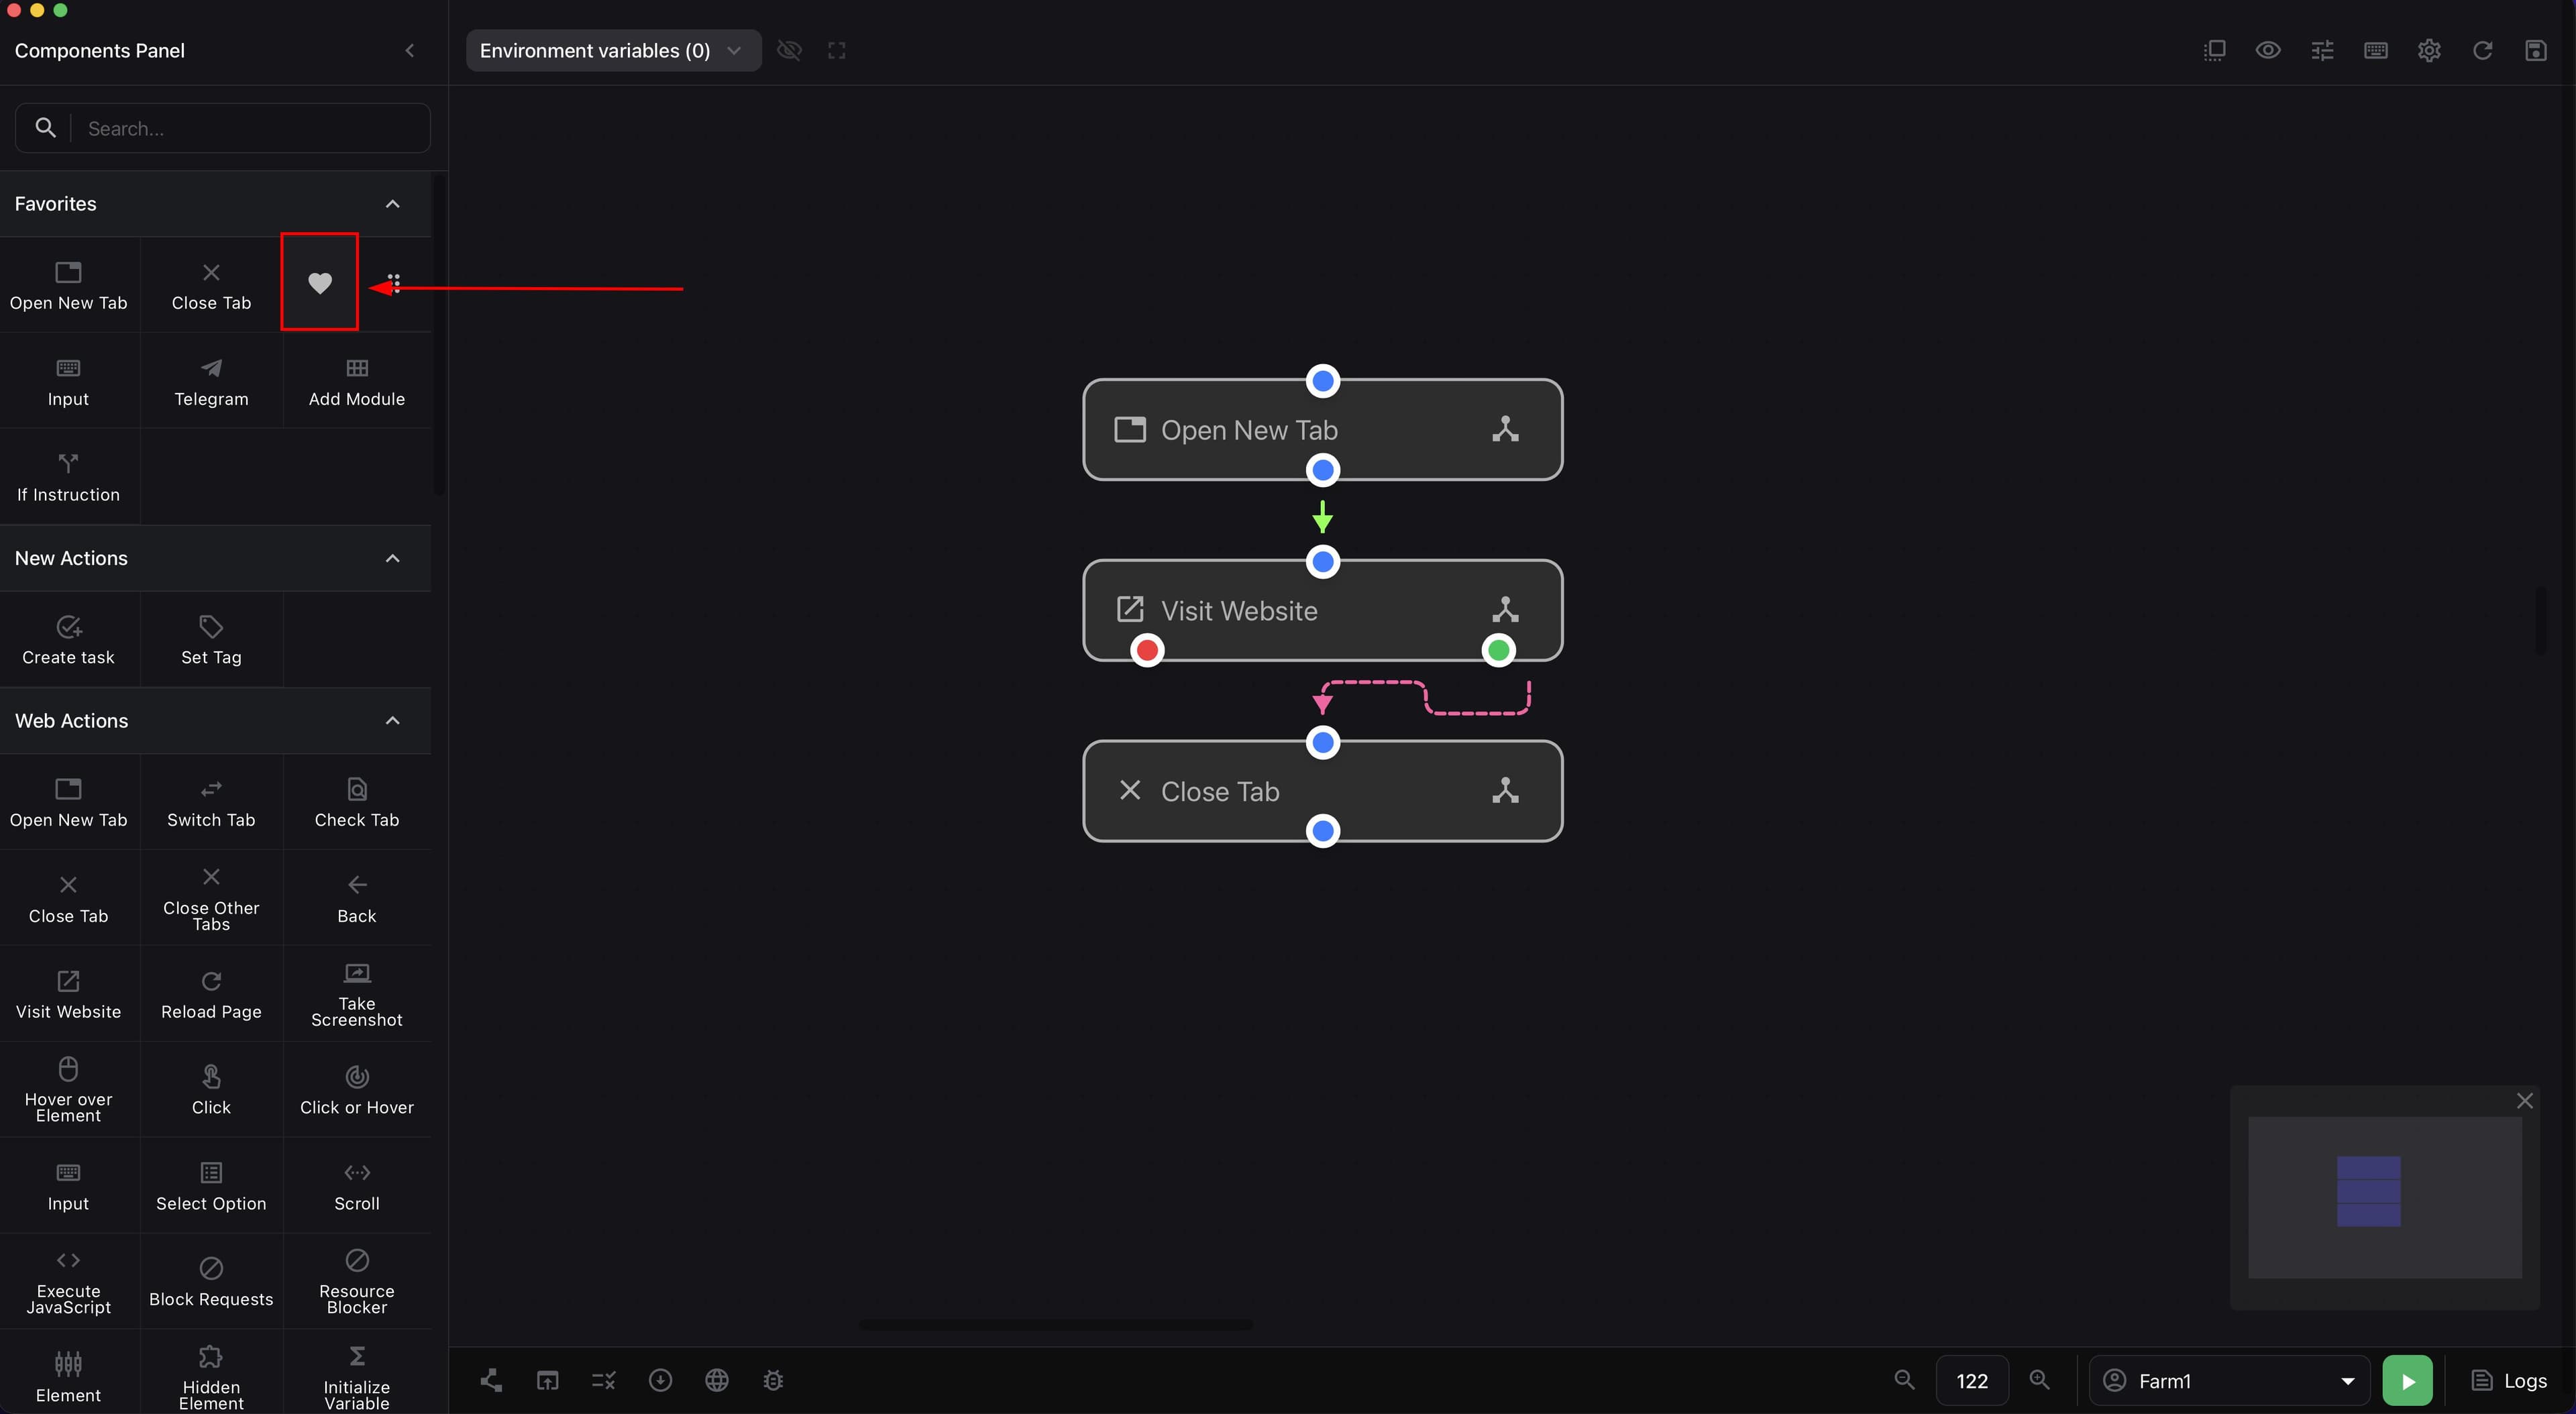
Click the heart icon if you want to add the block to favorites for quick reuse.
This screenshot shows how to add a block to favorites on the left components panel.
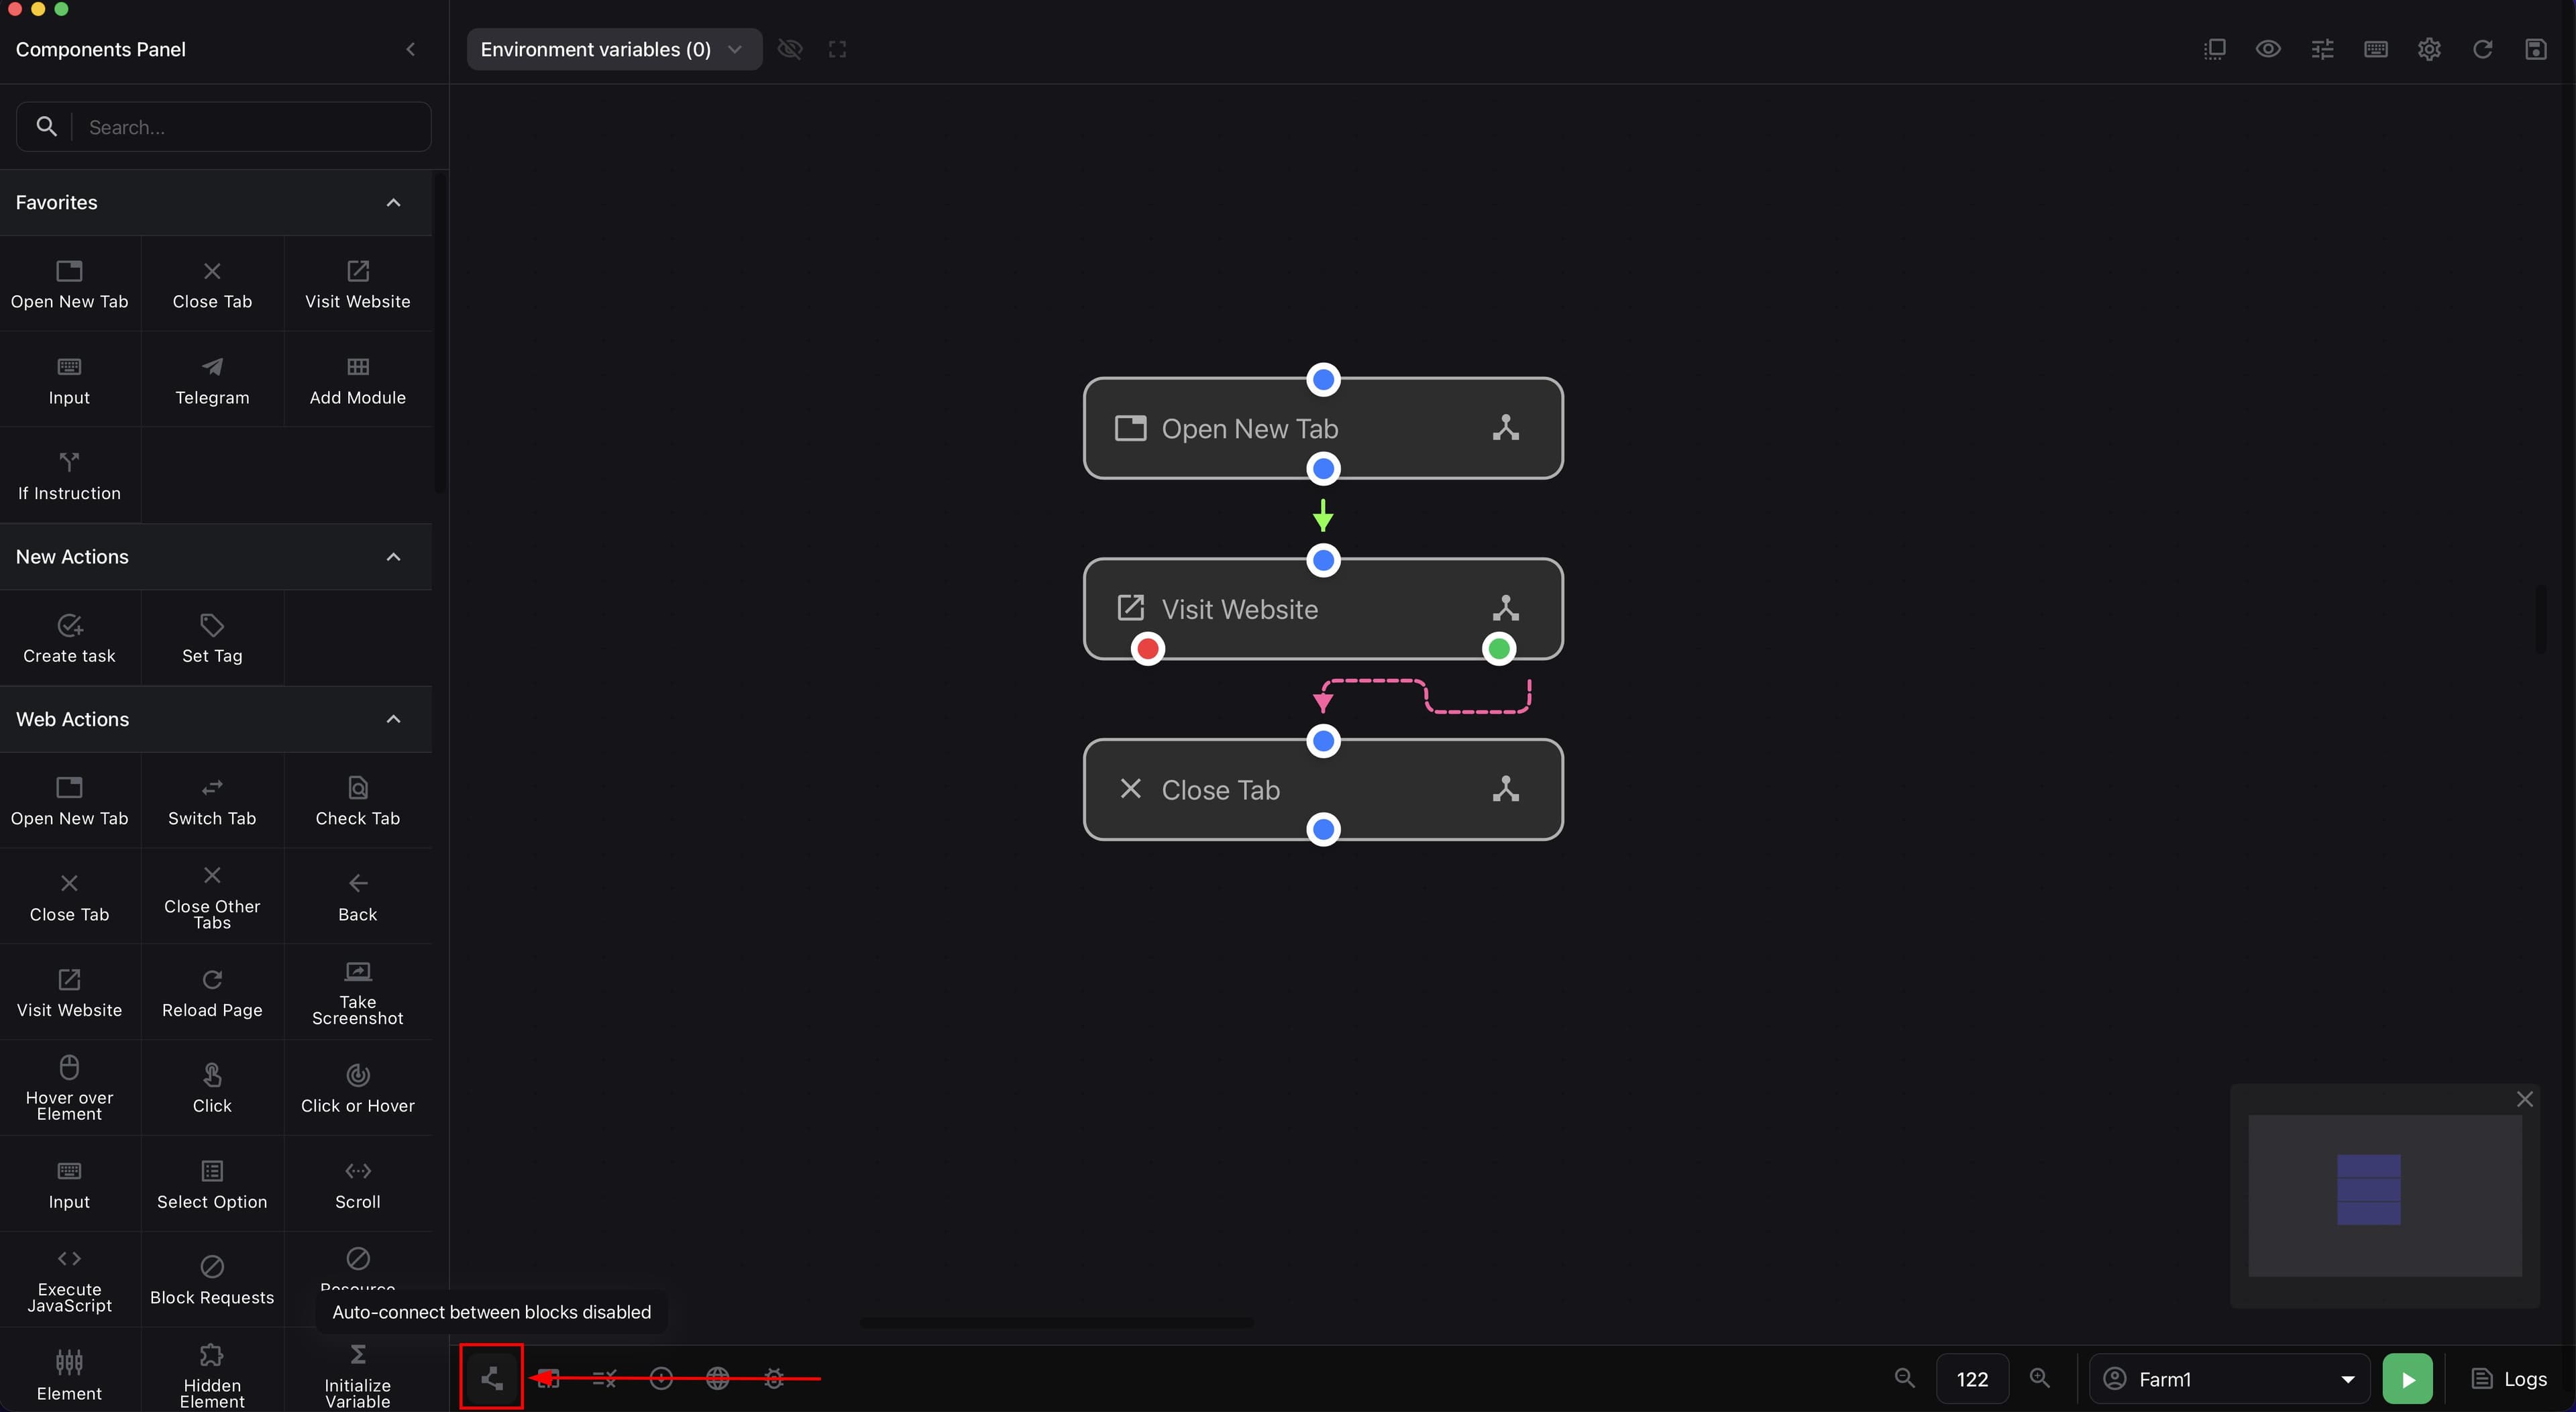
- Enable the "Auto-connect" switch on the lower panel if you want to build simple sequential schemes faster.
The next screenshot shows the lower builder panel with "Auto-connect" enabled.
To add a note to a block, right-click the needed block and choose "Edit note".
Script launch parameters#
-
Click the Settings icon at the top of the builder.
-
Click Input if you want to add a text parameter for manually entering a value before launch.
-
Click Select if you want to add a list of predefined options.
-
Click Checkbox if you want to add a parameter with
1or0states. -
In the parameter name field, enter the variable name.
-
In the default value field, enter the starting value if it is needed.
-
Drag parameters with the mouse if you need to change their order in the launch form.
-
Click Save.
The screenshot below shows the "Settings" window with Input, Select, and Checkbox parameters.
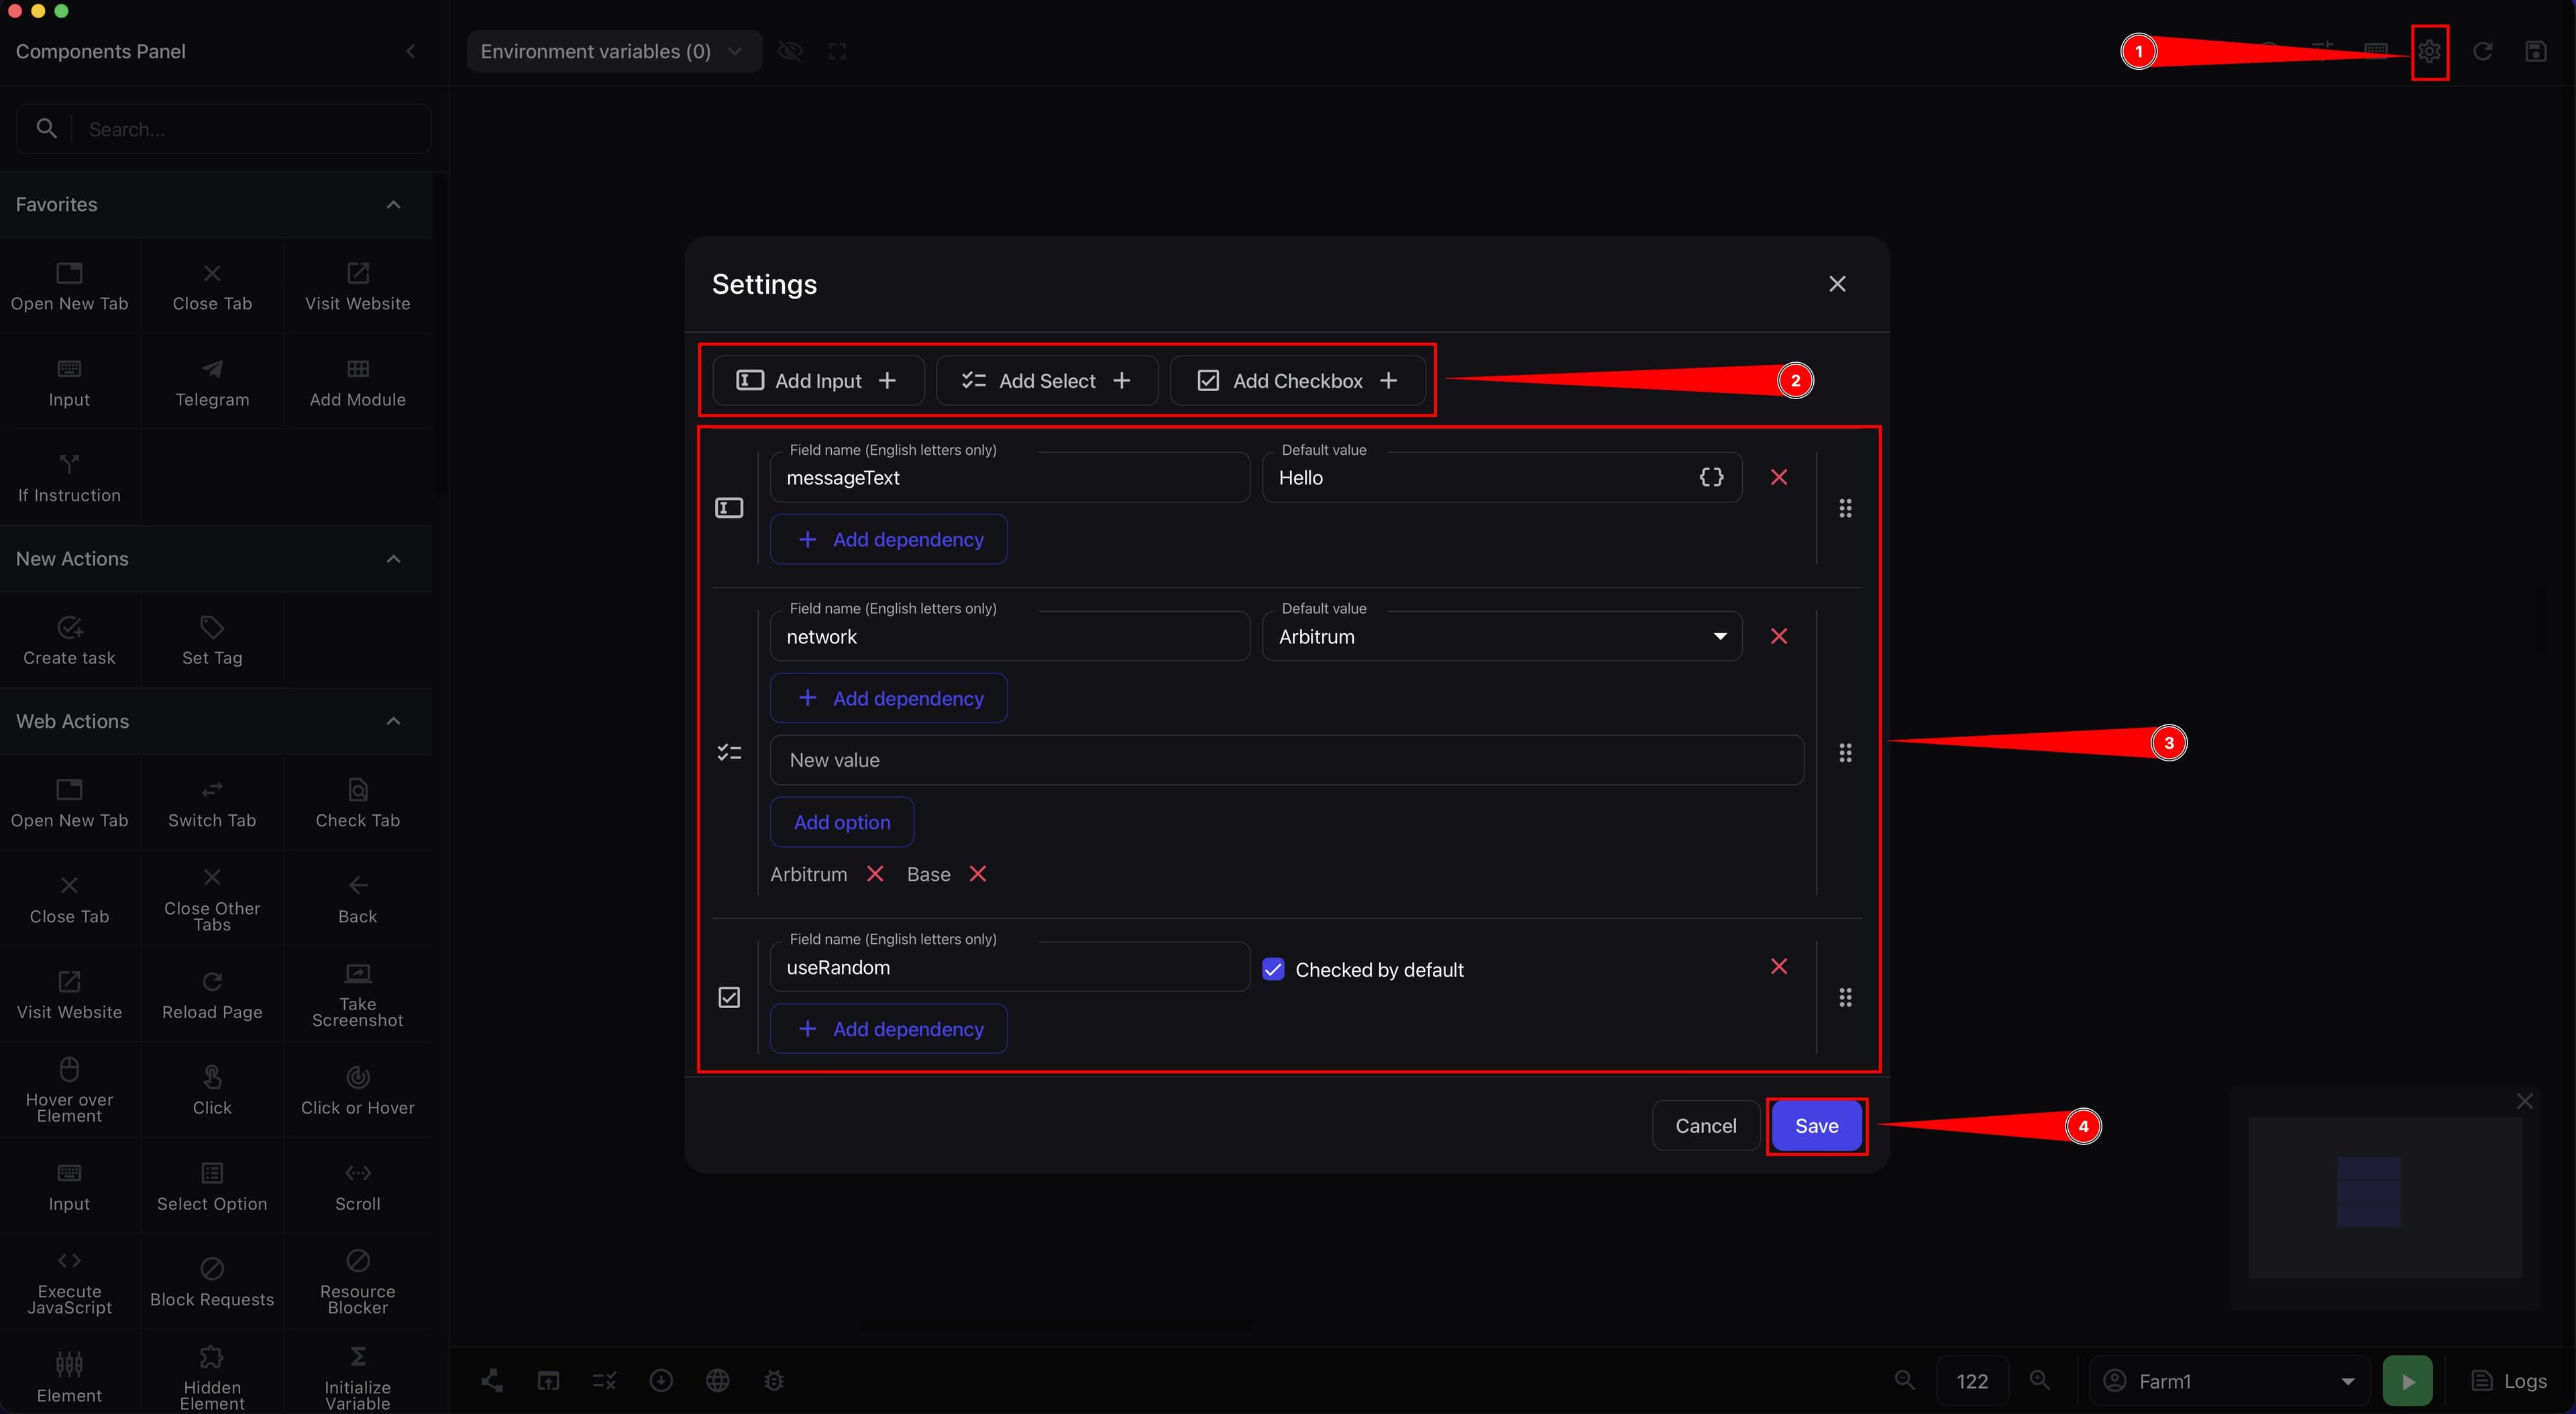
How Input, Select, and Checkbox work Use Input when you need to pass any value to the script manually before launch: a link, number, text, or another parameter. The variable name is set on the left, and a default value can be specified on the right.
Examples for Input:
chatUrl->https://afina.io/messageText->HellomessagesCount->10
Use Select when you need to give the user several predefined options. In this parameter, you set the variable name, the list of possible values, and one default value.
In the Select parameter, the variable name is set at the top left, the default value is selected on the right, and the available options are created inside.
Examples for Select:
mode=fixed/randomnetwork=Arbitrum/Base
Use Checkbox for a simple switch with enabled or disabled states. If the parameter is active, the script receives 1; if disabled, it receives 0.
Examples for Checkbox:
useRandom=1/0debugLogs=1/0
These parameters are useful when the script should run with different values without editing the scheme itself.
To use a parameter value inside components, refer to it as a variable in the ${variableName} format.
Testing the script#
-
Enable "Step-by-step mode" on the lower panel if you want to see step-by-step script execution.
-
Enable "Auto-scroll" if you want the canvas to automatically move to the active block during launch.
-
Enable "Headless mode" only when the scenario does not require a visible browser window.
-
Enable "Browserless mode" only for scenarios that do not interact with the browser.
-
Enable "Dev mode" only when needed, if you need to run the script without checking module and script signatures. Usually, it is needed while actively editing your own JS module when you do not want to re-sign it after every change yet.
The screenshot below shows the lower builder panel with testing modes, the launch button, and the selected account.
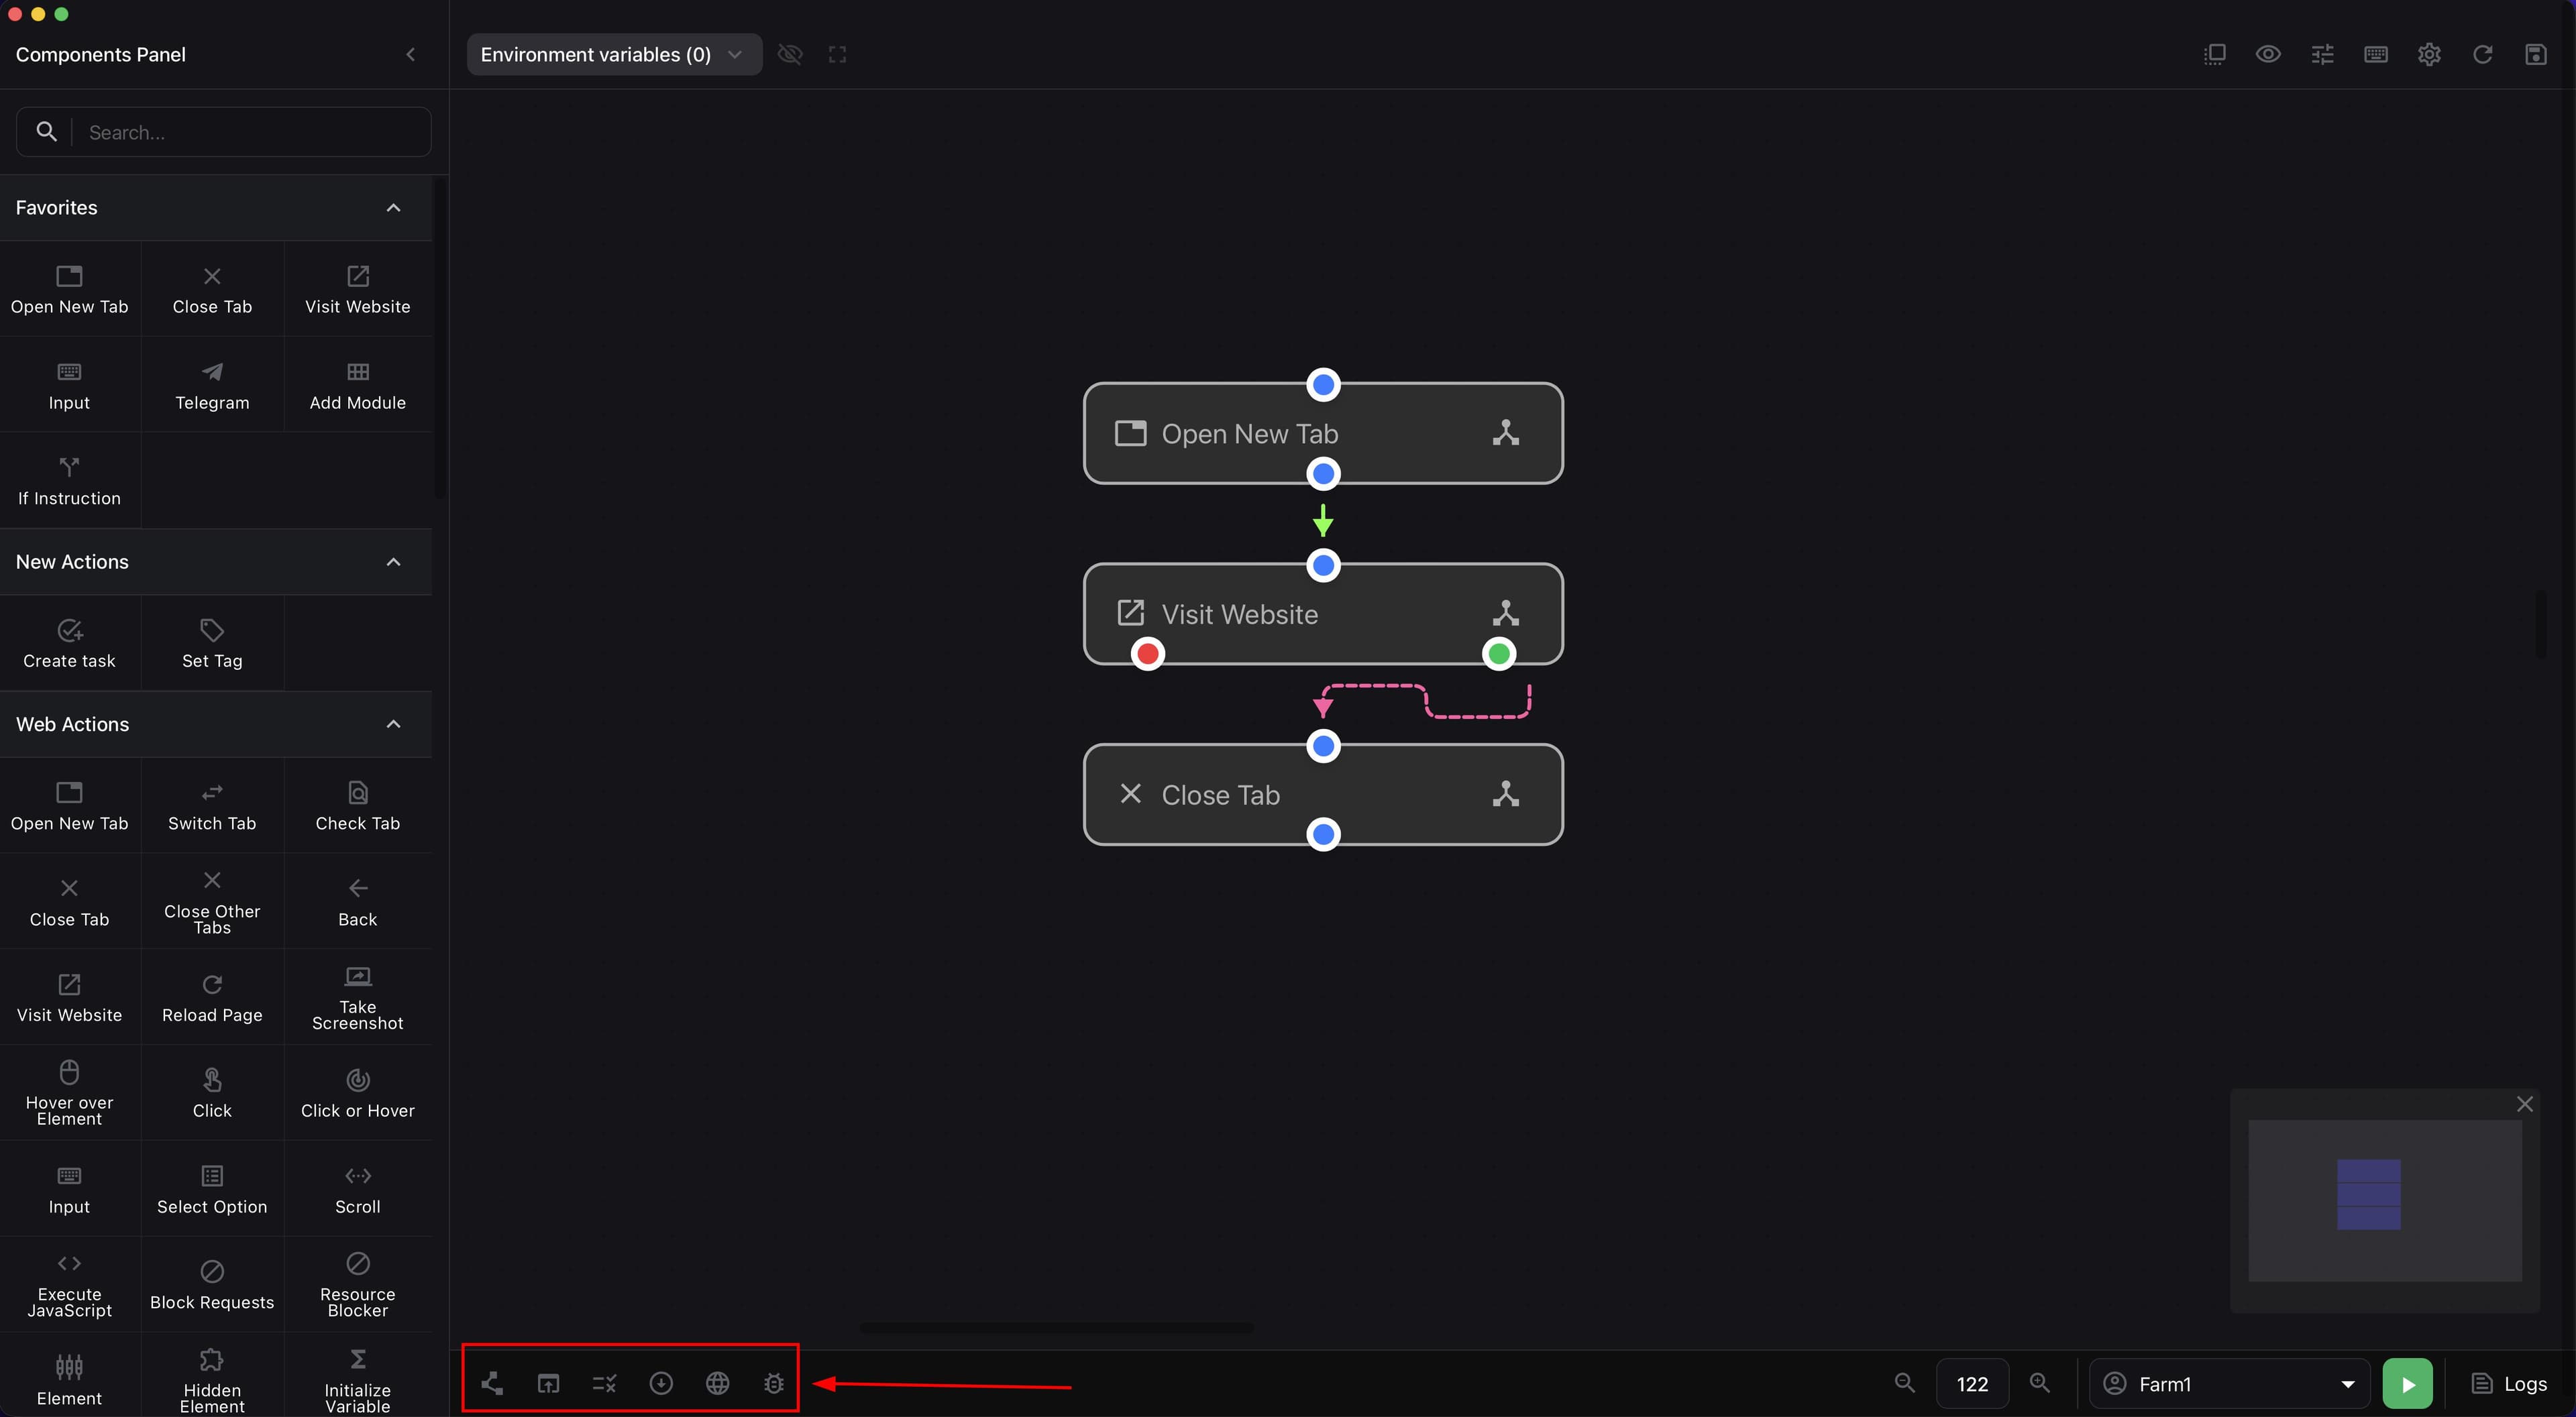
Useful testing modes On the lower panel, it is also useful to remember that "Auto-connect" speeds up building chains between blocks, "Headless mode" runs the scenario without a visible browser window, and "Browserless mode" is suitable only for logic without browser interaction.
For the first check, it is most convenient to enable "Step-by-step mode" and "Auto-scroll". This makes it easier to understand exactly which block the script is executing.
-
Open the accounts list in the lower-right corner of the builder.
-
Select the account on which you want to run the script.
-
Click Run script for this account.
This screenshot shows the lower-right part of the builder with account selection, the launch button, and the Logs button.
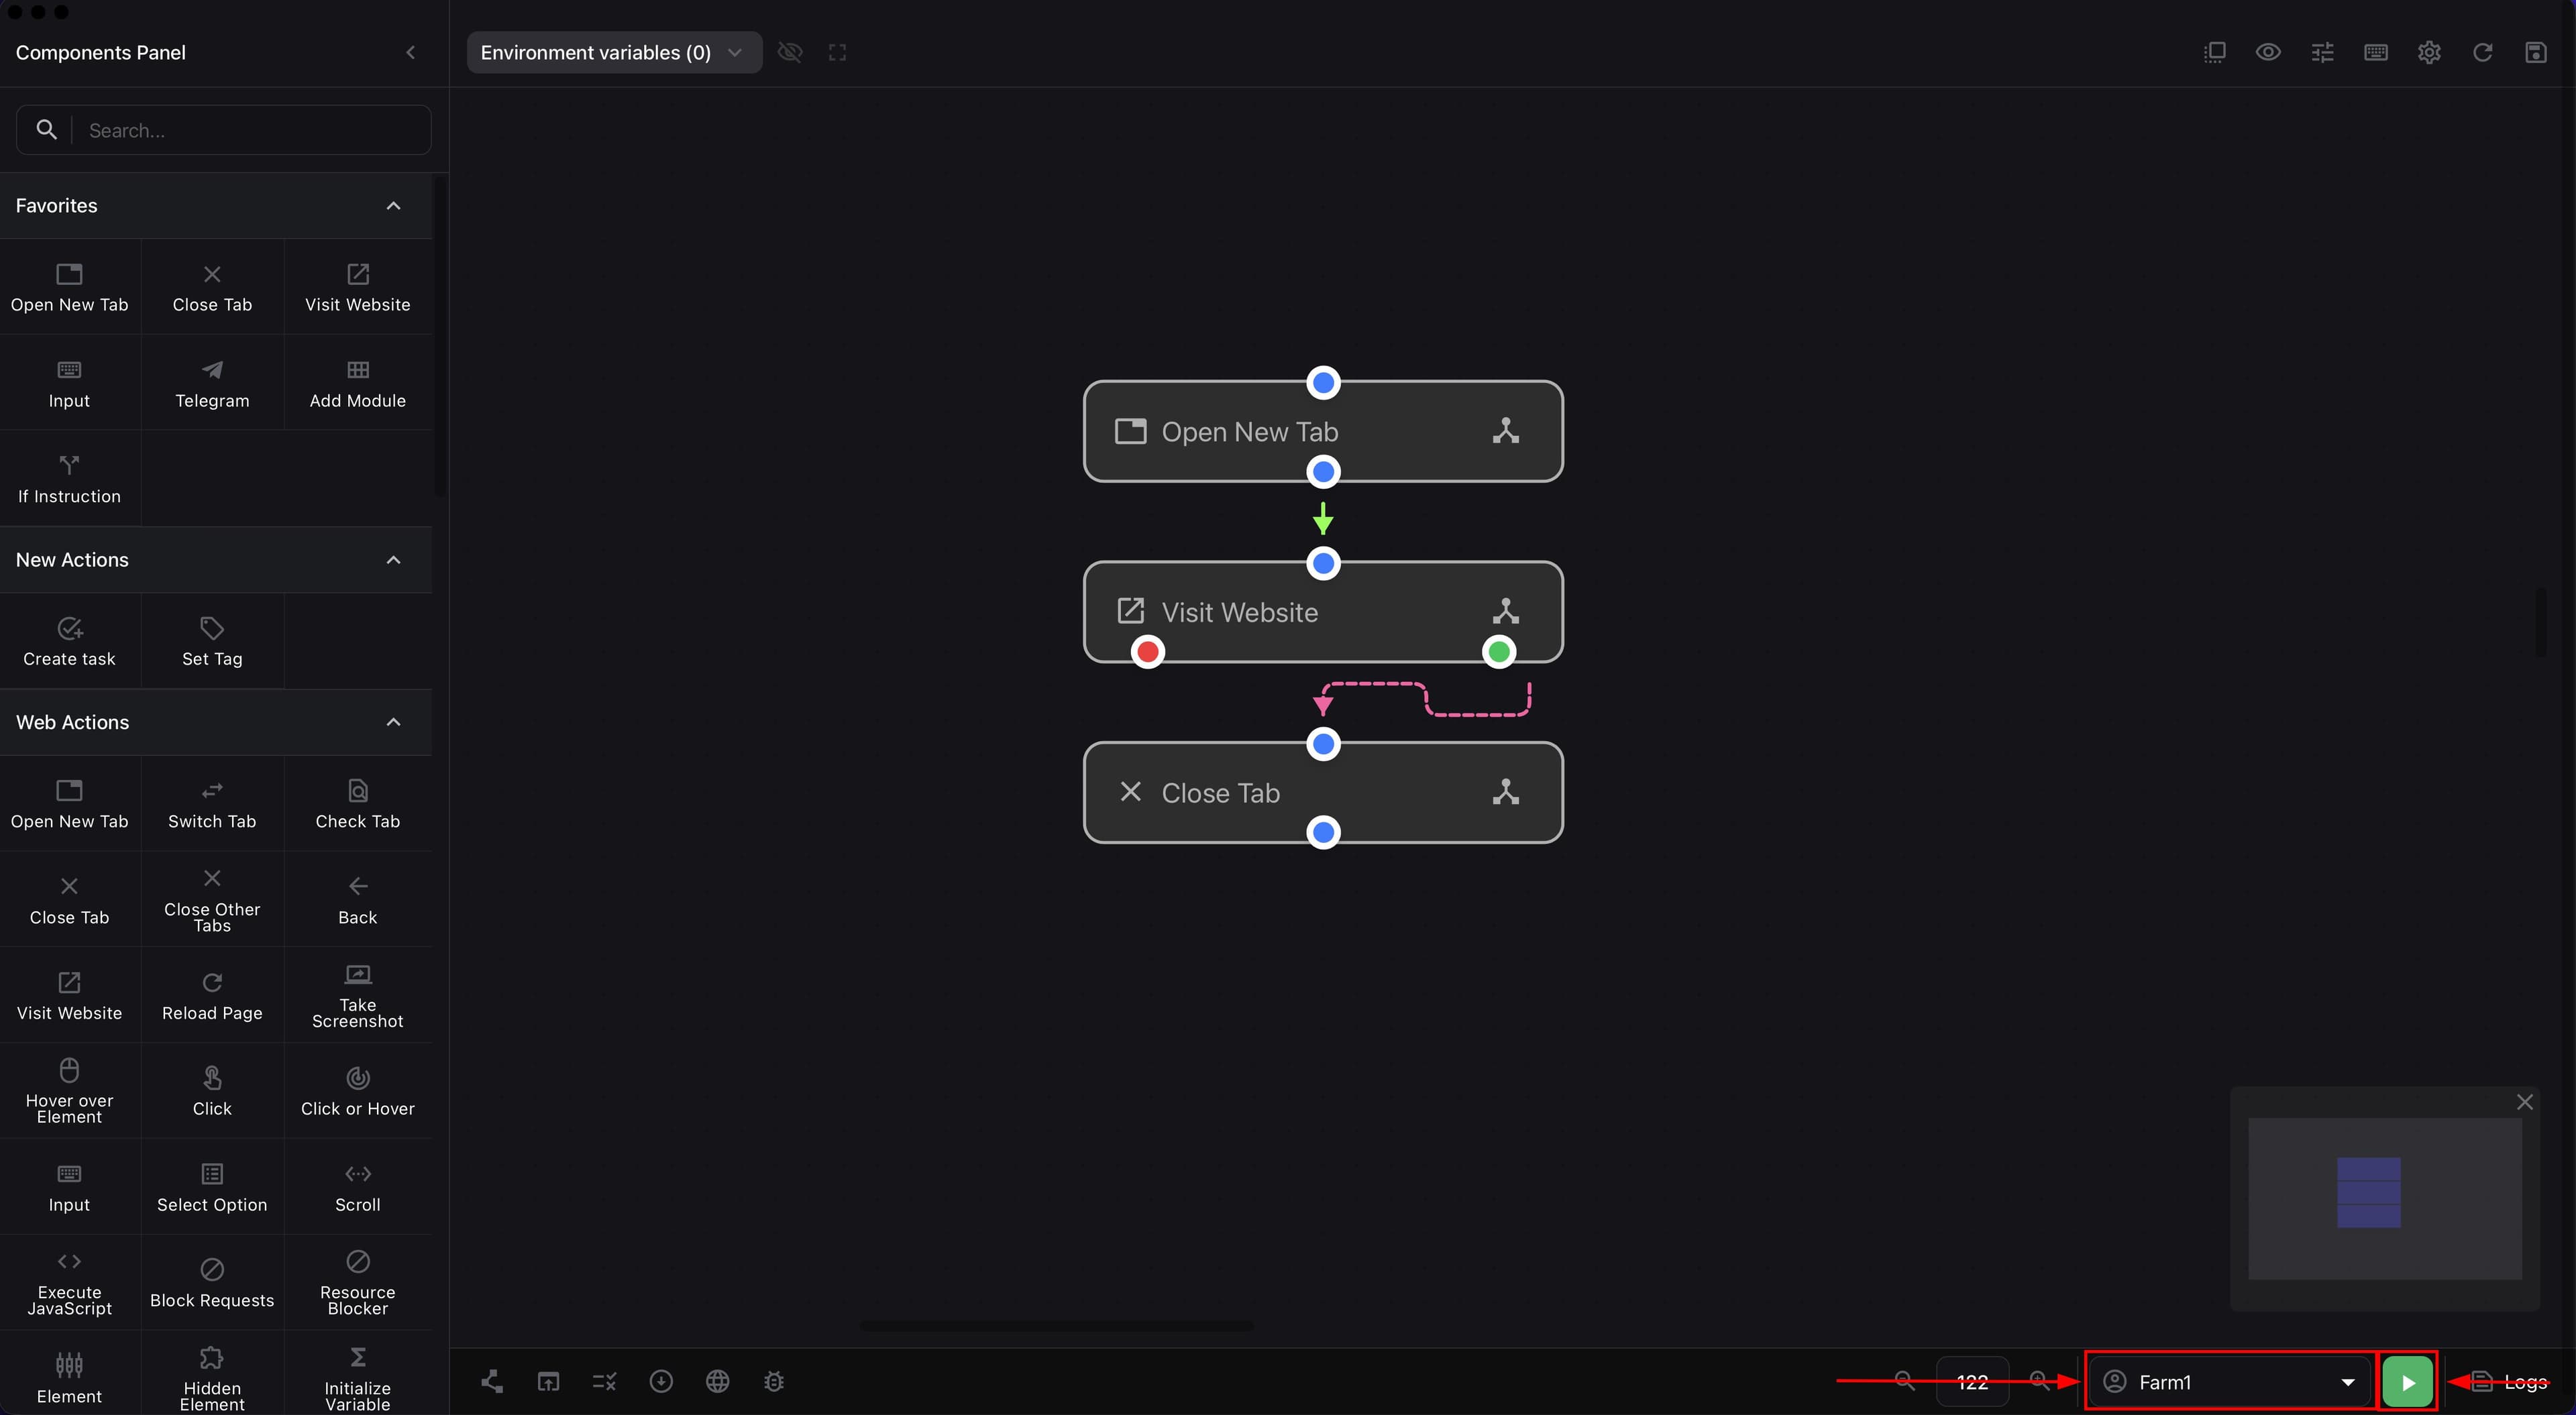
Before launching, set the start element. To do this, right-click the needed block and choose "Start element".
A script must have exactly one start element. If the start block is not set, the scenario will not know where to begin execution.
Limits and common launch errors#
- The maximum script execution time in one cycle is 1440 minutes, or 24 hours. After this limit is exceeded, the process will be forcibly stopped.
- If action blocks have red error branches, connect them to the next error-handling logic. Otherwise, after a failure, timeout, or missing element, the script may stop or follow the wrong path.
- If a signature error appears after manually editing module files, re-sign the module or temporarily use Dev mode for testing.
Variables and logs#
-
Open the "Environment variables" panel if you need to check which values actually entered the launch.
-
Review the list of variables in the panel.
-
Click the show value button if you need to temporarily reveal hidden data.
-
Click the copy button if you need to copy a variable value.
The screenshot below shows the "Environment variables" panel with the list of values used during script execution.
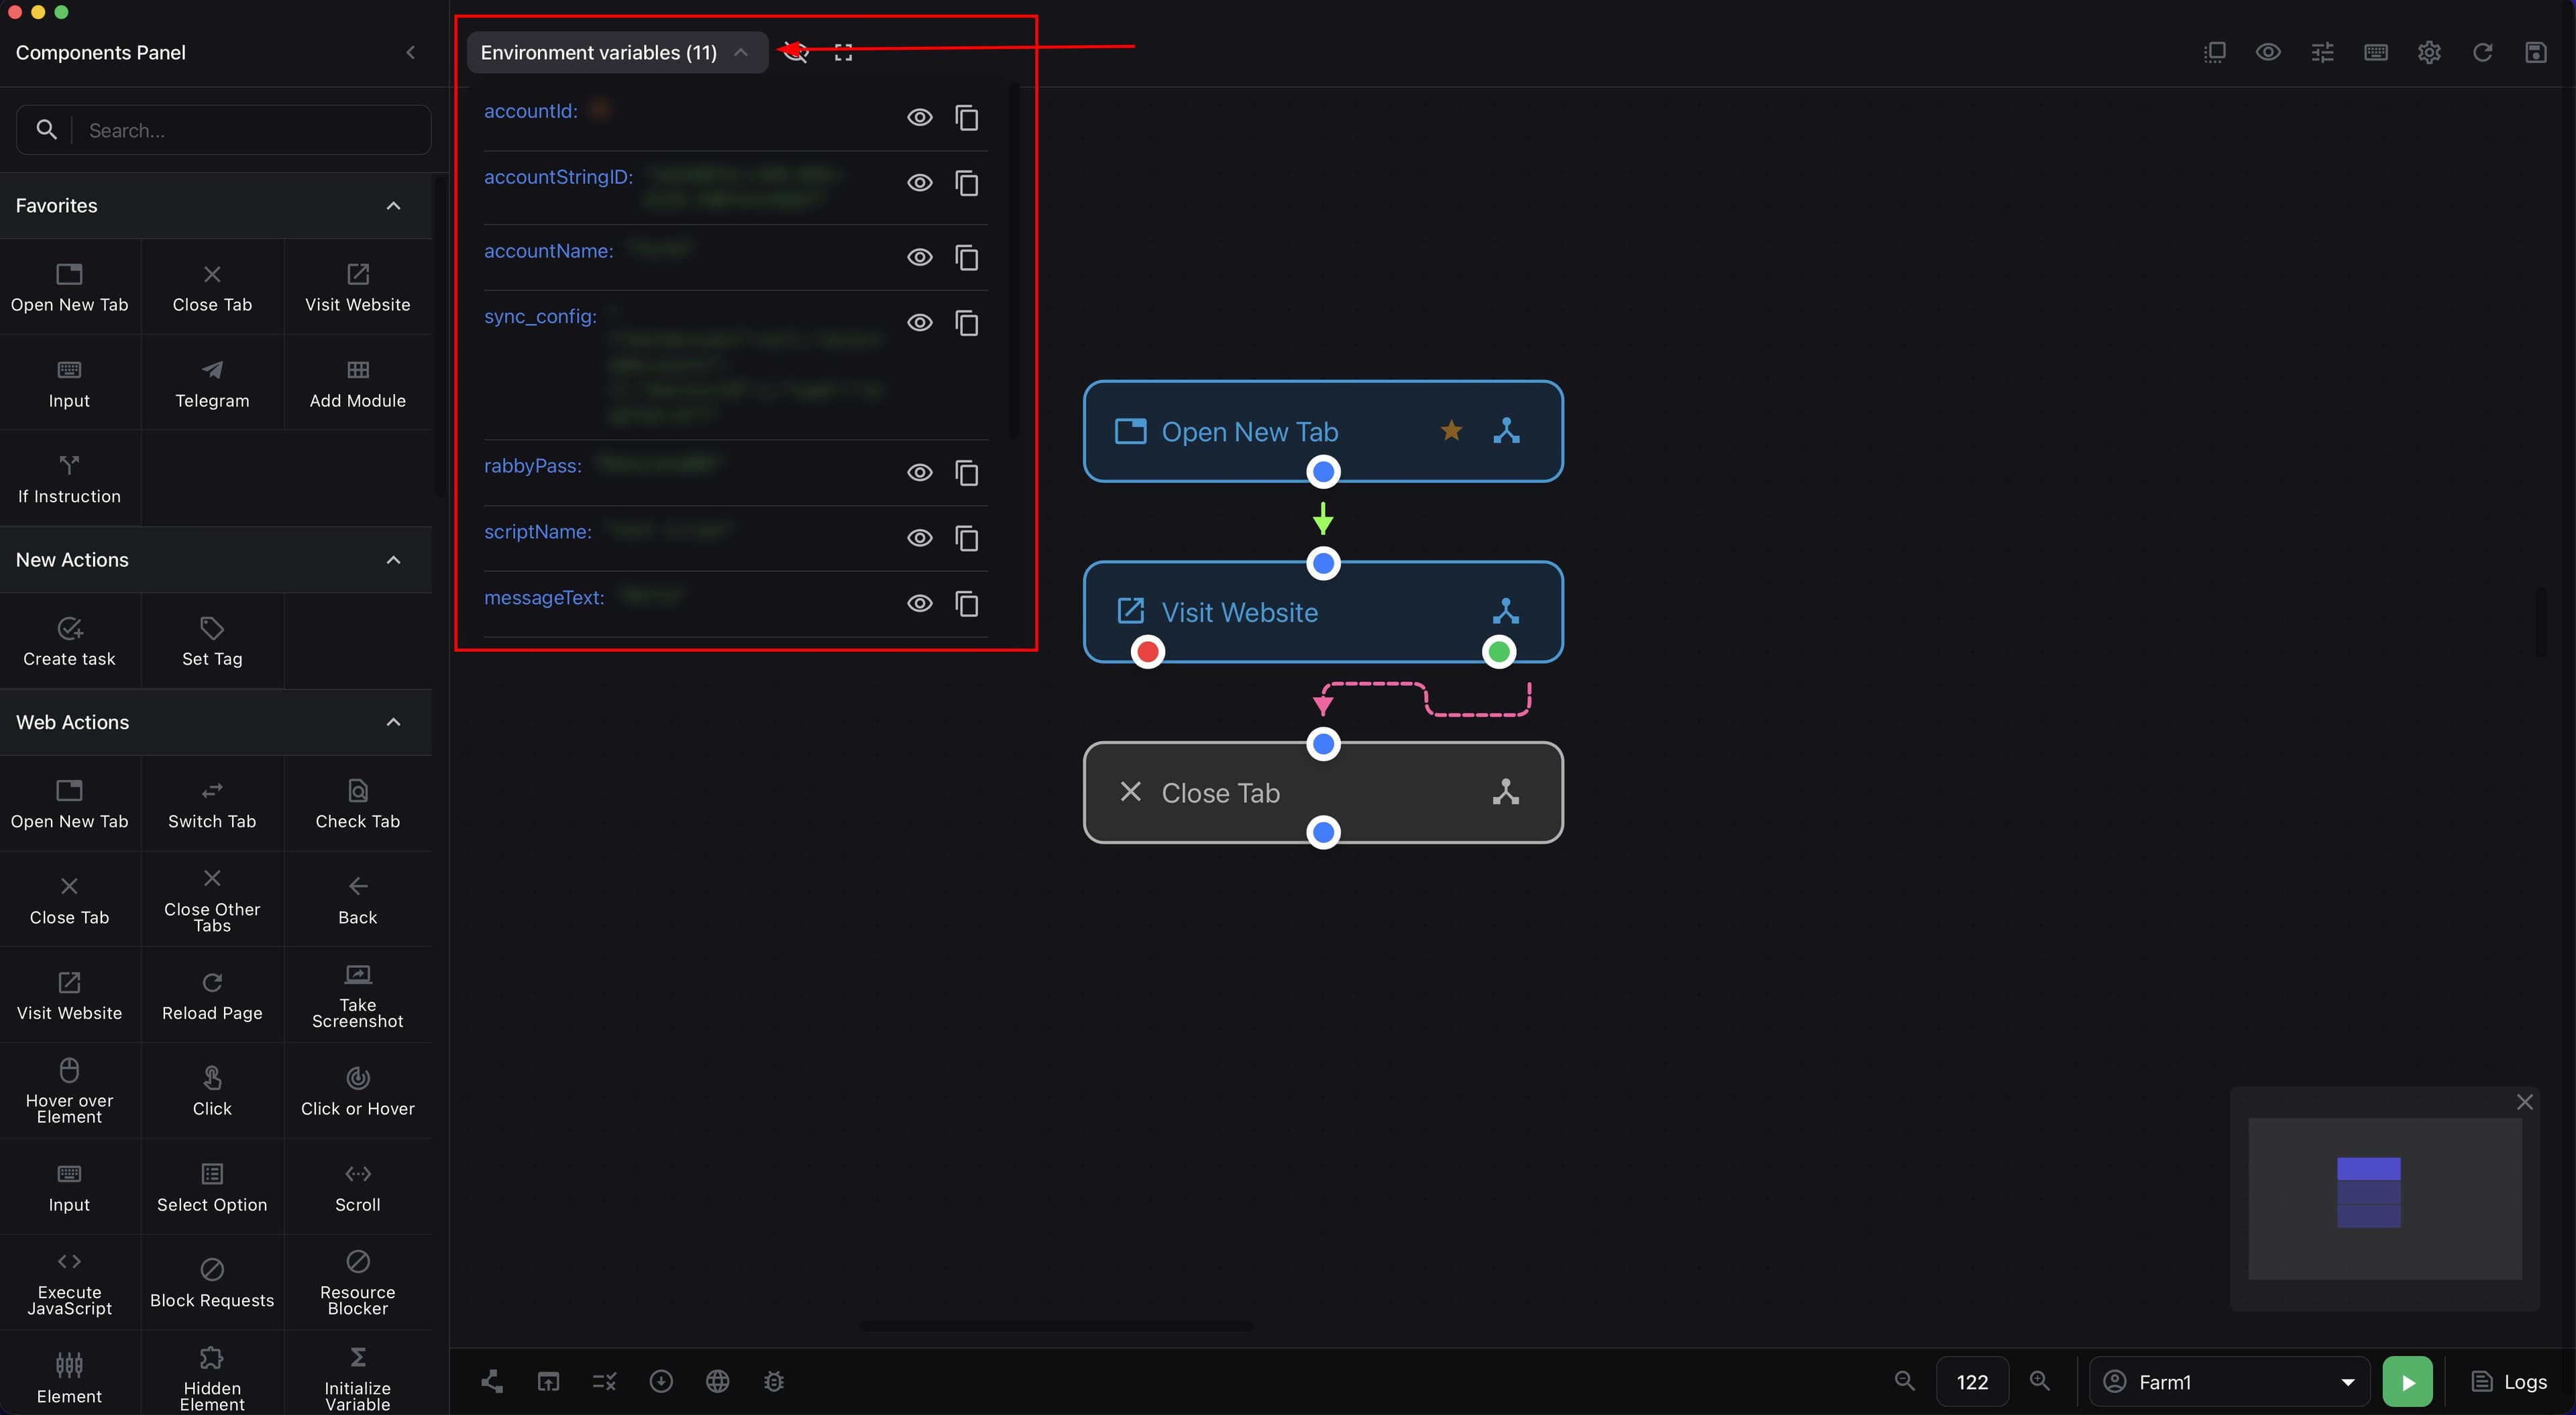
The "Environment variables" panel is useful when the script does not work as expected and you need to check which values actually entered execution.
-
Click Logs after launching the script.
-
Click Refresh if you need to pull in new records.
-
Click Load more if you need to view older records.
-
Click Open logs file if you need to open the full log separately.
The next screenshot shows the "View script execution logs" window with the list of script execution records.
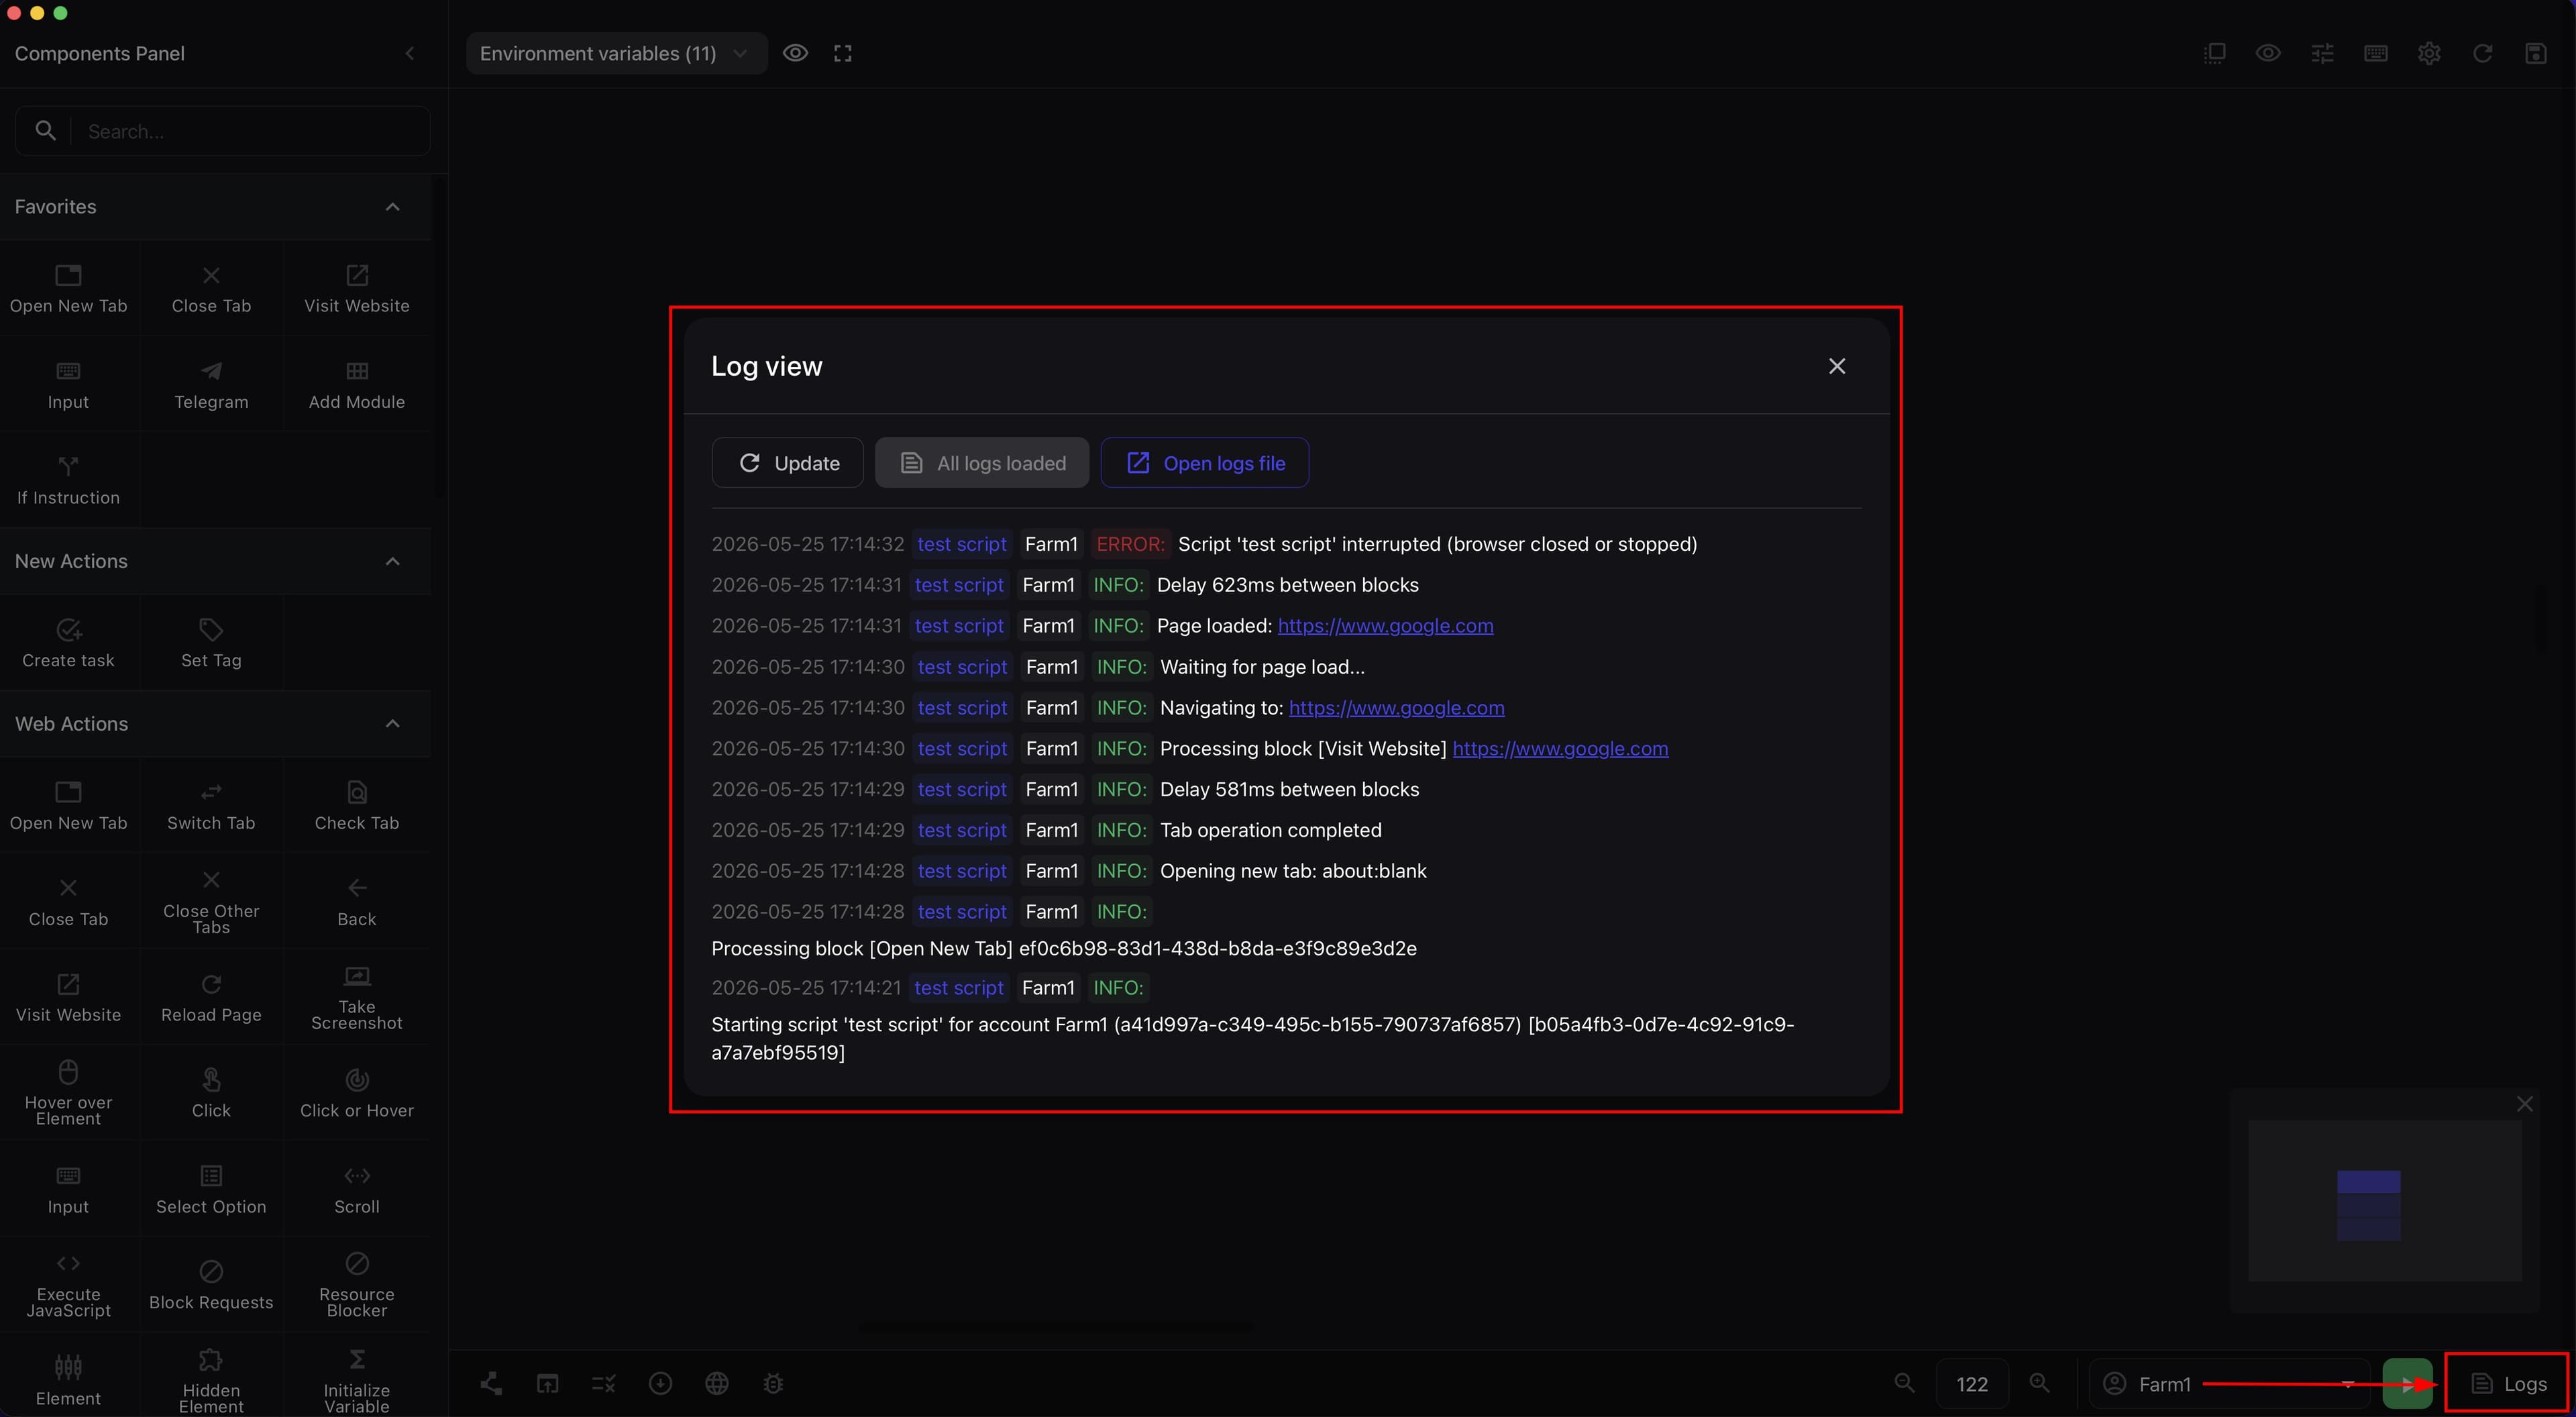
Why logs are needed With logs, it is convenient to check which exact block the script reached and find where an error or execution stop occurred.
If the script did not run as expected, check the logs first and only then edit the scheme.
The log language can be changed in Afina's main settings.
Organizing the scheme#
-
Place related blocks near each other so the logic is easier to read.
-
Use the color palette in the builder if you want to visually separate parts of a large scheme.
-
Do not stretch the canvas unnecessarily if one scenario can be assembled more compactly.
-
Click Save script after each series of changes.
-
Add repeated blocks to favorites if you often use them in different scenarios.
For basic order in scripts, this is enough: keep related parts close together, visually separate logic with colors, and do not overcomplicate the scheme before it is really needed.
If the scheme grows and takes up a lot of space, it is better to split the logic into understandable parts and think through the structure separately before expanding it further.
Deleting a script#
-
Find the needed script in the table.
-
Click the Actions icon in the script row.
-
Select Delete script.
-
Click Confirm.
The screenshot below shows the script actions menu with the Delete script item.
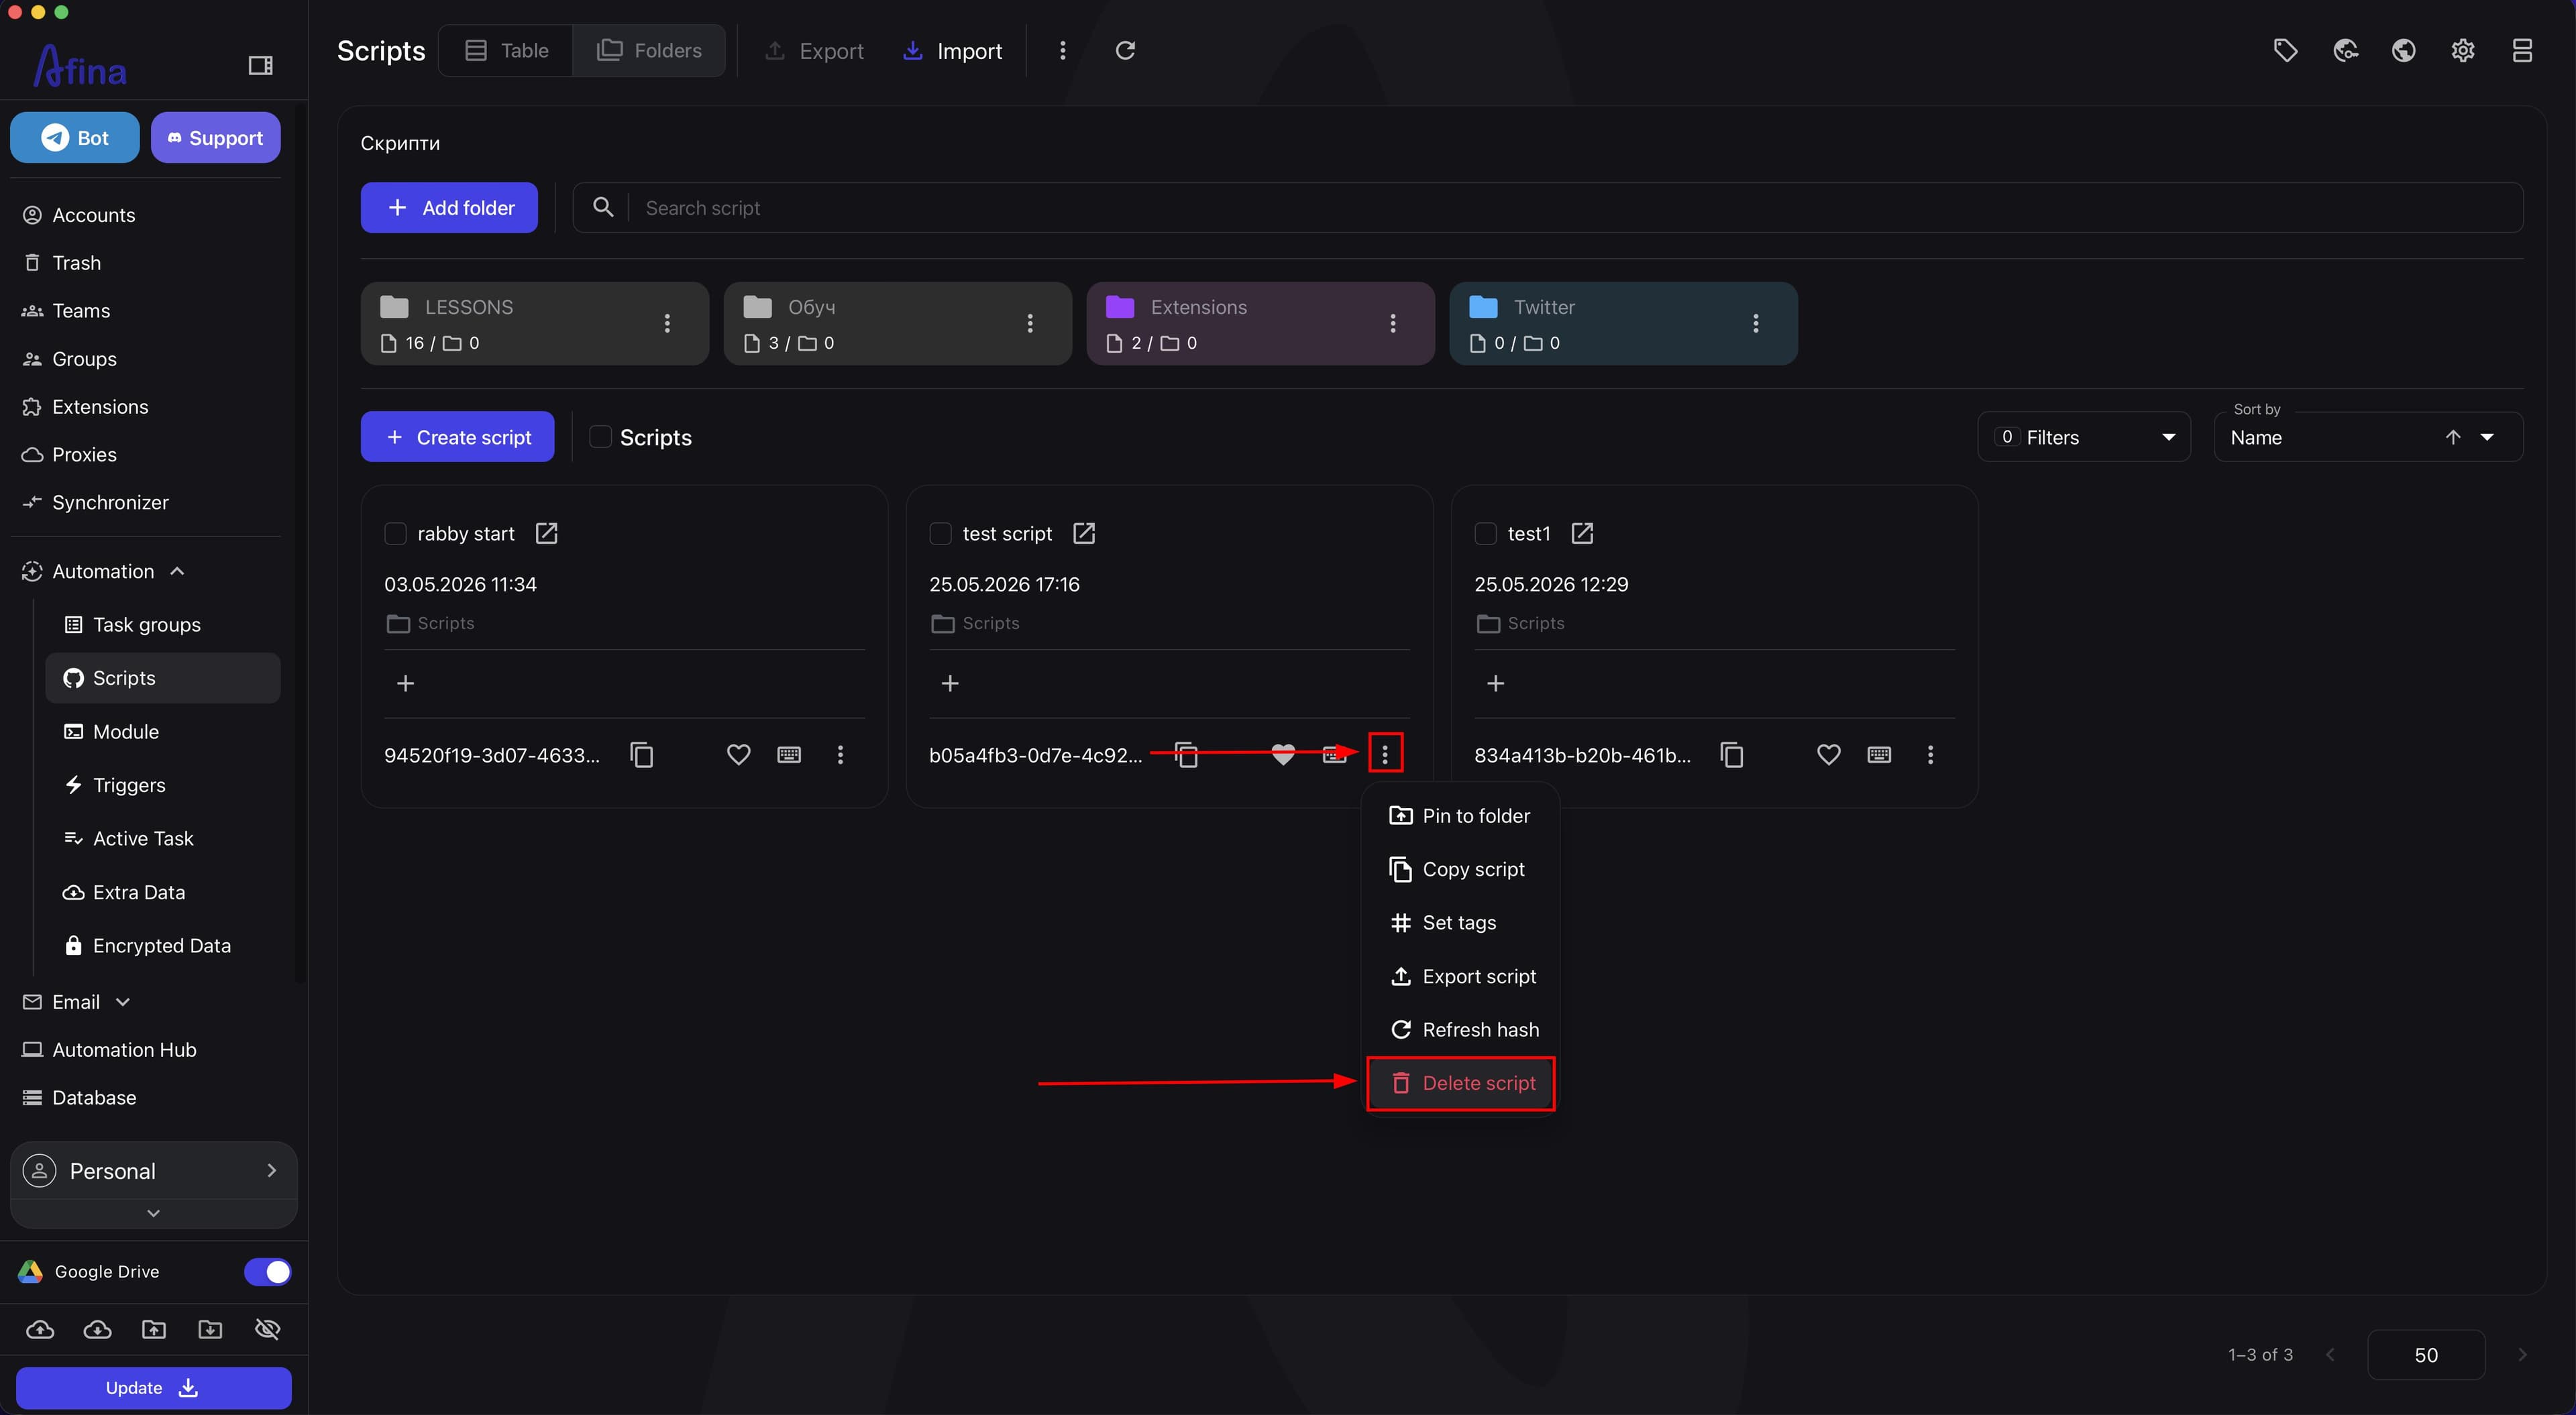
After that, the script will be moved to the scripts trash.
-
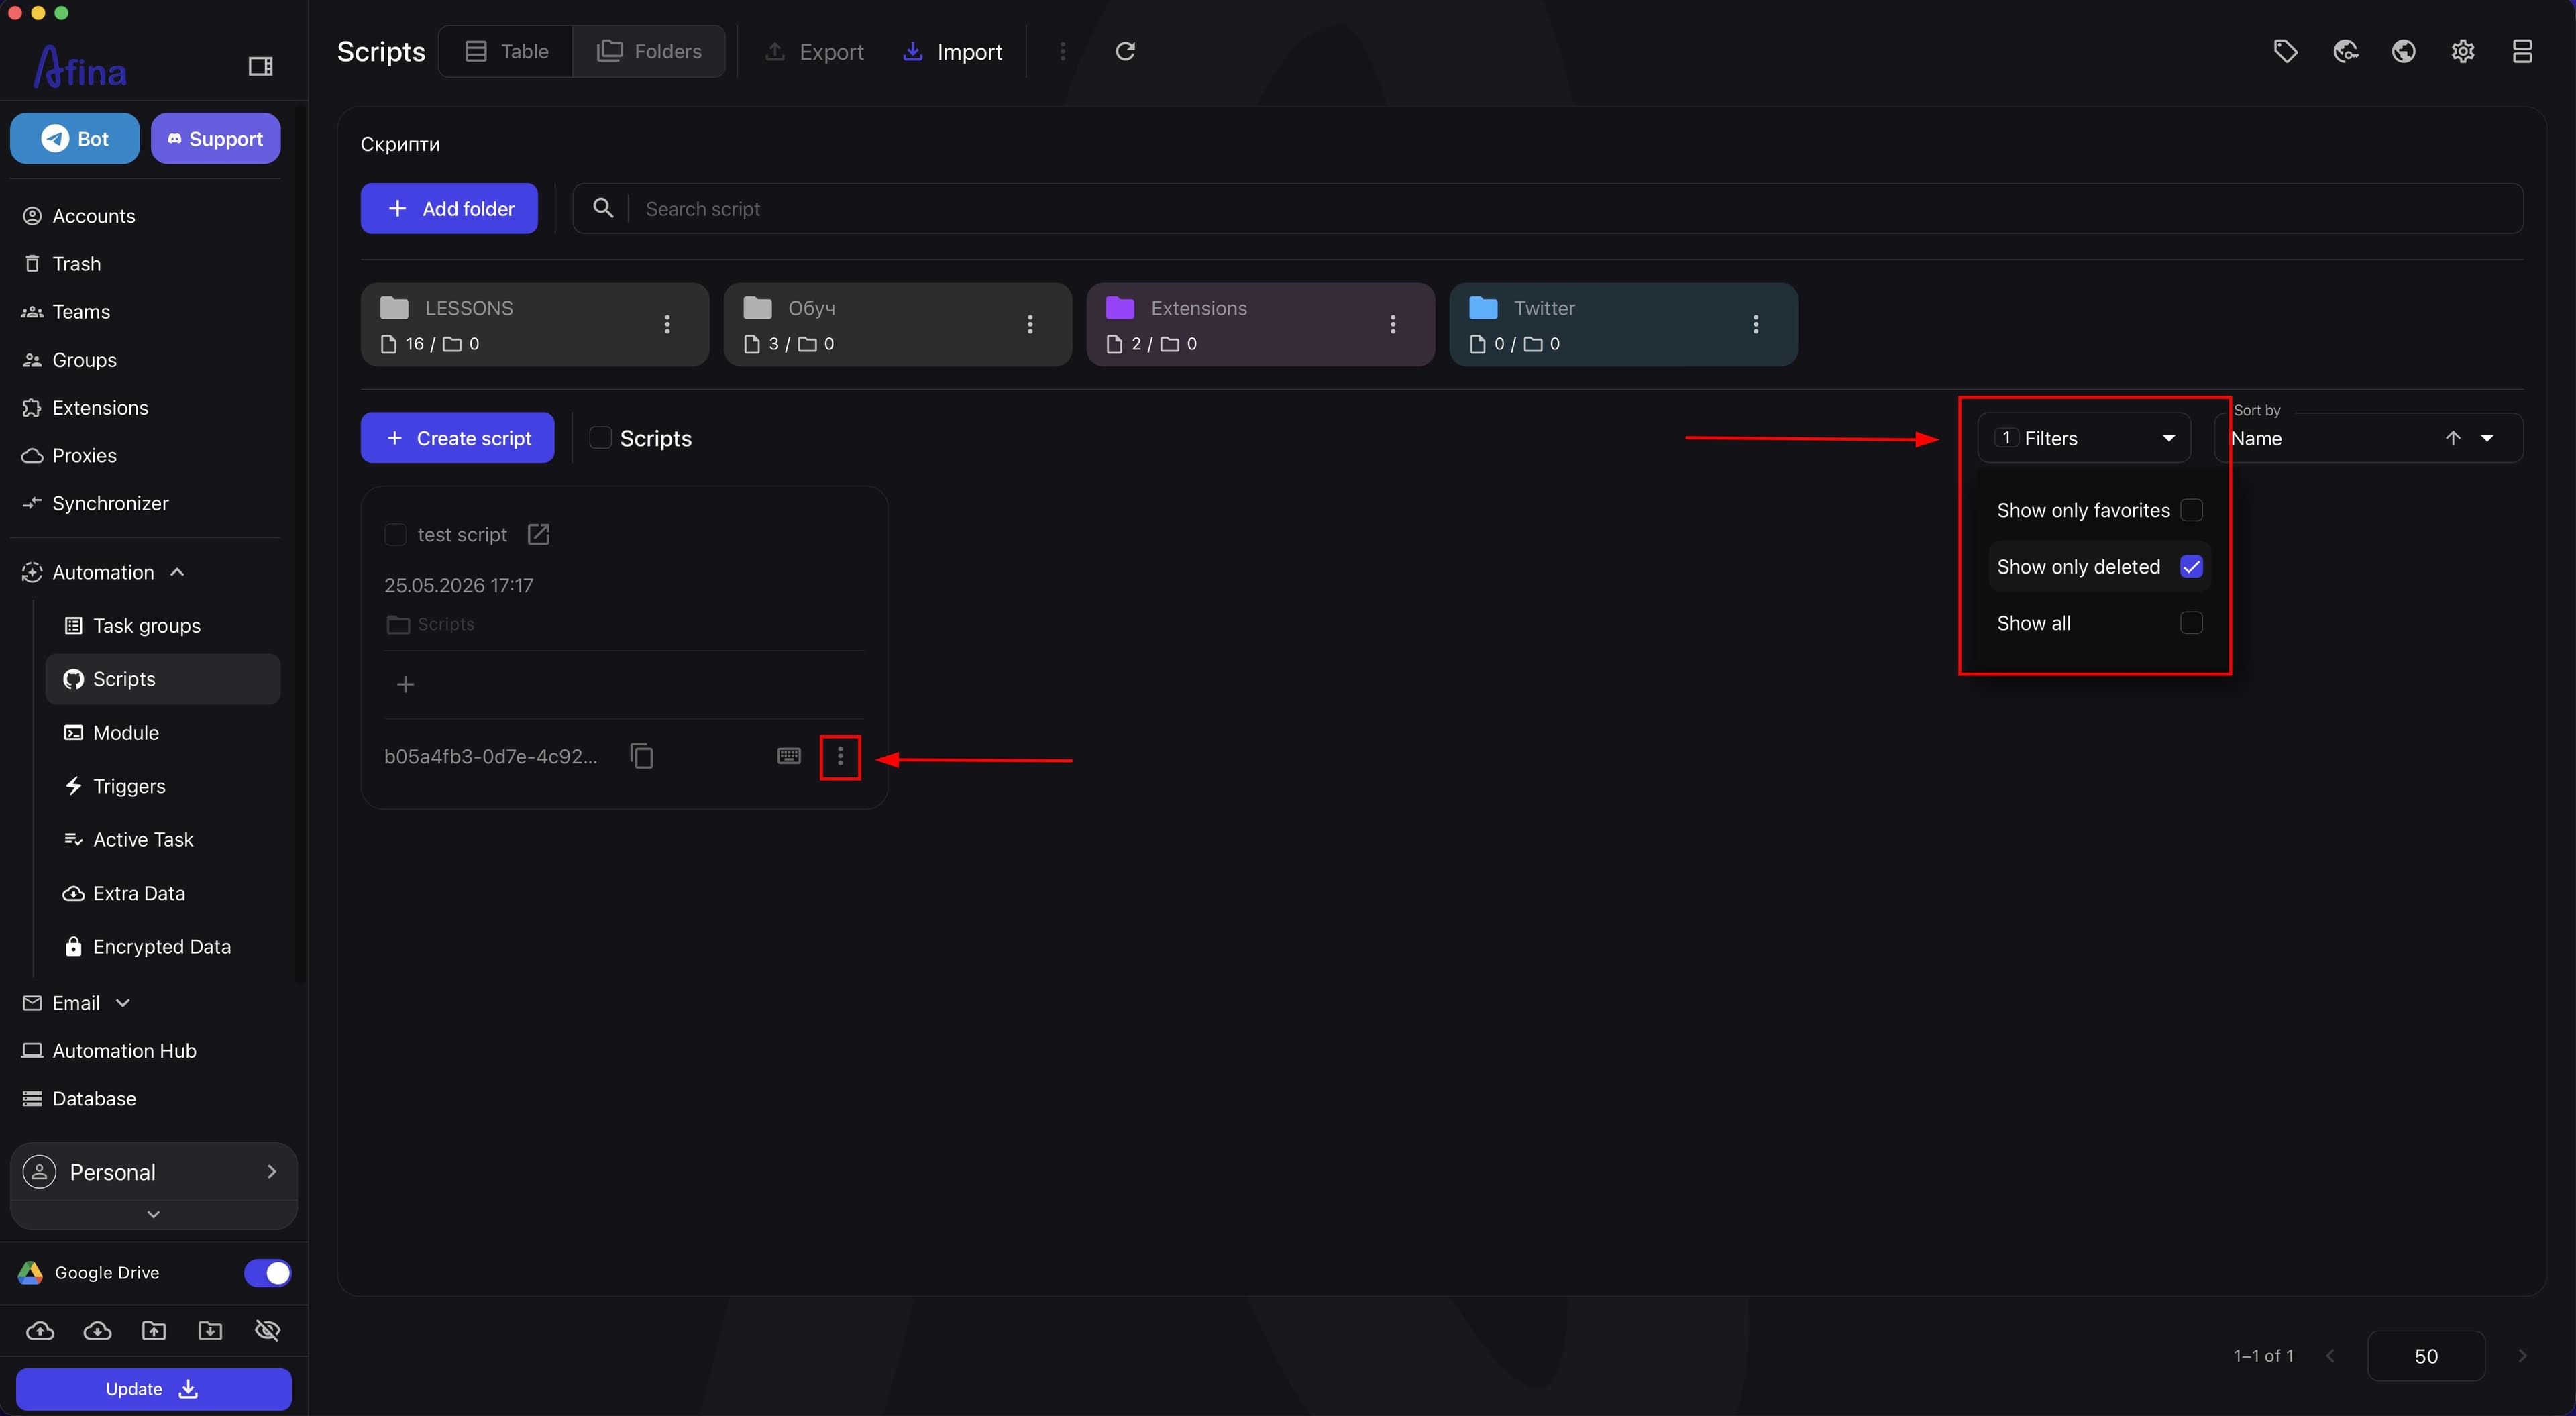
Click Filters.
-
Enable the "Show only deleted" checkbox if you want to open the scripts trash.
The next screenshot shows the "Scripts" page with filters open and the show deleted option enabled.
-
Find the needed script in the deleted items list.
-
Click the Actions icon near this script.
-
Select Delete without restore.
-
Click Confirm.
After that, the script will be permanently deleted.
If you perform permanent deletion from the trash, the script cannot be restored.
If you delete a folder with scripts, the scripts themselves are not deleted. They remain in the system and return to the general list without that folder.
Refreshing the script hash#
The "Refresh hash" action creates a new version identifier for the script. Use it carefully, especially if this script is already connected to other scenarios.
Refreshing the script hash is irreversible. If this script is used inside other scripts, after refreshing the hash you will need to add it again to all dependent scenarios.
Exporting and importing scripts#
-
Go to the Automation section.
-
Open the "Scripts" tab.
-
Select one or more scripts you want to save or transfer using the checkboxes.
-
Click Export.
-
Choose the needed export option.
Use script export for backup, transfer to another device, or sharing with another user. Before starting export, always check that the needed scripts are selected with checkboxes in the table.
-
Click Import if you want to load a script back into Afina.
-
Choose the import source.
-
Select the script on your PC or from the list if this is import from Google Drive.
-
Click Import after selecting the needed script or archive.
Import is convenient when you need to quickly restore a previously saved script to Afina or transfer it from another workstation.
Before exporting, be sure to select scripts in the table; otherwise, export will not start.
Result#
After completing these steps, you will have created your first script in Afina, configured the basic launch, assembled a simple scheme in the builder, and learned how to check execution through environment variables and logs. You will know everything is configured correctly if the new script appears in the "Scripts" list, opens in the visual script builder, runs on the selected account, and execution records appear in the logs.