The “Additional” Tab in Settings#
The “Additional” tab is used for fine-tuning the Chromium core for your tasks. Here, you define how the browser behaves at launch and which technical parameters are passed to the system.
Opening the Tab#
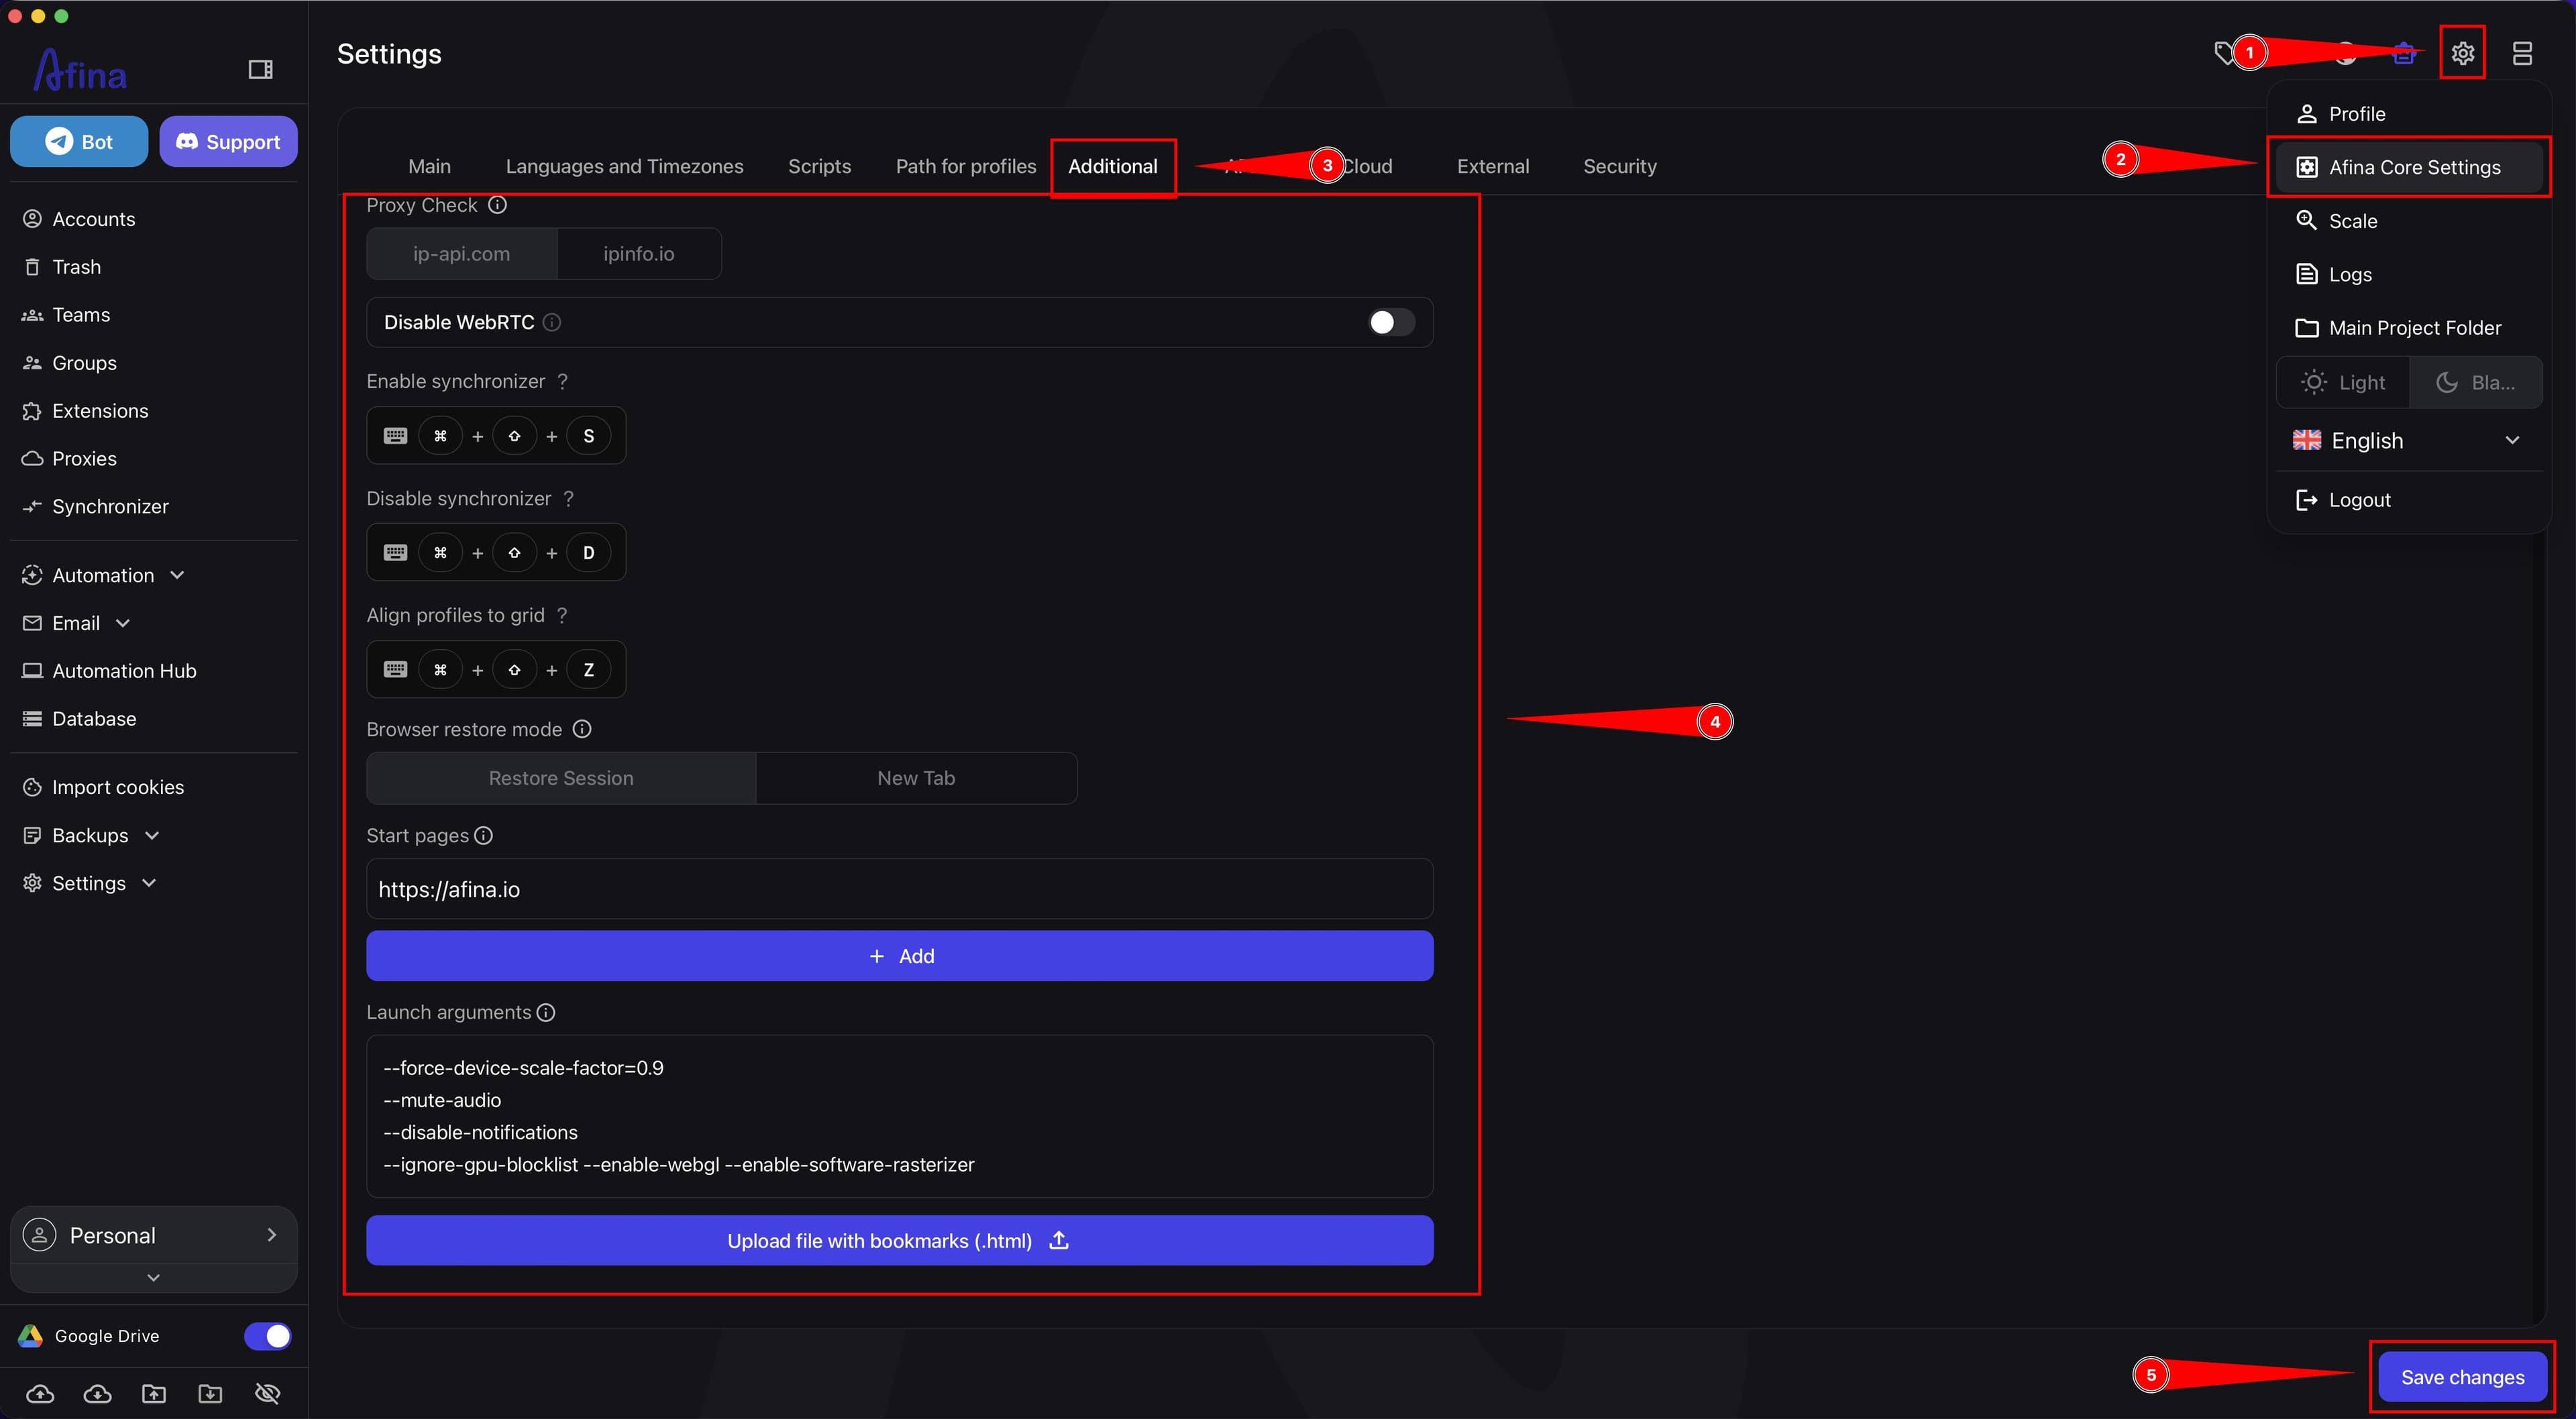
- Click the gear icon in the upper-right corner.
- Select Afina Core Settings.
- Open the Additional tab.
The screenshot below should show the path to the “Additional” tab through the “Afina Core Settings” menu.
Proxy Check#
In the “Proxy Check” block, Afina uses one of two services before launching a profile to pull the geo, time zone, and check the connection.
- In the Additional tab, find the “Proxy Check” block.
- Select the
ip-api.comoripinfo.ioservice. - Click Save changes at the bottom of the page.
If one service often returns a timeout error, simply switch to the other one.
WebRTC#
In this tab, you can manage WebRTC behavior with the “Disable WebRTC” toggle.
- In the Additional tab, find the “Disable WebRTC” toggle.
- Turn on the “Disable WebRTC” toggle if you want to fully disable WebRTC in the browser.
- Click Save changes at the bottom of the page.
After enabling this parameter, RTCPeerConnection will not work, and the real IP will not be able to leak through WebRTC.
Hotkeys#
The “Additional” tab also contains hotkey settings for actions with the synchronizer and profile alignment.
- In the Additional tab, find the “Enable synchronizer” block.
- Check the key combination for the “Enable synchronizer” action.
- Find the “Disable synchronizer” block.
- Check the key combination for the “Disable synchronizer” action.
- Find the “Align profiles to grid” block.
- Check the key combination for the “Align profiles to grid” action.
By default, these blocks show the following combinations:
- “Enable synchronizer” —
Command + Shift + SorCtrl + Shift + S - “Disable synchronizer” —
Command + Shift + DorCtrl + Shift + D - “Align profiles to grid” —
Command + Shift + ZorCtrl + Shift + Z
Browser Restore Mode#
The “Browser restore mode” block defines how the browser opens at launch.
- In the Additional tab, find the “Browser restore mode” block.
- Select New Tab if the browser should always open with an empty page.
- Select Restore Session if Afina should open all tabs that were active when the profile was last closed.
If you selected Restore Session, the browser will open all tabs that were active when the profile was last closed.
Start Pages#
The “Start pages” block separately defines the pages that open for a new account.
- In the Additional tab, find the “Start pages” block.
- Click Add.
- Add the required URLs if you want to set start pages for a new account.
- Click Save changes at the bottom of the page.
Start pages open only once: during the first launch of a new account.
Launch Arguments#
Launch arguments are CLI commands that Afina adds to the system request for launching Chromium. You can set them globally for all profiles in the “Additional” tab or for a specific profile through Accounts → ⋮ → Edit → Launch settings.
- In the Additional tab, find the “Launch arguments” block.
- Enter the required argument or set of arguments.
- Click Save changes at the bottom of the page.
Below are examples of launch arguments and what they are used for.
--force-device-scale-factor=0.9
Sets the scale of the entire browser interface to 90%. This helps if a site blocks Ctrl + or Ctrl -.
--mute-audio
Completely disables sound in the browser. This is useful if you launch 100+ accounts at the same time and do not want extra noise from advertising videos.
--disable-notifications
Blocks all pop-up requests from sites asking to send notifications.
--ignore-gpu-blocklist --enable-webgl --enable-software-rasterizer
This combination is suitable for working on servers or weak PCs. It forcibly enables WebGL and graphics processing, even if the system considers the video card incompatible.
--remote-debugging-port=65000
Opens a port for direct connection to the browser through CDP. This is needed for custom automation.
Uploading Bookmarks#
The Upload file with bookmarks (.html) button lets you import a standard bookmarks file exported from another browser.
- In the Additional tab, find the Upload file with bookmarks (.html) button.
- Upload a standard bookmarks file in
.htmlformat exported from another browser. - Click Save changes at the bottom of the page.
The uploaded file applies only to new profiles created after the upload. If you upload a new file later, it will overwrite all previous system bookmarks in all accounts.
Do not forget to click Save changes at the bottom of the page, otherwise the changes in the tab will not be applied.
Result#
After saving changes in the “Additional” tab, Afina will apply the selected proxy check method, WebRTC settings, browser launch logic, hotkeys for actions with the synchronizer, configured launch arguments, and the current bookmarks file for new profiles.