Encrypted and Additional Data#
This guide explains the difference between Additional Data and Encrypted Data in Afina, and how to export, import, edit, and delete them. Use this to manage automation variables and store both regular parameters and sensitive information correctly.
Before You Start#
- Prepare the accounts whose data you need to export, import, edit, or delete.
- If you plan to import data, make sure the file is saved in
.xlsxformat. - For bulk import, prepare the AccountID for each account so Afina can automatically match rows to profiles.
- To work with Encrypted Data, the Afina session must be unlocked with the master password. Without an unlocked session, the system cannot decrypt the local storage for script execution or API work.
Additional Data is suitable for logins, wallets, and notes, while Encrypted Data is for passwords, seed phrases, and 2FA secrets.
Encrypted Data text is not sent in plain text through the API, so use this data type for sensitive information.
Difference Between Data Types#
Additional Data is a regular text variable in key → value format. It is convenient for general automation parameters, and the data itself is stored in plain text and visible through the API.
Encrypted Data also uses the key → value format, but it is intended for sensitive information. It is stored in encrypted form, is not returned through the API as plain text, and is decrypted locally in the RPA executor immediately before the required script step runs.
Importing and editing Additional Data and Encrypted Data uses the same format. The difference is not in the template, but in the security level and the way values are stored.
Using API and Scripts#
Through the API, you can create, update, and delete both Additional Data and Encrypted Data. Afina uses a parameter that defines whether the variable is regular or encrypted.
The difference is in value visibility:
- Additional Data is visible through the API in plain text, so do not use it for passwords, seed phrases, private keys, or 2FA secrets.
- Encrypted Data can be written or updated through the API, but its decrypted text is not returned through the API, MCP agent, or agent chat.
- In RPA scripts and JS modules, both data types are called the same way: with the
${key}syntax. For Encrypted Data, Afina inserts the value locally at execution time.
If you lose the master password or key file, Encrypted Data cannot be restored. Store these data separately and do not share them with third parties.
Data Export#
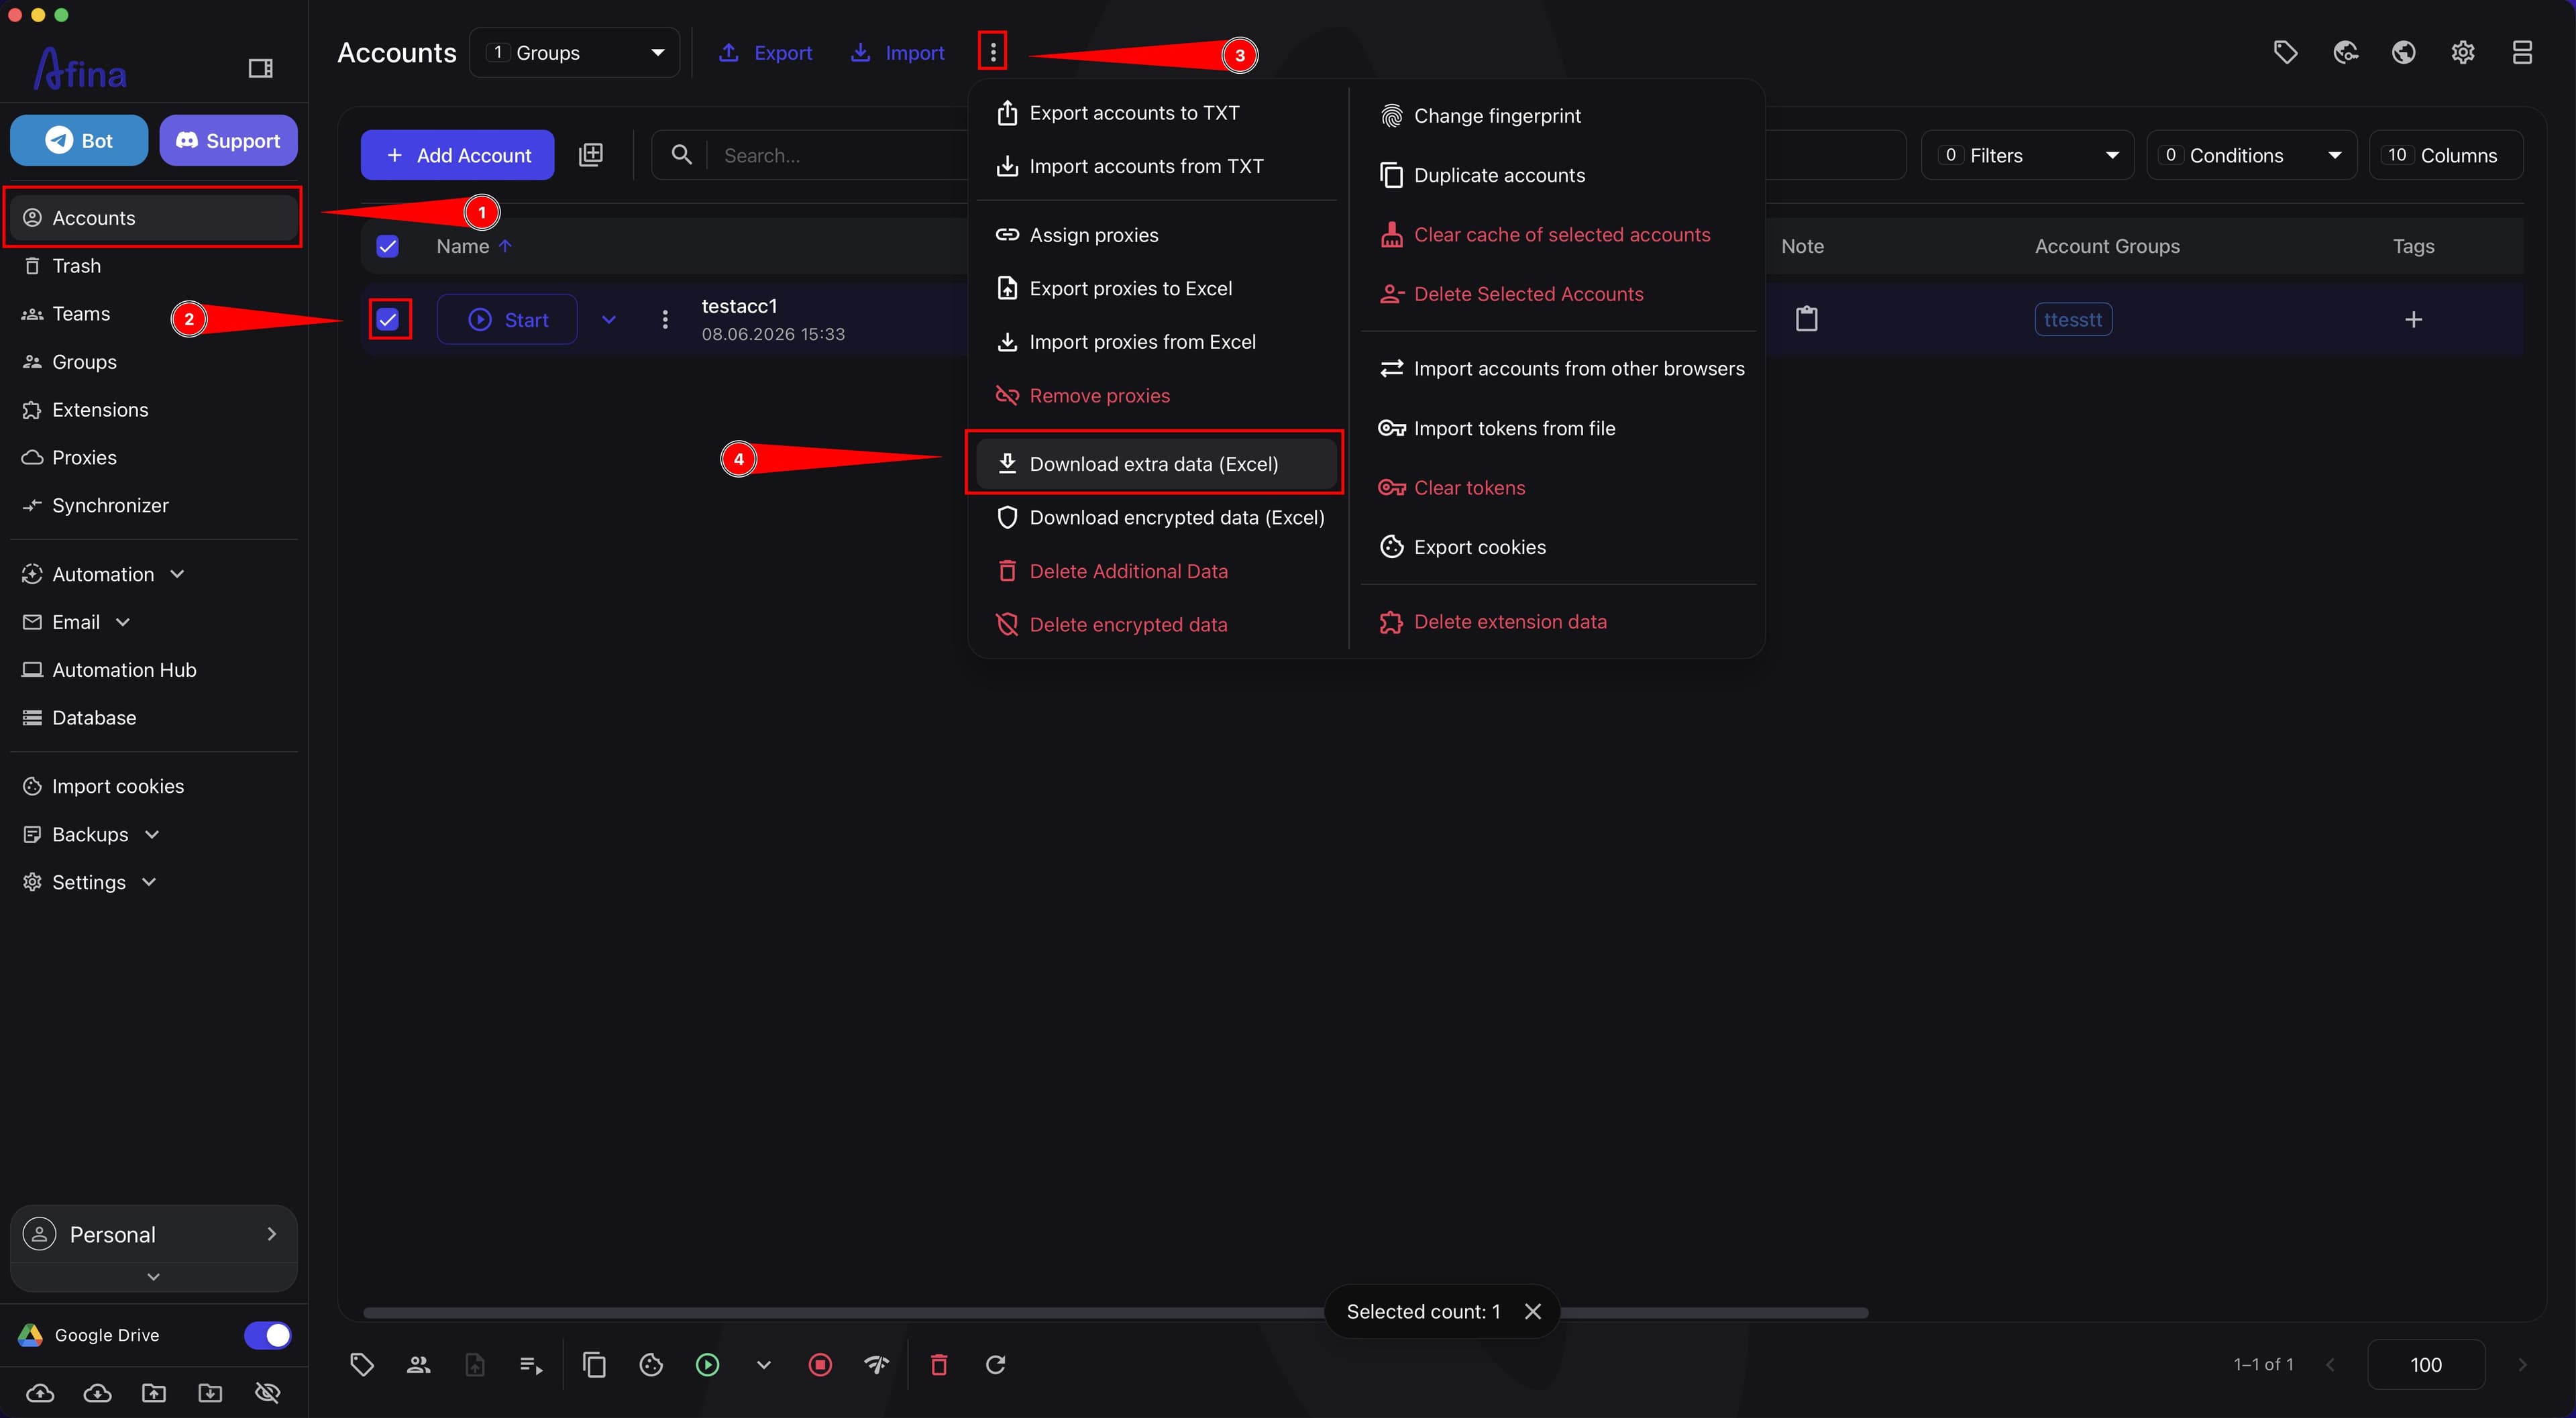
- Go to the Accounts section.
- Select the required profiles using checkboxes.
- Click the ⋮ icon on the top panel.
- Choose Download extra data (Excel) or Download encrypted data (Excel).
The screenshot shows the Accounts section with selected profiles and the open ⋮ icon menu, where Download extra data (Excel) and Download encrypted data (Excel) are available.
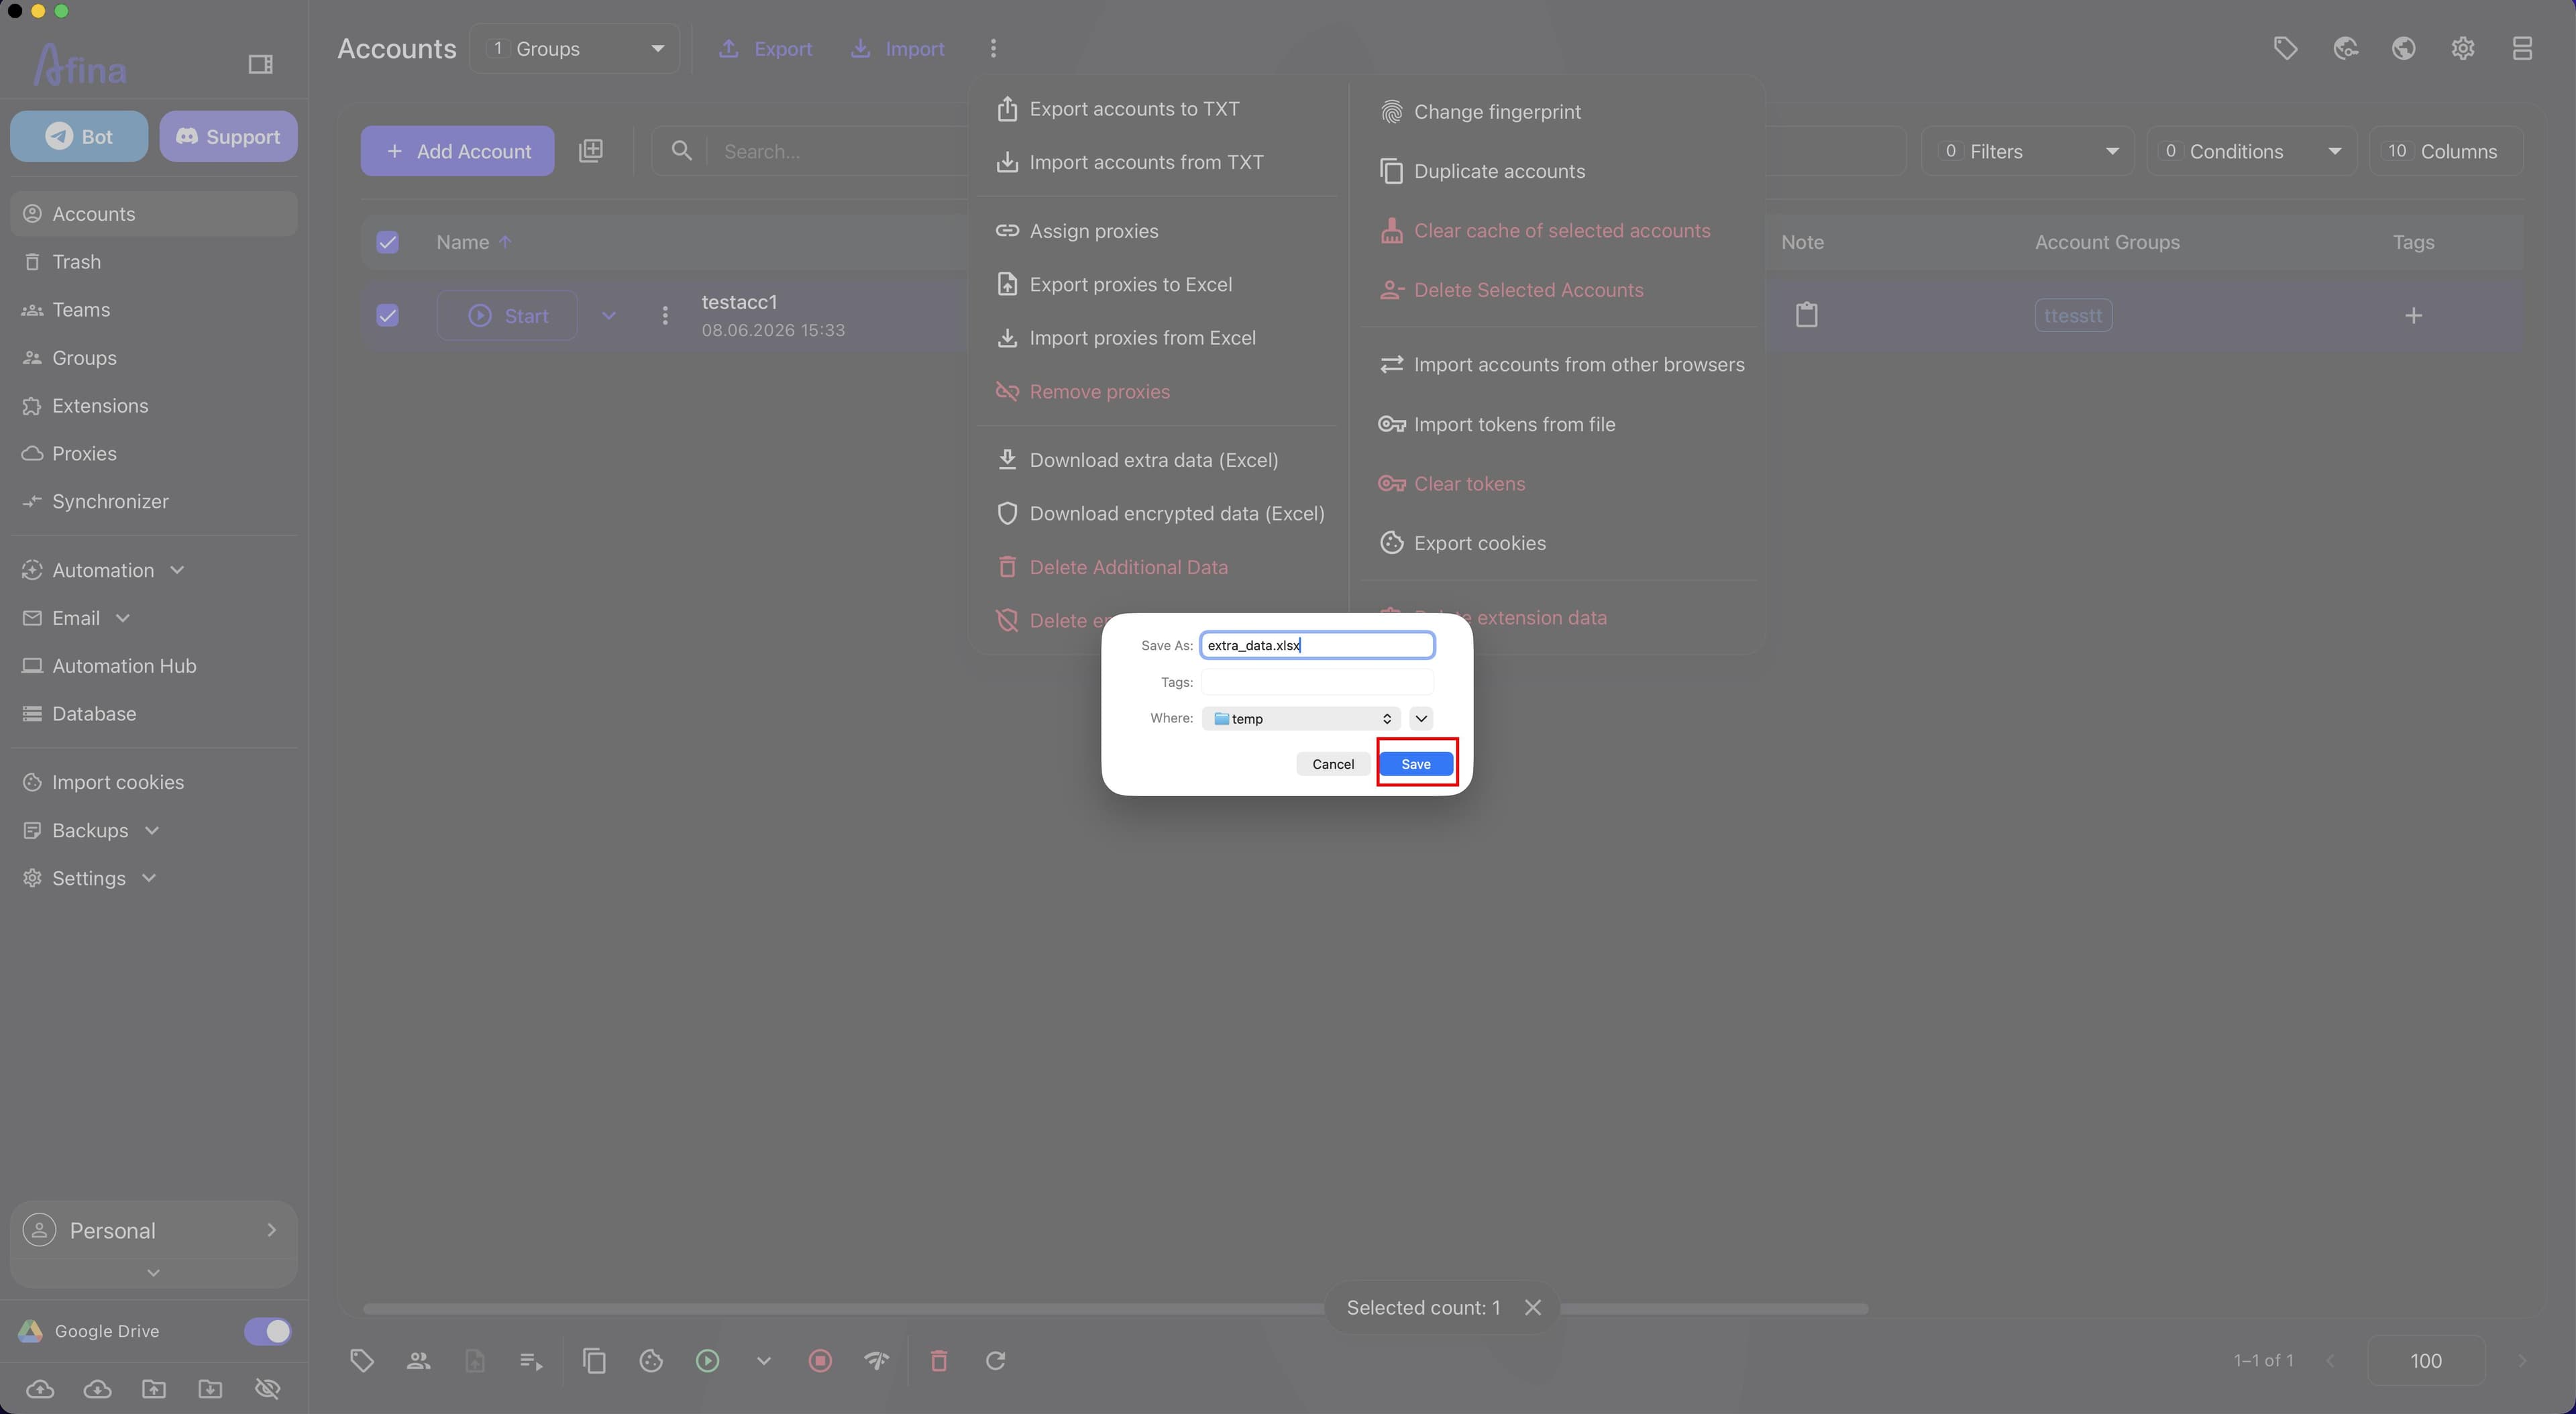
- In the system window, specify the folder for saving.
- Confirm the action in the system window.
The screenshot below shows the system file save window, where you need to choose a folder and confirm the export.
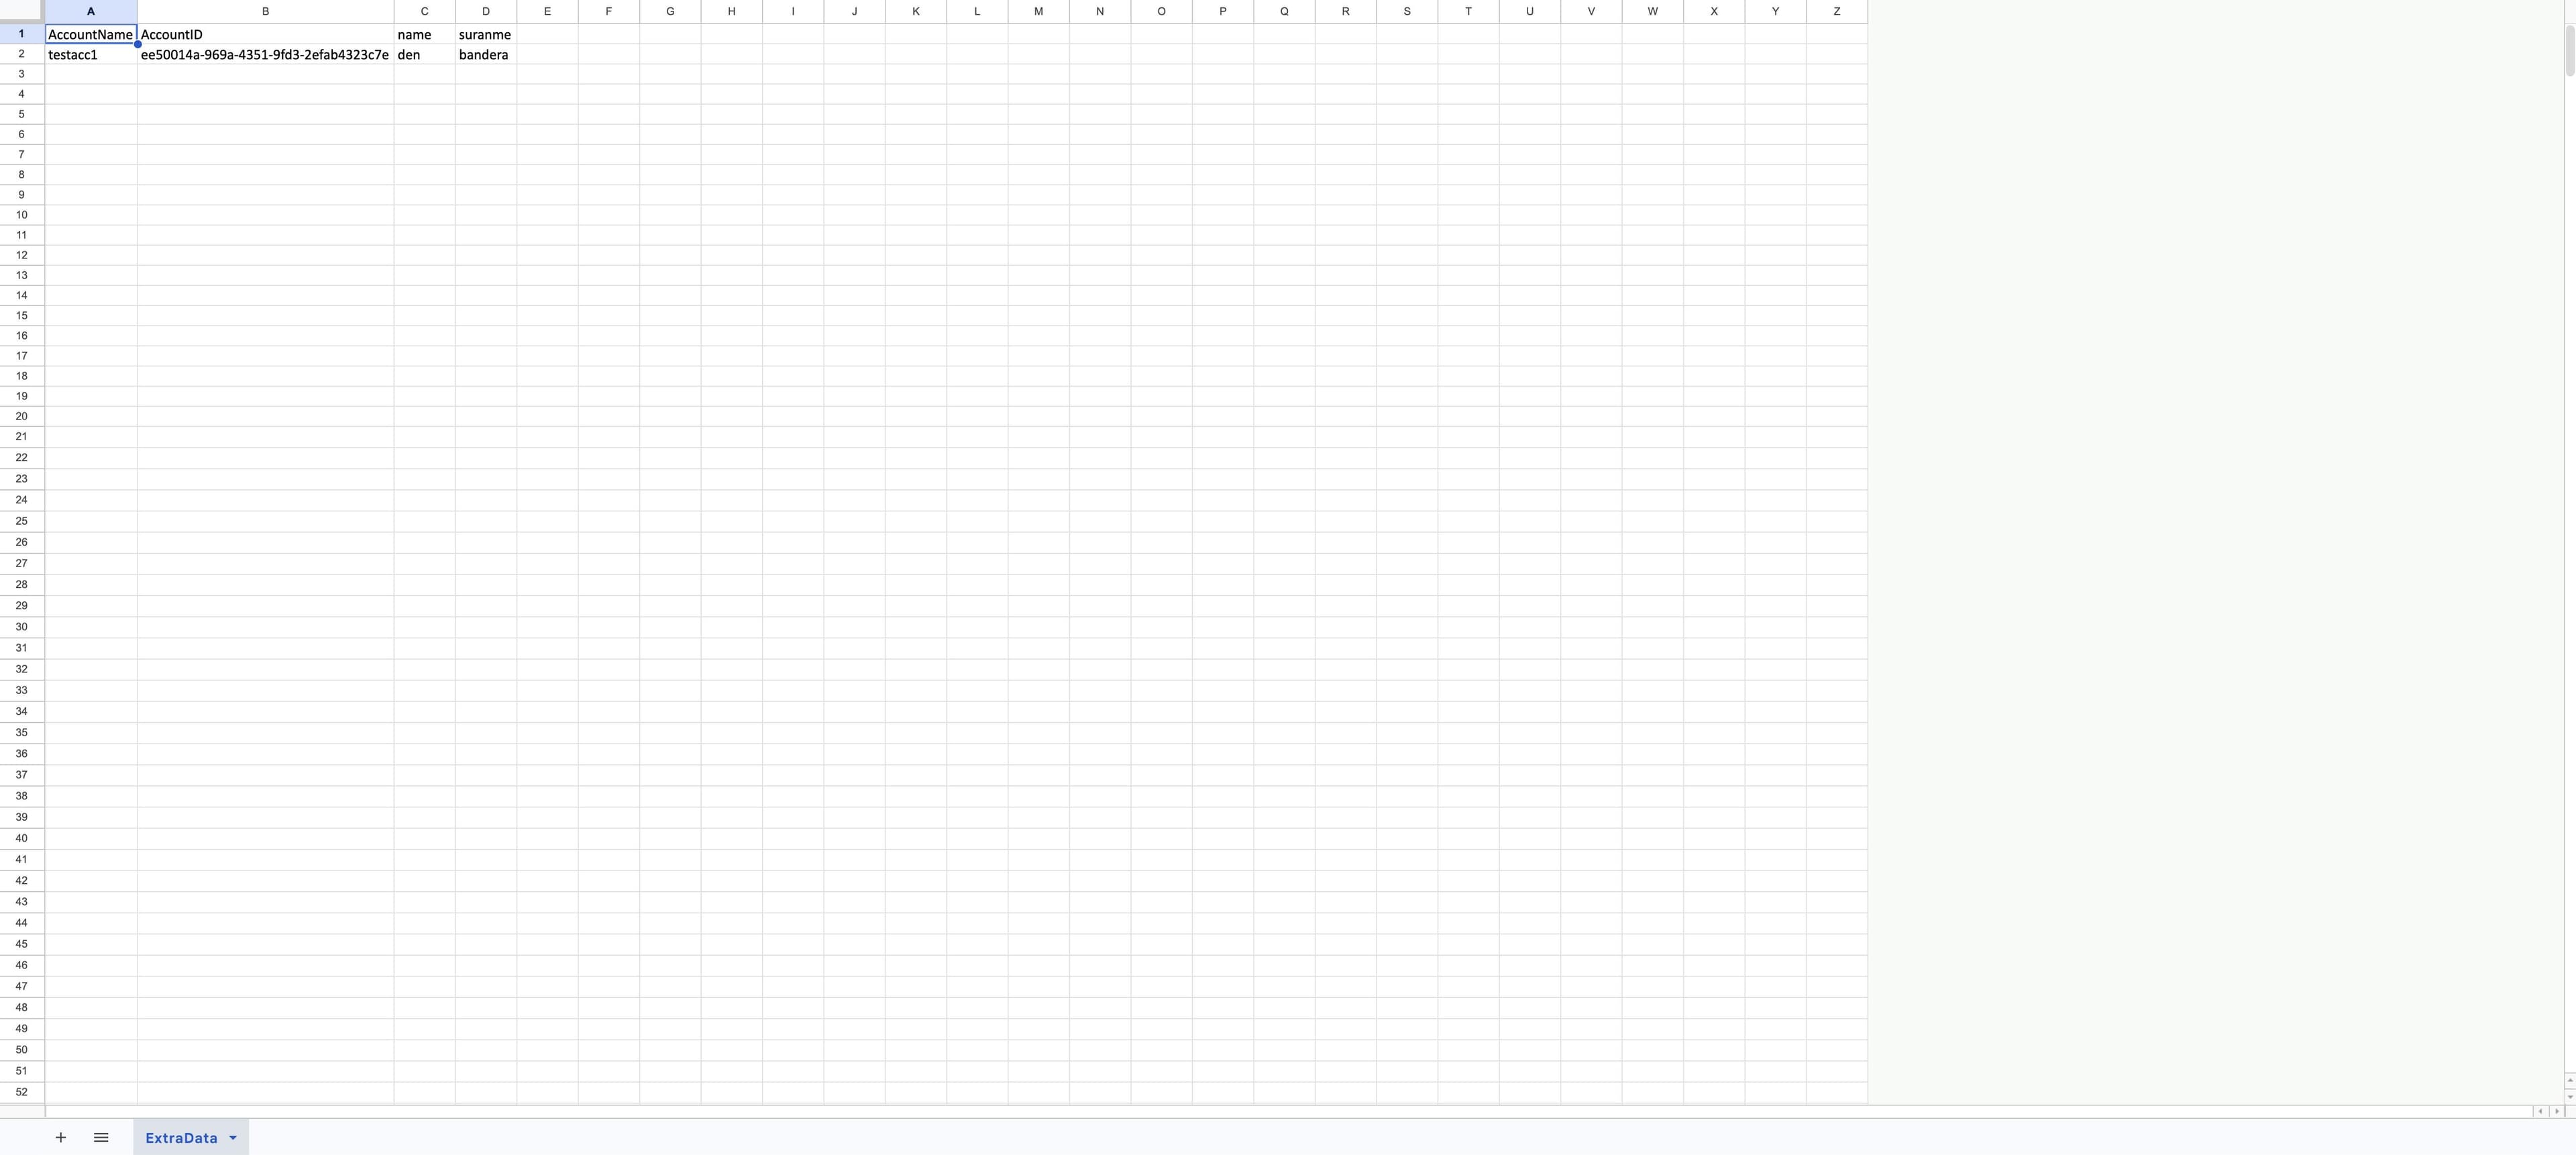
After export, Afina creates an XLSX file with the required AccountName and AccountID columns, as well as columns with your keys and values.
You can use the exported XLSX file as a reference for later import if you need to bulk update existing data or prepare a new file using the same structure.
Template Format#
The import template uses the XLSX format. In it, columns are key names, and rows are values for specific accounts.
The file must contain:
- AccountID to match the row with a specific account.
- AccountName as a service column for convenient account identification.
- Separate columns with the names of your keys.
Do not rename or delete the service columns AccountID and AccountName. If you change the basic template structure or upload a file in another format, the import may be blocked with an error.
Each row in the template corresponds to one account. In the cells of that row, enter values for the keys you want to add or update.
The most reliable way to prepare the file is to first click Download template in the Extra Data or Encrypted Data section. If you need to check the structure of existing account data, first export it from the Accounts section.
The screenshot below shows an example XLSX template with the AccountID column, the AccountName column, and separate key columns.
Data Import#
For import, you can use one of two options: download a ready-made template in the Extra Data or Encrypted Data section, or take an XLSX file that you previously exported from the Accounts section and fill or update it.
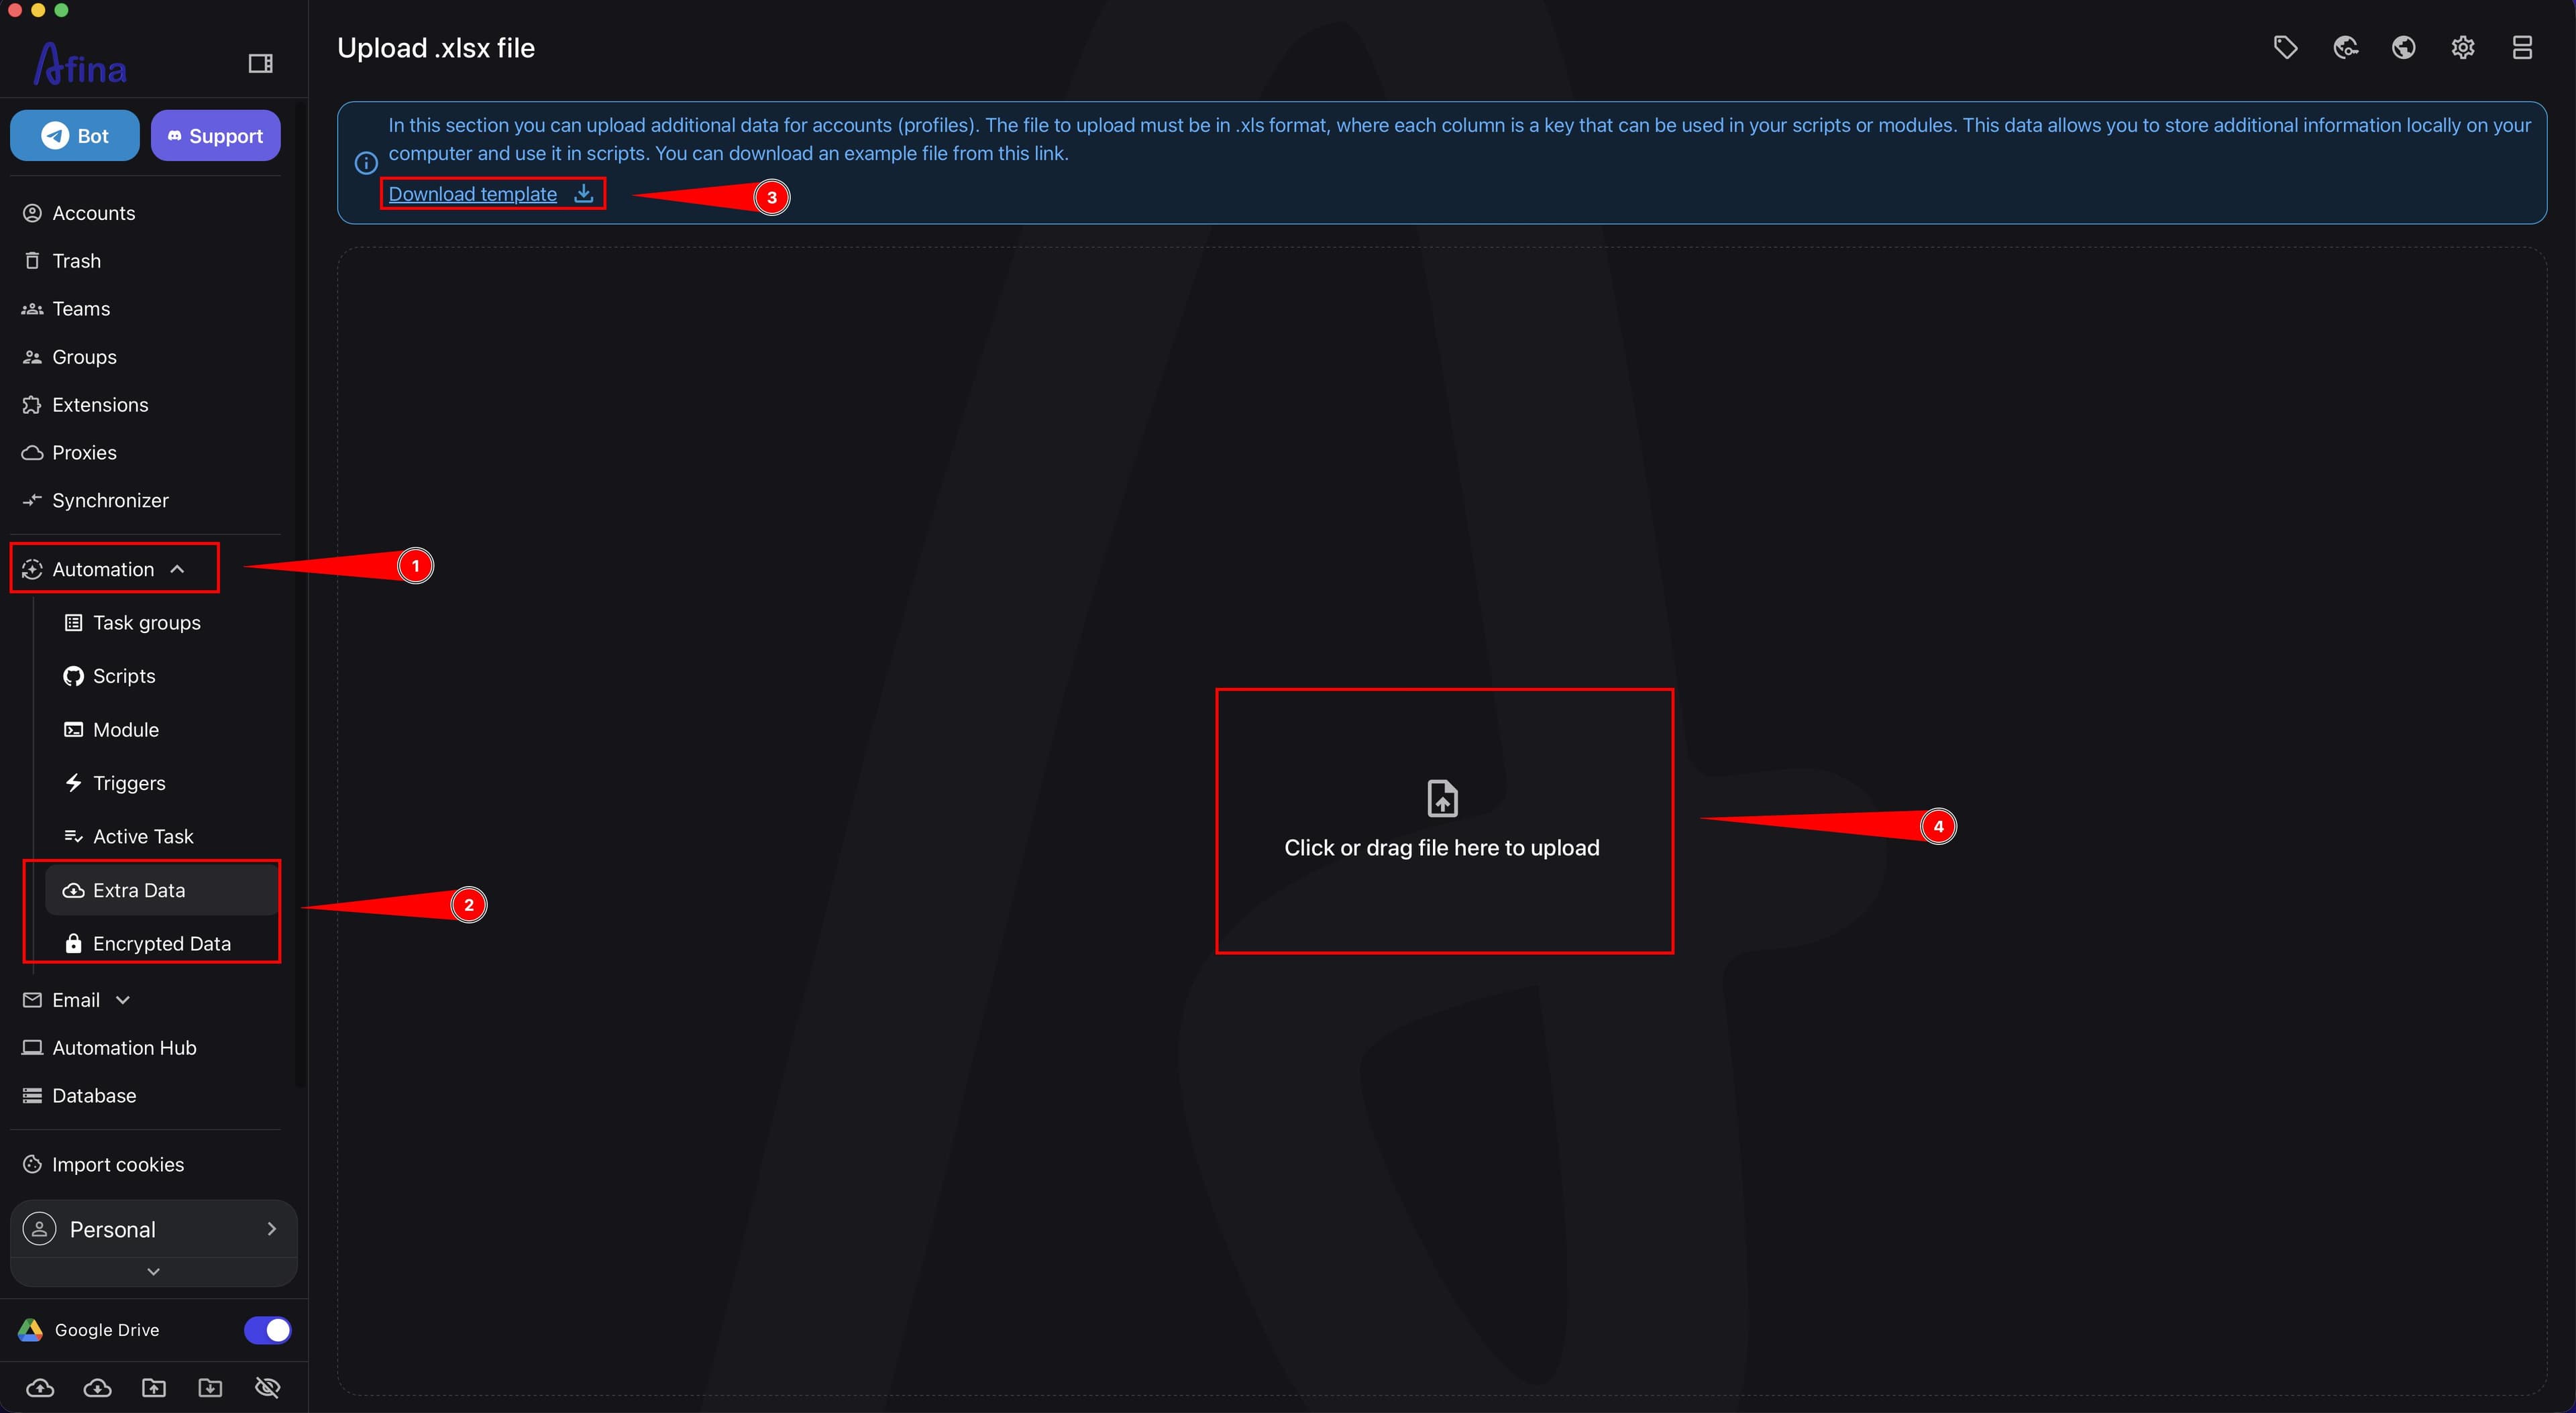
- Go to the Automation section.
- Open the Extra Data or Encrypted Data section.
- Click Download template.
- Fill in the
.xlsxfile: use columns as key names. - Fill rows with values for specific accounts by their AccountID.
- Drag the completed
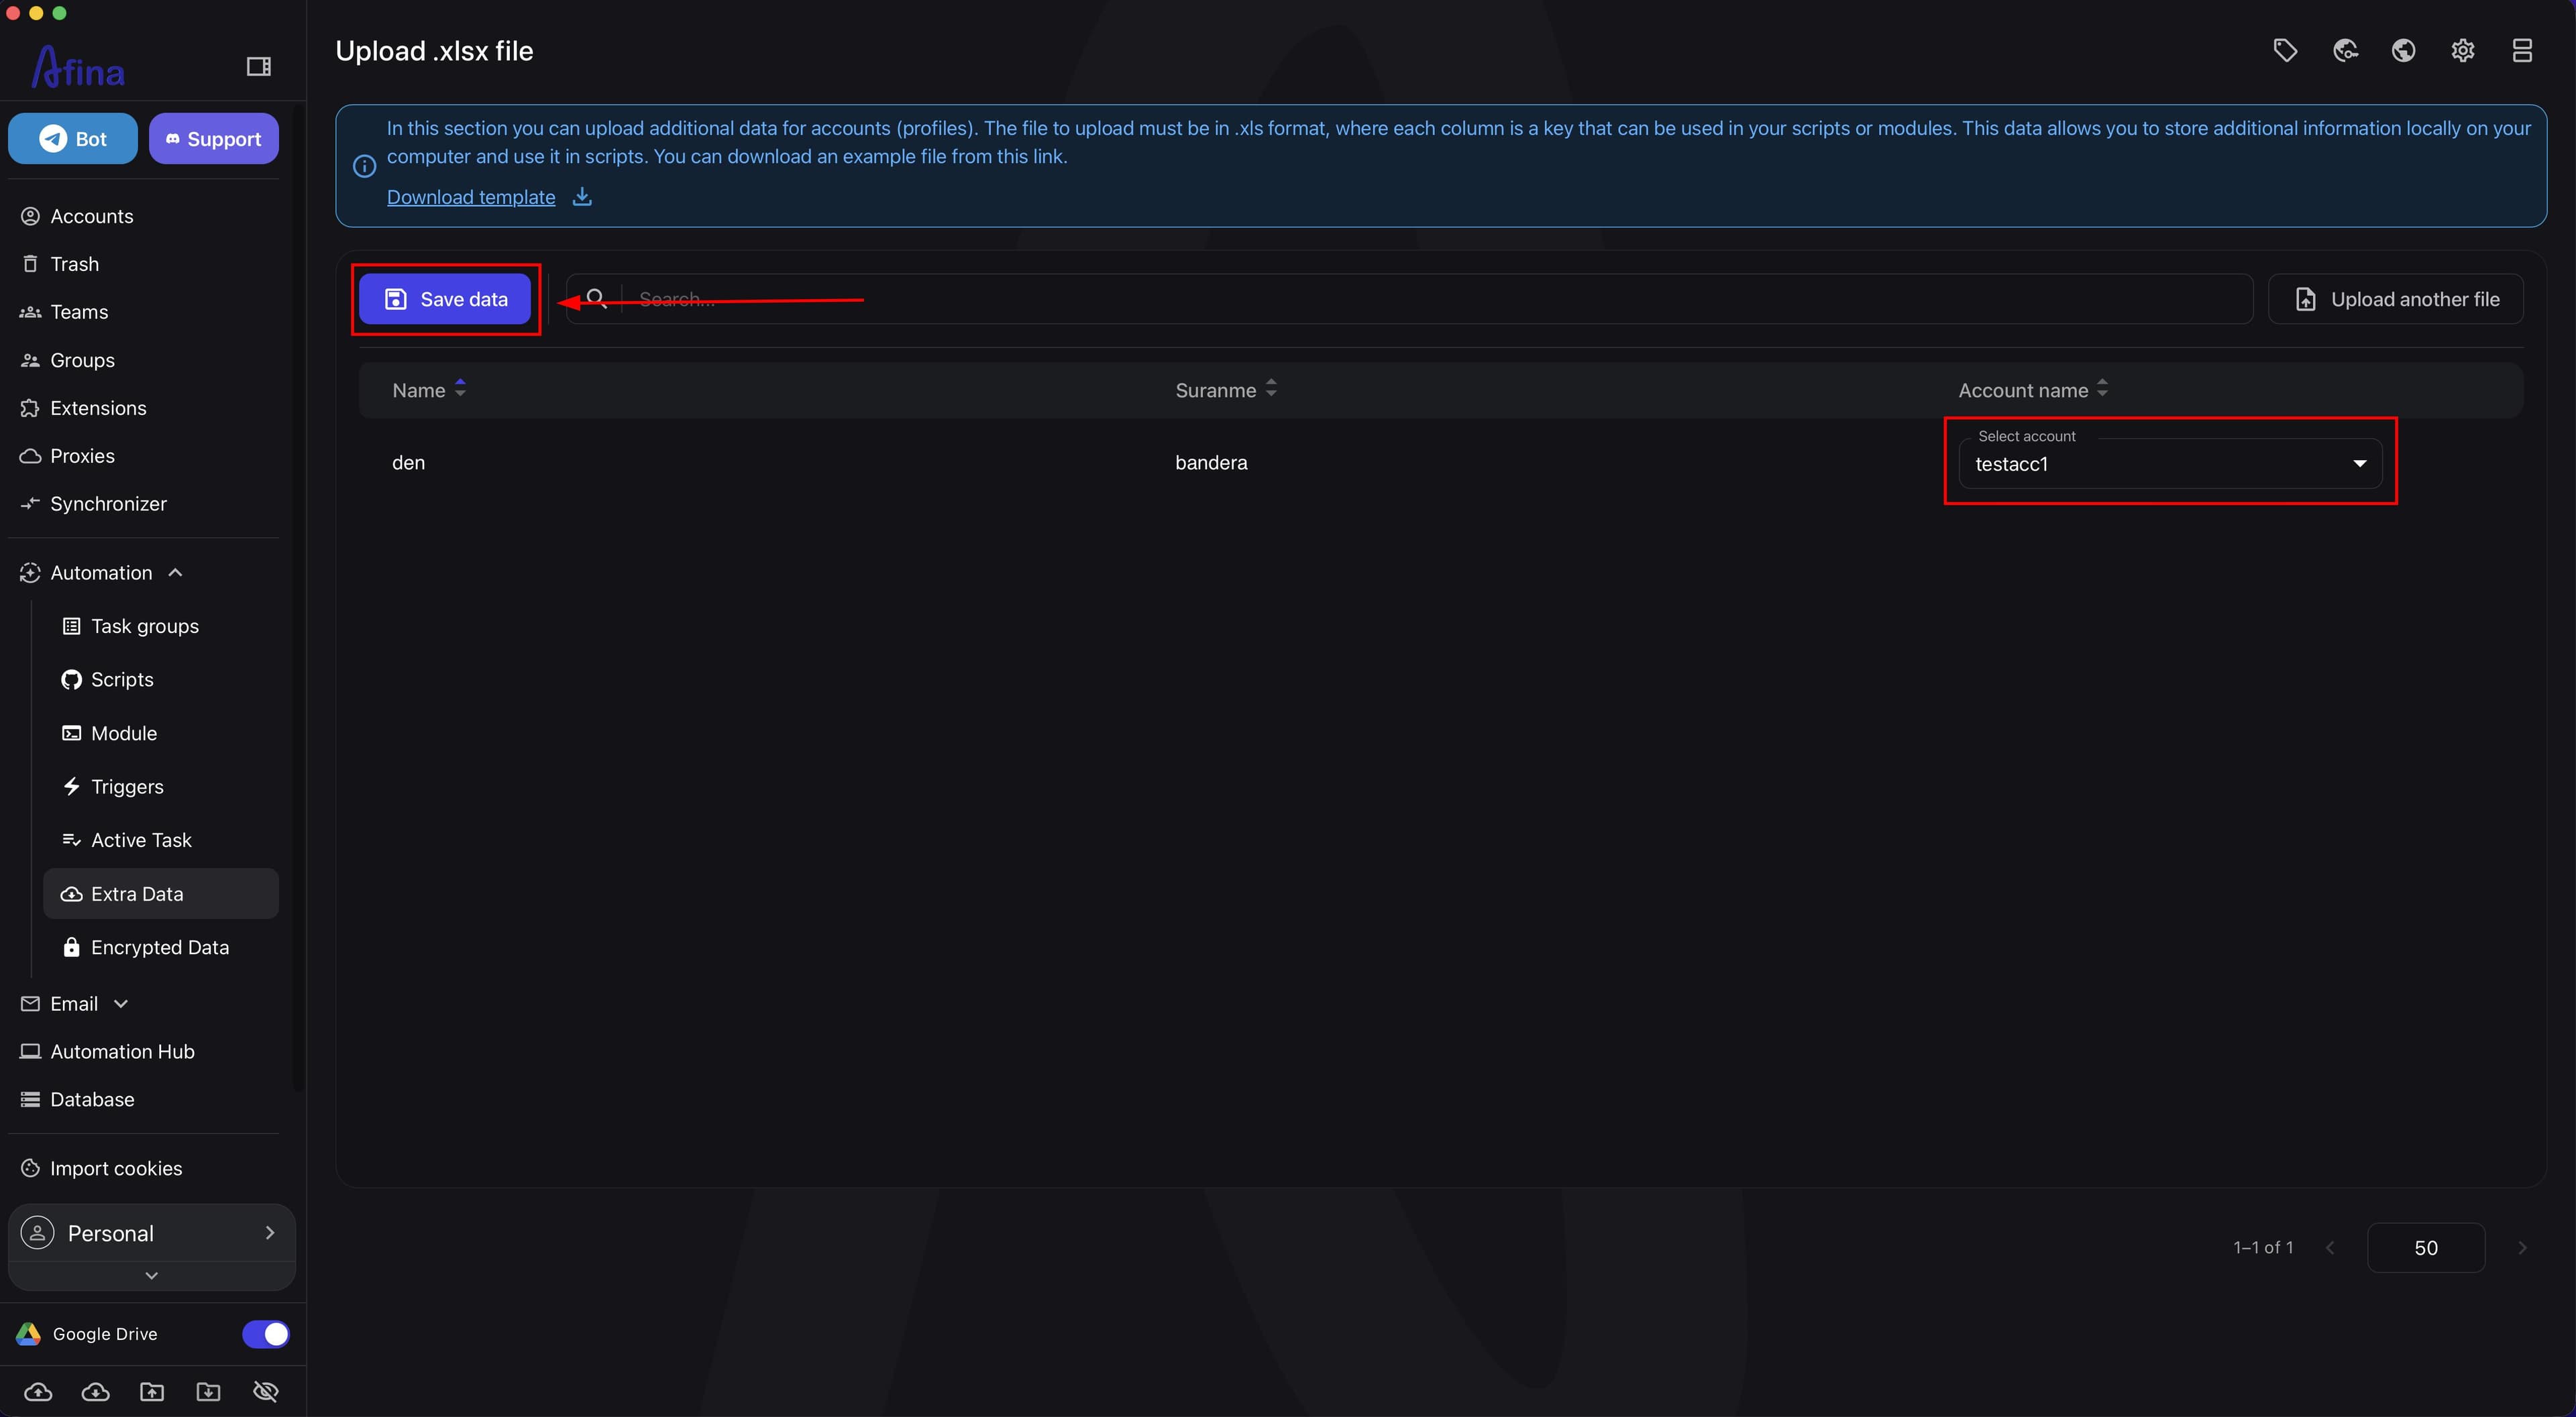
.xlsxfile into the file upload area or select it through the file explorer. - Check the data in the preview table opened by Afina.
- If a row was not linked automatically, select the account manually in the Account name column.
- Click Save data.
The screenshot shows the Automation section with the Extra Data or Encrypted Data section open, the Download template button, and the .xlsx file upload area.
The next screenshot shows the preview table after uploading the file, where you can check values before saving and, if needed, manually select an account in the Account name column.
If you import Encrypted Data, Afina automatically protects it while writing it to the database. The user documentation specifies AES-256-CBC for this process.
The save button stays inactive if at least one row in the preview table is not linked to an account. Check the AccountID or select the account manually in the Account name column.
If you only want to add new keys without deleting existing ones, add them as new columns in the file.
What Happens When Data Matches#
If you import a file where a certain account already has the same key, Afina replaces the old value with the new one from the file. This means that when keys match, the new value takes priority.
If the file contains new keys that the account did not have before, Afina adds them as new key → value pairs.
If the file does not contain some keys that already exist in the account, Afina does not delete them automatically. Import works as a merge of new and old data: new keys are added, and matching keys are overwritten with values from the file.
If you want to update only part of the data, leave only the keys and values you need to add or replace in the file. To delete data, use manual or bulk deletion in the Afina interface.
Adding, Editing, and Deleting Data#
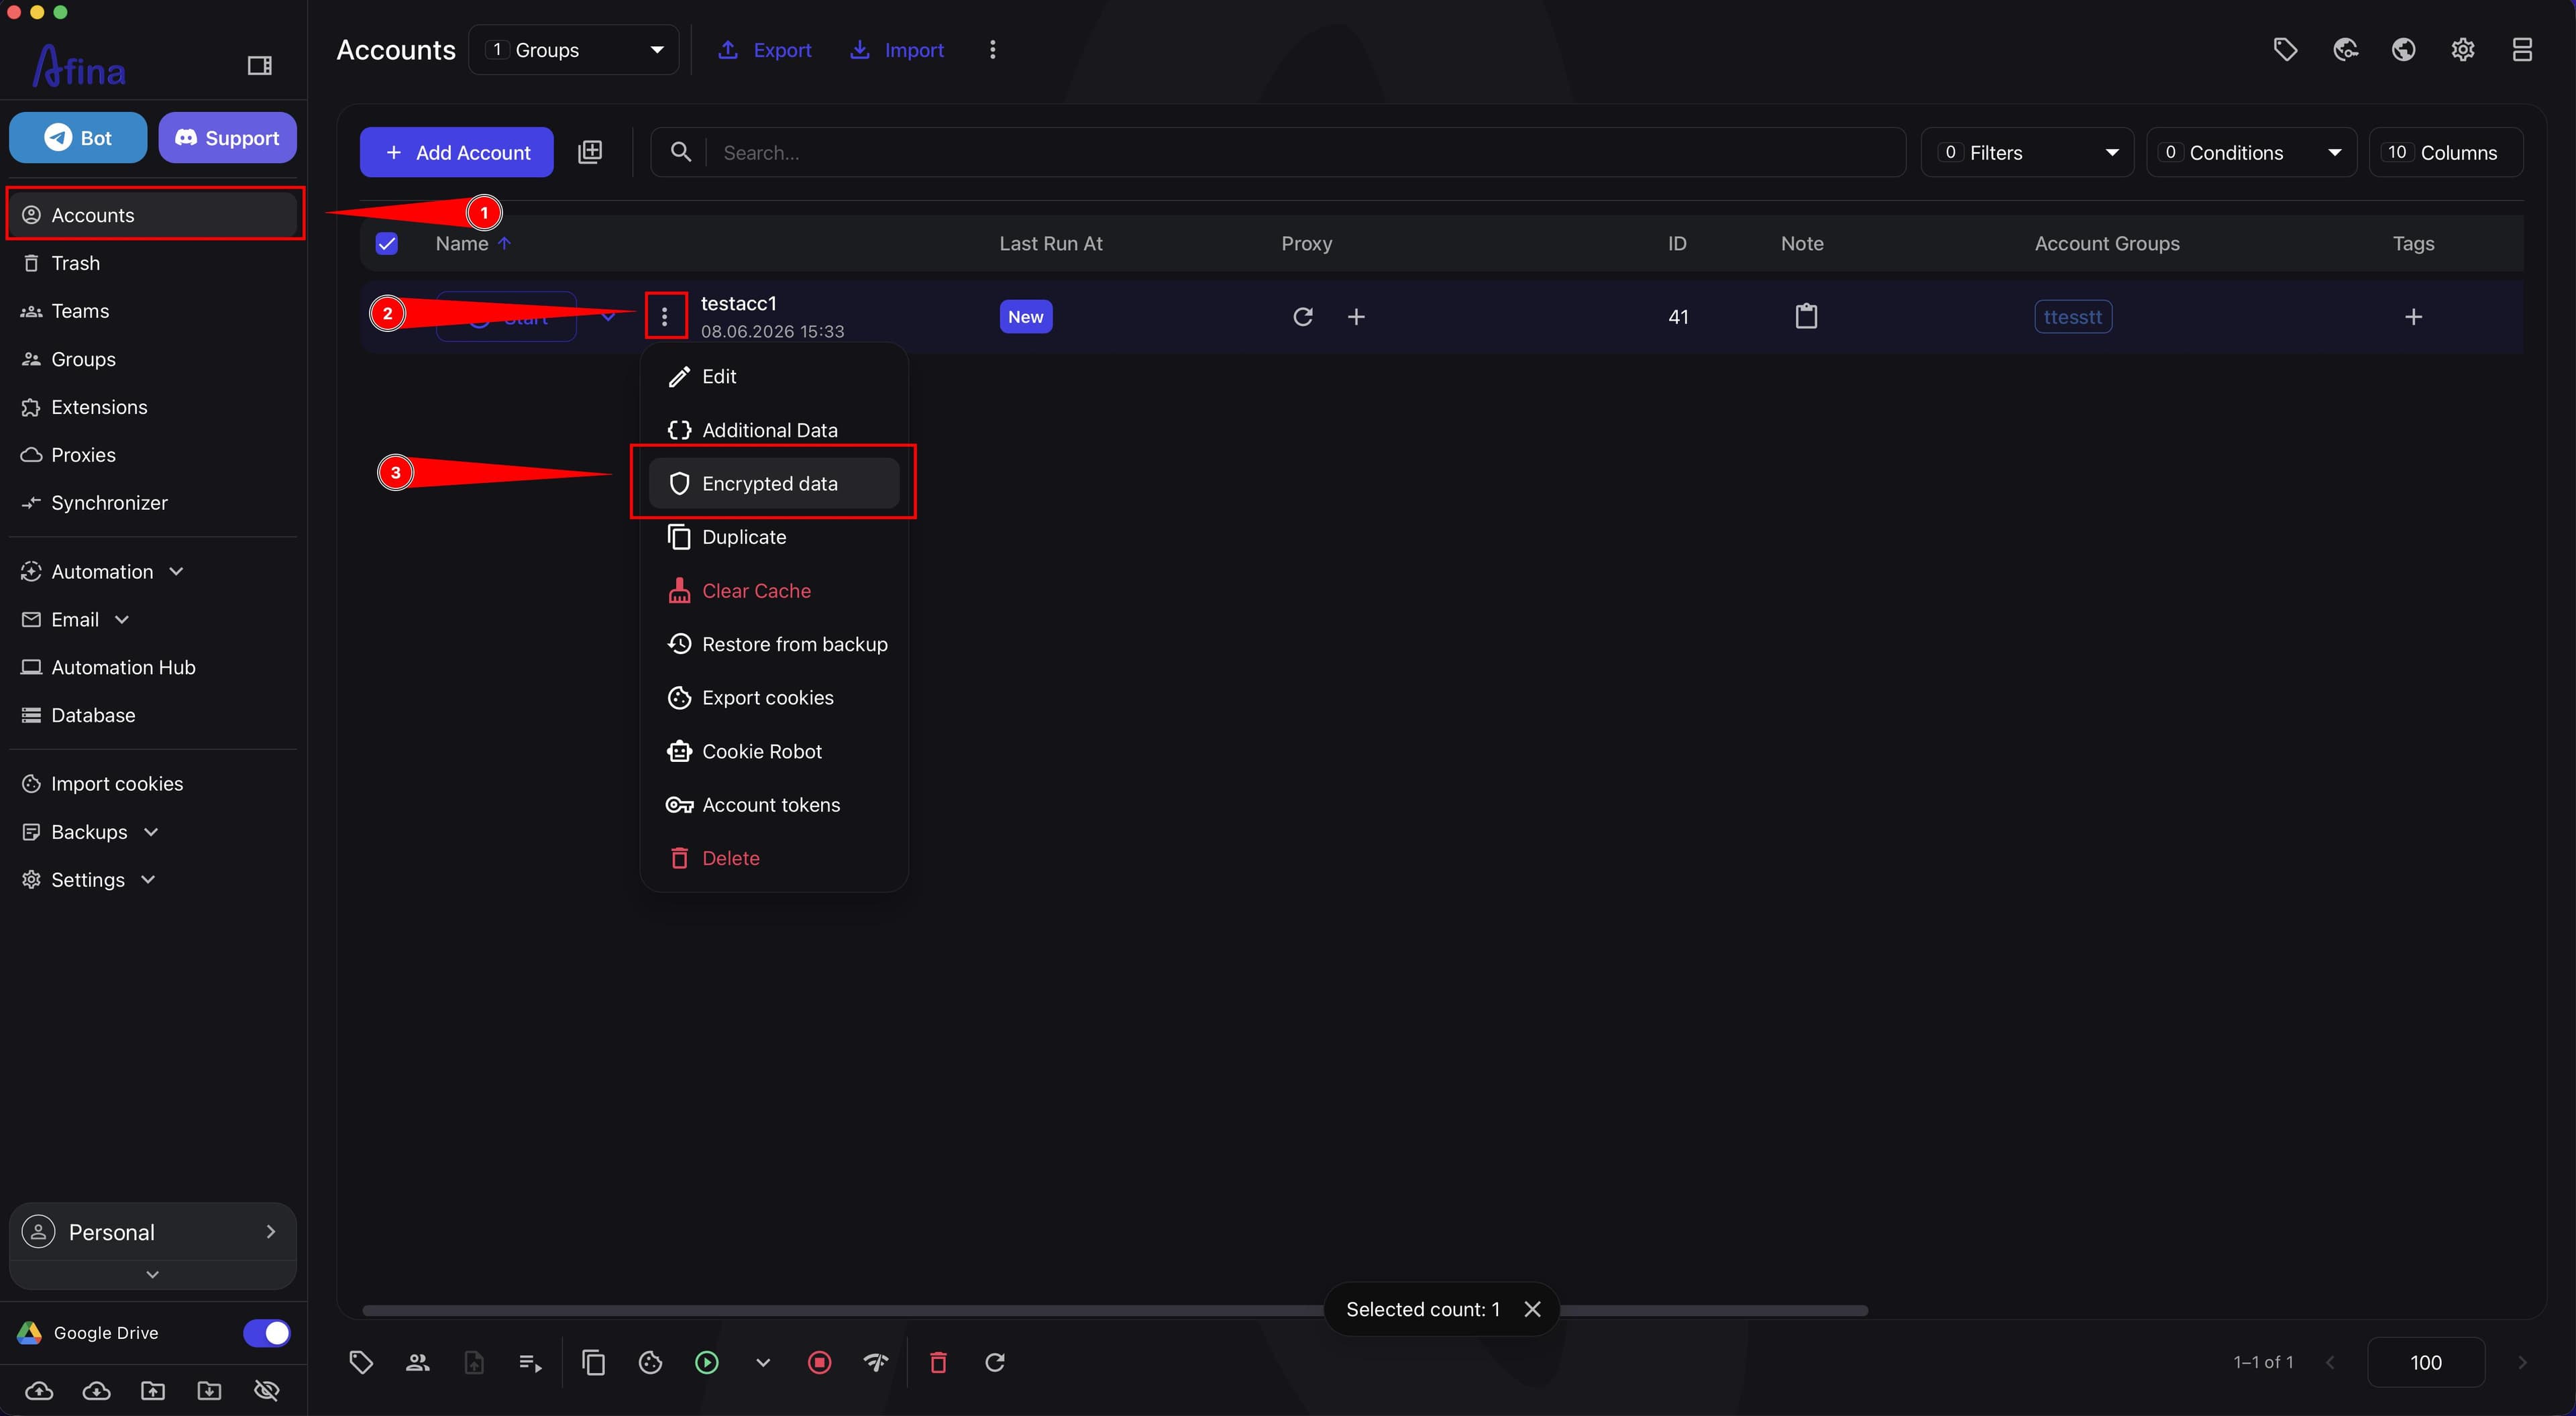
- Go to the Accounts section.
- Click ⋮ next to the profile name.
- Choose Additional Data or Encrypted Data.
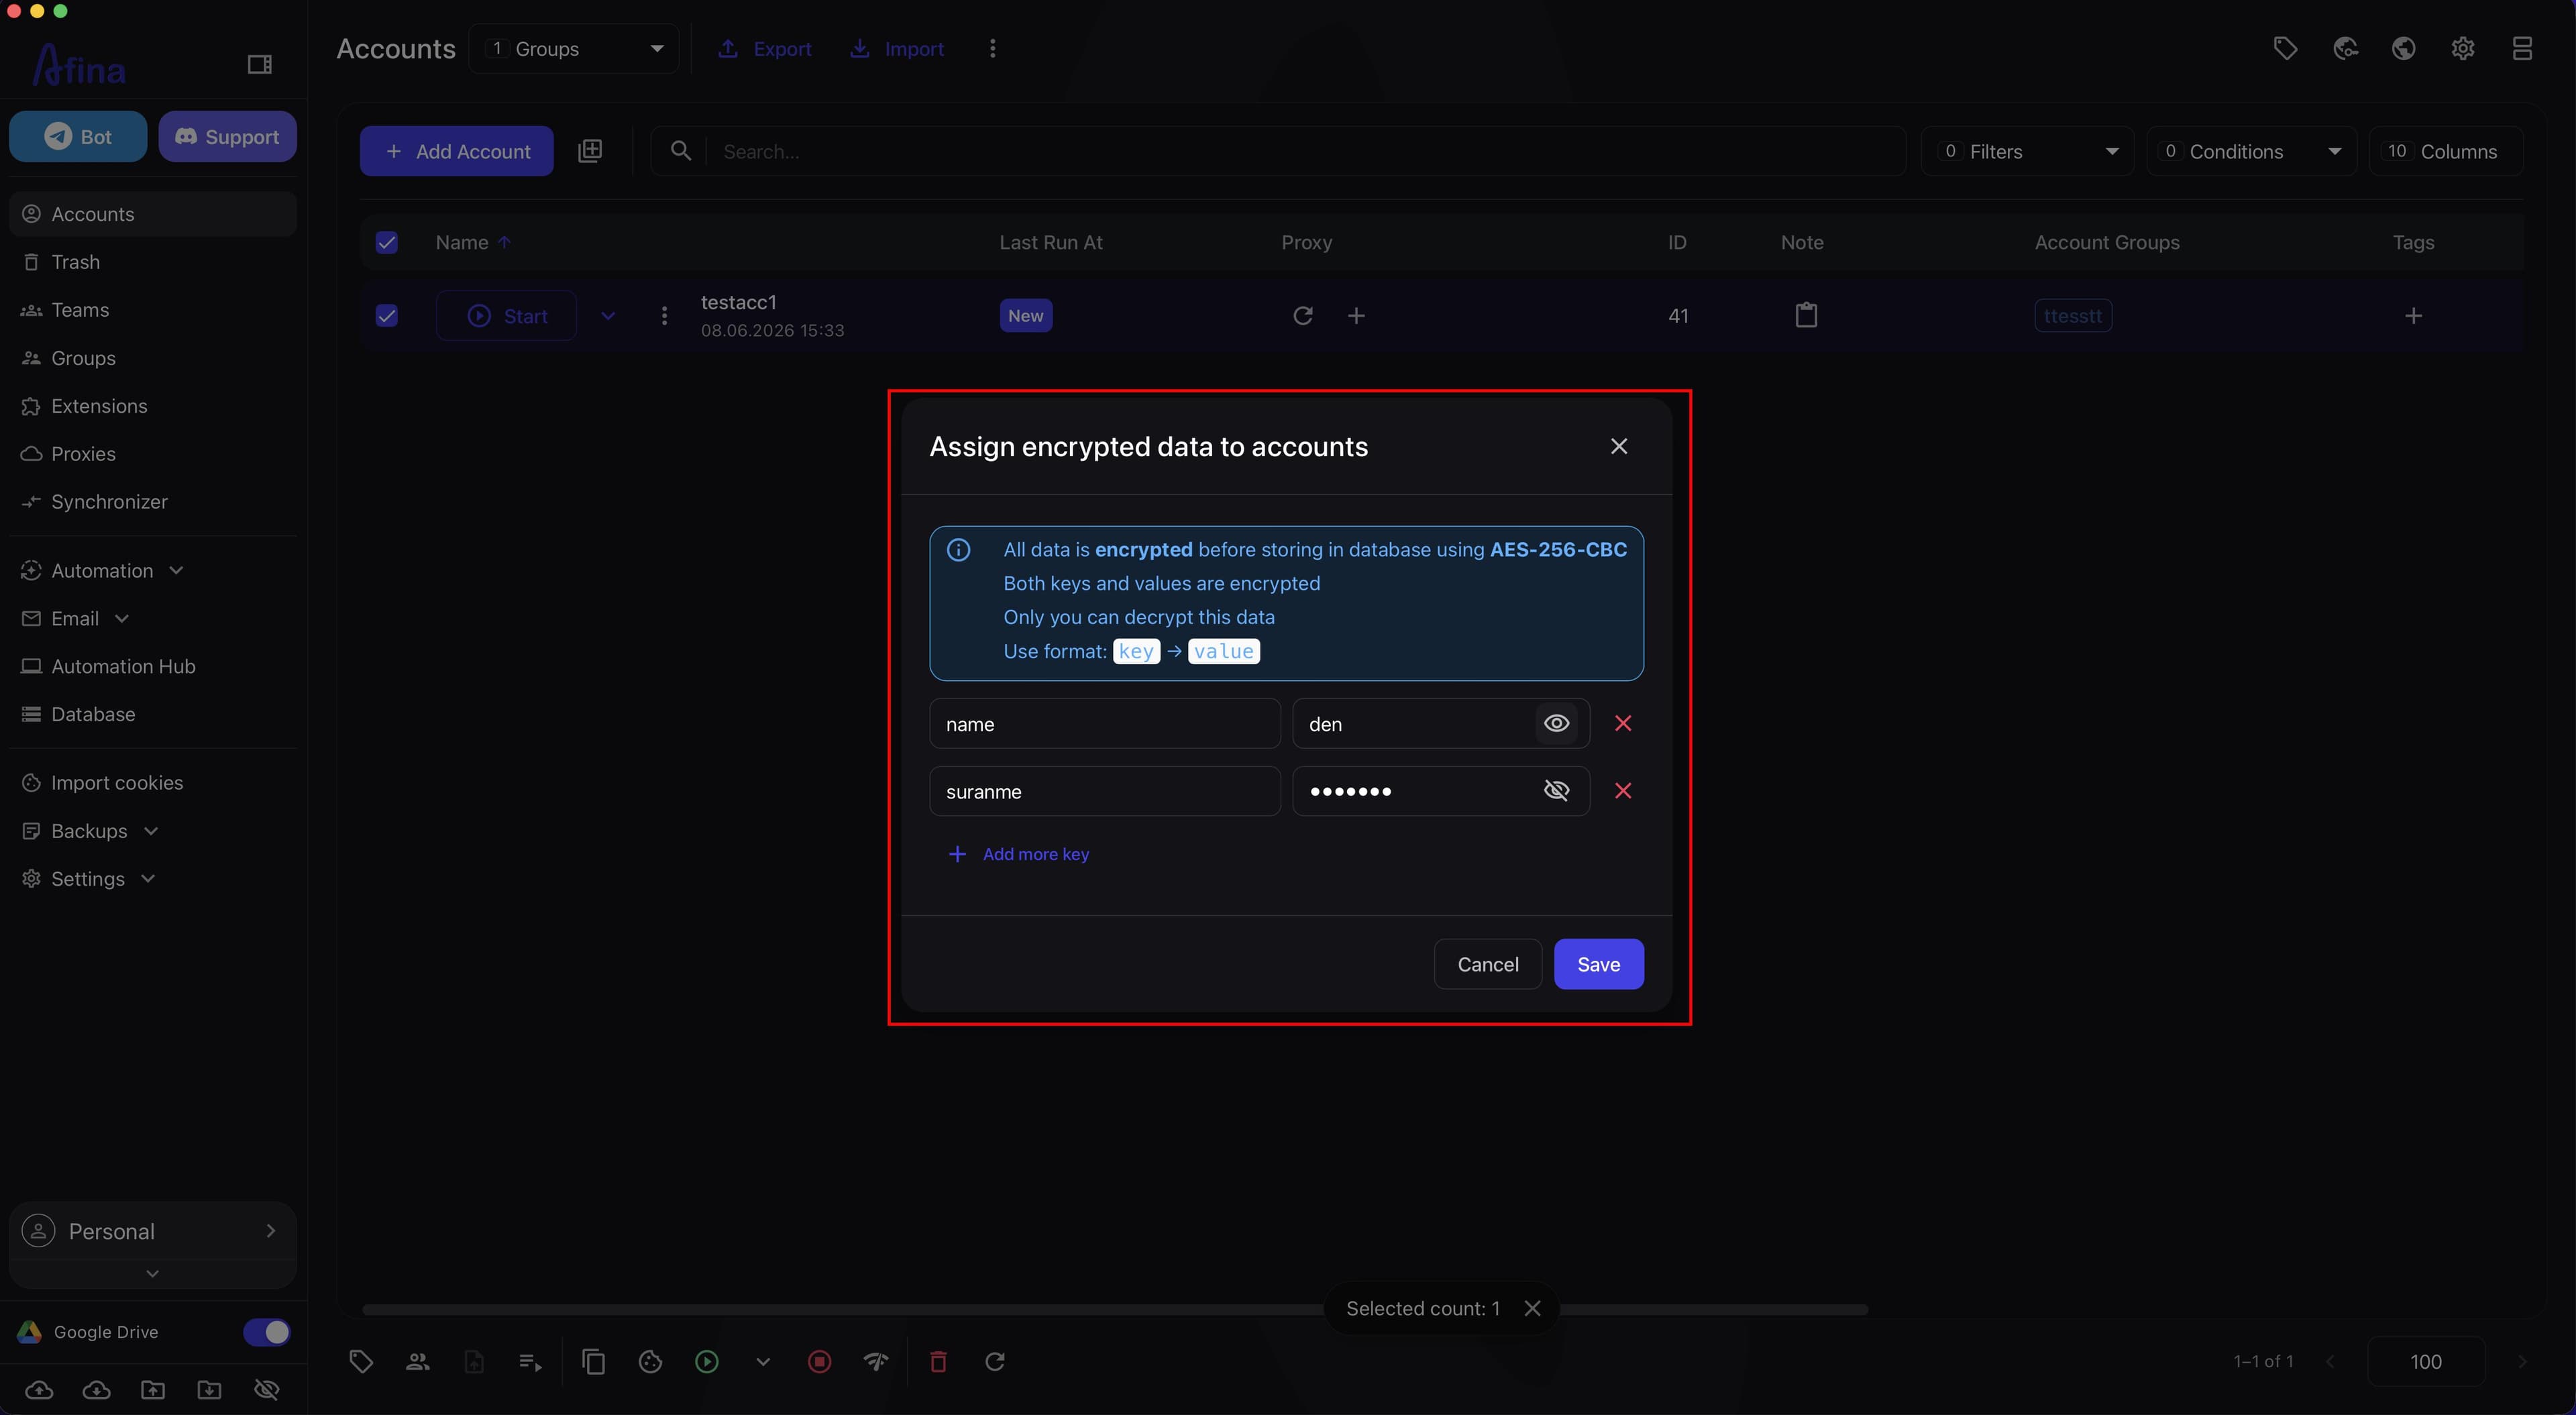
- Click Add more key if you need to manually add a new key → value pair for one account.
- Fill in the key and value in the new row.
- Change existing values or hide them with the eye icon.
- Click ✖️ in the key row if you need to delete a separate record.
- Select accounts with checkboxes, open the ⋮ menu on the top panel, and choose Delete Additional Data or Delete encrypted data if you need bulk deletion.
Bulk deletion removes only Additional Data or Encrypted Data from the selected accounts. Profiles, cookies, and open tabs are not deleted.
The screenshot shows the ⋮ menu next to a profile, where you can open Additional Data or Encrypted Data for a specific account.
The next screenshot shows the account data editing window with the Add more key button, key and value fields, the eye icon, and the row delete button.
The separate screenshot below shows bulk deletion through the top panel in the Accounts section.
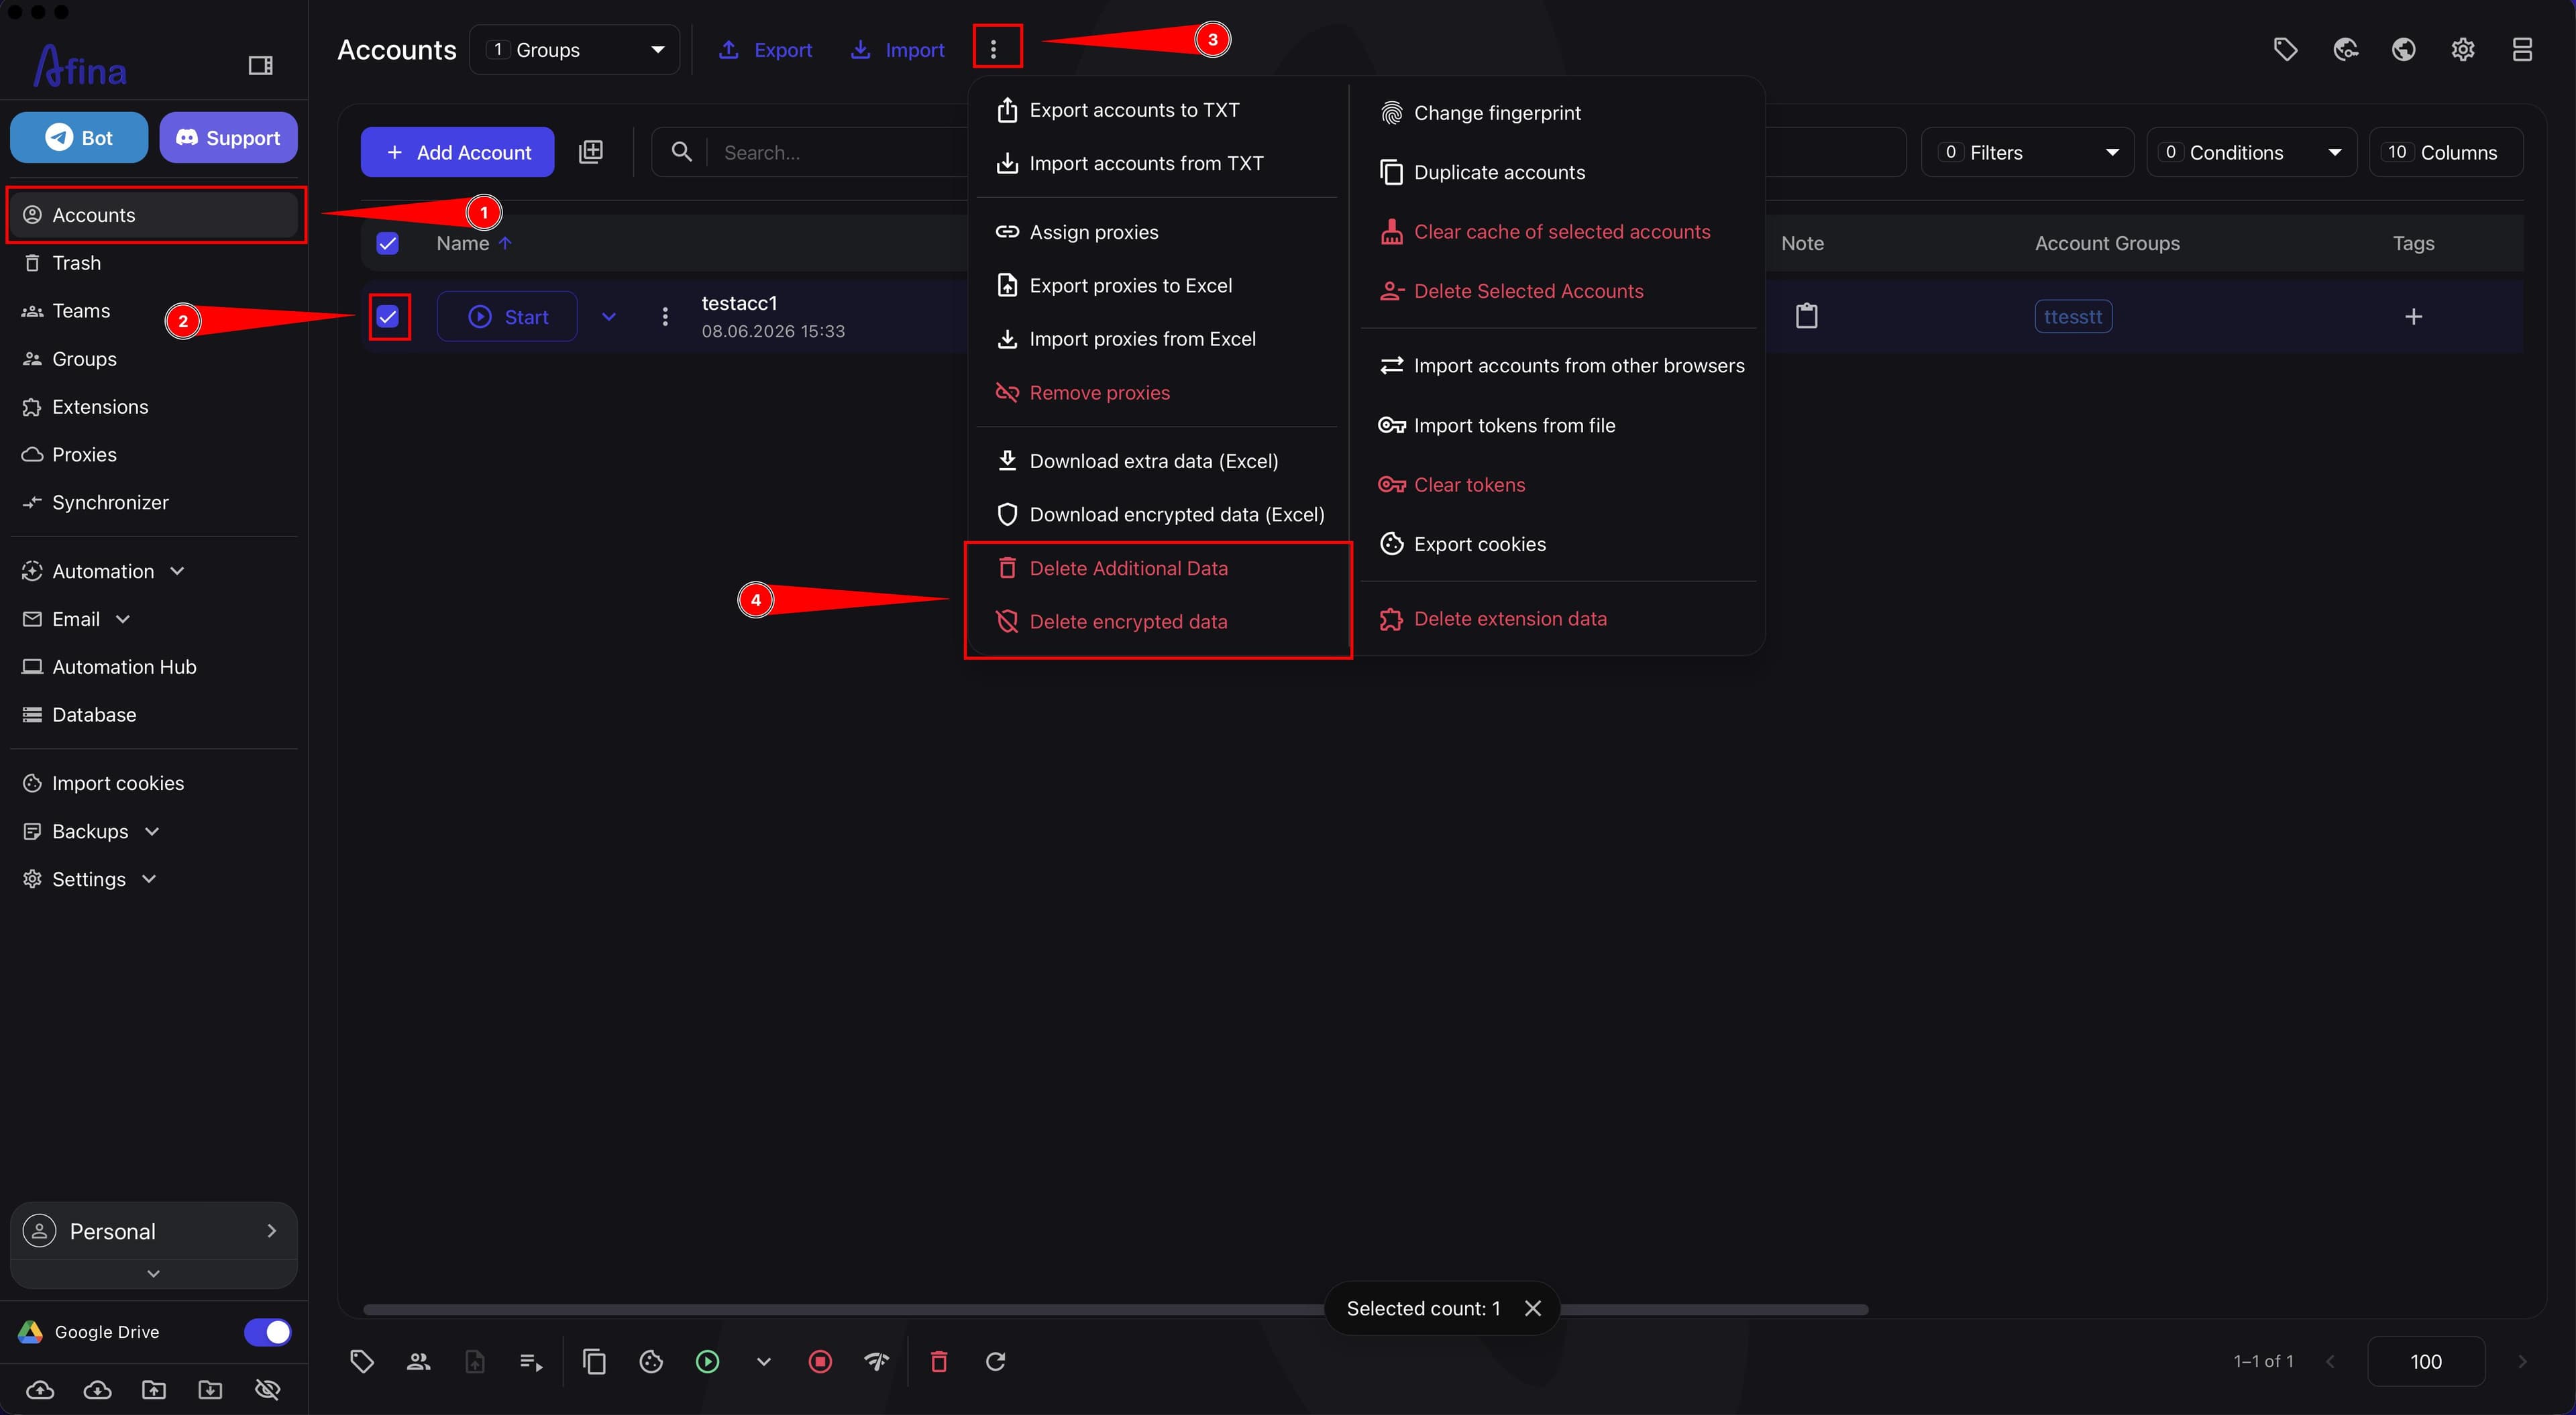
After you confirm bulk deletion, these data are erased without the possibility of recovery. Before deleting, check that you selected the correct accounts and data type.
Important Format Rules#
- Key names may contain only Latin letters
A-Zanda-z, digits0-9, and the underscore_. - Do not use spaces or special characters in key names.
- Empty keys or values are not saved.
- Do not duplicate key column names in one XLSX file. The official documentation does not describe separate logic for duplicate keys, so it is better to keep one column for one key.
If a row is not filled in completely, the save button stays inactive until you enter both the key and the value.
Result#
After completing these steps, you will be able to choose correctly between Additional Data and Encrypted Data, export them to .xlsx, bulk import them through a template, update separate values for each account, and safely delete unnecessary records.