Exporting and Importing Proxies in Excel#
This guide explains how to bulk export proxies to an Excel spreadsheet, edit them, and upload them back to Afina. Use it when you need to quickly update proxies for many accounts, change account names during import through the Accounts section, or bulk update the general proxy database through the Proxies section.
Before You Start#
- Prepare the accounts or proxies that you need to export or import.
- Make sure the import file is saved in
.xlsxformat. - If you plan to edit proxies in bulk, export them first to get a valid table template.
The easiest way to prepare an import file is to export proxies to Excel first, edit the exported table, and then upload it back.
Working Through the Accounts Section#
Use this method when you need to export or update proxies that are already assigned to specific profiles. After import, Afina changes the data directly in the selected accounts, so this option works well for quickly replacing proxies in profiles in bulk.
Export proxies to Excel
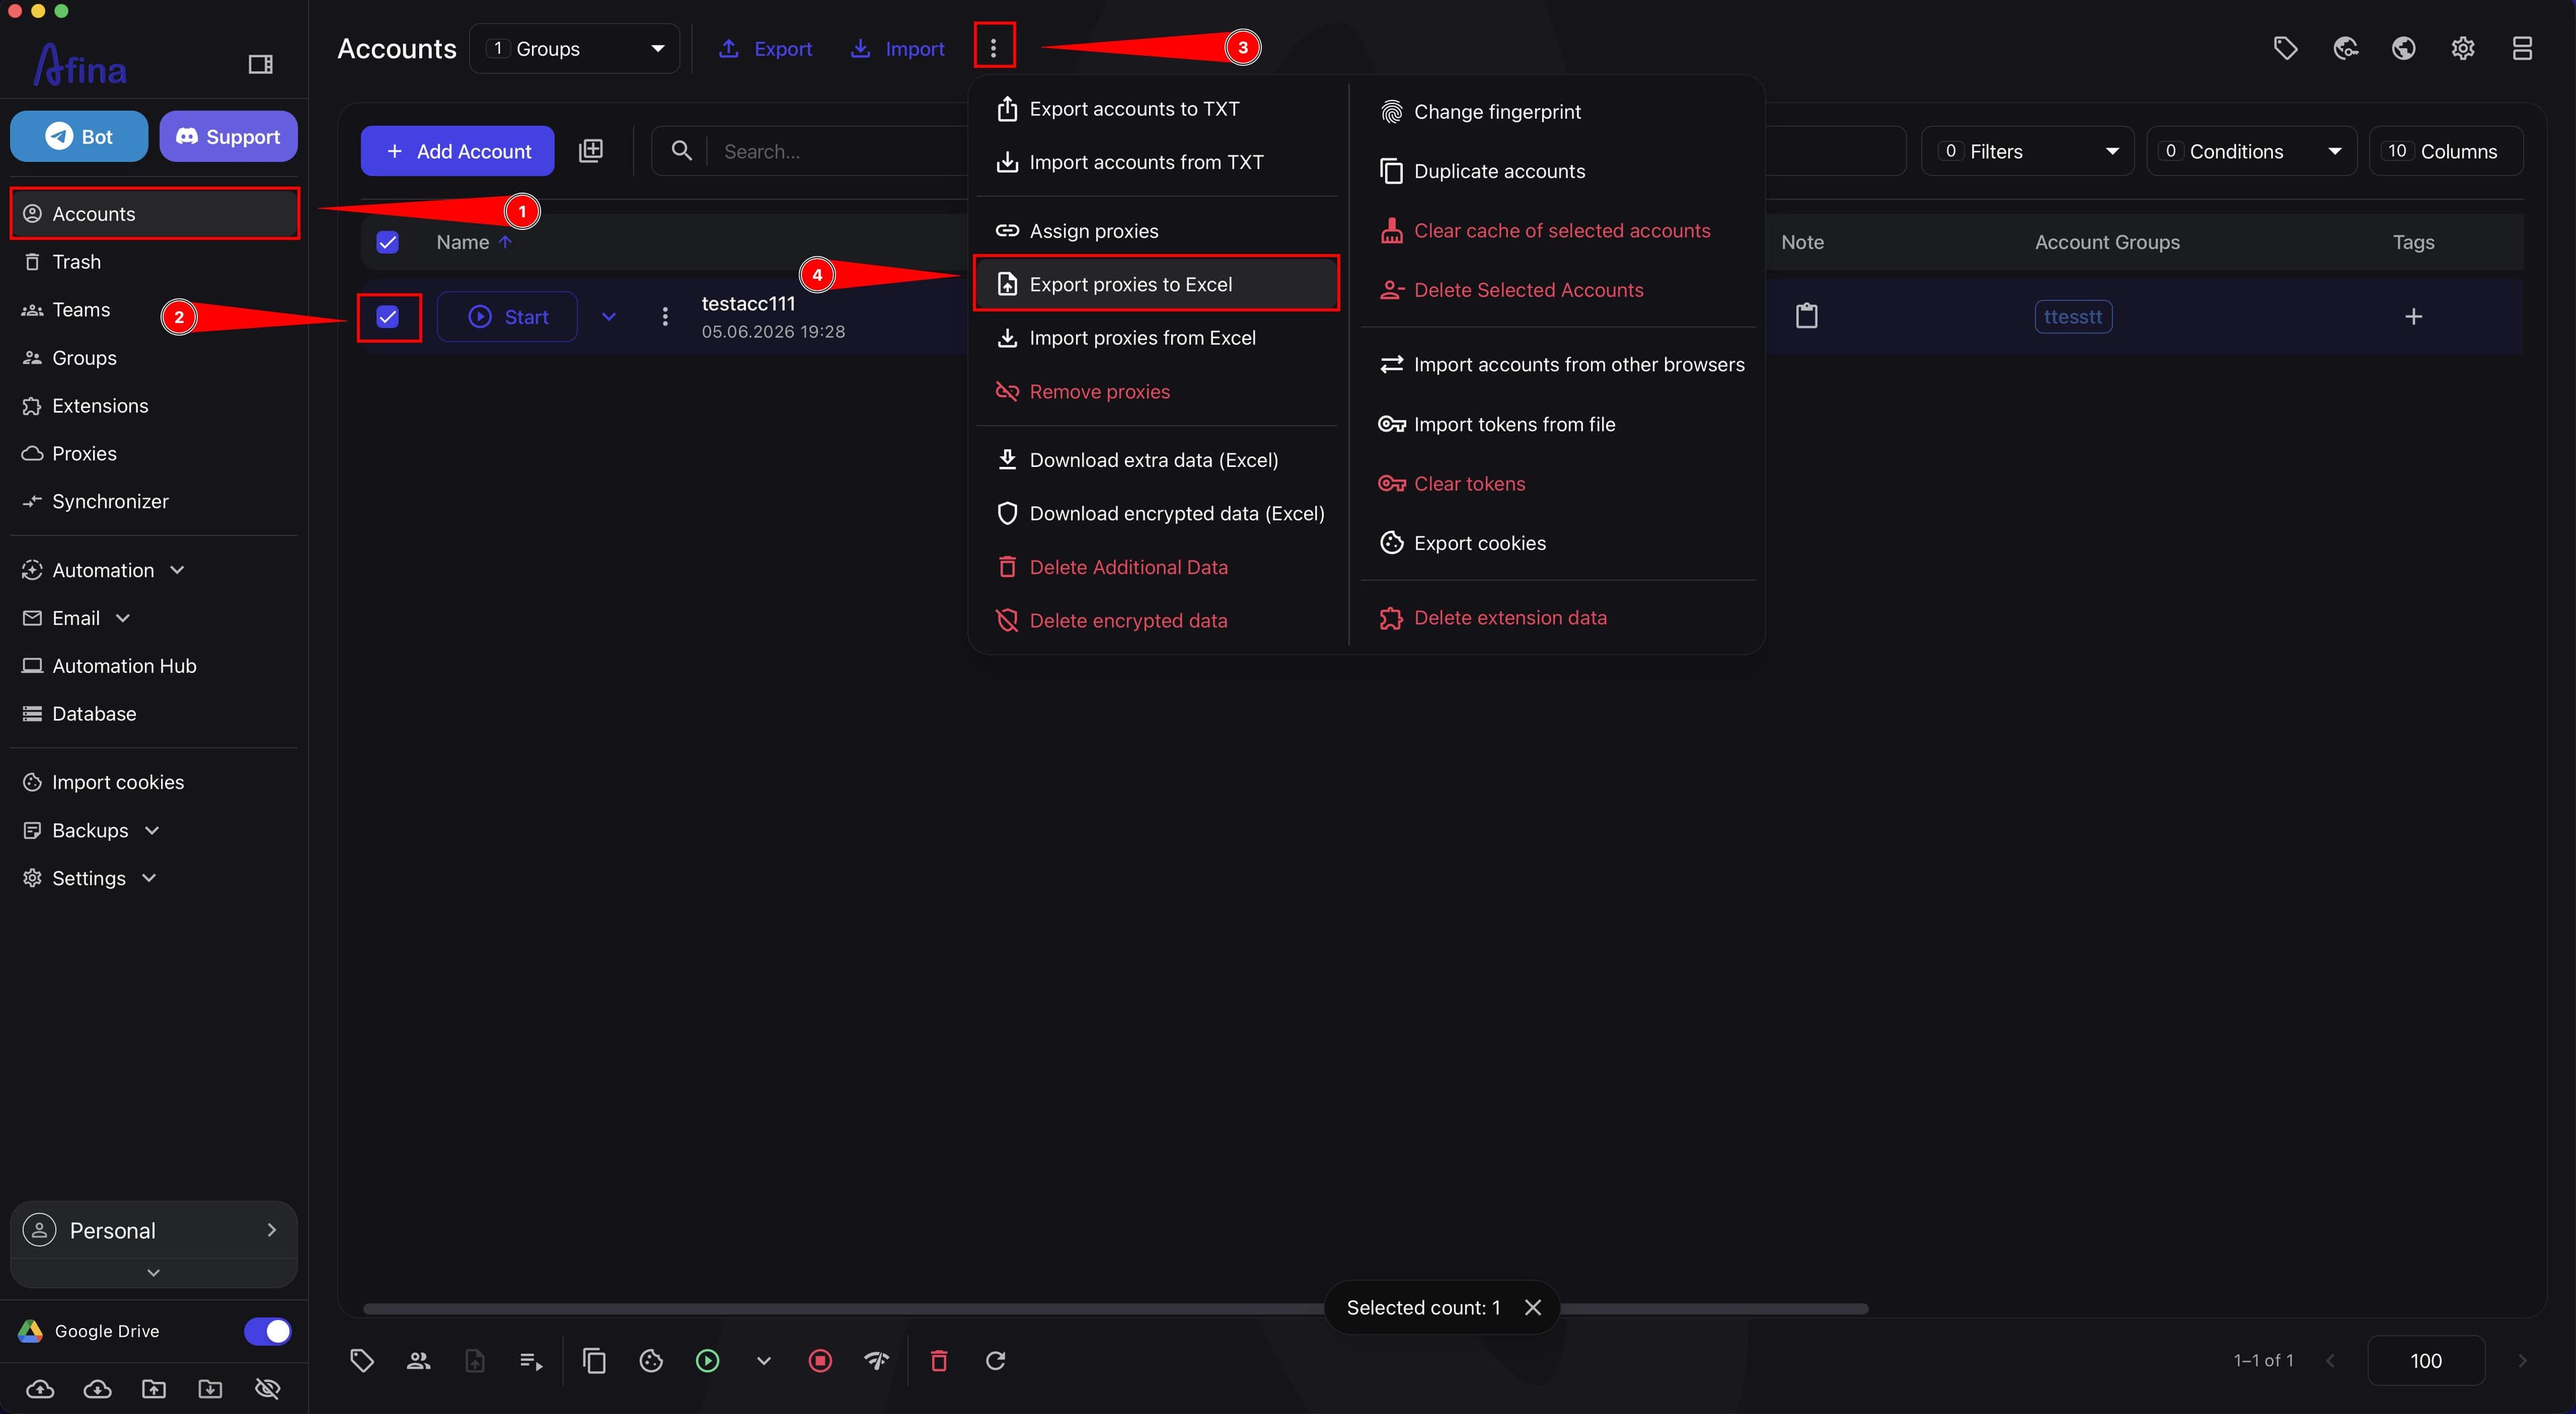
- Go to the Accounts section.
- Select the required accounts in the table using checkboxes.
- Click the ⋮ icon on the top control panel.
- Select Export proxies to Excel.
The screenshot below shows the Accounts section with the ⋮ icon menu open. Select the proxy export command in this menu.
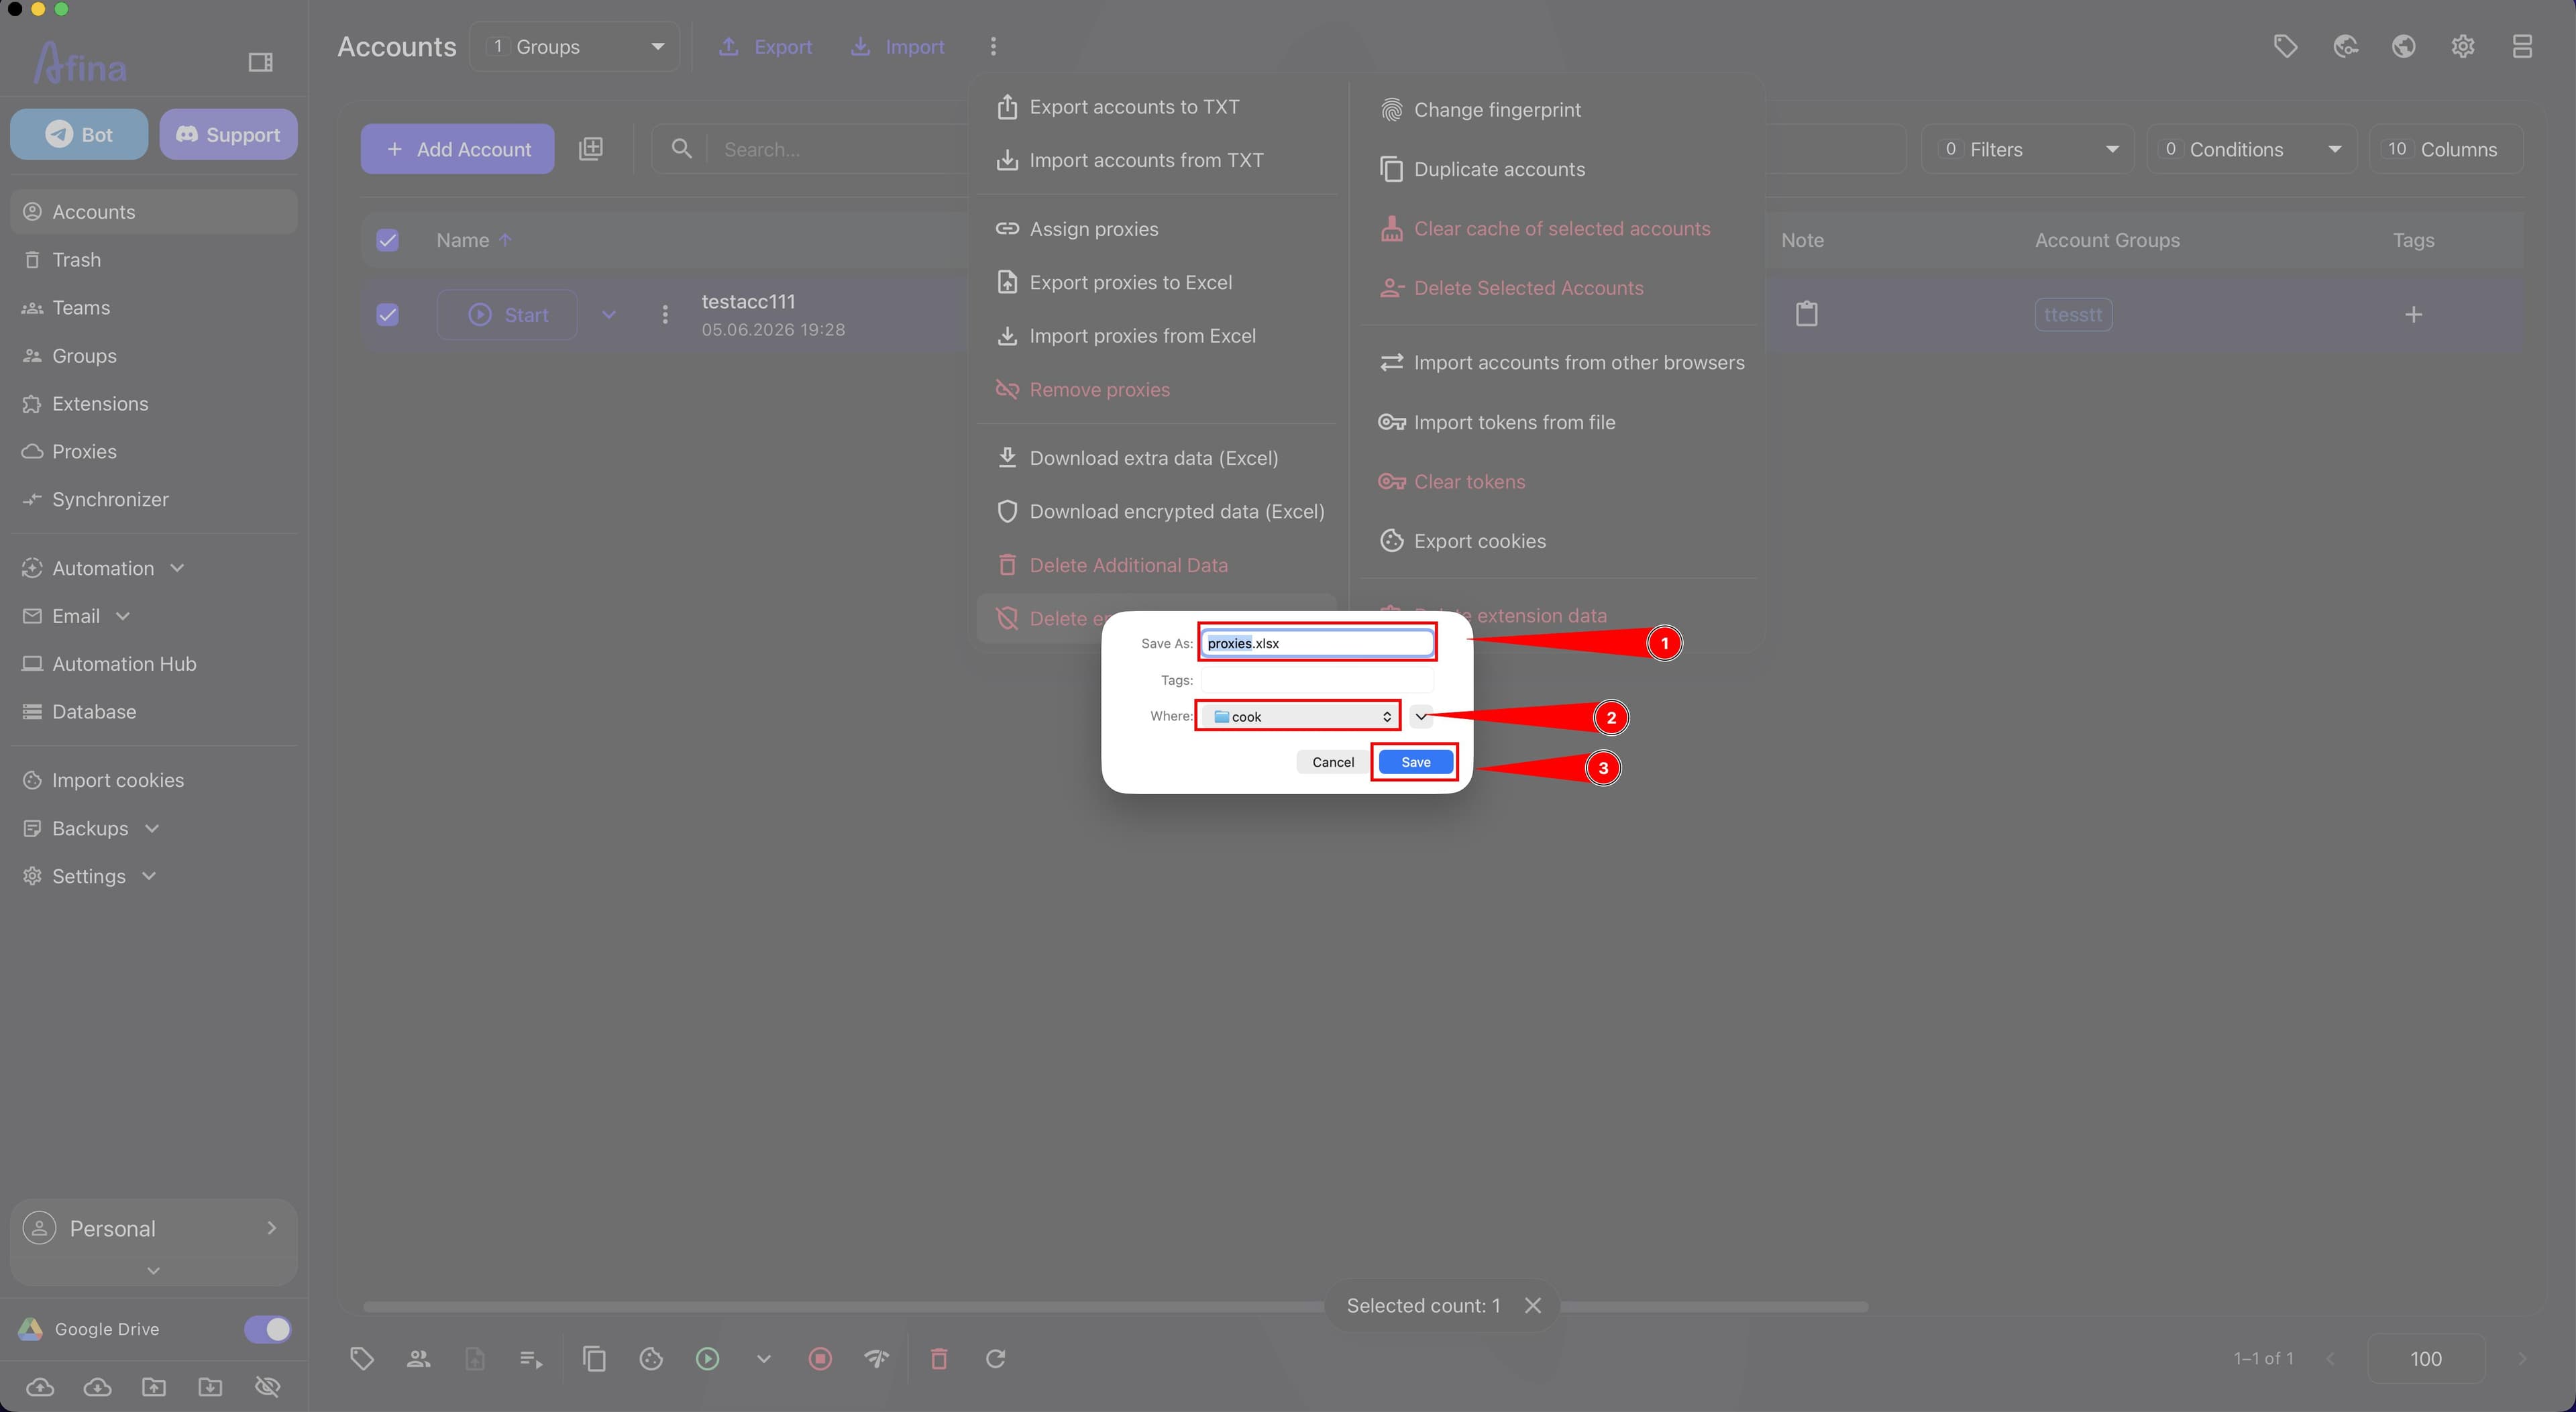
- In the "Save Excel file" system window, enter the file name and choose the folder where it should be saved.
- Click Save.
The next screenshot shows the "Save Excel file" system window, where you need to enter the file name and select the folder for saving.
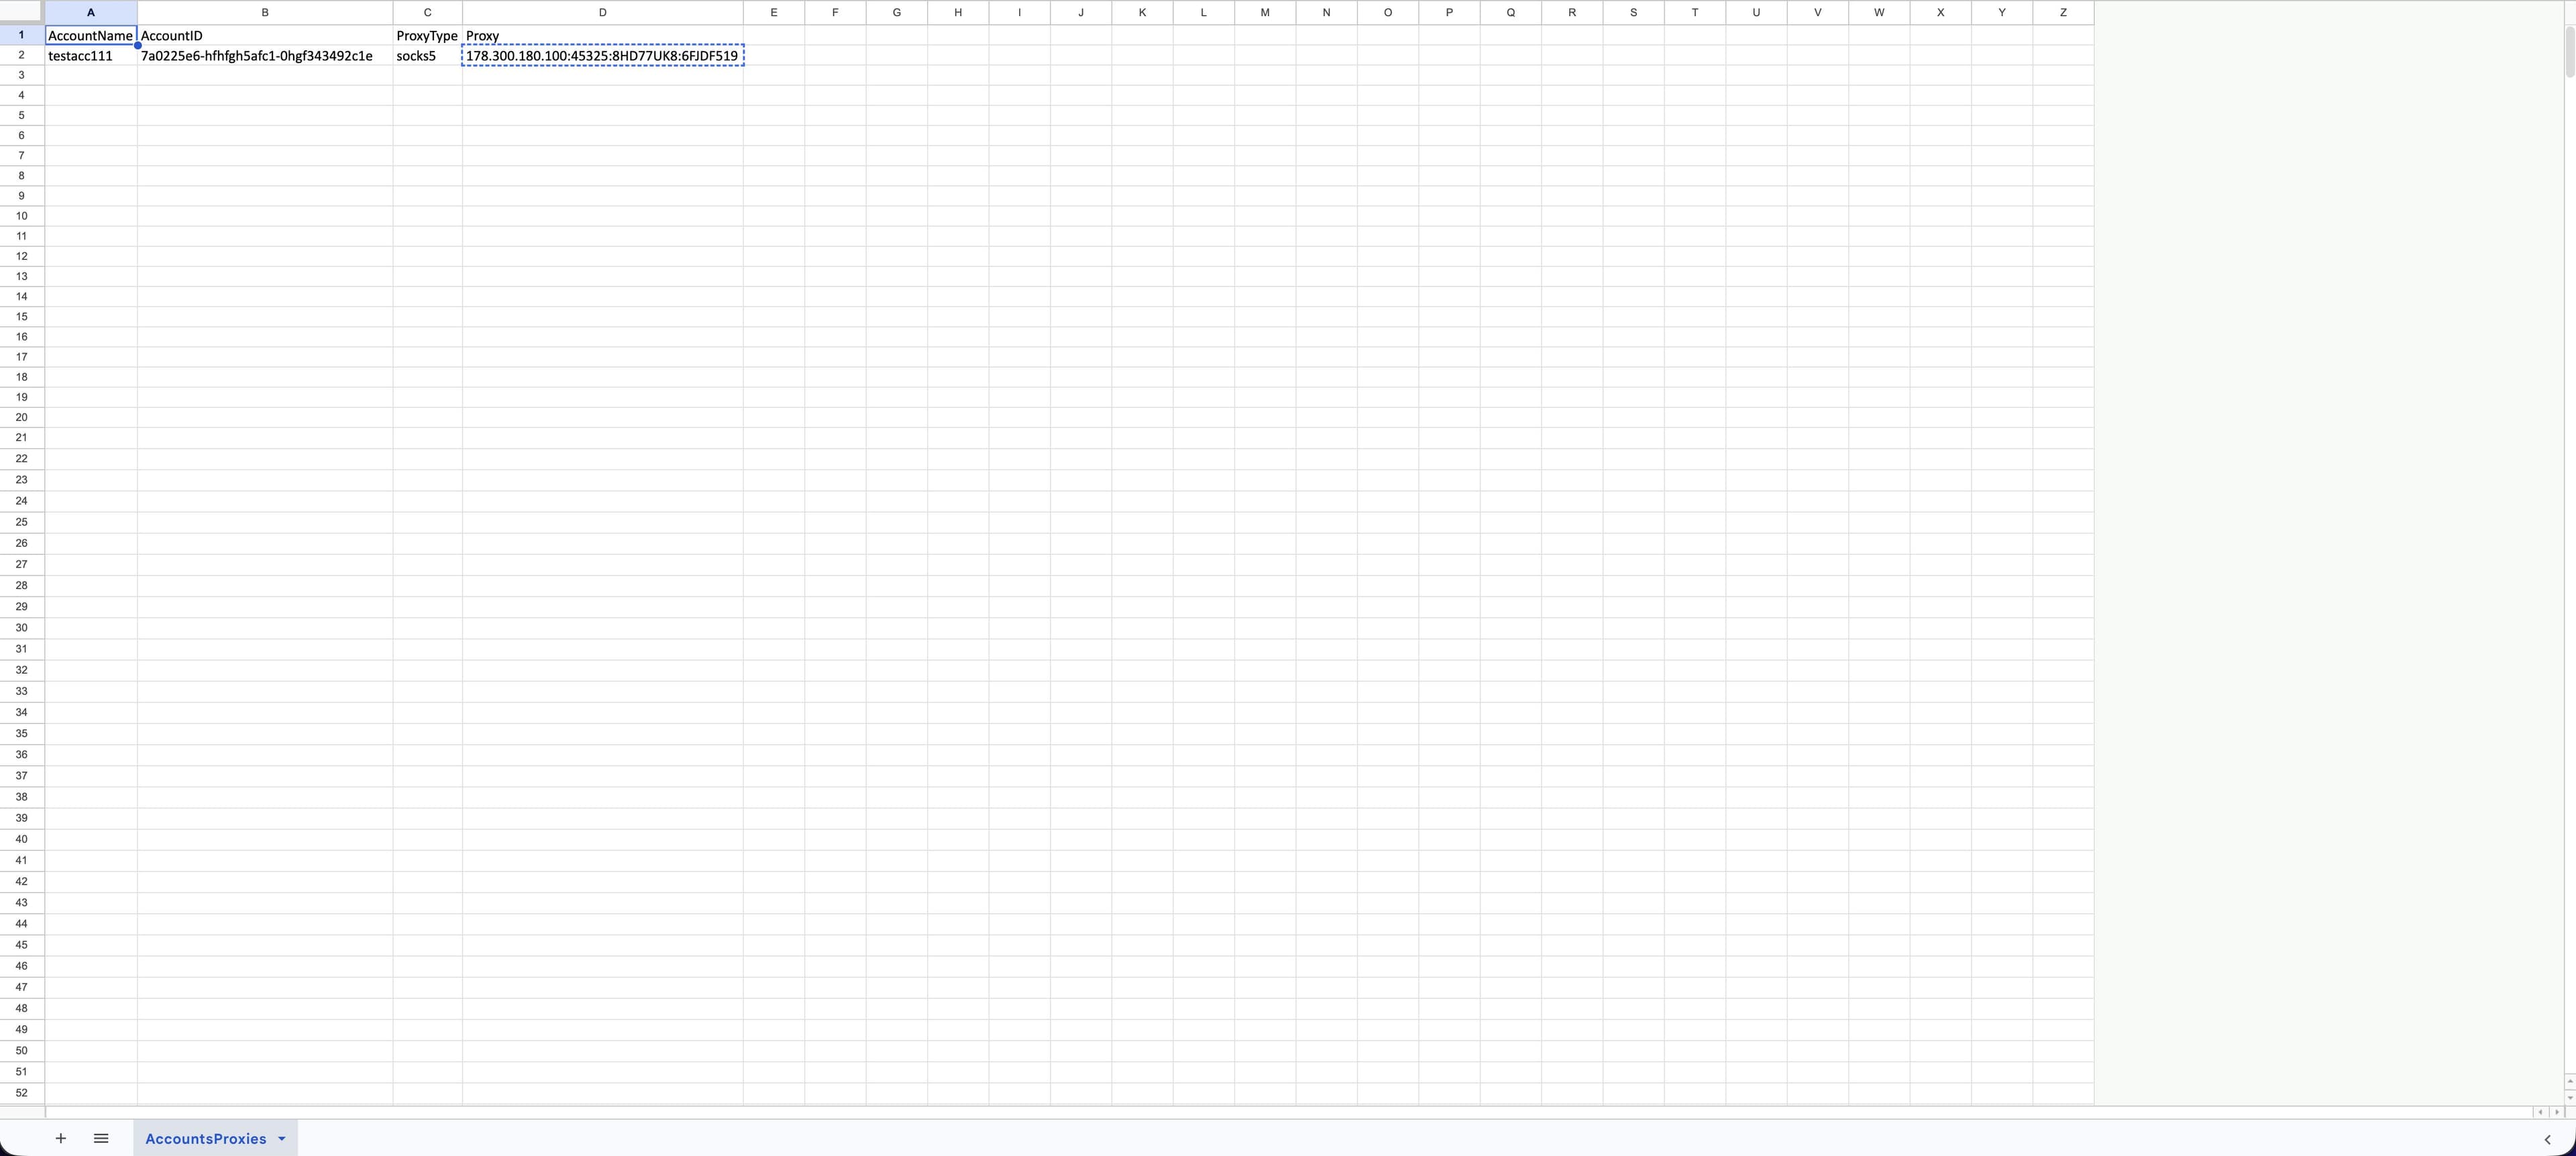
The file exported through the Accounts section contains the AccountName, AccountID, ProxyType, and Proxy columns.
What the columns mean AccountName The account name in the Afina table. During import through the Accounts section, you can change this value if you also need to update the account name.
AccountID The unique account identifier. Afina uses it to match the row to the correct profile, so this value must not be changed.
ProxyType The proxy type used in the account. This field is required. Supported types are HTTP, HTTPS, and SOCKS5.
Proxy The proxy connection string. This is the field usually changed for bulk proxy updates in accounts.
Import proxies from Excel
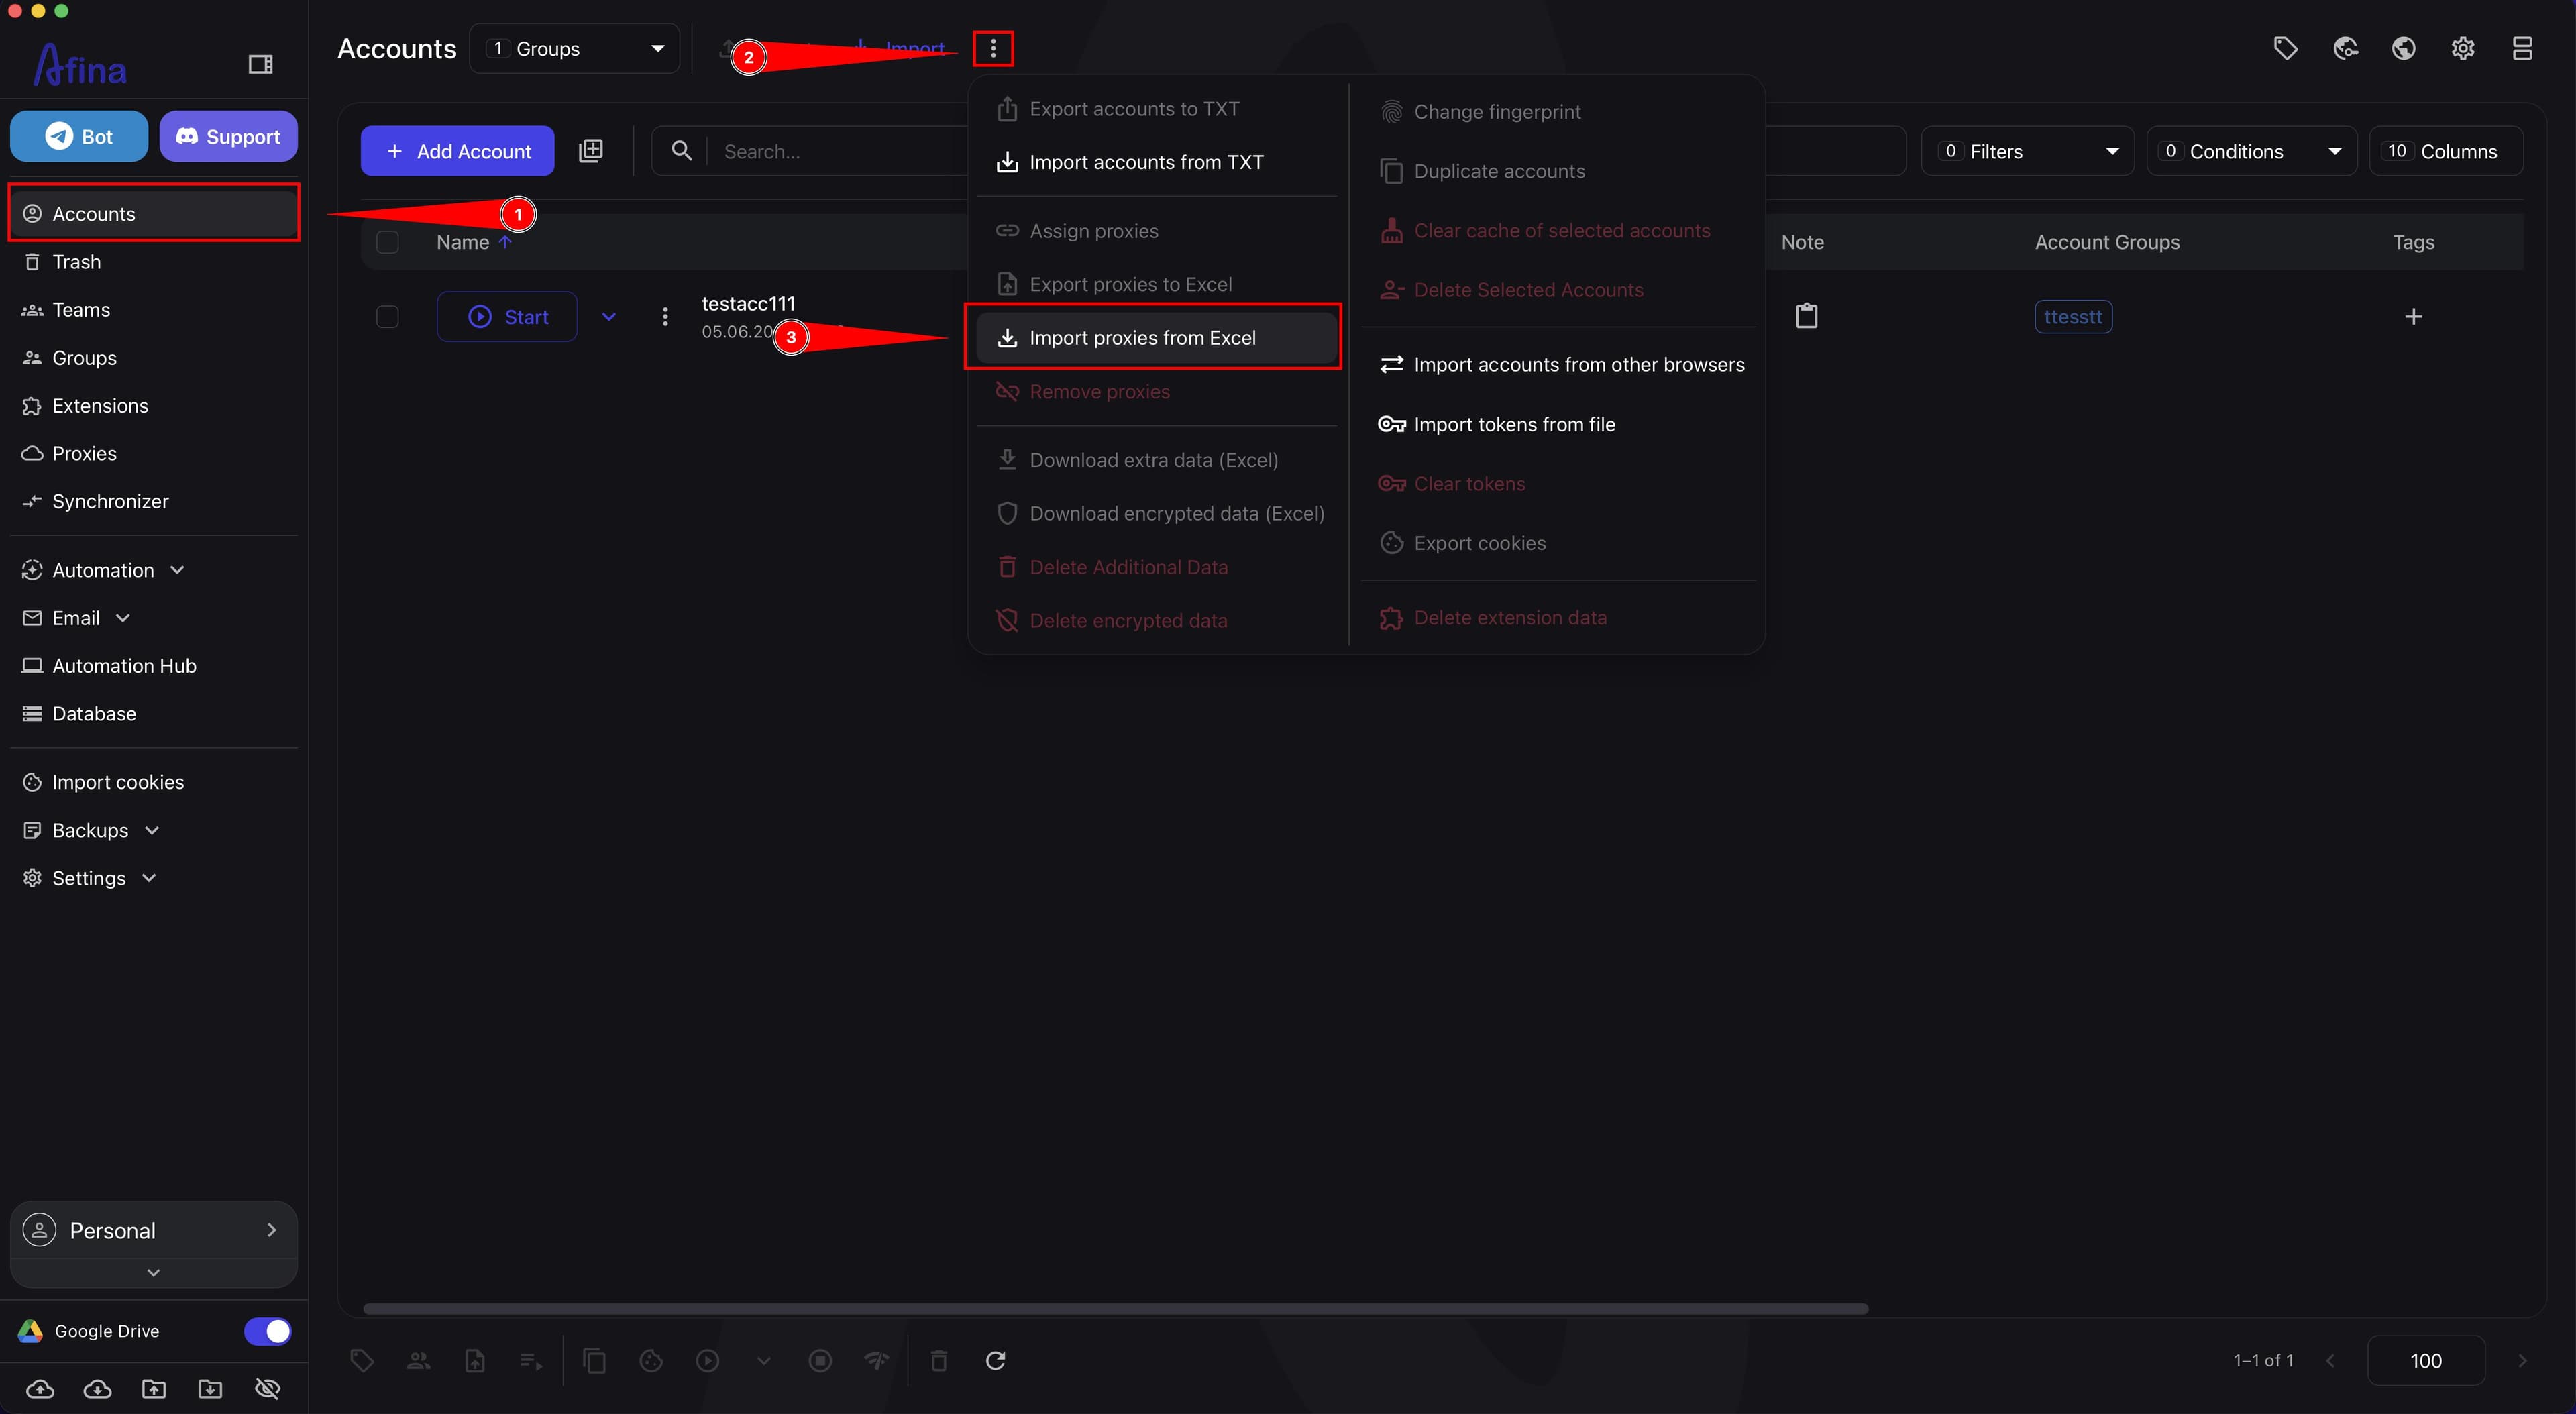
- Go to the Accounts section.
- Click the ⋮ icon on the top control panel.
- Select Import proxies from Excel.
The screenshot below shows the Accounts section with the ⋮ icon menu open. Select the proxy import command in this menu.
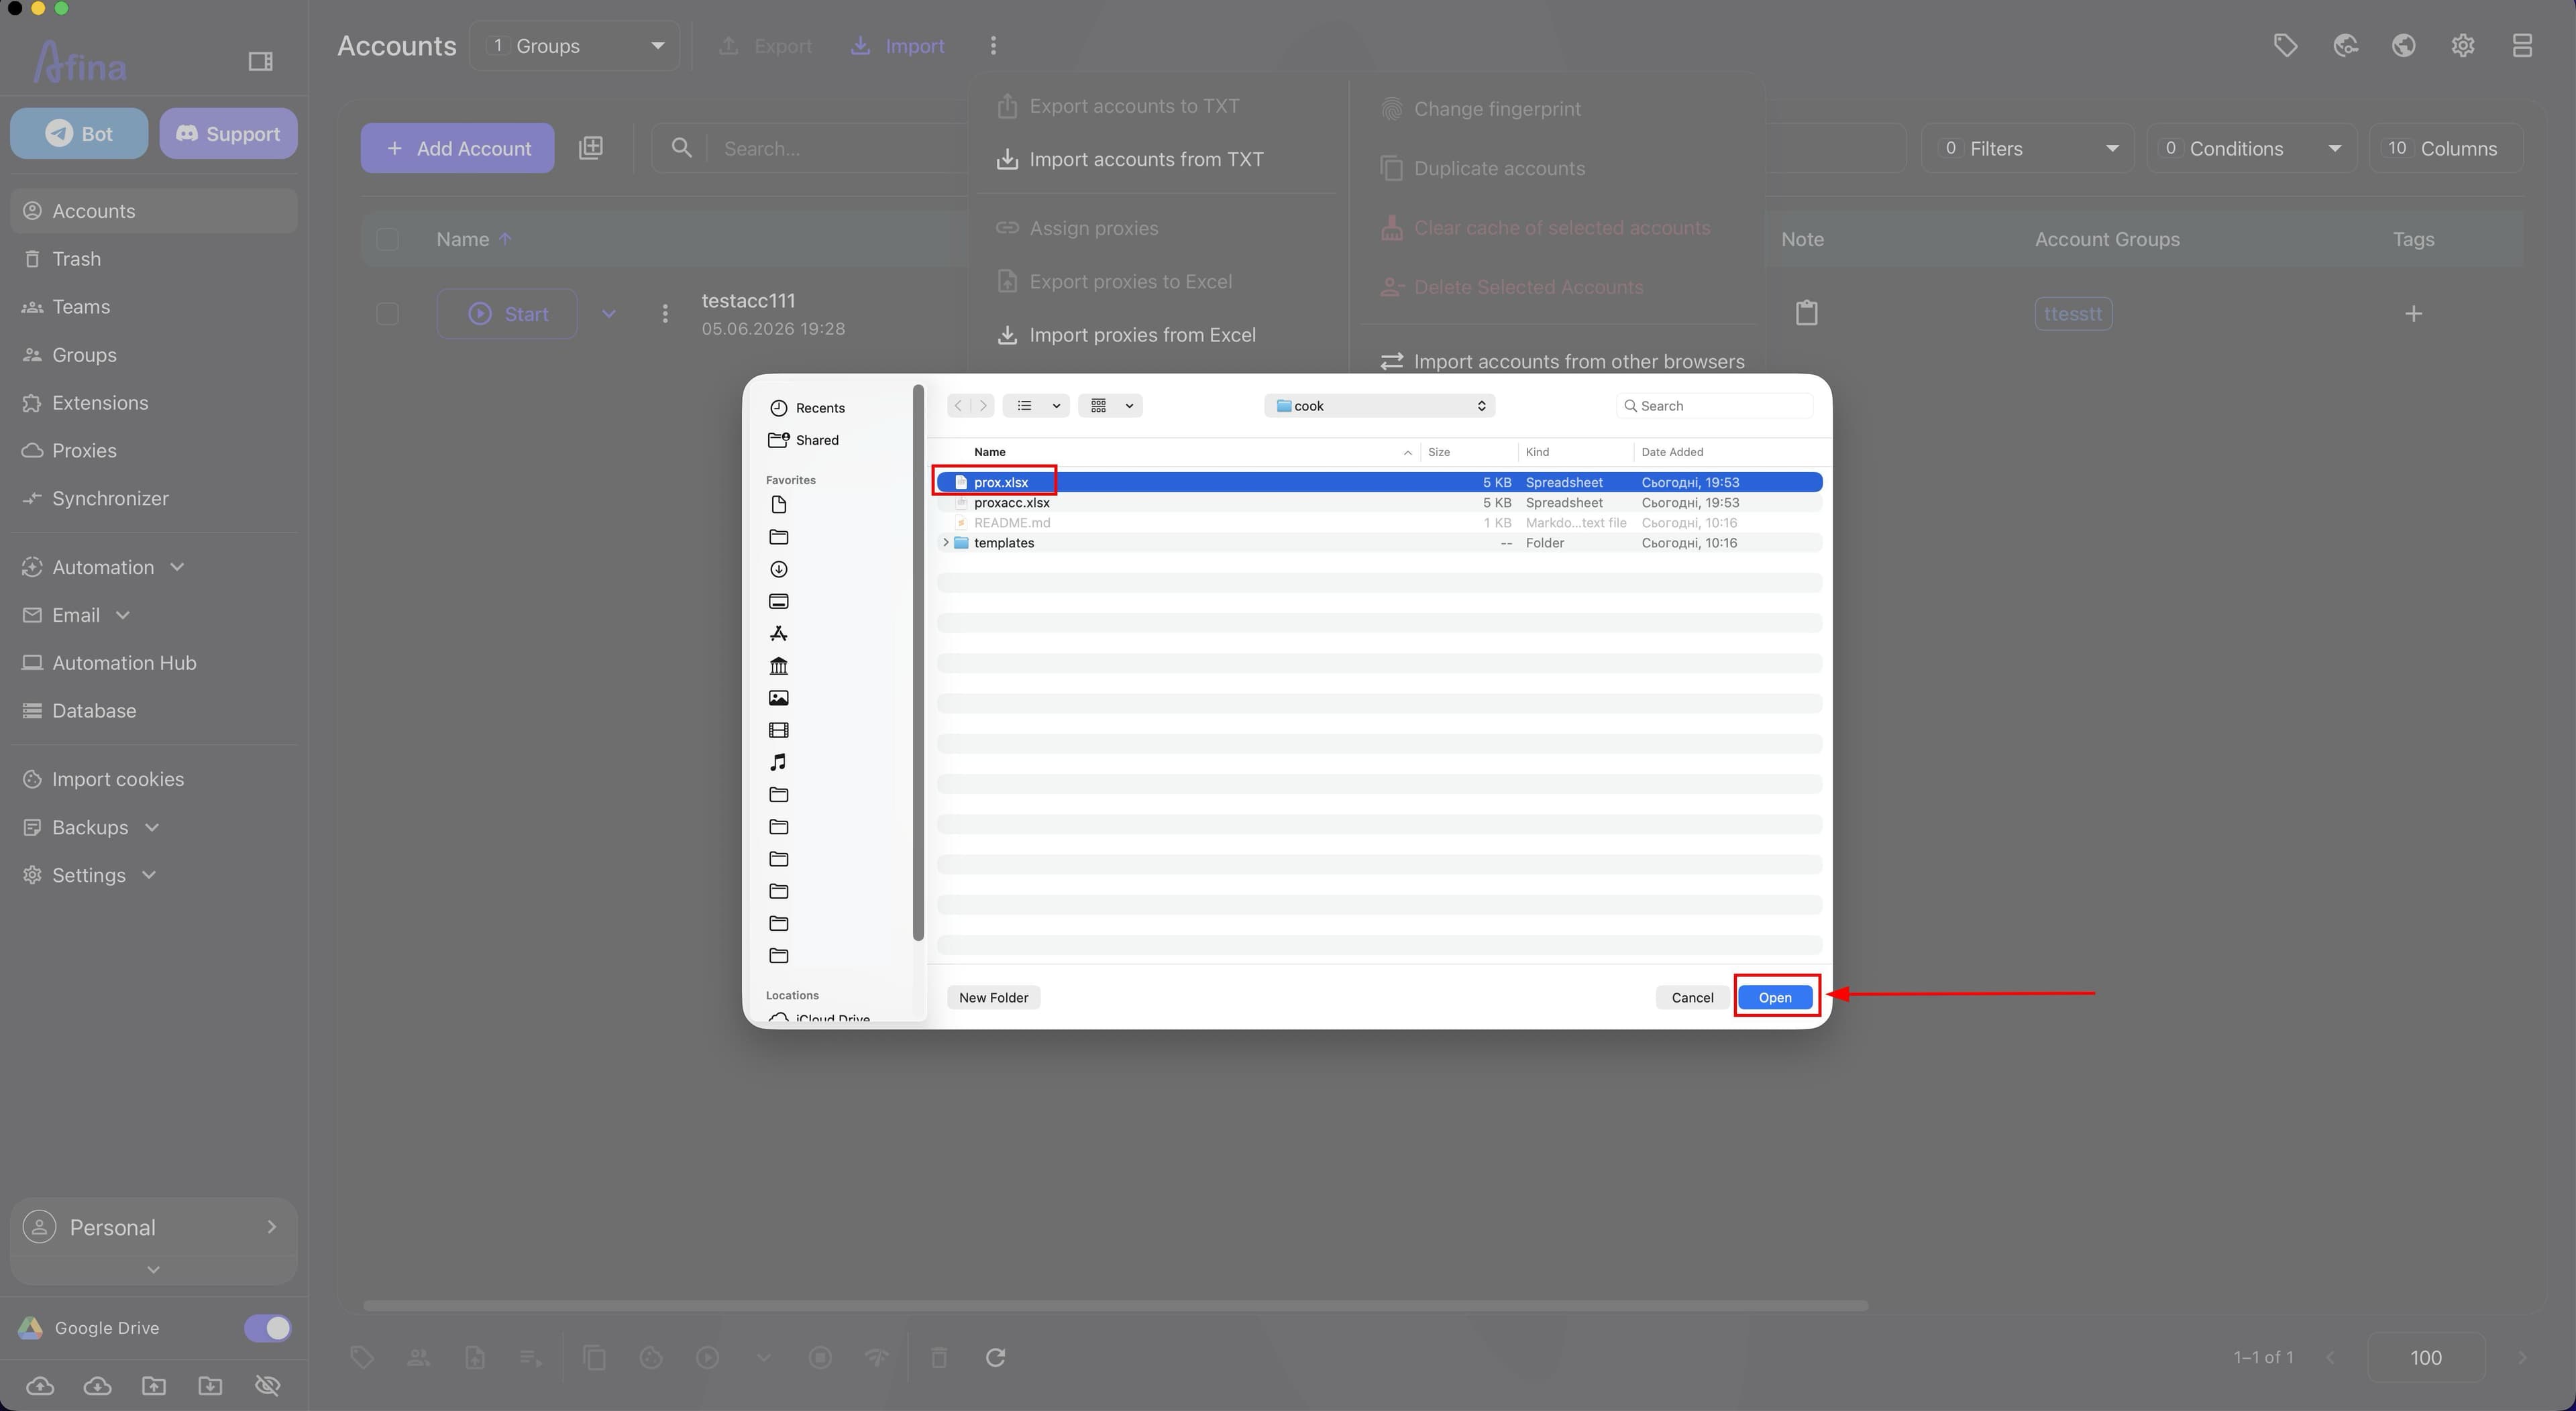
- In the system file picker, find the required
.xlsxdocument. - Click Open.
The next screenshot shows the system file picker where you need to select the .xlsx document for importing proxies into accounts.
After import, Afina automatically matches rows to accounts by AccountID or AccountName and updates the value in the Proxy column. If AccountName was changed in the file, the new name is also applied to the account.
When importing through "Accounts", you can change the value in the AccountName column, but you must not change the AccountID value.
After the import finishes, a green pop-up message appears with the operation summary: successfully updated rows and rows with errors.
Working Through the Proxies Section#
Use this method to manage the proxy database independently of the accounts the proxies are assigned to. It is suitable when you need to edit the proxy pool itself in bulk instead of updating specific accounts directly.
Export proxies to Excel
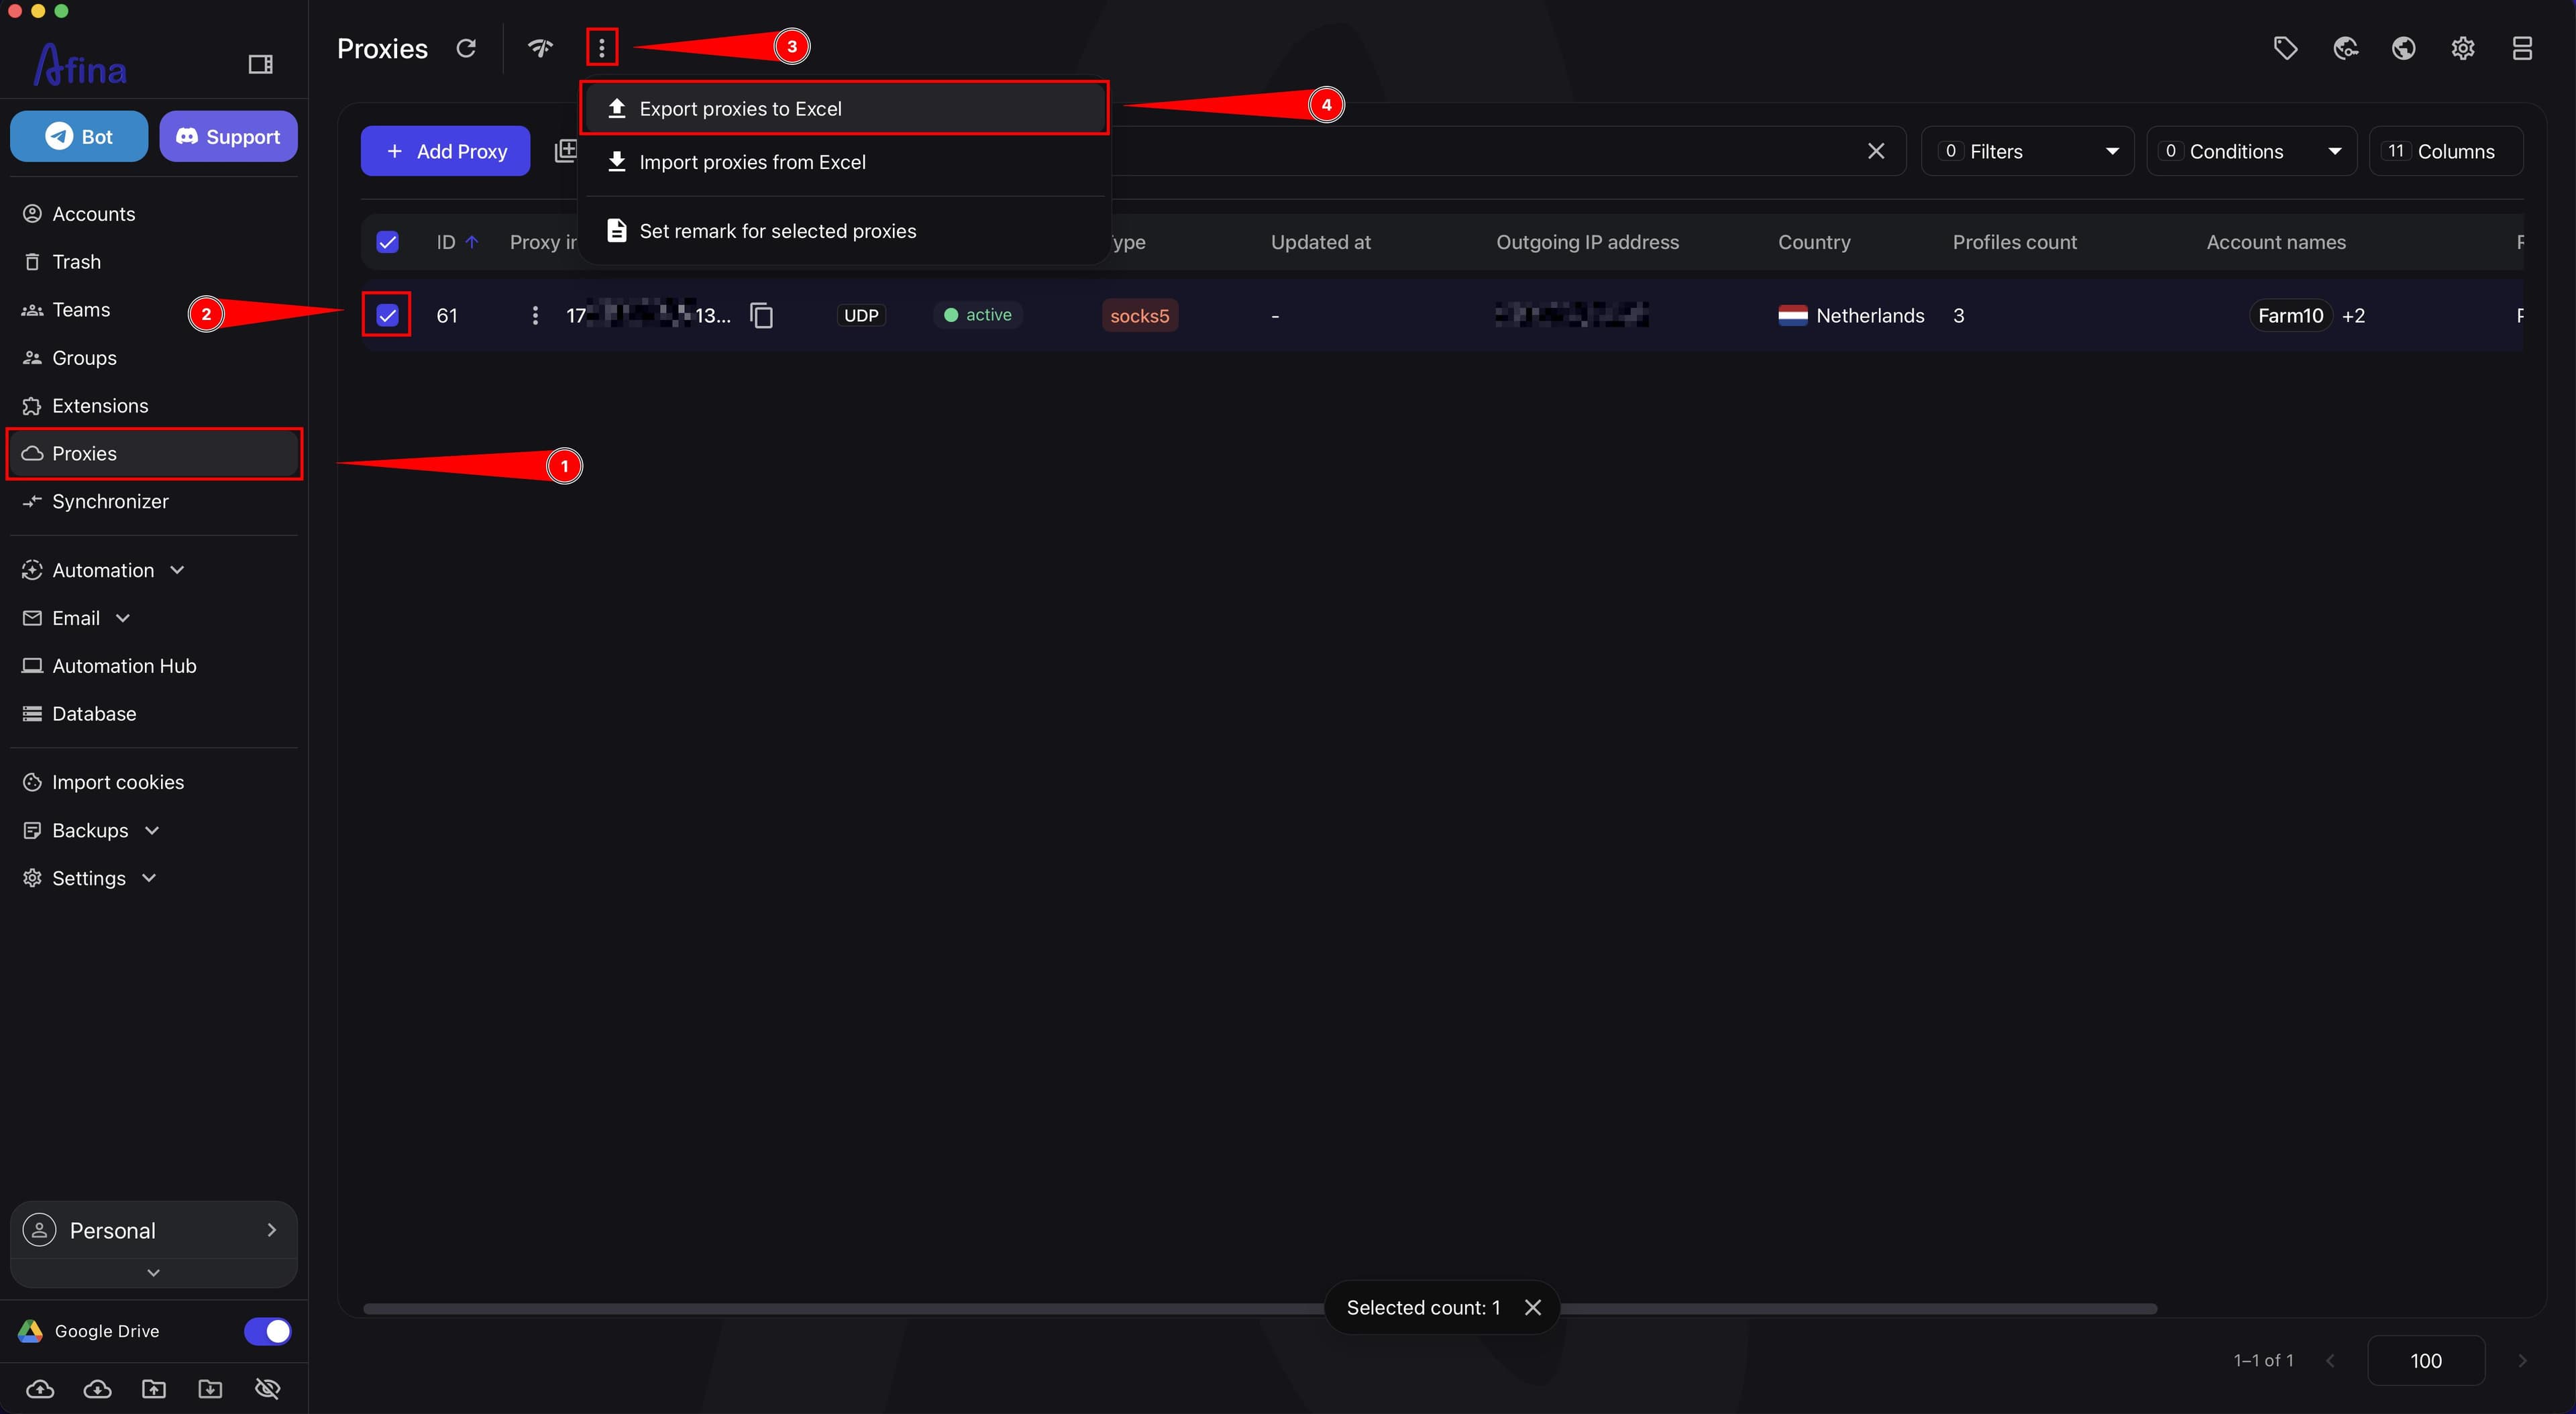
- Go to the Proxies section.
- Select the required proxies in the table, or click the checkbox in the header to select all records.
- Click the ⋮ icon on the top panel.
- Select Export proxies to Excel.
The screenshot below shows the Proxies section with the ⋮ icon menu open. Select the proxy export command in this menu.
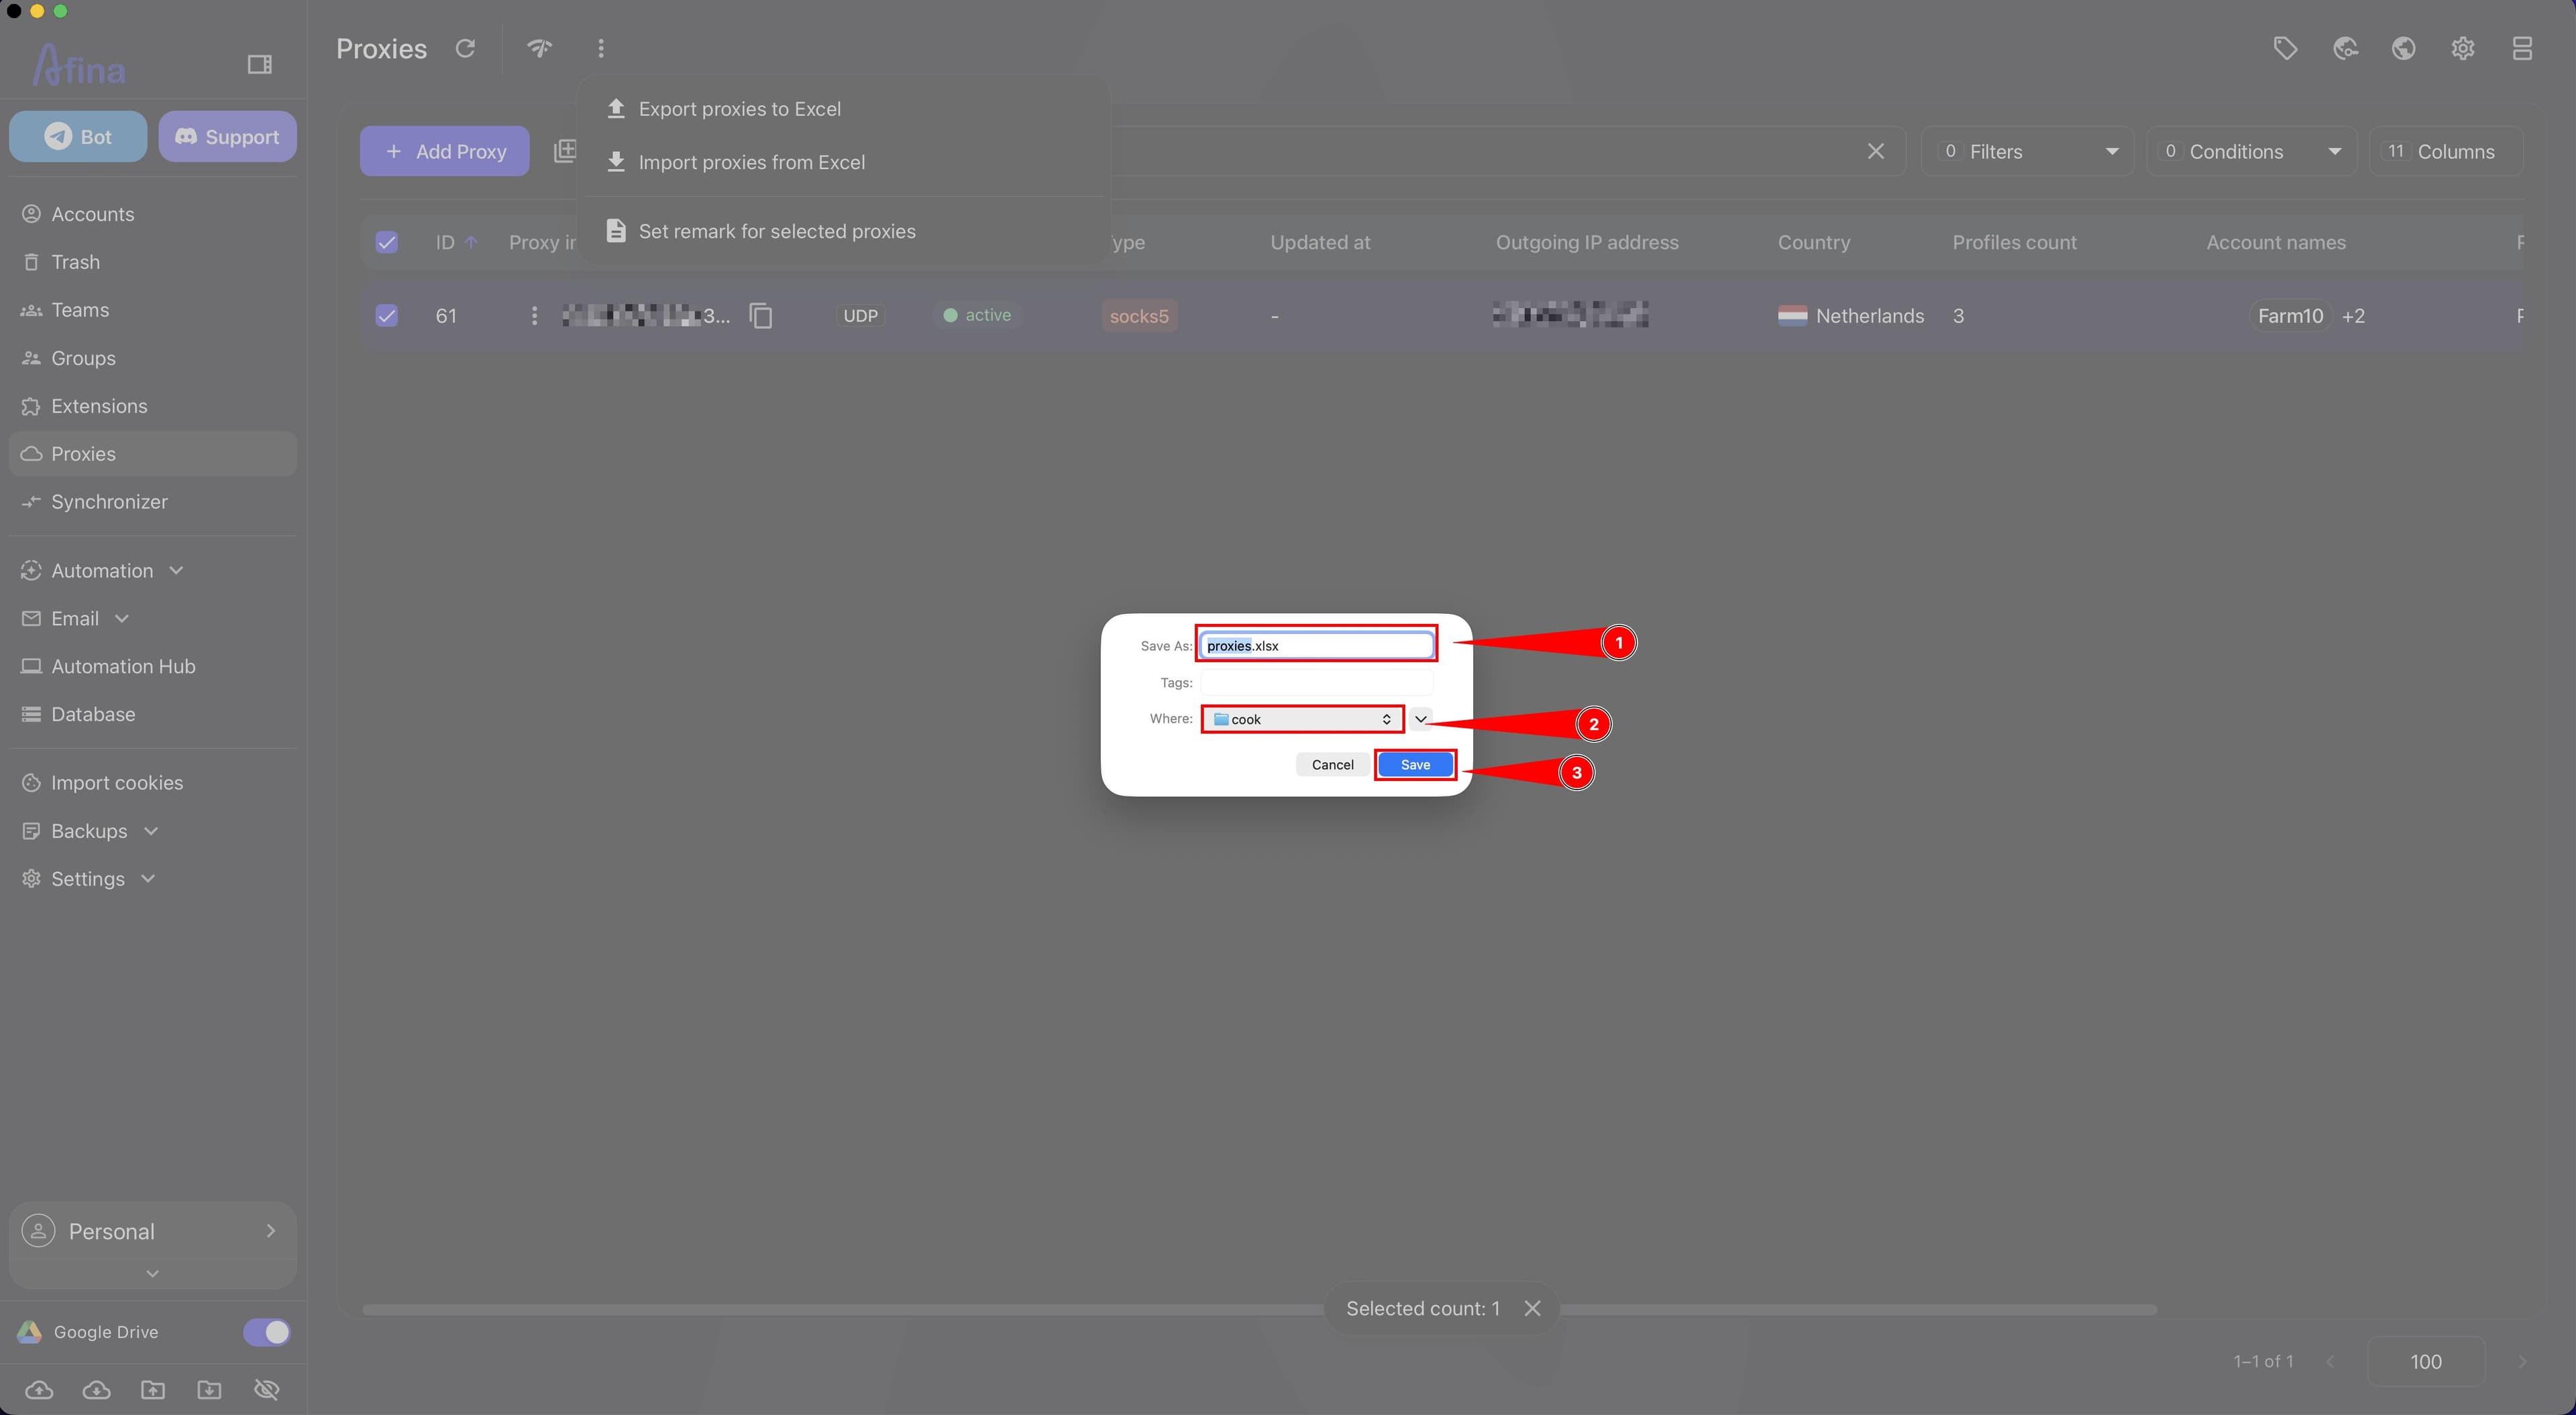
- In the system window, enter the file name and choose the folder where it should be saved.
The next screenshot shows the system window for saving an Excel file exported from the Proxies section.
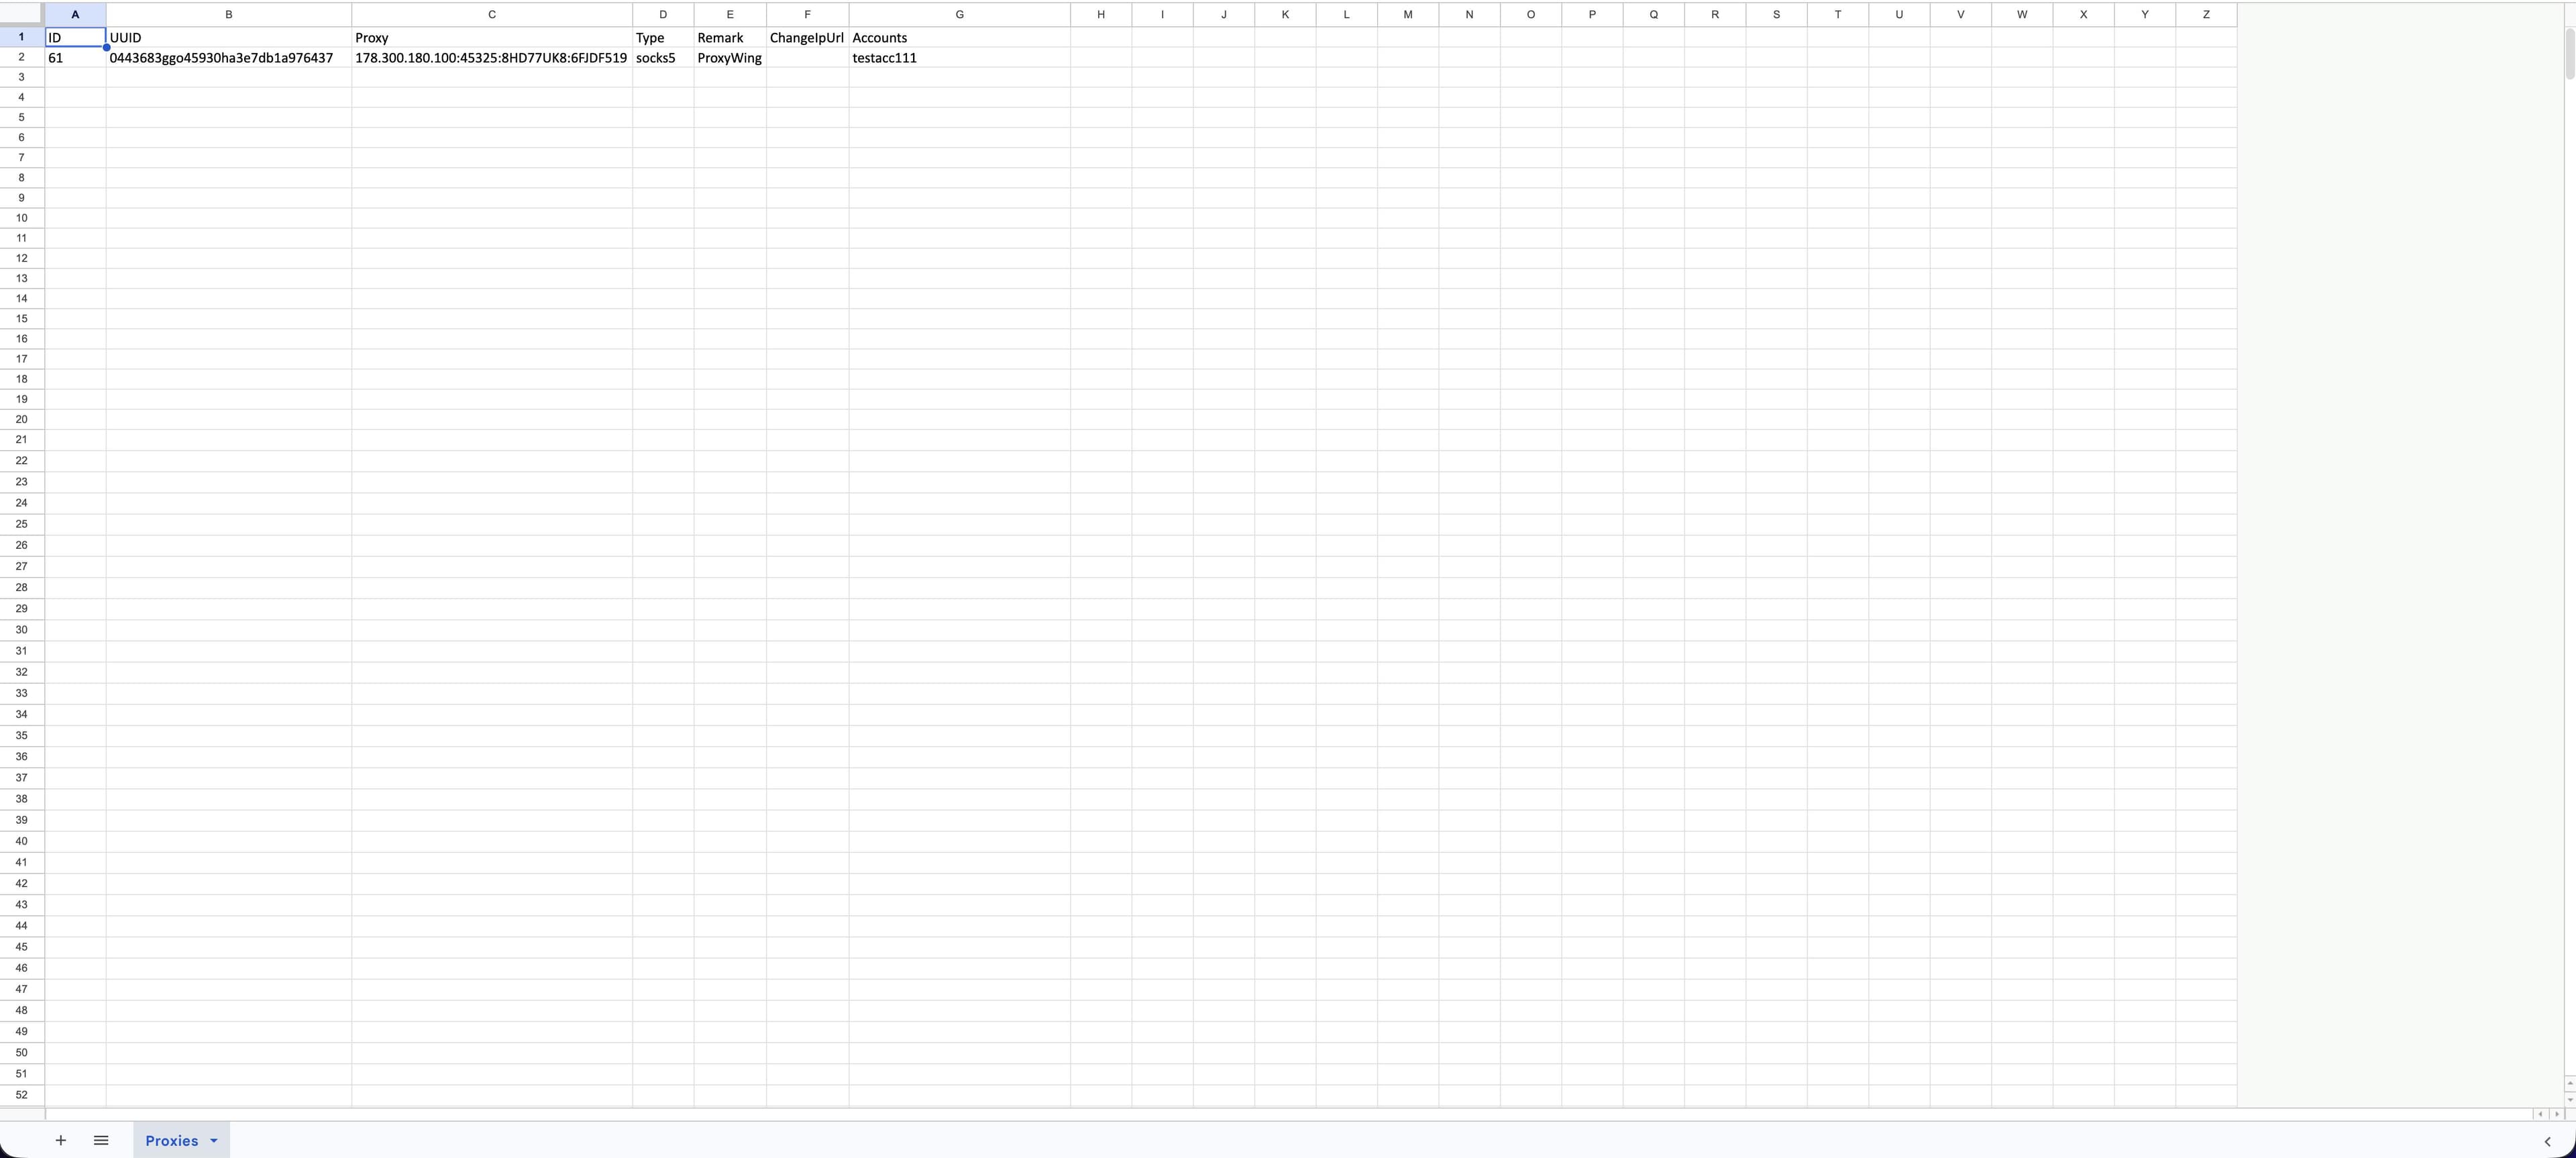
The file exported through the Proxies section contains the ID, UUID, Proxy, Type, Remark, ChangeIpUrl, and Accounts columns.
What the columns mean ID The internal proxy identifier. This is a service value and must not be changed. If you do not need to import a specific proxy back, you can delete its row from the file.
UUID An additional unique proxy identifier. Afina uses it to match records, so this value also must not be changed. You can edit the data in other columns in the same row when needed.
Proxy The main proxy string. Edit this field when you need to replace addresses, ports, usernames, or passwords in bulk.
Type The proxy type. This field is required. Supported types are HTTP, HTTPS, and SOCKS5.
Remark An additional note for the proxy.
ChangeIpUrl The URL for IP change, if your proxy provider supplies one.
Accounts The field that displays accounts associated with the proxy. This is an informational column, not an account assignment tool.
Import proxies from Excel
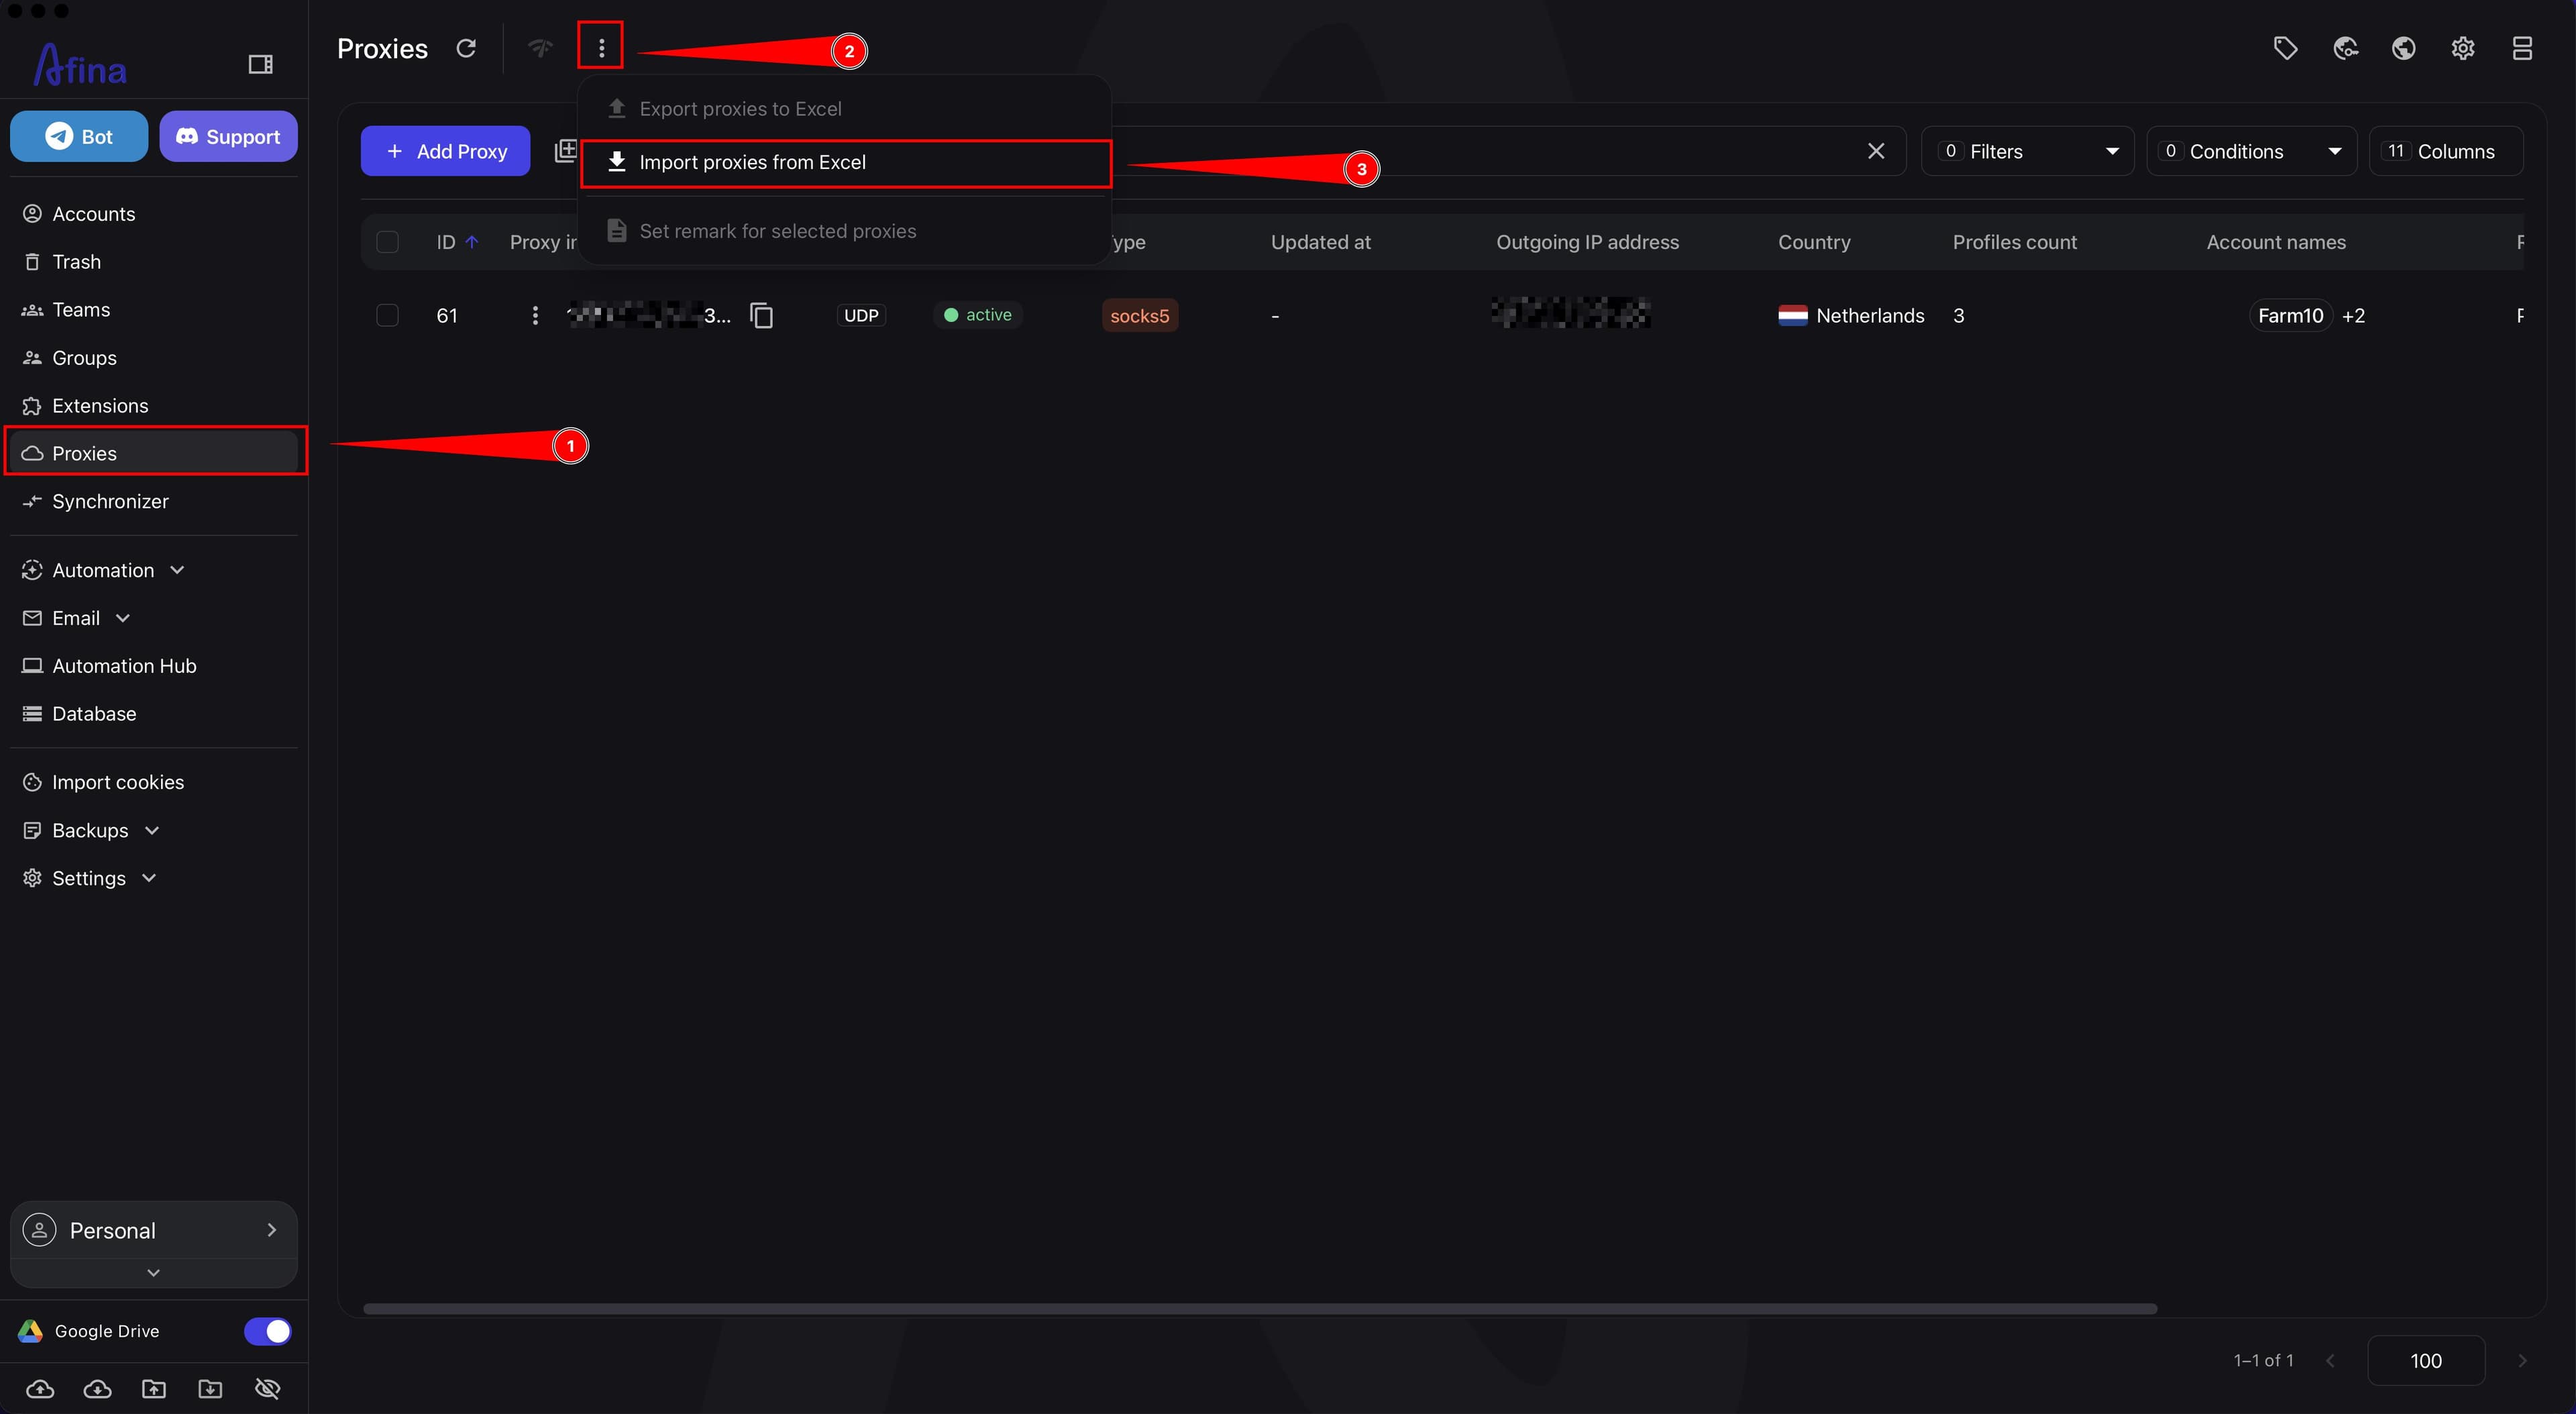
- Go to the Proxies section.
- Click the ⋮ icon on the top panel.
- Select Import proxies from Excel.
The screenshot below shows the Proxies section with the ⋮ icon menu open. Select the proxy import command in this menu.
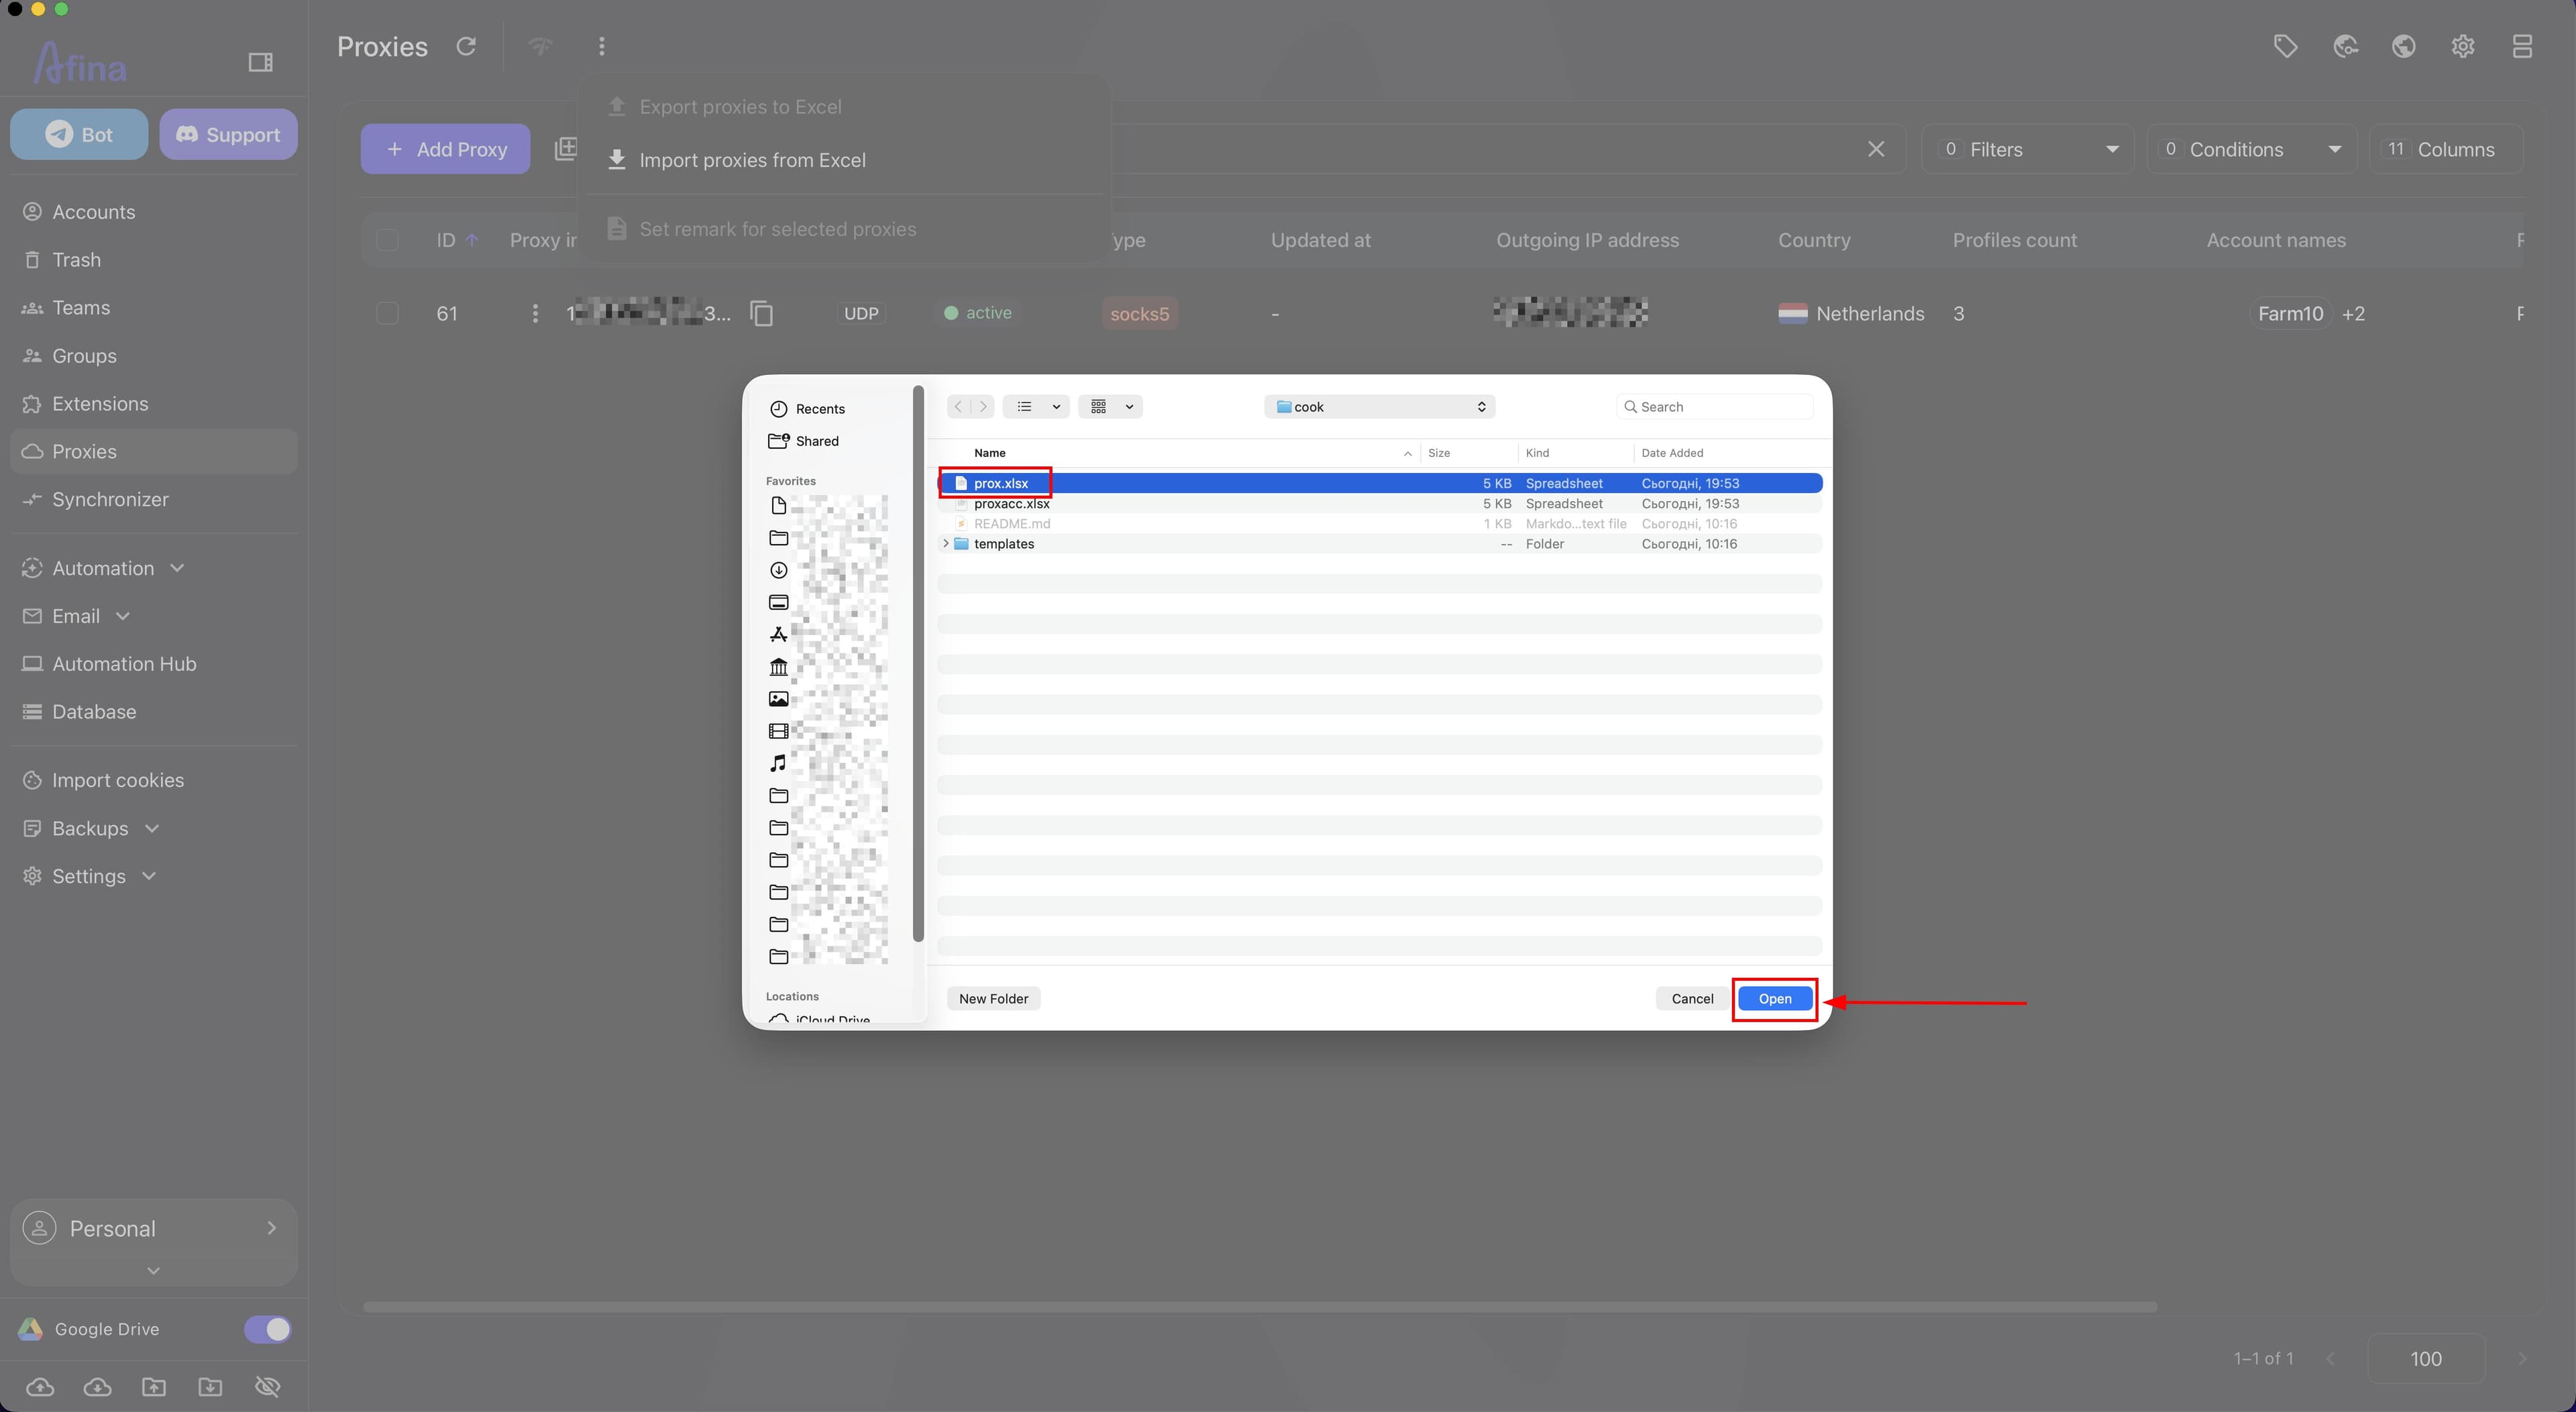
- In the system file picker, select the Excel file.
- Click Open.
The next screenshot shows the system file picker where you need to select the Excel file for importing proxies in the Proxies section.
After import, Afina updates the proxy database with the current data from the table and shows a message with the operation result. If some accounts already use these proxies, they receive the updated values in the associated records after the database is updated.
When importing through "Proxies", you must not change the ID and UUID values because they are proxy identifiers. If you do not need to update a specific proxy, delete its row from the file before import.
If you add an account name to the Accounts column during import through "Proxies", this will not assign the proxy to that account.
Important Notes#
- If you add proxies to the file manually, use the host:port:login
format. - To bulk update proxies on accounts, it is best to export the file through the Accounts section, replace the value in the Proxy column, and, if needed, change the value in the AccountName column.
- If you import a file through the Accounts section, do not change the value in the AccountID column. Otherwise, Afina will not be able to correctly match the row to the required account.
- If you import a file through the Proxies section, do not change the values in the ID and UUID columns because they are proxy identifiers. You can delete unnecessary rows or edit data in other columns next to the required ID and UUID.
- In the ProxyType or Type columns, always specify the proxy type: HTTP, HTTPS, or SOCKS5.
- Export works only for records that you selected with checkboxes beforehand.
- To complete the export, select a folder in the system window, enter the file name, and save it.
- Through the Accounts section, proxies are updated in the context of specific profiles.
- Through the Proxies section, you can conveniently bulk edit proxy data in the database, such as address, port, username, password, type, remark, or ChangeIpUrl.
The screenshot below shows what an Excel file exported from the Accounts section looks like with the AccountName, AccountID, ProxyType, and Proxy columns.
The next screenshot shows what an Excel file exported from the Proxies section looks like with the ID, UUID, Proxy, Type, Remark, ChangeIpUrl, and Accounts columns.
Through "Accounts", it is convenient to quickly change proxies for specific profiles and update AccountName at the same time. Through "Proxies", you can bulk edit or reassign proxy data in the database.
Result#
After completing these steps, you will be able to export proxies to an Excel file, understand the purpose of each column in the table, bulk update proxy values, change AccountName during import through the Accounts section when needed, and update the general proxy database through the Proxies section.